This document covers the following topics:
There are two types of controls that you can create with Natural for Ajax:
Graphical Controls
A graphical control transforms an element of an XML layout definition
into HTML/JavaScript code. You can either create completely new controls by
writing your own HTML/JavaScript, or you can reuse existing controls and
compose the HTML/JavaScript of these controls to new controls. The latter is
called "macro control". The recommendation is to use macro
controls if possible and to write your own HTML/JavaScript only if needed.
Example: You can define an address area that comprises several existing controls (such as ITR, LABEL and FIELD). You call the address area "NADC:ADDRESS" where "NADC" is the library prefix. The control is a kind of macro that expands a short XML layout definition, which just contains the NADC:ADDRESS control tag, into a more complex layout definition containing all the single control tags (such as ITR, LABEL and FIELD).
Non-visual Controls
A non-visual control adds some data binding to the layout. It allows
your Natural program to exchange data with the Natural for Ajax framework and
the browser client. The control can decide whether the data is available in the
browser or only available in the Natural for Ajax framework of your web
application. Non-visual custom controls are usually defined as macro controls
from existing non-visual controls.
Examples: You would like to define a specific data structure. This structure should be the same for multiple layouts of your application. To do so, you would define a macro control composed of several XCIDATADEF controls. Or you would like multiple of your layouts to exchange context data. To do so, you could define a macro control composed of XCICONTEXT controls.
The following two aspects of macro controls are important:
Layout Aspect
From the layout aspect, macro controls help to be flexible regarding
design changes. Macro controls make sure that a certain graphical arrangement
of existing controls is not applied to various page layouts by using
copy-and-paste, but by using a proper control definition. When changing the
control definition and re-generating the layout definitions that use the
control, all changes in the control are automatically propagated to the page
layouts.
Server-side Aspect
From the server-side aspect, a macro control may have pre-designed
server-side Natural data fields and events that can be associated with it. For
example, an address control may trigger an event on the Natural server to check
the validity of a zip code that the user has specified.
Creating a macro control consists of the following steps:
Defining the Control Attributes and Control Hierarchy (Subtags, Container)
Implementing the Control's Server-Side Processing (Optional)
The topics below describe a sample control which is used to specify an address.
We recommend that you use all-lowercase letters for prefixes, control names and attributed names. A good example for this is:
nadc:zipcodecity
A bad example would be the following:
NaDc:zipCodeCity
Each control that is not supplied by Software AG requires a prefix that ensures that controls supplied by different providers can be used within one page. In our example, we use the prefix "nadc" for "Natural for Ajax Demo Controls".
The setup is done in the file <project>/cisconfig/controllibraries.xml.
An example for registering the nadc library would be:
<library prefix="nadc"
	        package="mycontrols.nadc">
</library>
The package that is included in the definition is the Java package that contains corresponding tag handlers (optional).
Note:
In order to activate new control libraries, you must restart the
Tomcat server. For NaturalONE, this means restarting Eclipse.
For our nadc control library, we create the file editor_nadc.xml. This file can be created using the Control Editor.
Note:
If you are working with NaturalONE, see
Ajax
Developer in the NaturalONE documentation for details on
using the Control Editor. If you are working with the standalone version of
Natural for Ajax, see Development Workplace in the
Application Designer documentation, which is included in the Natural for Ajax
distribution package, for details on using the Control Editor.
In the Control Editor, set up the file editor_nadc.xml. One file can contain a number of controls. For each control, you specify the following:
- The name of the control
In our example, this is "nadc:address". Be sure to add the prefix when entering the name.
- The control's attributes
This is the list of attributes that a user of the control must specify when using the control inside a page. In our example, the control "nadc:address" has the following attribute:
- addressprop
A reference to the runtime property implementation.
- Positioning definitions
These specify where the control can be added inside a layout definition. They are used by the layout editor, which only allows controls to be placed in the specified positions.
The positioning definitions include:
- Name of the section in the controls palette
The layout editor arranges all controls within the controls palette. This palette is structured into sections. If the name of a section does not yet exist, a new section is created automatically. In our example, the name of the section is "NJXDemos".
- Embedding containers
A list of all controls which allow the new control to be positioned inside it. In our example, we decide to position the controls below "pagebody", "rowarea", "colarea" and "splitcell".
After maintaining the information in the Control Editor, the content of the file editor_nadc.xml is as follows:
<?xml version="1.0" encoding="UTF-8"?>
<controllibrary>
  <editor>
    <tag name="nadc:address">
      <attribute name="addressprop" mandatory="true"/>
      <taginstance>
      </taginstance>
      <protocolitem>
      </protocolitem>
    </tag>
    <tagsubnodeextension control="pagebody" newsubnode="nadc:address"/>
    <tagsubnodeextension control="rowarea" newsubnode="nadc:address"/>
    <tagsubnodeextension control="colarea" newsubnode="nadc:address"/>
    <tagsubnodeextension control="splitcell" newsubnode="nadc:address"/>
    <taggroupsubnodeextension group="NJXDemos" newsubnode="nadc:address"/>
  </editor>
</controllibrary>
You can define the rendering either in a descriptive way (XML) in the
editor_nadc.xml file or you can define it by implementing
a tag handler. The Natural for Ajax demos contain examples for both options.
Here, we will describe how to implement the rendering using a tag handler. The
tag handler is a Java class which defines how the control's "short
XML" (for example, <nadc:address
addressprop=’person’/>) is transformed into an XML layout definition
which itself contains standard controls or own controls. The tag handler class
must extend the interface IMacroTagHandler. For details,
see the corresponding Java API documentation. The tag handler has to take care
of two main issues:
defining the rendering of the control;
defining data bindings (advanced usage).
First, we discuss the sample "nadc:address"
control. The tag handler is implemented in the package
com.softwareag.cis.test.customcontrols; this is the
package that was defined with the control library prefix
"nadc" in the configuration file
controllibraries.xml. The name of the tag handler class
follows the convention
<controlInUpperCase>Handler, in
our case "ADDRESSHandler".
package com.softwareag.cis.test.customcontrols;

import org.xml.sax.AttributeList;

import com.softwareag.cis.gui.generate.IMacroTagHandler;
import com.softwareag.cis.gui.generate.IXSDGenerationHandler;
import com.softwareag.cis.gui.protocol.Message;
import com.softwareag.cis.gui.protocol.ProtocolItem;

public class ADDRESSHandler
    implements IMacroTagHandler
{

    public void generateXMLForStartTag(String tagName,
                                       AttributeList attributes,
                                       StringBuffer xml,
                                       ProtocolItem protocolItem)
    {
        // read attributes
        String ap = attributes.getValue("addressprop");
        // rendering
        xml.append
        (
            "<rowarea name='Address'>" +
              "<itr>" +
                "<label width='120' name='First/ Last Name'/>" +
                "<field valueprop='"+ap+".firstName' width='150'/>" +
                "<hdist width='5'/>" +
                "<field valueprop='"+ap+".lastName' width='150'/>" +
              "</itr>" +
              "<itr>" +
                "<label width='120' name='Street'/>" +
                "<field valueprop='"+ap+".street' width='305'/>" +
              "</itr>" +
              "<itr>" +
                "<label width='120' name='Zip Code/ City'/>" +
                "<field valueprop='"+ap+".zipCode' width='80'/>" +
                "<hdist width='5'/>" +
                "<field valueprop='"+ap+".city' width='220'/>" +
                "<hdist width='10'/>" +
                "<button name='Check' method='"+ap+".onCheck'/>" +
              "</itr>" +
            "</rowarea>"
        );
        IXSDGenerationHandler xga = protocolItem.findXSDGenerationHandler();
	    xga.addControlInfoClass(protocolItem, ap, ADDRESSInfo.class);
	}


    public void generateXMlForEndTag(String arg0, StringBuffer arg1)
    {
    }

}
Here are the major processing steps of the tag handler:
The attribute addressprop is read from
the control definition and stored in the variable
ap.
The XML layout definition is appended by adding controls such as ROWAREA and FIELD. Note that inside the rendering definition, property and method references are prefixed with "ap" and "." (period).
The ADDRESS control implements some advanced binding (optional). As
seen later, some part of the control functionality is implemented in a
corresponding binding class. This binding class
ADDRESSInfo is registered as the server-side counterpart
of the control at an IXSDGenerationHandler interface.
You can apply binding objects to controls. The association of a control
to a binding object is specified in the control's tag handler via the method
addControlInfoClass of the interface
IXSDGenerationHandler.
The server binding objects are optional. They may encapsulate functions with the control which are executed for the control on the server side. Example: In our address control, a zip code validity check will be added. This check is automatically executed within the control when the user presses the button that is part of the control's rendering.
This server-side processing for a control is defined in a class that
extends the existing class NDOCustomControlInfoBase. See
the following code:
package com.softwareag.cis.test.customcontrols;

import com.softwareag.cis.adapter.ndo.NDOCustomControlInfoBase;
import commonj.sdo.DataObject;

public class ADDRESSInfo
    extends NDOCustomControlInfoBase
{
    public void onCheck()
    {
        // first execute the control's logic
        DataObject address = getDataObject();
        String zipCode = address.getString("zipCode");
        String city = address.getString("city");
        if ("64297".equals(zipCode) &&
            (city == null || city.length() ==0))
        {
            address.set("city","Darmstadt");
        }
        // delegate the method to the normal event processing
        super.invokeMethod("onCheck");
    }
}
We recommend the following guidelines:
The class's package should be the same as with the handler class.
The name of the class is
<controlInUpperCase>Info.
The class extends the class
NDOCustomControlInfoBase which is supplied with Natural
for Ajax. The base class provides some useful functions:
It provides the properties for the contained content (that is, "firstName", "lastName", "street", etc.).
It provides a binding to the SDO to which the control refers. In the
address example, the control binds to an
"addressprop", all detail properties are defined to
be
"<valueOfAddressProp>.firstName",
"<valueOfAddressProp>.lastName",
etc. The method getDataObject() returns the SDO object
that represents the control.
It provides a function to map methods to events in the Natural
adapter code. If you control a specific execution for a method inside the
control (in the example, this is the onCheck()
method), you can delegate the event to the normal Natural adapter event
handling after having handled the control-specific matters.
Now we show how to use the control within a page.
When you open the Layout Painter, you can see a new section in the controls palette which has the name "NJXDemos". In this section, you can find the control "nadc:address".
If you define a layout as follows:
<natpage>
   ...
    <pagebody>
        ...
        <nadc:address addressprop="person">
        </nadc:address>
        ...
    </pagebody>
    ...
</natpage>
the corresponding page looks as shown below:
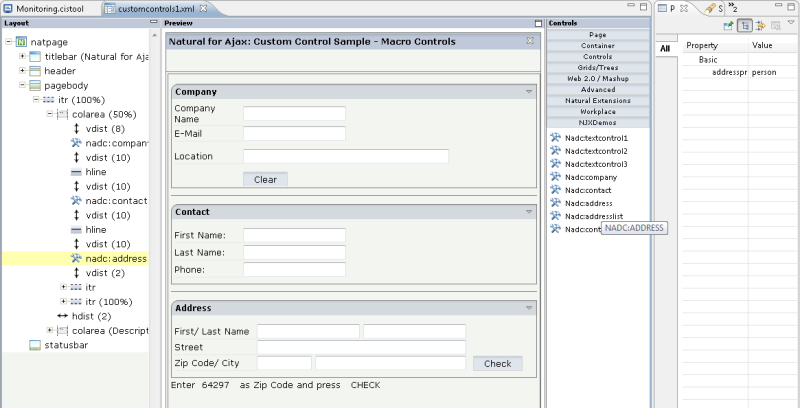
When you run a corresponding Natural program with this layout and you
then enter "64297" in the field defined by
zipCode and choose the button, the
name of the corresponding city is "calculated" by the control
processing. Note that the event person.onCheck is then
delegated to the normal Natural adapter event processing. This means that this
method can be implemented just as a normal event in the Natural program.
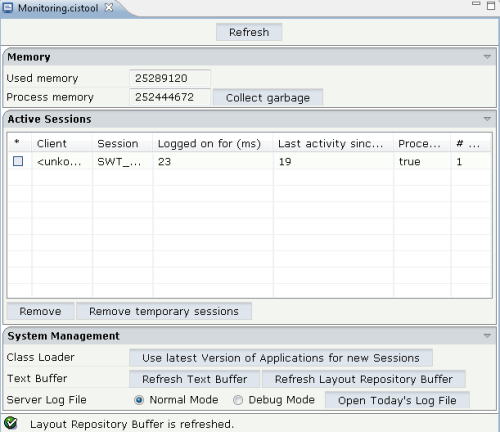
Important:
To activate/refresh new/changed controls in existing control
libraries, you must choose the Use latest Version for Applications in
new Session, Refresh Text Buffer and
Refresh Layout Repository Buffer buttons in the monitoring
tool.