
This document covers the following topics:
The name of a Natural project must meet the Eclipse naming conventions.
You can create a Natural project in different ways:
You can download entire libraries from a Natural server. A library is either placed in a newly created project or in an existing project, depending on the command that you use.
It is also possible to download only single objects of a library. These objects are then downloaded into a library which has the same name as the library on the Natural server (into a new or existing project, depending on the command that you use).
Only the sources are downloaded from the Natural server. Since a Natural application can only be executed (and debugged) directly in the Natural server environment, the generated programs (which are also called "GPs" or "cataloged Natural objects") remain on the server.
When you download into a new project, a number of required Natural profile parameter settings is also downloaded to the project. These settings are stored as the default settings in the .natural file. See also Changing the Project Properties.
Notes:
![]() To download a library or object
To download a library or object
In the Natural Server view, map the required Natural server as described in the section Mapping a Natural Environment.
Expand the node for the mapped Natural server.
Expand the node for the required system file (for example, User Libraries).
Select one or more of the following: a library, a node for an object type (for example, Program) or a single object.
Tip:
Type the first letters of the library name to select the
first library that starts with these letters. When you type all letters of a
name quickly, without a pause, you can immediately select the corresponding
library.
If you want to download several single objects at a time, open the library node(s), then open the node(s) for the object type(s), and then select the object(s).
If you want to download, for example, all subprograms of a library, select the corresponding node for this object type.
Notes:
SYSMAIN utility profile of Natural Security in order to download
objects. See also Protecting the Natural Development Environment in
Eclipse in the Natural Security documentation,
which is part of the Natural documentation.
Invoke the context menu and choose either Add to New Project or Add to Existing Project.
With , a new Natural project is created and the project properties are set. The properties apply to the Natural server environment from which the objects are downloaded.
With , the project properties of the existing project are not modified even if they do not apply to the Natural server environment from which the objects are downloaded.
When you have chosen to download to a new project, a dialog box appears and you can specify a project name. The name of the (first) selected node is offered as the default name. When a project with this name already exists in your workspace, the dialog box informs you and you have to specify a project name that is not yet used.
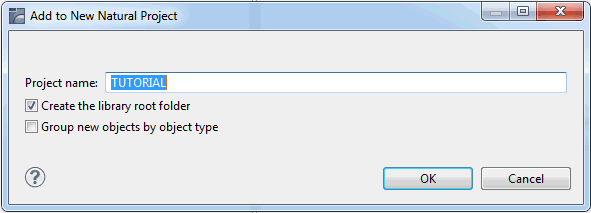
If you want to create the "Natural-Libraries" root folder in the new project, make sure that the option Create the library root folder is selected. This option is only shown when root folder support has been enabled in the Natural preferences. For further information, see Natural > Project in Setting the Preferences.
If you want to group the downloaded Natural objects into separate folders within the new project, according to their object types, make sure that the option Group new objects by object type is selected. For further information, see Group Folders.
Or:
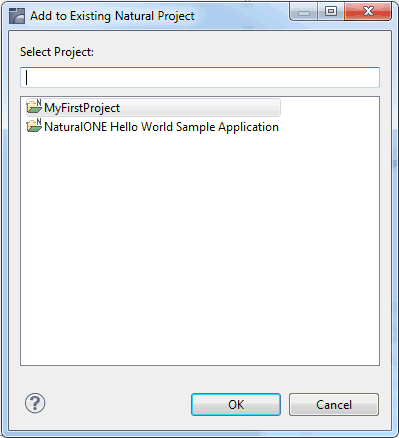
When you have chosen to download into an existing project,
a dialog box appears in which you have to select the project.
Choose the button to continue.
A dialog box is shown indicating the download progress. When you download a small number of objects, this dialog box is only briefly shown. However, when you download a large number of objects, you can choose to download the objects in the background so that you are able to continue working. A progress indicator is shown at the right bottom of the Eclipse window.
The downloaded libraries or objects are shown in the Navigator view and in the Natural Navigator view.
![]() To download a library or object to an existing project using
drag-and-drop
To download a library or object to an existing project using
drag-and-drop
In the Natural Server view, select one or more libraries or objects as described above.
Drag the selected nodes onto an existing project node in the Navigator view or in the Natural Navigator view.
Instead of downloading a library as a project from a Natural server, you can also create a Natural project manually.
You only have to provide a project name. The project wizard creates a Natural project structure that contains the .natural file with the default settings of the project properties. All other project information may be entered at a later point in time. See also Changing the Project Properties.
![]() To create a project using a wizard
To create a project using a wizard
From the menu, choose .
Or:
In the Navigator view or in the
Natural Navigator view, invoke the context menu and choose
.
The following dialog box appears.
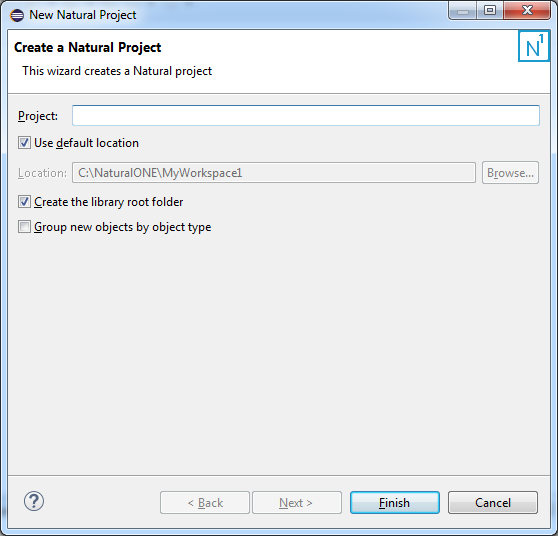
Specify the following information:
| Option | Description |
|---|---|
| Project | A unique name for the new project. |
| Use default location. | Natural projects are usually created under the Eclipse workspace root. With this option, you can change the location so that projects can be created outside of the Eclipse workspace. You can view the location of an existing Natural project by displaying the properties of that project. |
| Create the library root folder | If you want to create the "Natural-Libraries" root folder in the new project, make sure that this option is selected. This option is only shown when root folder support has been enabled in the Natural preferences. For further information, see Natural > Project in Setting the Preferences. |
| Group new objects by object type | If you want to group the Natural objects in this project into separate folders, according to their object types, make sure that this option is selected. For further information, see Group Folders. |
Optional. Choose the button repeatedly if you want to change the default settings.
On the next pages of the dialog box, you can then specify the following information:
Settings for the connection to a Natural server. By default, the local Natural runtime will be used. This enables you to upload projects without having to define any connection settings.
The advantage of using a local Natural runtime is that you can immediately test and debug your Natural applications which are located in the Navigator view or in the Natural Navigator view, without the need of having Natural Development Server (NDV) installed. To deploy your applications, however, remote Natural server access via Natural Development Server (NDV) is required; this is also required if you want to test or debug applications which read or write data from/to Adabas.
If you want to create a project which applies to a Natural server, you have to specify all required mapping information. See also Mapping a Natural Environment. When you are working in a new workspace and create a project, the user ID in the project wizard is initially set to the user ID that you have used to log on to your operating system. Each time you enter a different user ID in the project wizard, this user ID is persistently stored in Eclipse and will be provided as the default value the next time you create a new project.
Environment settings (steplibs).
Project encoding and character assignments.
Parser limits and parser report parameters.
Parser options.
See Changing the Project Properties for further information.
Note:
Many default settings (such as the parser settings,
project encoding and character assignments) are defined in the Natural
preferences. For further information, see Setting the
Preferences.
Choose the button.
You use the standard Eclipse functionality to import a Natural project from a version control system.
You use the standard Eclipse functionality to import a Natural project from a different workspace into the current workspace.
When you import a Natural project into your workspace or check it out from the repository of a version control system, the user ID on the Runtime page of the project properties may differ from your current user ID. On import or checkout, the user ID is always set to the default user ID and the password is set to blank. The default user ID is either the ID that you have used to log on to your operating system or - if already entered in the project wizard - the user ID that is persistently stored in Eclipse. It is your responsibility to enter the appropriate user ID and password for the defined server connection.
There are different types of Natural projects with different characteristics:
Regular Natural Project
This is the standard project type that is used to develop
Natural applications. In the properties of each project, you can define other
projects as project references (this is standard Eclipse functionality). If you
do this, it is important that you also define the corresponding libraries in
the referenced project as steplibs in the regular
project.
Referenced Natural Project
A referenced Natural project is designed to hold common
Natural source objects for use in the regular project. For example, common data
structures or copycodes can be defined once in a referenced project in order to
have these objects available for other projects. In the properties of the
regular project, the referenced project must be defined as a project reference;
the builder of the regular project then gets the information from the
referenced project.
Example: You have a library containing Natural subprograms which provide a set of general functionality. These subprograms are used in all of your projects, but you have not downloaded the corresponding sources into your workspace. Since the subprograms that are referenced in your programs are not available to your projects, the Dependencies view marks them as "Unknown". To avoid this, you can download all subprograms once into a dedicated project in your Eclipse workspace. Let us call this project "ExternalObjects". In all other regular projects that make use of these subprograms, you can then define the project "ExternalObjects" as a referenced project (in the project properties). In addition, you have to define the library containing the subprograms as a steplib in all projects which make use of the referenced project. When this has been done, the Dependencies view no longer shows a subprogram as "Unknown". It now shows the name of the referenced project.
The Natural project properties are made up of information and profile parameters that are important for the development of a Natural application.
When a project is created using the wizard, the project properties are preset and can be changed in the wizard. The properties are then written as the default settings into the .natural file. For some properties, default values can be defined in the Natural preferences.
When a project is created by downloading a library or object from a Natural server into a new project, the properties from the server are written as the default settings into the .natural file.
The settings stored in the .natural file are the so-called "default settings". They are important when you work with a version control system. When you change any settings in the project properties and just choose the or button, these changes are stored persistently under the control of Eclipse, but they are not automatically written to the .natural file. The content of the .natural file is only changed when you do this explicitly by also choosing the button (see the description of the Natural property page below).
When you change the settings for a project, your changes are uploaded to the appropriate Natural environment the next time you update the Natural environment with an object in this project. The uploaded changes include the default settings in the .natural file, plus your user settings which are stored persistently under the control of Eclipse. In this case, the user settings always superimpose the default settings.
![]() To change the project properties
To change the project properties
Select the project in the Navigator view or in the Natural Navigator view.
Invoke the context menu and choose .
In the tree of the resulting dialog box, expand the Natural node.
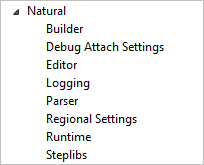
Different pages are provided for setting different types of properties.
Notes:
Select one of the property pages in the tree and set the required options as described in the topics below.
Choose the button to save your changes and to close the dialog box.
The following property pages are available for Natural projects:
This property page is shown when you select the Natural node.
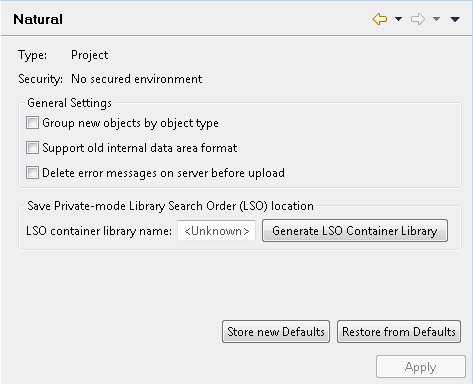
One of the following messages can be shown next to Security:
| Message | Meaning |
|---|---|
| Environment is secured | This environment is protected by Natural Security. |
| No secured environment | This environment is not protected by Natural Security. |
Note:
The environment is defined on the
Runtime
page.
You can modify the following settings:
- Group new objects by object type
If you want to group the Natural objects in this project into separate folders, according to their object types, make sure that this option is selected. For further information, see Group Folders.
- Support old internal data area format
This option applies to the internal format of data areas in a Natural for Windows, UNIX and OpenVMS environment.
With Natural Version 6.1 for Windows and UNIX and Natural Version 6.3 for OpenVMS, a new internal format was introduced for data areas which supports, for example, dynamic and large variables.
When data areas are uploaded to the Natural environment, the new internal data area format is used by default. It is strongly recommended that you keep this default (that is, do not select this check box).
Data areas with the new format are not downward-compatible. Therefore, it is not possible to use them with Version 5.1 and below. Select this check box only, if you require data areas in the old format that are to be used with Natural Version 5.1 or below.
Note:
The default setting for this option can be changed in the Natural preferences. See Natural > Options in Setting the Preferences.- Delete error messages on server before upload
When selected, all error messages are deleted in the appropriate library on the server before the error messages from the project are uploaded.
When not selected (default), all error messages are uploaded to the server. Any error messages which are no longer available in the project are not deleted on the server. This may cause inconsistencies.
See also Creating Application-Specific Messages.
Note:
The default setting for this option can be changed in the Natural preferences. See Natural > Options in Setting the Preferences.- Store new Defaults / Restore from Defaults
The .natural file contains the default settings of the Natural project properties. The following command buttons are available:
If you choose this command button, the current user settings of the project properties are stored as the new default values in the .natural file. A dialog appears in which you have to confirm the action.When you commit the new version of the .natural file to the repository of your version control system, the new default values are available to all developers involved in the project.
If you choose this command button, the current user settings of the project properties are discarded. They are overwritten with the default values that are stored in the .natural file. A dialog appears in which you have to confirm the action.Since the .natural file can be versioned, any newly defined project settings can thus be used consistently by all developers involved in the project.
If the project uses private-mode libraries, and the library search order (LSO) container has not yet been created, the following command button is available:
If you choose this command button, an LSO container library
is created on the server and the name of the LSO container library name is
shown. This name is required when running a Natural batch application in
private mode. The naming convention for the LSO container library is the same
as for a private-mode library defined in the Natural preferences. See
Natural >
Options in Setting the Preferences.
If the library search order (LSO) container has already been created, the following command button is available:
If you choose this command button, the LSO container library
is deleted.
Notes:
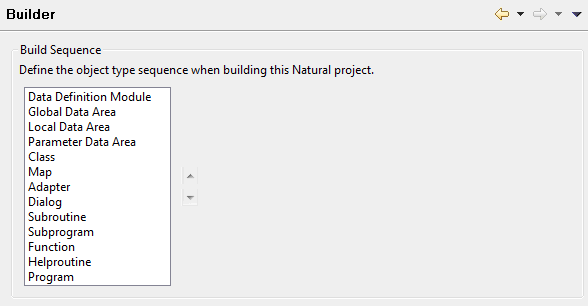
This property page allows you to define a project-specific build sequence. This sequence is used by the command to upload and stow objects in the Natural environment. If required, you can use the up-arrow and down-arrow buttons to change the build sequence for the current project.
The default sequence for new projects is defined in the Natural preferences. See also Natural > Build Sequence in Setting the Preferences.
This property page (and its corresponding link in the tree) is only shown when a debug attach server has been enabled in the Natural preferences. See Debug Attach Settings in Setting the Preferences.
The debug attach server uses a client ID to manage its attach records. A new unique client ID is generated for each project each time you start NaturalONE. This client ID is shown on this property page.

- Generation type
It is recommended that you do not change the generation type. You should leave it with unique.
However, if you want to debug an external Natural application or, if necessary, for testing purposes, you can define a custom client ID. You should only do this if you want to start a particular Natural runtime server manually. In this case, select custom from the drop-down list box and specify a client ID in the text box.
This property page allows you to change editor settings.

You can modify the following Natural profile parameter on this page:
| Option | Corresponding Natural Profile Parameter |
|---|---|
| Renumber line numbers in constants | RNCONST |
For detailed information on this profile parameter, see the Natural documentation for the appropriate platform.
If Renumber line numbers in constants is enabled, the line number references in constants are automatically renumbered while you are editing a source (see also Line Numbers).
Note:
The setting of the above option is only taken into account
when a source is being opened. If you change the setting while a source is
already open, you have to close and reopen the source so that the changed
setting becomes active.
The following applies when you are downloading a source from the server:
When you use the command and if the Natural server was started with
RNCONST set to ON, the Renumber
line numbers in constants option is automatically enabled in the
properties of the new project.
When you use the command, the setting of the Renumber line numbers in constants option in the existing project is not changed.
When you upload a source from a project in which the
Renumber line numbers in constants is enabled, all line
number references in constants are automatically renumbered during the upload
(irrespective of the RNCONST setting on the server).
This property page allows you to write the history of the Natural builder to a log file.
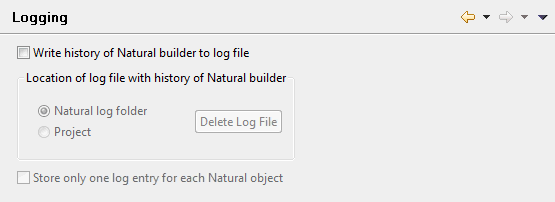
- Write history of Natural builder to log file
When this check box is enabled, all other options on this page are also enabled and information is written to a log file each time you change, delete or add a source. The log file is created as soon as the first action occurs which requires an update in the server environment. These are the actions for which flags will be shown in the label decorations when your projects are not automatically built (see also Flags in a Label Decoration).
New history information is appended to the log file. As long as you do not enable or disable the option Store only one log entry for each Natural object (see below), the content of the log file is not deleted.
The following is an example of a log file:
[2012/03/29][10:25:14.817],MYLIB-A,COPY1,C,SAVE
[2012/03/29][10:25:14.817],MYLIB-A,PROG1,P,CAT
[2012/03/29][10:25:27.330],MYLIB-B,LDA1,L,STOW
[2012/03/29][10:25:27.330],MYLIB-A,PROG1,P,CAT
[2012/03/29][10:25:27.330],MYLIB-A,PROG3,P,CAT
[2012/03/29][10:25:35.641],MYLIB-A,PROG1,P,STOW
[2012/03/29][10:25:40.072],MYLIB-B,HLPRT2,H,STOW
[2012/03/29][10:25:40.072],MYLIB-A,PROG3,P,STOW
[2012/03/29][10:25:46.945],MYLIB-B,SUBP1,N,SCRATCH
For each operation, the log file provides the following information, separated by commas:
timestamp in the format [yyyy/mm/dd][hh:mm:ss.SSS]
library name
object name
one-letter abbreviation for the object type (for example,
Pfor a program)type of operation (
SAVE,CAT,STOWorSCRATCH)- Location of log file with history of Natural builder
Using the following option buttons, you can define where the log file is to be stored:
Natural log folder
When enabled (default), the log file is stored in your Eclipse workspace. When you look at your workspace in the file system, you can find it in the .naturalone/log folder. The name of the log file is <project-name>_builderHistory.log.Project
When enabled, the log file is stored in the root of the current Natural project. You can find it in the Navigator view or in the Natural Navigator view. The name of the log file is builderHistory.log.When a log file exists at the selected location (either in the Natural log folder or in the project), the button is enabled. You can use this button to delete the log file at the selected location. When you choose this button, a dialog appears, asking whether you want to delete the log file. It is not possible to undo the deletion.
- Store only one log entry for each Natural object
Caution:
When you change the setting of this option and if a log file exists at the selected location, a dialog box appears, informing you that the current contents of the log file will be deleted. You are asked whether you want to continue.When enabled, each Natural object is listed only once in the log file. The log file is written in the same format as described above. However, its sort sequence is different. The entries are no longer sorted according to the timestamp (that is, new information is not always appended at the end of the file). Instead, the following sort sequence is used: library name, object type, object name. This is similar to the sort sequence which is used by
CATALL.The following is an example of such a log file:
[2012/04/05][10:26:52.633],MY_LIB1,SUBPGM2,N,STOW
[2012/04/05][10:27:03.345],MY_LIB1,PGM1,P,STOW
[2012/04/05][10:26:56.954],MY_LIB1,PGM2,P,STOW
[2012/04/05][10:26:48.930],MY_LIB2,PGM2,P,STOW
[2012/04/05][10:26:58.954],MY_STEP1,CPYCDE1,C,SAVE
[2012/04/05][10:26:50.930],MY_STEP1,LDA1,L,STOW
[2012/04/05][10:27:07.126],MY_STEP1,SUBROUT1,S,STOW
[2012/04/05][10:27:03.345],MY_STEP2,CPYCDE2,C,SAVE
The content of the log file can be seen as a compilation of all actions which are needed to deploy updates. Each time an action is performed on an object, either a new entry is created in the log file or the stored entry is updated.
For example, when the log file already contains a
SAVEentry for an object and aCATentry is later added for the same object, both log entries are automatically combined into a singleSTOWentry (which logically contains theSAVEandCAToperations).Or, when a
STOWoperation occurs several times for the same object, only the latestSTOWoperation (with the corresponding timestamp) is shown in the log file.
This property page provides the following tabs:
Note:
If Natural Security is active, the parser settings can also
be defined in the properties of a library. In this case, the library properties
override the project properties. See
Changing the Library
Properties.
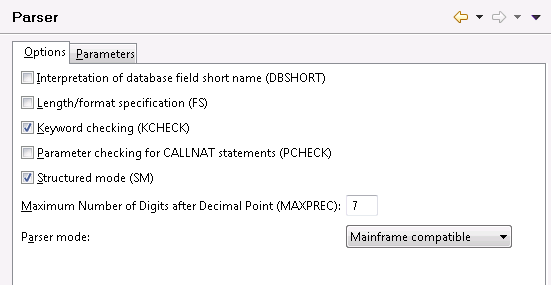
On this tab, you can modify the following Natural profile parameters:
| Option | Corresponding Natural Profile Parameter |
|---|---|
| Interpretation of database field short name | DBSHORT |
| Length/format specification | FS |
| Keyword checking | KCHECK |
| Parameter checking for CALLNAT statements | PCHECK |
| Structured mode | SM |
| Maximum Number of Digits after Decimal Point | MAXPREC |
For detailed information on these profile parameters, see the Natural documentation for the appropriate platform.
The Parser mode drop-down list box, which is also provided on this tab, allows you to define the platform for which the Natural language syntax is to be checked. You can select one of the following options:
Mainframe compatible
Natural sources are checked according to the Natural
syntax for mainframe platforms.
Open systems compatible
Natural sources are checked according to the Natural
syntax for Windows, UNIX and OpenVMS platforms.
Error tolerant
This is the default setting. When the Natural sources are
checked, all valid Natural syntax is accepted, no matter for which platform you
are currently developing. An error will occur only if invalid Natural syntax is
found which does not apply to any of the supported platforms.
For example, if you are developing for UNIX platforms and your code contains special syntax which is only valid for mainframe platforms (such as the SQL extended set for DB2 databases), the parser will not consider this as an error.
Platform compatible
When the Natural sources are checked, not all Natural
syntax is accepted. The parser only accepts syntax which can be used on
all supported platforms. An error will occur if platform-specific
syntax is found (even if this is the correct syntax for a specific
platform).
For example, if your code contains special syntax which is only valid for mainframe platforms (such as the SQL extended set for DB2 databases), the parser will consider this as an error.
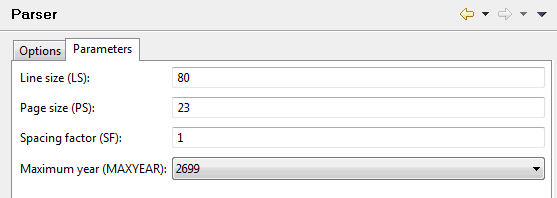
On this tab, you can modify the following Natural profile parameters:
| Option | Corresponding Natural Profile Parameter |
|---|---|
| Line size | LS |
| Page size | PS |
| Spacing factor | SF |
| Maximum year | MAXYEAR |
For detailed information on these profile parameters, see the Natural documentation for the appropriate platform.
This property page provides the following tabs:
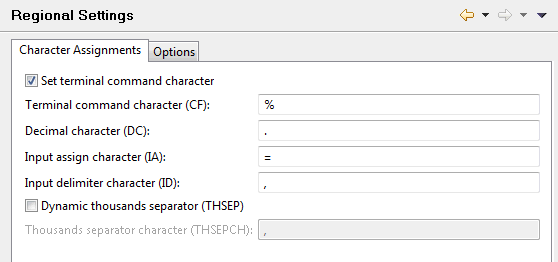
On this tab, you can modify the following Natural profile parameters:
| Option | Corresponding Natural Profile Parameter |
|---|---|
| Set terminal command character | CF |
| Terminal command character | |
| Decimal character | DC |
| Input assign character | IA |
| Input delimiter character | ID |
| Dynamic thousands separator | THSEP |
| Thousands separator character | THSEPCH |
For detailed information on these profile parameters, see the Natural documentation for the appropriate platform.
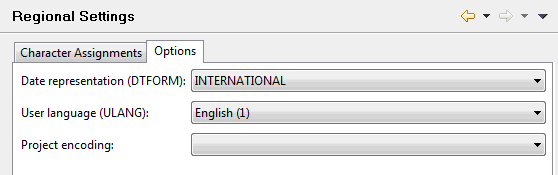
On this tab, you can modify the following Natural profile parameters:
| Option | Corresponding Natural Profile Parameter |
|---|---|
| Date representation | DTFORM |
| User language | ULANG |
For detailed information on these profile parameters, see the Natural documentation for the appropriate platform.
The Project encoding drop-down list box, which is also provided on this tab, provides for selection all code pages that are valid for the Natural environment (Natural server or local Natural runtime) which is currently defined on the Runtime page of the project properties. When set to blank, a code page is not defined for the project. When the Natural environment is updated, the default code page defined in this environment will be used. New sources will be created using the code page that is defined for the project.
This property page shows the mapping information for the Natural environment (Natural server or local Natural runtime) to which this project belongs. This information is used, for example, when you execute an object.
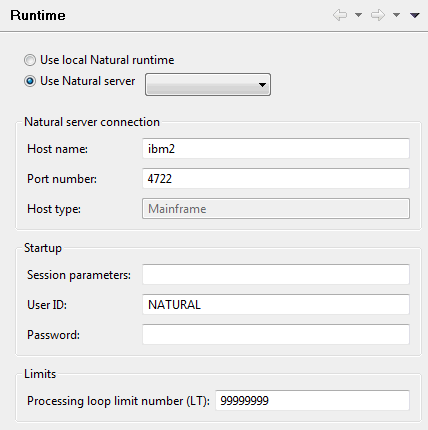
For information on the Natural server connection and startup options on this property page, see Mapping a Natural Environment.
The Use local Natural runtime option button is only visible when the local Natural runtime has been installed. When the local Natural runtime is selected, host name and port number are automatically provided and the corresponding text boxes appear gray.
If you want, you can assign your project to a different Natural environment. If you do so, it is likely that the security status of the project no longer matches the security status of the new Natural environment. Therefore, a dialog box appears which allows you to change or keep the current security status:
When you change the Natural environment from a secured environment (protected by Natural Security) to an unsecured environment or vice versa, a dialog box appears, asking whether you want to change the security status of the project (for example, from secured to unsecured). In addition, when you decide to change the security status, you can adapt the properties for all libraries so that they match the properties of the new environment:
When you change to an unsecured environment, you can specify that the existing security properties are to be removed from all Natural libraries.
When you change to a secured environment, you can specify that properties are to be added to all Natural libraries with the security settings from the secured environment.
When you change from a secured environment to a different secured environment, a dialog box appears asking whether you want to update the properties of all Natural libraries with the security settings from the new environment.
You can modify the following Natural profile parameter on this page:
| Option | Corresponding Natural Profile Parameter |
|---|---|
| Processing loop limit number | LT |
For detailed information on this profile parameter, see the Natural documentation for the appropriate platform.
Note:
If Natural Security is active, this profile parameter can
also be set in the properties of a library. In this case, the library
properties override the project properties. See
Changing the Library
Properties.
This page is only available when the project pertains to a server environment which is not protected by Natural Security. If the server environment is protected by Natural Security, you can only define steplibs for a library; see Changing the Library Properties.
On this property page, you can define steplibs and the development mode in which the build is to be performed on the Natural server.
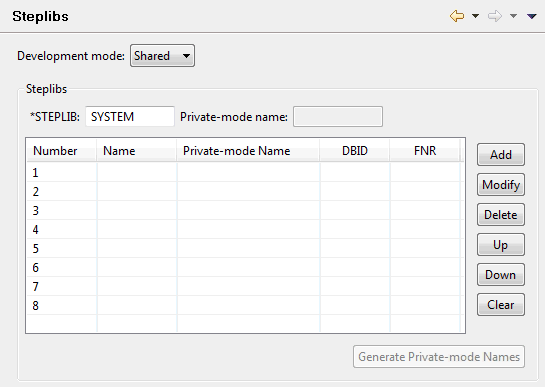
- Development mode
When the Natural server is updated (see Updating the Objects in the Natural Environment), all new and changed sources of a project are uploaded to the server and are stowed there. The development mode that you define determines the target libraries on the server. Two modes are available:
Shared Mode
This is the default mode. The sources are uploaded to libraries which have the same names as in the Eclipse workspace and are stowed in these libraries.Shared mode has the disadvantage that unpredictable results may occur if two users update the same sources on the same server at about the same time. In the best case, the update initiated by the second user overwrites the updates made by the first user, and the subsequent stow process thus considers only the changes made by the second user.
When your original sources are stored on the Natural server (and not in the repository of a version control system), shared mode must be active for production.
Private Mode
When several users work with the same libraries, it is recommended that you use private mode for development and testing. With this mode, private-mode libraries are automatically created on the Natural server. They remain there persistently. For more information, see Private-mode Libraries in NaturalONE in a Nutshell.The name of each private-mode library has a prefix which is defined in the Natural preferences (see Natural > Options in Setting the Preferences). In the Natural preferences, it is also possible to define a label decoration for a library in the workspace which displays the name of the associated private-mode library (see Label Decorations in Setting the Preferences).
The sources are uploaded to private-mode user libraries which belong only to one user; they are not shared by other users. The resulting cataloged objects are also stored in these private-mode user libraries. This has the advantage that each user can develop and test an application without affecting the sources of other users.
Exception: DDMs can only be uploaded to private-mode user libraries if they are stored in libraries in the server environment. This is the case in UNIX, OpenVMS and Windows environments when the
FDDMparameter has not been set. DDMs which are not stored in libraries in the server environment are always uploaded to their original locations. It is not possible to upload them to private-mode user libraries. These are the DDMs which are stored in theFDICsystem file (mainframe) and in theFDDMsystem file (UNIX, OpenVMS and Windows when theFDDMparameter has been set).In addition to the private-mode user libraries, a private-mode steplib can be created for each steplib which exists in the current project. The search sequence is changed in such a way that each private-mode steplib is searched before the corresponding original steplib is searched.
You can define your own names for the private-mode steplibs or you can create the names automatically. See below.
After a successful test, the changes can either be stored on the server (in shared mode) or they can be committed to the repository of a version control system, depending on the location where your original sources are stored.
Private Mode Libraries
It is not intended to use private-mode libraries outside of a project. For this reason, it is not possible to change a private-mode library in the Natural Server view, and it is not possible to change any object in a private-mode library (for example, it is not possible to edit such an object).A dialog will appear in the following cases, asking whether you want to delete private-mode libraries in the runtime environment currently associated with a project:
when you switch from private mode to shared mode in the project properties or library properties,
when a project makes use of private-mode libraries and you switch to a different runtime environment via the Runtime property page,
when you delete a library inside a project which has an associated private-mode library or
when you delete a project from the workspace which makes use of private-mode libraries.
- Steplibs
A steplib is a Natural user library or system library that is concatenated with the current user or system library. This avoids redundant storage of identical objects and helps organize applications. Natural searches in a steplib when an object is not found in the current library. The standard steplibs are the libraries
SYSTEMin the system filesFUSERandFNAT. The additional steplibs that you define on this property page are searched for an object before the standard steplibs.
*STEPLIB
This option corresponds to the Natural profile parameterSTEPLIBwhich specifies the initial setting for the system Natural variable*STEPLIB. You can specify any valid library name.Steplib Table
You can define up to eight steplibs in the steplib table. The steplib number is shown in the first column and cannot be changed. The search sequence is determined by the steplib number (number 1 is searched first).When you add or modify a steplib, you specify the following information:
Option Description Library name The name of an existing library. Private-mode name Only available in private mode. Optional. The name of the private-mode steplib that is used in addition to the existing steplib. Private-mode names can only be generated for libraries which exist in the current project. When you add or modify a steplib and the library name you specify cannot be found in the current project, the text box is dimmed and it is thus not possible to enter a private-mode name. On the other hand, when you modify a steplib and if a private-mode name has already been generated, the generated name is shown in a dimmed text box.
DBID The database ID of the system file in which the library is located. FNR The file number of the system file in which the library is located. The following command buttons are available:
Command Button Description Add a new steplib. Alternative: double-click any empty line. A new steplib is always added in the next empty line. It is not possible to add more than 8 steplibs. Modify the library name, private-mode name, DBID and/or FNR for the selected steplib. Alternative: double-click a defined steplib. Delete the selected steplib. Any defined steplibs after the deleted steplib are automatically moved up in the table and thus receive a different steplib number. Move the selected steplib to a higher steplib number (in this case, the steplib is moved down in the table). Move the selected steplib to a lower steplib number (in this case, the steplib is moved up in the table). Delete all steplib entries. Only available in private mode. Generates a private-mode name for each steplib for which a private-mode name has not yet been defined. The generated name includes the prefix which is defined in the Natural preferences; see Natural > Options in Setting the Preferences.
The Properties view shows enhanced, Natural-specific information for a node which is currently selected in the Natural Navigator view. Such information is not shown when working with the standard Navigator view of Eclipse.
The information that is shown in the Properties view depends on the type of node that is currently selected in the Natural Navigator view. It is very similar to the information that is shown when using the command. But it also provides additional information such as the number of objects in a node.
When accessed via the Natural Navigator view, the Properties view provides different tabs. You can immediately see the settings for a selected project, library or object. For example, you can see the following information at a glance:
for a project: whether is it controlled by Natural Security, or whether new objects are to be grouped by type,
for a library: the development mode, and whether a private-mode name is used,
for an object: the different names (object name, file name, and, if appropriate, long name), and the programming mode.
In addition, you can quickly compare the settings for two different nodes. For example, when you display the Parser tab for one library and then select a different library in the tree, the Parser tab is also shown for the newly selected library.
You can use any kind of project (for example, a Java project) with NaturalONE. However, you have to enable it first.
Natural projects which have been created with Natural for Eclipse
cannot be used immediately with NaturalONE. If you have imported such a project
into NaturalONE or if you have checked it out from your version control system,
you first have to enable it for NaturalONE. A Natural project which has not yet
been enabled for NaturalONE is indicated by the following icon:
![]() .
.
![]() To enable a project for NaturalONE
To enable a project for NaturalONE
In the Navigator view or in the Natural Navigator view, select the project that you want to enable.
Invoke the context menu and choose .
Note:
This command is only visible when you select a project
which has not been created with NaturalONE.