
This document covers the following topics:
Excluding Objects from Processing in the Natural Environment
Committing the Objects to the Repository of the Version Control System
For catalog purposes, you can upload your new and changed sources to the appropriate Natural environment (Natural server or local Natural runtime). The appropriate Natural environment (that is, the environment to which your sources will be uploaded) is defined on the Runtime page of the project properties.
Objects are always uploaded to the active system file.
When Natural Security is active on the Natural server, the
SAVE command must be allowed in the
"Command Restrictions" of the library security
profile of Natural Security in order to upload objects.
Caution:
Different parsers are used with NaturalONE and in the
Natural environment. The parser in the Natural environment is responsible for
the syntactical correctness of a source. Since the NaturalONE parser may
indicate errors which are not problematic in a Natural environment, the sources
are always uploaded to the Natural environment, even if they contain errors.
However, when the parser in the Natural environment then detects an error in a
source, this source is not saved, not compiled and a cataloged object is
therefore not created - the existing source and cataloged object are not
replaced in this case.
You can also commit your new and changed sources to the repository of your version control system. When you work in local mode, it is most likely that your sources are kept in a version control system.
NaturalONE uses two different types of build commands. The Eclipse-specific build commands in the menu apply to the contents of the workspace (the Navigator view or Natural Navigator view). The NaturalONE-specific build command which is described under Updating the Objects in the Natural Environment applies to the contents of your Natural environment (Natural server or local Natural runtime).
See also Understanding the Behavior of the Natural Builder.
The following topics are covered below:
When the option Build Natural projects automatically is enabled in the Natural preferences (see Natural > Builder in Setting the Preferences), the appropriate Natural environment (Natural server or local Natural runtime) is automatically updated each time you save a source in the Eclipse workspace or when you add a new source. The source is uploaded to the Natural environment and is stowed there.
When the Build Natural projects automatically option is disabled in the Natural preferences, the following commands can be used to update the Natural environment manually:
This command updates the Natural environment by uploading
and stowing all new and changed sources of the current project. In
addition to the new and changed sources, all other sources that reference
changed sources are cataloged.
You can prevent the cataloging of the referencing sources by disabling the option Rebuild dependent objects in the Natural preferences (see Natural > Builder in Setting the Preferences).
This command just uploads the selected sources to the
Natural environment. They are neither cataloged nor stowed there.
Caution:
Since objects are not cataloged, the parser in the
Natural environment is not invoked. In this case, it is possible to store
erroneous sources in the Natural environment.
Update
This command uploads the selected sources to the Natural
environment and stows them there. Sources that reference the selected sources
are not stowed.
Notes:
When the option Prompt on compile errors is enabled in the Natural preferences, a message box will appear in the case of a compile error. For further information on this message box, see Natural > Builder in Setting the Preferences.
Actions which have been disallowed in Natural Security are not disabled in the context menus of the Navigator view or Natural Navigator view. If data is transferred to a Natural server (for example, with the command) and an action is not allowed on this server, the server responds with an error message.
![]() To upload and stow all new and changed sources
To upload and stow all new and changed sources
In the Navigator view or in the Natural Navigator view, select the project which contains the sources that you want to upload and stow.
Or:
Select any source within the project.
Invoke the context menu and choose .
Or:
Choose the following icon in the local toolbar:
![]()
Or:
Press ALT+B.
Note:
For the command, the STOW command must
be allowed in the "Command Restrictions" of the
library security profile. See also Protecting the Natural Development
Environment in Eclipse in the Natural Security
documentation, which is part of the Natural documentation.
The command always updates all sources in the Natural environment which have been changed in the project, or which are new. Even if you have selected a single file in the project (and this file has not even been changed), all changes in the project are updated in the Natural environment.
Important:
The library into which the sources are written and
stowed is determined by the mode you have defined for the project (either
shared mode or private mode). See
Steplibs
in Changing the Project Properties for further
information.
![]() To upload selected sources without cataloging
To upload selected sources without cataloging
In the Navigator view or in the Natural Navigator view, select the source(s) that you want to upload.
Or:
Select a library, if you want to upload all sources in
this library.
Invoke the context menu and choose .
Or:
Choose the following icon in the local toolbar:
![]()
If more than one Natural object is about to be uploaded, a dialog box appears, asking whether you really want to upload the selected objects and replace the corresponding objects on the server.
Optional. Select the check box Always process selected objects without prompt.
When you select this check box, Confirm server processing of selected objects is automatically deselected in the preferences. See Natural > Builder in Setting the Preferences.
Choose the button.
Other than the command, the command only updates the sources in the Natural environment which have been selected in the project (that is, either single sources or, when a library has been selected, all sources in this library).
![]() To upload and stow selected sources
To upload and stow selected sources
In the Navigator view or in the Natural Navigator view, select the source(s) that you want to upload and stow.
Or:
Select a library or even a project, if you want to upload
and stow all sources in this library or project.
Invoke the context menu and choose .
Or:
Choose the following icon in the local toolbar:
![]()
Or:
Press ALT+T.
If more than one Natural object is about to be updated, a dialog box appears, asking whether you really want to update the selected objects and replace the corresponding objects on the server.
Optional. Select the check box Always process selected objects without prompt.
When you select this check box, Confirm server processing of selected objects is automatically deselected in the preferences. See Natural > Builder in Setting the Preferences.
Choose the button.
Note:
For object types that only have sources (such as
copycode and text), the command behaves just
like the command.
When the command is used to upload and stow objects in the Natural environment, the following sequence is used by default:
Data definition modules
Global data areas
Local data areas
Parameter data areas
Classes
Maps
Adapters
Dialogs
Subroutines
Subprograms
Functions
Helproutines
Programs
This default sequence can be changed for all Natural projects in the Natural preferences (see Natural > Build Sequence in Setting the Preferences) or for a specific Natural project in the project properties (see Builder in Changing the Project Properties).
When you build a project with a large number of objects, this may take a while. You can watch the build progress in the Progress view. This is a standard Eclipse view. It is not part of the NaturalONE perspective. You can display it with or by double-clicking the progress indicator at the bottom right of the Eclipse workbench.
Using the Progress view, it is possible to cancel a build.
Caution:
It is recommended that you do not cancel a build since this
will result in inconsistent builder data. This in turn may cause NaturalONE not
to work properly anymore until a full build of the project is
performed.
When you still decide to cancel a build, a dialog box appears, asking whether you really want to cancel the current build of the project. This dialog box contains the Always cancel the build without prompt check box. When you select this check box, Confirm cancelation of builds is automatically deselected in the preferences. See Natural > Builder in Setting the Preferences.
When the Build Natural projects automatically option is disabled in the Natural preferences, different types of flags can be shown in the Navigator view or in the Natural Navigator view, indicating the status of the corresponding object. The following flags are used by default (see also Label Decorations in Setting the Preferences). They are shown with the name of a source.
| Flag | Type of Flag | Description |
|---|---|---|
| ^ | Upload flag |
Indicates that the source for which this flag is shown needs to be uploaded to the appropriate Natural environment. |
| % | Stow flag |
Indicates that the source for which this flag is shown needs to be stowed in the appropriate Natural environment. For example, when a program has been changed, the program shows the upload flag and the stow flag. |
| ° | Catalog flag |
Indicates that the source for which this flag is shown uses another source which has been changed. The source for which this flag is shown needs to be cataloged in the appropriate Natural environment. For example, when a program uses copycode and this copycode is changed, the copycode then shows the upload flag and the program shows the catalog flag. When a program uses, for example, a subroutine and this subroutine is changed, the subroutine then shows the upload flag and the stow flag. The program itself, which has not been changed, shows the catalog flag. As a rule, the catalog flag is only shown when the stow flag does not apply. |
| ~ | Scratch flag |
Only shown when the command from the menu is used while the Build Natural projects automatically option is disabled in the Natural preferences. Indicates that the source and the generated object for which this flag is shown need to be deleted in the appropriate Natural environment. |
Flags are not only shown for sources but also for other nodes. By default, an update flag is shown for all upper nodes (project nodes, library nodes, and the subnodes of a library). When a project node is collapsed, you can thus see immediately that this project contains sources that need to be updated in the appropriate Natural environment.
| Flag | Type of Flag | Description |
|---|---|---|
| * | Update flag | Indicates that one or more sources need to be updated in the appropriate Natural environment. |
All of the above flags disappear when the command is issued.
The following flags are displayed independently of the Build Natural projects automatically option and they do not disappear when the command is issued. These flags are not shown by default. You have to define them in the Natural preferences by adding the corresponding variables (see Label Decorations in Setting the Preferences).
| Flag | Type of Flag | Description |
|---|---|---|
| + | Private-mode flag |
Shown for all objects that are available in a private-mode library. |
| - | Consolidate flag |
Only shown when the Find Objects to Consolidate command was used in order to find all objects which are obsolete in the private-mode library. See also Consolidating Objects in Private-Mode Libraries. |
Note:
Flags are not shown for excluded objects. See also
Excluding Objects from
Processing in the Natural Environment.
You can reset the flags in the label decorations (which are described above) so that they are no longer shown. Any information on the objects that need to be updated in the Natural environment is then lost.
Resetting flags is helpful when you are sure that the objects in your workspace are the same as those in the Natural environment. This may be the case, for example, when you are working with a version control system and the objects in the Natural environment are automatically updated each night. When you update the objects in your workspace with the modifications of another user, you can then safely reset the flags.
![]() To reset the flags
To reset the flags
In the Navigator view or in the Natural Navigator view, select the node(s) for which you want to reset the flags. This may be a Natural project, library, library folder or Natural object.
Invoke the context menu and choose .
Note:
When all objects in the selected node are currently
excluded from
processing in the Natural environment, the command is not available.
A dialog box appears, asking whether you really want to reset the flags.
Optional. Select the check box Always reset without prompt.
When you select this check box, Confirm resetting flags is automatically deselected in the preferences. See Natural > Builder in Setting the Preferences.
Choose the button.
Only available in private mode.
You can show which objects are stored in private-mode libraries and which objects are obsolete in the private-mode libraries because they are identical to those stored in the base libraries. Obsolete objects can be consolidated. The following commands are available for this purpose:
This command checks for all selected objects for which the
private-mode flag is shown whether the object in the private mode library is
obsolete or not. All objects which can be consolidated are then shown with the
consolidate flag.
A Natural source is obsolete in the private-mode library if its source is identical to the corresponding source in the base library.
The cataloged object of a Natural source (also called "generated program" or "GP") is obsolete in the private-mode library if the sources of all objects which are referenced from the current object, are obsolete or not available in the private-mode library.
This command acts on all selected objects which can be
consolidated in the private-mode library. These are the objects which have been
found with the command
and for which the consolidate flag is shown. The
command purges, uncatalogs or scratches
the objects from the private-mode library, depending on whether the source,
cataloged object or both can be deleted.
The above-mentioned flags are part of the label decoration. However, they are not shown by default. You have to define them in the Natural preferences by adding the corresponding variables. For more information, see Label Decorations in Setting the Preferences.
![]() To find the objects that can be consolidated
To find the objects that can be consolidated
In the Navigator view or in the Natural Navigator view, select the node that you want to check. If you want to find all objects in a project which can be consolidated, it is recommended that you choose the project node.
Invoke the context menu and choose .
All objects which can be consolidated are marked with the consolidate flag.
![]() To consolidate the found objects
To consolidate the found objects
In the Navigator view or in the Natural Navigator view, select the node that you want to consolidate. If you want to consolidate all objects in a project, it is recommended that you choose the project node.
Invoke the context menu and choose .
Note:
This command is only available if objects to be
consolidated have been found.
Only available in shared mode.
Instead of updating only the new and changed objects in a Natural environment, you can also update all objects in the Natural environment which belong to your project.
| Warning: When you rebuild all objects in the Natural environment, this will delete any changes of other users in the affected libraries. |
Rebuilding the objects in the Natural environment is also helpful, for example, in the following cases:
You have checked out a project from the repository of your version control system, and the cataloged objects for the sources in this project are not yet available on the Natural server.
You want to move your project to another Natural server. In this case, you first have to specify the appropriate mapping information for the new server in the project properties.
![]() To rebuild all objects in the Natural environment
To rebuild all objects in the Natural environment
In the Navigator view or in the Natural Navigator view, select the project that you want to rebuild.
Invoke the context menu and choose .
Or:
Press ALT+R.
A dialog box appears, asking whether you really want to rebuild the project.
Optional. Activate the check box Delete the contents of the affected libraries on the server first.
When you activate this check box, the entire contents of all
libraries within your project are deleted from the Natural environment before
the objects from the Eclipse workspace are uploaded and stowed in the Natural
environment. This avoids an inconsistent state in the Natural environment.
Libraries of the FNAT system file and the SYSTEM
library of the FUSER system file will not be deleted.
| Warning: The deletion may also include objects in the Natural environment that do not exist in the project of your Eclipse workspace. |
When this check box is not selected, any objects that are not part of the project remain in the Natural environment. This may cause problems.
You can use the compare editor of Eclipse to compare the sources from your Natural projects in the workspace with the corresponding objects in the Natural environment (for example, with the objects on a mainframe server). The sources can be compared with both, the objects on the server which are stored in the base library (that is, the library which has the same name as in the workspace) and, if private mode has been enabled, with the objects on the server which are stored in a private-mode library.
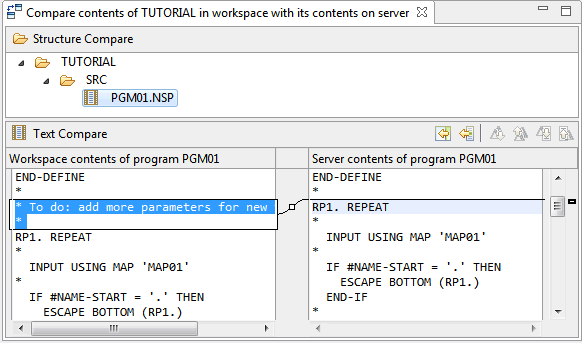
You can invoke the compare editor either for single sources or for several sources. In the latter case, you can select, for example, the node for a project or library. If the compare editor is invoked for more than one source, it shows a tree in the upper pane listing all sources which are different. You can then double-click a source to view the differences. For example:
Note:
If you invoke the compare editor for more than a single source
this may take some time. For example, if you invoke the compare editor for a
library with many sources, all sources in that library need to be compared
first before the structure of the compare tree can be filled.
For more information on the compare editor, see the Eclipse online help.
![]() To compare sources with the objects in the server's base
library
To compare sources with the objects in the server's base
library
In the Navigator view or in the Natural Navigator view, select the source that you want to compare.
Or:
Select a node (such as a project or library node) which
contains the sources that you want to compare.
Or:
In the Time Stamp Conflicts view,
select the source that you want to compare. See
Checking the Time
Stamps in the Natural Environment for more information on
this view.
Invoke the context menu and choose .
If there are no differences, a corresponding message is shown. If differences are found, the compare editor appears.
Using the compare editor, it is possible to copy the changes
from the object on the server (right side) to the source in the workspace (left
side). The following buttons are available for this purpose:
![]() (Copy All
Non-Conflicting Changes from Right to Left) and
(Copy All
Non-Conflicting Changes from Right to Left) and
![]() (Copy Current Change
from Right to Left). You can then use the standard Eclipse functionality to
save the changes in the source. If you close the compare editor and there are
still unsaved changes, you are asked if you want to save them.
(Copy Current Change
from Right to Left). You can then use the standard Eclipse functionality to
save the changes in the source. If you close the compare editor and there are
still unsaved changes, you are asked if you want to save them.
It is not possible, however, to copy changes from the source in the workspace to the object on the server using the compare editor. To do so, you have to use NaturalONE's update functionality.
![]() To compare sources with the objects in the server's
private-mode library
To compare sources with the objects in the server's
private-mode library
In the Navigator view or in the Natural Navigator view, select the source that you want to compare.
Or:
Select a node (such as a project or library node) which
contains the sources that you want to compare.
Invoke the context menu and choose .
If there are no differences, a corresponding message is shown. If differences are found, the compare editor appears.
The following applies only, if the differences for a single
source are shown in the compare editor: If you also want to display the content
of the object in the server's base library, choose the
![]() (Three-Way Compare) button and then the
(Three-Way Compare) button and then the
![]() (Show Ancestor Pane) button.
(Show Ancestor Pane) button.
The content of the object in the base library is then shown in the upper pane of the compare editor. For example:
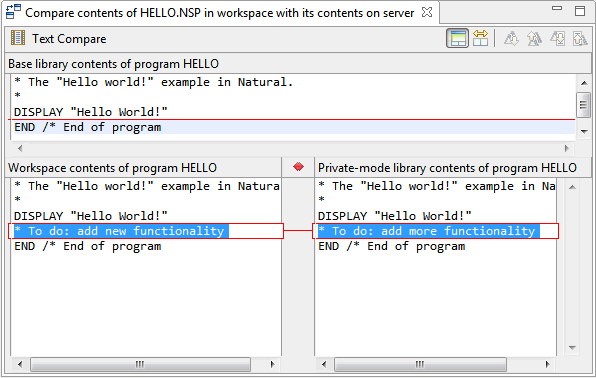
When comparing with a private-mode library, the compare mode is read-only. It is not possible to copy changes from one source to another.
The following topics are covered below:
Time Stamp Conflicts During an Update of the Natural Environment
Comparing the Time Stamps Before an Update of the Natural Environment
This feature is helpful, for example, when part of the development team works with Eclipse and another part of the development team works directly in the Natural environment (for example, on a mainframe server). You can find out whether the source has been modified on the server in the meantime. Thus, you can avoid that an object which another user has changed on the server is overwritten with your changes.
The objects are checked in the following way: The time stamp of
the source in the local workspace is compared with the time stamp of the
corresponding source on the server. When the time stamps are different, the
contents of the sources are compared. When the sources are identical, no
conflict occurs. When the sources are not identical, a time stamp conflict
occurs. This approach makes sure that a time stamp conflict occurs only when
the content of the source on the server has been modified. This makes sense,
for example, when the system command CATALL * STOW
has been executed on a mainframe server, which changes the time stamps of the
sources but not their contents.
In order to use this feature, you must make sure that the Check time stamp on server option is enabled in the Natural preferences (see Natural > Builder in Setting the Preferences).
Notes:
When the Check time stamp on server option is enabled in the preferences, the commands for updating the Natural environment (Upload, Update, Build Natural Project and Rebuild Natural Project) check for every object whether a time stamp conflict occurs. They do this before the object is updated in the Natural environment.
When the option is also enabled in the Natural preferences, a dialog appears in case of a time stamp conflict, asking whether you want to upload the object anyway.
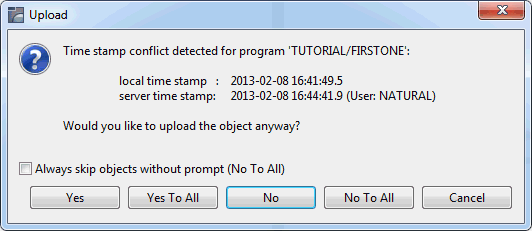
This dialog box offers the following options:
| Command Button | Description |
|---|---|
| The time stamp conflict for the current object is ignored and the Natural environment is updated. | |
| Same as . In addition, this action is applied for all following time stamp conflicts. | |
| The Natural environment is not updated with the current object. | |
| Same as . In addition, this action is applied for all following time stamp conflicts. | |
| The execution of the command is canceled. |
The dialog box also contains the Always skip objects without prompt (No To All) check box. When you select this check box, is automatically deselected in the preferences.
When the option is not enabled in the Natural preferences, objects with time stamp conflicts are not updated in the Natural environment. This corresponds to in the above dialog box.
All time stamp conflicts are collected in the Time Stamp Conflicts view (see below). In addition, a label decoration indicating the conflict is displayed in the Navigator view or in the Natural Navigator view. The following example shows this decoration for a program for which a conflict has been detected:
![]()
Note:
The label decorations for the server problems are controlled
by the preferences under General > Appearance > Label
Decorations. If you do not want to have these label decorations,
just go to the above mentioned preference page and deselect Natural
Compiler Problems.
If a time stamp conflict occurs, it is your responsibility to find the differences and to resolve the conflict. You do this by looking at the contents of the local object and the object in the Natural environment.
When you decide to download the object from the Natural environment into your workspace, the object in the workspace receives the time stamp of the server and the conflict is resolved.
When you choose or in the dialog box (that is, when you ignore the conflict and update the Natural environment in spite of the conflict) the conflict is also resolved. Keep in mind that in this case it is no longer possible to compare the contents of the sources in the different environments. You should only update the Natural environment when you are absolutely sure that it is correct to overwrite the source with the content of your local source. It is therefore recommended that you first find out why the conflict has occurred - for example, you look at the code in the Natural environment, include any changed code from the Natural environment into your local source, resolve the conflict using the command and then build the project.
The command updates the time stamp of the object in the workspace with the time stamp of the object in the Natural environment. It also removes the label decoration in the Navigator view or in the Natural Navigator view which indicates the time stamp conflict.
![]() To resolve a time stamp conflict in the Navigator view or
Natural Navigator view
To resolve a time stamp conflict in the Navigator view or
Natural Navigator view
In the Navigator view or in the Natural Navigator view, select the object for which the time stamp conflict occurred.
Invoke the context menu and choose .
![]() To resolve a time stamp conflict in the Time Stamp Conflicts
view
To resolve a time stamp conflict in the Time Stamp Conflicts
view
In the Time Stamp Conflicts view (see below), select the object for which the time stamp conflict occurred.
Invoke the context menu and choose .
Before updating the Natural environment, you can compare the time stamps of the sources that are flagged for update in the Navigator view or in the Natural Navigator view with the time stamps of the sources in the Natural environment.
Note:
The sources in the Natural environment are not locked when
you compare the time stamps. Keep in mind that is possible that another user
changes the source in the Natural environment between your time stamp
comparison and your subsequent update.
![]() To compare the time stamps
To compare the time stamps
In the Navigator view or in the Natural Navigator view, select the object to be compared or the node containing the objects to be compared.
Invoke the context menu and choose , where command can be one of the following, depending on your selection:
(compares the time stamps for all selected sources)
(compares the time stamps for new and changed sources of the current project)
Note:
is
only visible in the context menu if the
Check time stamp on server option is enabled in the
Natural preferences.
Go to the Time Stamp Conflicts view (see below) and check the output.
The Time Stamp Conflicts view is not shown by default when you open the NaturalONE perspective. However, as soon as you enable the Check time stamp on server option in the Natural preferences, this view is automatically shown. If it is currently not shown, see Showing a View of the NaturalONE Perspective.
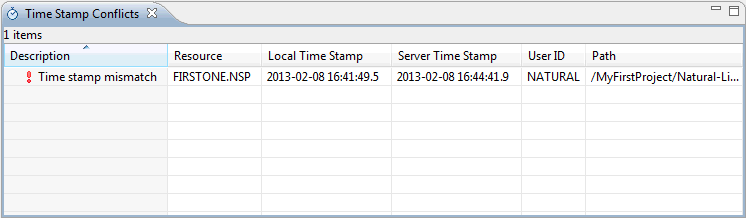
In the Time Stamp Conflicts view, "Time stamp mismatch" is shown for all sources which have changed in the Natural environment.
If an object in your workspace does not yet have a time stamp (for example, this is a new object or a Natural project has been checked out from a repository), the contents of the local source in the workspace is compared with the contents of the source in the Natural environment. If the sources are identical, no conflict occurs and the time stamp of the local source is set to the time stamp of the source in the Natural environment. If the sources are not identical, a time stamp conflict occurs. In this case, "No local time stamp - local source and server source are not identical" is shown in the Time Stamp Conflicts view.
For each object that is shown in the Time Stamp Conflicts view, you can invoke the compare editor of Eclipse. See Using the Compare Editor for further information.
You can start NaturalONE with special command line arguments. Using these arguments, you can write the time stamp conflicts for the objects in a project to a log file or, if no conflict occurs, update all objects of the project. In this case, NaturalONE is started as usual, with the Eclipse workbench user interface, but after handling the command line arguments, NaturalONE is shut down automatically. This feature works regardless of the setting of the Natural preference Check time stamp on server.
If you want to use this feature, you have to specify all of the following command line arguments:
natural.TSProject
                                                   "project-name"
Specifies the name of the Natural project for which time stamp checking and update is to be performed. This project must be located in the active workspace. If the project is not found in the workspace, an error is displayed in the Error Log view of Eclipse and NaturalONE is not shut down.
natural.TSLogFile
                                                   "path-to-log-file"
Specifies the path to the log file (including the log file name) in which all time stamp conflicts of the specified project are to be logged. If no time stamp conflicts are found, the log file is not created. If time stamp conflicts are found and a log file with the specified name already exists, it is overwritten (if no time stamp conflicts are found, an existing log file with the specified name is deleted). If the directory specified in the path does not exist, an error is displayed in the Error Log view of Eclipse and NaturalONE is shut down.
natural.TSCommand [ Compare | CompareAndUpdate
                                                   ]
Specifies the command to be executed. This can be one of the following:
Command Description CompareOnly compare the time stamps for all objects of the specified project. CompareAndUpdateCompare the time stamps for all objects of the specified project. If no time stamp conflicts are found, execute the command for all objects of the project. If a wrong command is specified (that is, a command which is neither
ComparenorCompareAndUpdate), an error is displayed in the Error Log view of Eclipse and NaturalONE is shut down.
The command line arguments are only executed if all of the above arguments are specified and if no error occurs in the definition of the arguments.
Like other Eclipse command line arguments, the NaturalONE arguments can be specified on the command line of your operating system or in the eclipse.ini file.
Example for the command line:
eclipse.exe natural.TSProject "My Sample Project" natural.TSLogFile "c:\temp\timestamp.log" natural.TSCommand CompareAndUpdate
You can exclude projects, folders, library folders or objects from being uploaded to the Natural environment. The names of the excluded items of a project are listed in the file .excludes. This file is stored in the root of a Natural project.
The .excludes file is created with the command (see below). Once this file has been created, it is possible to invoke an excludes editor (see below). Using the excludes editor, you can define to exclude, for example, specific Natural object types or files which match a particular pattern.
If you use the command in the Natural Navigator view, the content of the .excludes file depends on the type of node that you have selected before issuing the command:
Physical Node
If you select a node in the Natural
Navigator view which physically exists in your Eclipse workspace,
the path to the directory containing the files to be excluded is written to the
.excludes file. If you add more objects to an excluded
directory (for example, to a library), these objects are automatically excluded
from processing.
Virtual Node
Virtual nodes in the Natural Navigator
view are shown with a gray icon.
When the objects in the Natural Navigator view are logically grouped according to their object types and you select the node for such a virtual group (for example, a Programs or Subprograms node), the name of each single object which is currently shown in that node is written to the .excludes file.
On the other hand, when the folders which physically exist in your Eclipse workspace are not shown (because you have selected to show the objects of a library as they would be stored on the server) and you select a library node in the Natural Navigator view, the name of each single object which is currently shown in that node is written to the .excludes file.
Any additional objects that will later appear in a virtual node are not automatically added to the .excludes file.
Be careful when using the command, which removes the excluded objects from the .excludes file. If you include nodes in the Navigator view which have previously been excluded in the Natural Navigator view (or vice versa), the result might not be as expected.
| Warning: You must not change .excludes file manually since this may result in damaging your project. |
![]() To exclude objects from processing in the Natural
environment
To exclude objects from processing in the Natural
environment
In the Navigator view or in the Natural Navigator view, select the node(s) that you want to exclude from any processing in the Natural environment. This may be, for example, a Natural project, library, library folder or Natural object.
Invoke the context menu and choose .
In the Navigator view or in the Natural Navigator view, the label for each excluded node is shown with a gray color.
![]() To include excluded objects in processing in the Natural
environment
To include excluded objects in processing in the Natural
environment
In the Navigator view or in the Natural Navigator view, select the previously excluded node(s) that you want to include again. This may be any node for which the label is currently shown with a gray color.
Invoke the context menu and choose .
In the Navigator view or in the Natural Navigator view, the label for each included node is no longer shown with a gray color.
![]() To exclude objects using the excludes editor
To exclude objects using the excludes editor
In the Navigator view or in the Natural Navigator view, go to the project in which you want to exclude objects and select the .excludes file.
Invoke the context menu and choose .
The excludes editor is invoked. This is a multi-page editor which provides the following pages:
Excludes
Allows you to edit the .excludes
file in a graphical way (as described below).
.excludes
Shows the actual content (code) of the
.excludes file. It is not possible to modify the
information on this page.
The Navigator section on the left side of the Excludes page shows the same tree which the Navigator view shows for a project. When you expand the nodes, all items which have been excluded are shown with a gray color. All nodes for which an exclude definition has been defined are shown in bold. When an exclude pattern has been defined for the selected node, this is shown at the bottom right. Example:

The Exclude Rules section on the right side of the Excludes page always shows the path for the selected library, folder or object. This is the path for which your exclude rules will be saved. A path is not shown when the project is selected; in this case, your exclude rules will apply to the entire project.
The option buttons and specify the exclude range for the current path. When a library is selected, the option button is selected by default. In this case, your exclude rule will be applied to the selected library, to all library folders that belong to the library, and to all subfolders (such as SRC) of the library. When the option button is selected, your exclude rule will only be applied to the currently selected library folder and all of its subfolders; it does not apply to the entire library to which a library folder is assigned. When the label of the or option button is shown in bold, this indicates that an exclude rule has been defined.
When you click a gray object in the Navigator section, the Applied Exclude Rules section indicates the node on which the corresponding exclude rule has been defined. For example, when an object name is shown, this means that an individual object has been excluded. Or when a project or library name is shown, this means that the exclude definition has been done on project or library level; when you click on the entry in the Applied Exclude Rules section, the corresponding definitions (including the path) are then shown in the editor.
On the Excludes page, you can exclude objects as follows:
To exclude a single object
Select a node in the Navigator
section. A single check box is then shown in the Exclude
Rules section. Select this check box to exclude the selected
object.
To exclude all objects of a specific type
In the Navigator section, select
the project, library or folder for which your exclude definition is to apply.
The Exclude Rules section then shows check boxes for
excluding special file types in the selected node. Select the check box for
each type that you want to exclude.
To exclude all objects which match a particular
pattern
In the Navigator section, select
the project, library or folder for which your exclude definition is to apply.
Enter a pattern of a file name in the Pattern text box and
choose the button. Your pattern may contain the
wildcards "?" and "*".
For Natural object types and error messages, you must not enter an extension.
If you do, the corresponding objects are not found. However, for Natural
resources (that is, non-Natural files such as images or HTML files), you must
enter the extension. Examples:
| Pattern | Excludes the following files |
|---|---|
| *02 | LDA02.NSL |
| *02* | LDA02.NSL and
PGM02OLD.NSP |
| M???? | MAP01.NSM and
MYPRG.NSP |
| L??* | LDA.NSL,
LDA01.NSL, and LONGPRG.NSP |
| N??APMSL | N01APMSL.ERR |
| *.PNG | All Natural resources with the extension PNG. |
Using the or button, you can modify or delete an existing pattern which is currently selected in the list box. The button deletes all patterns for the selected node.
Save your changes using the standard Eclipse functionality (for example, press CTRL+S).
In the Navigator view or in the Natural Navigator view, the label for each excluded node is now shown with a gray color.
You use the standard Eclipse functionality to commit the objects to your version control system.
It is important that you also keep the following in your version control system, in addition to the sources. Otherwise, your project will be corrupted.
| Name | Type | Description |
|---|---|---|
| .project | File | Contains standard project information which is required by Eclipse. |
| .settings | Folder | Contains standard project information which is required by Eclipse. |
| .natural | File | Contains many settings which are written to the project when downloading libraries from a Natural environment or when changing the project properties. |
| .paths | File | Contains the mappings of the folder names to Natural library names. |
| .excludes | File | Contains all items which are to be excluded from any server operations. |
The files .paths and .excludes are only available when the corresponding actions have been performed in your project. Therefore, these files need not necessarily exist in your project.