
This document covers the following topics:
With the data browser, you can quickly and easily issue database queries against Adabas and SQL databases. You can use the data browser during application development to find out whether the application works properly. Or you can simply use it to find out which data has been stored in a database.
So that you are able to generate data reports from Adabas or SQL databases which are available in your current Natural server environment, an appropriate DDM is required for each database file.
To get a report from a database, a template is required which specifies the database fields that are to be retrieved from the database. You create (or edit) a so-called "report template" which defines the required fields. The report template is stored for further use in the Eclipse workspace.
![]() To create a report template
To create a report template
In the Navigator view or in the Natural Navigator view, select the DDM for which you want to define a new report.
From the context menu, choose .
Or:
From the menu, choose
. In the resulting
New dialog box, expand the
Natural node, select Browse
Data and then choose the button.
The following dialog box appears.
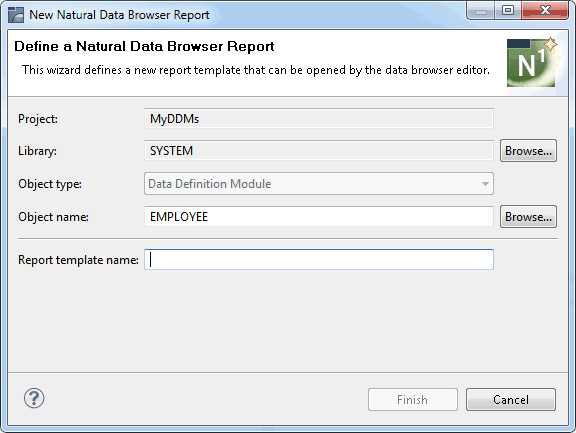
Enter a name for the report template.
Choose the button.
The selected DDM is now validated on the Natural server.
It may happen that there are differences between the local DDM and the DDM on the server (for example, when the DDM on the server has been changed in the meantime and therefore has a different version). It may also happen that the DDM is no longer available on the server or that it is not cataloged on the server. The corresponding information is then provided, for example, in the Properties view and/or in the Problems view.
When the DDM has been validated, a new report template for the selected DDM is opened in the editor area. For further information, see About the Data Browser Editor.
The new report template is an XML file that is stored in the RES folder of the library which contains the DDM that you have selected.
The report templates are edited using the data browser editor. This editor is invoked when you create a new report template or when you open an existing report template.
The data browser editor is a multi-page editor which provides the following pages:
Fields
On this page, you select the fields that are to be included in
the report. See Selecting the Fields for the
Report.
Report
On this page, you can set several options (optional). See
Setting Options for
the Report.
The Fields page of the data browser editor shows a tree structure with the fields of the DDM. Example:
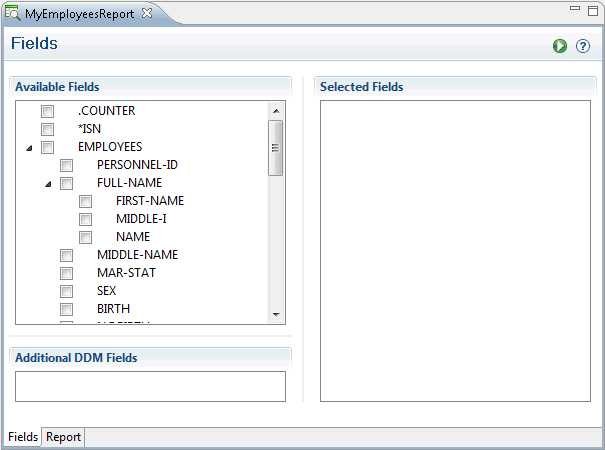
By default, no fields are selected.
The following general fields are shown at the top of the tree, before the DDM name:
.COUNTER
When selected, the records are numbered in the sequence in
which they are read from the database. This number is then shown in the report.
This feature is available as of Natural Development Server Version 2.2.6.
*ISN
This corresponds to the Natural system variable
*ISN. When selected, the internal sequence number
(ISN) of a record is shown in the report. This field is only available for
Adabas and Tamino databases. This feature is available as of Natural
Development Server Version 2.2.6.
Groups can be expanded and collapsed. For a multiple field, the indices of the separate dimensions are indicated in parentheses. For a group, only an asterisk is shown in parentheses to indicate that this is a multiple group.
Note:
Under Additional DDM Fields, you can see
the fields which are available in the current DDM, but which are not available
in the report template. This may only happen when you have selected a different
DDM on the Report page. See
Setting Options for
the Report.
![]() To select the fields for the report
To select the fields for the report
In the tree structure of the Fields page, activate the check box for each field and/or group that you want to include in the report.
When you activate the top-most check box of the DDM (next to the DDM name), all DDM fields are automatically selected.
When you activate the check box for a group, all individual fields and subgroups that belong to the group are automatically selected.
Each selected field is shown on the right side of the Fields page.
If you want to remove a selected field, simply deactivate the corresponding check box in the tree structure.
Optional. In order to design the report, you can arrange the sequence of the selected fields individually. To do so, select one or more fields on the right side of the Fields page and drag them to the desired positions.
As long as you do not change the sequence of the selected fields, any new fields that you select are inserted in the same sequence as in the tree structure. However, if the selected fields have already been arranged individually, further fields that are selected in the tree structure are always added at the end of the list. Thus, the individual sequence is not corrupted.
In the list of selected fields, you can choose from the context menu. This rearranges the selected fields in the same order as in the tree structure.
Optional. When you select a field (either in the list of available or selected fields), information on this field is shown in the Properties view. Some field properties have modifiable options. See Displaying the Properties for a Field for further information.
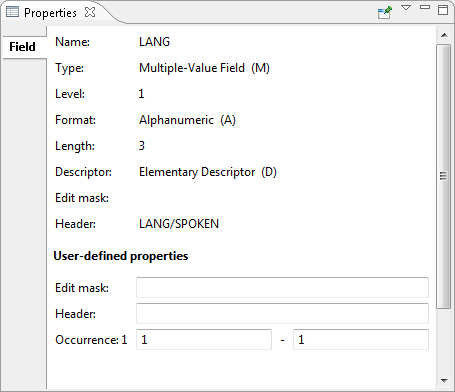
The Properties view shows additional information for the entry which is currently selected on the Fields page of the data browser editor.
For the DDM, the following information is shown: database ID, file number, type (for example, Adabas) and DDM name (long name).
For a field, the following information is shown:
| Option | Description |
|---|---|
| Name | Name of the field. |
| Type | Type of field:
Elementary field. |
| Level | Level number assigned to the field. |
| Format | Natural data format of an elementary field, such as "Alphanumeric (A)". |
| Length | Length of an elementary field. |
| Descriptor | Descriptor type:
Elementary descriptor (D). When a descriptor is not defined, this text box is blank. |
| Edit mask |
Two text boxes are shown for the edit mask. The first text box shows the value that is defined in
the DDM. This is the default edit mask to be used when the field is output, for
example, with a The second text box (under the heading User-defined properties) is modifiable. This edit mask is used in the report in order to show the values of a field. When the DDM-defined or user-defined edit mask is to be used in the report, you must also set the corresponding option on the Report page of the data browser editor. See Setting Options for the Report. |
| Header |
Two text boxes are shown for the header. The first text box shows the value that is defined in
the DDM. This is the header to be produced for each field specified in a
The second text box (under the heading User-defined properties) is modifiable. You can specify a user-defined header for this field. When the DDM-defined or user-defined header is to be used in the report, you must also set the corresponding option on the Report page of the data browser editor. See Setting Options for the Report. |
| Occurrence n | Only shown for a multiple field. The
range that is to be used in the report can be modified. You can specify a
different start value and a different end value for the range. This feature is
available as of Natural Development Server Version 2.2.4.
Caution: |
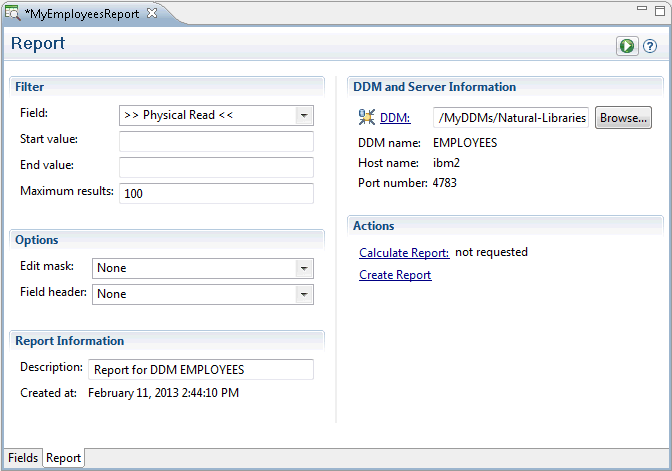
Optional. When you have selected the fields that are to be included in the report, you can set several options. This is done on the Report page of the data browser editor.
You can set the following options:
| Option Name | Description |
|---|---|
| Filter | |
| Field |
The report is sorted according to the value that is selected in this drop-down list box. By default, the records are read as they stand physically in the file (physical read). You can select another sorting criterion from this drop-down list box. The drop-down list box provides for selection the ISN and all descriptors that are defined in the DDM (including subdescriptor and superdescriptor). |
| Start value / End value | The range of values of the descriptor field can be defined by a start value and/or by an end value. If only an end value is defined, the start value is set to the format-dependent default initial value (for example, it is set to blank for format A or to 0 for format N). The start value must be less than the end value. |
| Maximum results | All filter criteria can be further limited by entering an absolute record limit (the default setting is 100 records). Regardless of the filter criteria, only the corresponding number of records is written to the report. By entering 0 (zero), the record limit is switched off. |
| Options | |
| Edit mask | The edit masks to be used in the
report. This drop-down list box provides for selection the following options:
|
| Field header | The column headers to be used in the
report. This drop-down list box provides for selection the following options:
|
| Report Information | |
| Description | A brief description for the report. You can specify any description you like. |
| Created at | Shows the date and time when the report definition was created. |
| DDM and Server Information | |
| DDM |
Shows the path to the DDM to which this report definition pertains. When you choose the DDM action, this DDM is opened in the DDM editor. Using the button, you can also use another DDM with the current report definition. When you select a DDM which is not suitable for the current report definition, errors and/or warnings are shown in the Properties view and in the Problems view. On the Fields page of the data browser editor, the errors and warnings are indicated by corresponding icons, and all fields that are not available in the report definition are listed under Additional DDM Fields. |
| DDM name | Shows the name of the DDM to which this report definition pertains. |
| Host name | Shows the name of the host on which the DDM is located. |
| Port number | Shows the port number on the above host. |
| Actions | |
| Calculate Report | When you choose this action, the number of records is calculated and shown on this page. |
| Create Report | When you choose this action, the report is created. See also Creating the Report. |
When you have selected the fields that are to be included in the report (and when you have set any optional report options), you can create the report.
![]() To create the report
To create the report
Choose the following button which is shown at the top of the data browser editor (it is available on the Fields page and on the Report page):
![]()
Or:
On the Report page, choose the
Create Report action.
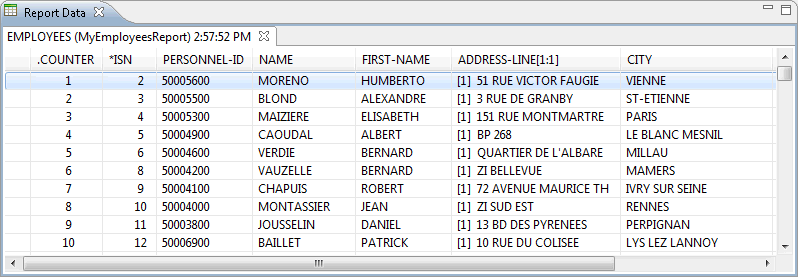
The report is generated. It is shown in the Report Data view. Example:
Note:
This view is automatically opened when you create a
report. It is not shown by default when you open the NaturalONE perspective.
See also Showing a View
of the NaturalONE Perspective.
In the Report Data view, you can
sort a report according to a specific column by clicking on the column header;
drag a column header to a different position.
When you have created more than one report, all of these reports are shown in the Report Data view (unless you have closed them). The tab of each report page contains the name of the DDM, the name of the report template that has been used to create the report, and a time stamp which indicates when this report has been created.
When a range is defined for a field, this is indicated in the column header (for example, "1:4"). In this case, only the first element of the range is initially shown and expand/collapse icons are provided. You can also double-click an entry in order to expand or collapse it. When you expand an entry, all elements of the range are shown (see the example below). When you move the mouse pointer over a column which shows ranges (either in expanded or collapsed state), a tooltip appears, listing all elements of the range. This feature is available as of Natural Development Server Version 2.2.4.
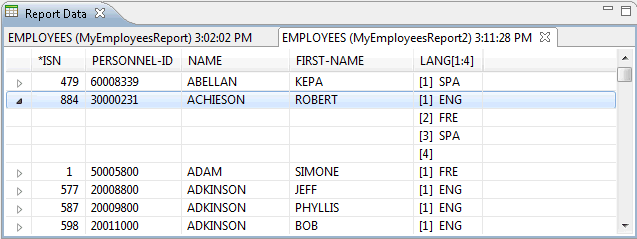
When expand/collapse icons are shown in the report, the context menu contains the commands and . Using these commands you can expand or collapse all entries in the report at once.
You save a report template using the standard Eclipse functionality (for example, by pressing CTRL+S).
The following applies when your report template has been changed in such a way so that it contains the former template structure, but pertains to a different DDM. When you save the report template (with or ), a dialog box appears asking whether you want to use the new DDM with the report template. You have two options for saving:
To use the new DDM, you choose the button.
The fields of the new DDM are shown as the available fields on the Fields page.
The fields that are also available in the new DDM remain
selected on the Fields page. All other selected fields are
cleaned. For example, when the selected field PERSONNEL-ID is used
in both DDMs, this field is kept.
When a descriptor which has been defined as a filter on the Report page is no longer available in the new DDM, the filter is reset to its default value.
If you do not want to use the new DDM, you choose the button.
The definition of the new DDM is disregarded and the report template is saved with the original DDM. The next time you open the report template, you can see that the original DDM is used again.
You can save each report which is currently shown in the
Report Data view. Different commands are available for
this purpose. You can either save the whole report or just selected lines of
the report. The result is a text file containing, by default, a comma-separated
list of fields. The character that is used to separate the field values is
determined by the Natural input delimiter character (ID
parameter) as defined in the
character
assignments of the current project properties.
![]() To save the report
To save the report
In the Report Data view, go to the page which contains the report that you want to save.
In the list of fields, open the context menu and choose Save Report.
A dialog box appears.
Select a folder and specify a file name.
Choose the Save button.
![]() To save selected lines of the report
To save selected lines of the report
In the Report Data view, go to the page which contains the report that you want to save.
In the list of fields, select each line that is to be included in the report.
You can use the standard key combinations for selecting a range of fields (using the SHIFT key) or individual fields (using the CTRL key).
Open the context menu and choose Save Selection.
A dialog box appears.
Select a folder and specify a file name.
Choose the Save button.
Note:
A file extension is not automatically added to the file name.
You have to specify it yourself.
When you select a report in the Report Data view, the Properties view shows metadata for this report.
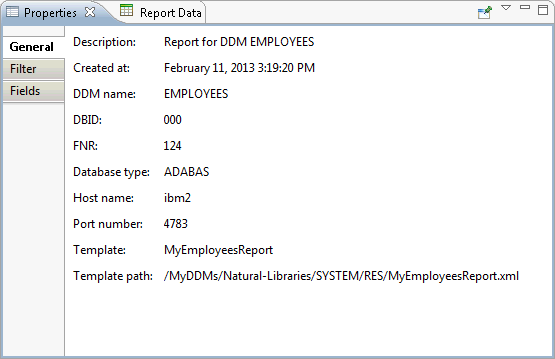
The following pages are provided:
General
Shows general information about the report. This includes the
name and location of the DDM and the report template that has been used to
create the report.
Filter
Shows the filter criteria for the report. These are the
definitions which have been made on the Report page of the
data browser editor (see Setting Options for the
Report). In addition, the number of processed records is
shown.
Fields
Shows the fields that are used in the report. These are the
fields that have been selected on the Fields page of the
data browser editor (see Selecting the Fields for the
Report).
A report template is an XML file that is stored in the RES folder of the library which contains the DDM to which it pertains. When you open a report template, you can change all required information as described previously and you can create a new report.
![]() To open a report template
To open a report template
In the Navigator view or in the Natural Navigator view, select the report template, invoke the context menu and choose .
Or:
Double-click the report template.
The report template is opened in the data browser editor.
Note:
The report template may be copied from the
RES folder of the original into the
RES folder of a new Natural project. To find the DDM
which pertains to the report template, the new Natural project must have a
reference to the original project. For further information about referenced
projects, see Types of
Natural Projects.