
The Menu dialog box lets you define the user menus that are to appear in the menu bar of the terminal application. It shows a list of all available tasks.
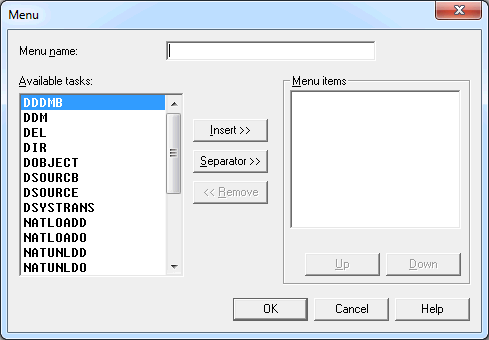
You can make up to 5 user menus available to a user. Each user menu may contain up to 20 menu items (tasks).
The following buttons are provided (in addition to the standard buttons):
| Insert the selected task as a command in the menu. | |
| Insert a separating line below the highlighted menu item. | |
| Remove the selected menu item. | |
| Move the selected menu item up. | |
| Move the selected menu item down. |
 To define a user menu
When you create a new menu, specify a name in the Menu name text box.
The name can be up to 32 characters long and must not contain blanks. When you modify a menu, this text box cannot be modified.
In the Available tasks list box, double-click the task you wish to include in the menu.
Or:
Select the task and choose the
button.
The selected task appears in the Menu items list box. When this list box contains more than one item, the new task is inserted below the highlighted menu item.
Optionally, choose the button to insert a separating line below the highlighted menu item.
Optionally, choose the or button to move the selected menu item.
Optionally, double-click a menu item to remove it from the menu.
Or:
Select the menu item and choose the
button.
Repeat the above steps until all required tasks are defined as menu commands.
Choose the button.
After having defined a user menu, the administrator can modify the group properties and add the user menu to the list of allowed objects. The administrator can then modify the user properties to specify which user menus are to be available to a specific user. The user menu will be shown in the menu bar the next time this user starts the terminal application.
A general user only has to define the user menu in the user properties.