
A Natural Screen Tester procedure is a well-defined encapsulation of a complete process, and contains process input arguments, process output arguments and the process definition itself. A procedure group is a container of several procedures. The following procedure types are available:
Test Case Procedure
Encapsulates a process of navigation in host screens, collecting data or submitting data.
Flow Procedure
Encapsulates a complex process that can combine host sessions and other data sources: databases, host transactions (RPC),
other web services.
Web Procedure
Encapsulates a process of navigating and selecting elements in the Web.
Program Procedure
Encapsulates a host transaction (in COBOL or RPG), invoked via RPC and not via the screens layer.
External Web Services
Encapsulates a web service that is external to Natural Screen Tester, invoked via SOAP.
This document covers the following topics:
See also Procedures in the Designing and Developing a Test Case documentation.
Text
Long
Boolean (True, False)
Double
Integer
Float
Byte
Date: The format can be either 2001-07-04 12:08:56.235 or 2001-07-04T12:08:56.235 (this format should be used for Web Services only), or dd/MM/yyyy
See also Defining Procedure Inputs and Outputs in the Designing and Developing a Test Case documentation.

- Show name
Includes the name of the node in the procedure details.
- Show details
Includes details of the node in the procedure details.
- Show description
Includes a description of the node in the procedure details.
The procedure nodes are listed on the right, and can be placed within the procedure by dragging and dropping them to the relevant place within the procedure process. Clicking on one of the titles, such as Navigation, will display all the available nodes within navigation.
In the Procedure tree, right-clicking on a node will display the actions available for that node. These may include actions such as expanding or collapsing the node. The root node includes saving an image of the procedure to a file.
When your network requires defining a proxy, set the proxy Hostname,
Port, Username and Password in the WebProcedureConfig section in
the <Natural Screen Tester installation>/config/gxconfig.xml
file:
<MainConfiguration>
        ...
        <ServerConfiguration>
        ...
           <webProcedureConfig>
              <proxyHostname></proxyHostname>
              <proxyPort></proxyPort>
              <proxyUsername></proxyUsername>
              <proxyPassword></proxyPassword>
           </webProcedureConfig>
        </ServerConfiguration>
</MainConfiguration>
Natural Screen Tester deciphers the Web page and finds elements using standard W3C technology called XPath. XPath, the XML Path Language, is a query language for selecting elements from an XML document. XPath was defined by the World Wide Web Consortium (W3C) and further details can be found at their site. When recording the Web procedure, and capturing an element, Natural Screen Tester finds the most suitable XPath that will locate the element in runtime. The XPath technology provides flexibility to locate a specific element using various XPaths. The format of an XPath can vary, for example, it can be of a format which only looks for a specific HTML attribute such as a name or ID within the Web page (recommended) or it can be a canonical XPath which provides the whole path, detailing the hierarchy of the tags which point to the element. If there is no name or ID, or if the name/ID is not generic enough, (i.e. if it is specific to a value that is likely to change in different instances of the page), alternative XPaths should be considered. The alternative suggestions by Natural Screen Tester are options which include various levels of hierarchy. The objective is to use an XPath which is based on a "solid" name/ID, with as few as possible levels of hierarchy as the fewer levels of hierarchy, the more stable the XPath is.
The suggested XPath has an additional level, and when there are inline frames, the XPath combines the web page and iframe's XPath into one XPath, to simplify the use within Natural Screen Tester.
For example:
The Web pages standard XPath (refers to the first iframe tag in the
main document): /html/body/iframe[1].
The IFrames standard XPath (refers to the second input tag under the
first div tag, inside the iframe's document):
/html/body/div[1]/input[2].
The combined XPath used by Natural Screen Tester:
/html/body/iframe[1]/html/body/div[1]/input[2].
The Web Procedure can fail to run for a number of reasons such as an element cannot be found on the page or unexpected behavior when running JavaScripts. Some of these issues can be solved by adjusting parameters in the <NSR-installation>/config/gxconfig.xml file. Following is a list of possible problems with a recommendation as to what to do and when relevant, which parameter to configure. Below is a snipet of the code as it appears within the gxconfig.xml file.
Timeout error: When running the Web Procedure, sometimes an error message is displayed indicating that a timeout occurred, and that the procedure failed and did not run successfully. This can be for a number of reasons:
A specific element used in the procedure was not found on the page. In this case, you should try the following:
The XPath defined may not capture the correct element. Run the procedure from within the Designer and follow the output in the Console area.
Refine the XPath to make it more robust. Refer to What is an XPath?
Change the server log level to "trace" to help you understand where the problem may lie.
If you know that this element is on the page, you should try to
change the waitElementTimeout parameter and see if after extending
this time the element is found.
Required resources are not loaded on the page within a certain
amount of time. You can confirm that this is your problem by setting the
log level to "trace" and see that the
actions/web element content retrieval is performed on the previous page. Change
the navigationTimeout parameter to try and solve this.
Unexpected behavior when running JavaScript
methods: If in a scenario which relies on the execution of a
JavaScript method, the results are not as expected. Changing the
javascriptTimeout may solve this.
CSS related problem: When there is a scenario
that relies on the evaluation of CSS rules, and the results are not as
expected, setting the cssEnabled parameter to enabled may solve
this.
<MainConfiguration>
        ...
        <ServerConfiguration>
        ...
           <webProcedureConfig>
                <waitElementTimeout>30000</waitElementTimeout>
                <navigationTimeout>90000</navigationTimeout>
                <javascriptTimeout>30000</javascriptTimeout>
                <cssEnabled>false</cssEnabled>
           </webProcedureConfig>
        </ServerConfiguration>
</MainConfiguration>
Flow, Test Case and Web procedures may consist of a number of nodes. These nodes are defined by the user to perform logical operations and are arranged in the order that these operations are to be executed. Tree nodes have nested scopes, much like blocks in programming languages. Objects and values are available for mapping in the node in which they are defined and their child nodes, but not in the parent nodes.
The information in this section applies to flow, test case and web procedures and covers the following topics:
See separate sections for Flow Procedure | Test Case Procedure | Web Procedure nodes.
Used in procedures to execute a procedure and return the procedure's output. It contains a Mapper and defines Procedure Input, information about the session (for Test Case procedures and Program procedures) and Connection Properties (Program Procedures).
 To Create an Execute Procedure Node
In the Procedure editor, drag and drop the Execute Procedure node (from within the Navigation divider) to the relevant position within the procedure.
In the bottom half of the screen, select the procedure.
Map necessary inputs from the source to the target. The target includes inputs, information about the session (for Test Case procedures and Program procedures) and Connection Properties (Program Procedures) such as user ID and password).
After the node is executed, the Procedure Output element, depending on the selected Procedure Output definition, is available at the procedure scope.
In the New Object node define temporary data structure which can be used within the context. Using the mapping tool, you can map values to parameters within the node, and later use the mapper to access the values of these parameters in other nodes within the context.
To create a New Object node
In the Procedure editor, drag and drop the New Object node (from within the Assignment divider) to the relevant position within the procedure.
The object can be defined as simple attribute, array, simple structure or array of structures. Click Add attribute or Add Structure as required. Enter a name and determine whether it is an array. It is also possible to provide a default value.
This node enables you to create mappings between scope objects/variables or expression values to any output or object defined in the flow procedure's scope. Refer to using the mapper.
The Merge Array node is used to create an array of structured elements (objects) from a number of arrays of simple elements of the same size (such as inputs, or outputs from another procedure etc.). The iteration runs on one of the simple elements and therefore if the size of the arrays of all the simple elements is not the same, the results of the procedure may be lacking.
The following example will guide you through a basic example of the use of the Merge Arrays node in flow procedures. The source data is taken from three string array inputs (Name, Age and Address). The data received as a result of running the procedure will be placed in an array of a structure (in this case, a Business Entity (named Person), which includes Name, Age and Address attributes).
Create a Data Structure entity. In the Name field type Person and save the entity.
Open the entity in the Editor and add three attributes: Name, Age and Address (refer to Business Entity and Creating Business Entity Attributes). Save the Data Structure.
Create a flow procedure and add three array inputs: Name, Age and Address to the Flow Procedure node (refer to Defining Inputs and Outputs). Add an output called People. In this Output, add a structure. In the Type field select the data structure Person and select the Array check box.
In the Procedure editor, drag and drop the Merge Arrays node (from within the Assignment divider) to the relevant position within the procedure.
Click Select to select the object, where the data received as a result of running the procedure will be placed. The Modify Expression dialog box is displayed.
Double-click People to determine that the data will be mapped to the output called People. Click OK.
Click For Each Select Object to determine the input array that the procedure will run over. The Modify Expression dialog box is displayed.
Double-click In\Name to determine that the procedure will run over the array of names. Click OK.
In the bottom panel, expand In to view the list of inputs.
Click and drag In\Name to People\Name, creating a line between the two. In the same way, create a line between In\Age to Person\Age and between In\Address to Person\Address. When the procedure is run, an array of structures will be created (People).
Click Condition to filter some of the mappings. For example, to avoid mapping values from empty entities of the source arrays.
Click the Play icon in the debugger toolbar to test the procedure. Enter values for the input strings for three names, ages and addresses.
Click OK. The bottom panel displays the procedure inputs, outputs and status. The In node displays the string array data entered in the Get Flow Input dialog. The Out node displays structures of the Business Entity Person, which consists of the name, age and address of the string arrays, for all indexes in the array.
Throws an exception with the message specified by the expression.
Writes a log message specified by the expression. The expression also includes the level of the message: NORMAL, WARNING or ERROR.
The Send Mail node sends mail to the designated email addresses. Fill in the To and CC fields as well as a subject for the mail. In the From field enter the address which you would like to appear in the From field on the mail. When this field is left empty, the Default From address defined in the Server Configuration will be used.
Executes its child nodes while a specified condition is true.
Executes the child nodes for each item of the specified array that matches the condition.
Behavior depends on the relational operator:
With operator "greater than", "greater than or equal to", "less than", "less than or equal to" and one or both values are null: an exception is thrown.
With operator "equal to" or "not equal to" and one or both values are null: if result is true, the Case True (container) child node is executed, otherwise the Case False (container) child node is executed.
A Switch Screen function, depending on the switch value (the current screen), selects one of several possible cases. Each case is defined to handle one or more screens. If the current screen isn't one of the screens specifically handled in one of the cases then the default case is used. There can't be more than one case that handles a specific screen.
To create a Switch Node
In the Procedure editor, drag and drop the Switch node (from within the Workflow divider) to the relevant position within the procedure.
Click on <expr> at the bottom of the screen, to define the value of the Switch function.
To add additional cases, right-click on the Switch node and select . In the panel, click on the empty row and enter the value. Press to confirm the value. It is possible to add multiple values to a single case node enabling the same case functionality to be used for a number of values.
The Try node contains the sections of nodes that might potentially throw exceptions and the Catch node contains nodes that handle exceptions.
To create a Try/Catch Block Node
In the Procedure editor, drag and drop the Try/Catch node (from within the Workflow divider) to the relevant position within the procedure.
Right-click Try and define the nodes that are to be part of the Try Block and may potentially throw exceptions.
Right-click Catch and define the nodes that will handle the exceptions.
The Exit node is used to exit the procedure.
The Sleep node causes the procedure to pause for the defined number of milliseconds.
To create a Sleep Node
In the Procedure editor, drag and drop the Sleep node (from within the Workflow divider) to the relevant position within the procedure.
Click on the expression to determine the number of milliseconds the procedure should "sleep".
This node is typically used to create complicated customized wait conditions, where regular wait conditions cannot cover the complexity of the host behavior.
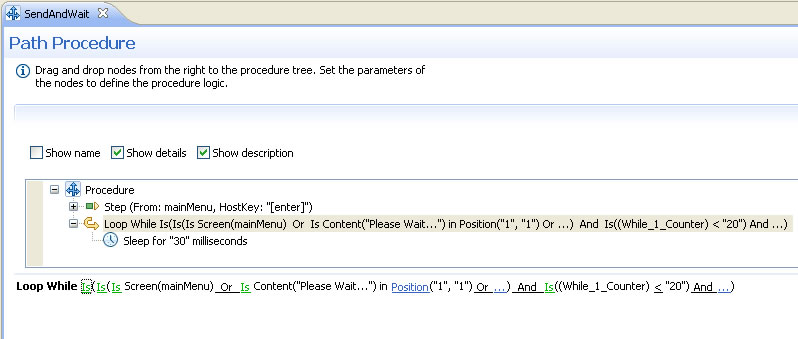
Pressing PF2 when in a screen named "mainMenu" should take us to another screen right away, however, every now and then the host displays a blank screen with a "please wait" message at the top and only after a second or so displays the desired screen.
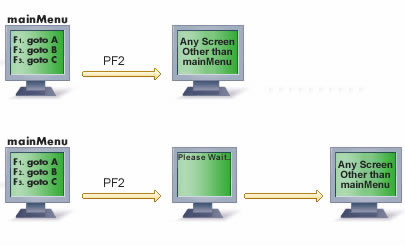
This example enables creating a Wait condition that pauses the procedure as long as the current screen is still "mainMenu" or as long as the "Please wait" message appears at the top of the screen. In addition it also prevents the procedure from hanging in an infinite loop from iterating more than 20 times. To accomplish this, a "Loop While" node with a complex condition, placing a Sleep Node inside the loop, should be used.
Used in procedures to create and initiate a new host session.
To create a create emulation session node
In the Procedure editor, drag and drop the Create Emulation Session node (from within the Session divider) to the relevant position within the procedure.
Select a connection pool from the list in order to create a new session to work with a connection of the selected connection pool. If you do not select a connection pool, a new session will be created against the host.
Refer to the Mapper for details on mapping.
Note:
The Host user name and Host password fields enable you to
establish an SSH connection. The Device name enables you to provide the host
with the relevant device name.
Once the new session is created, its session ID and device are available as outputs of the Create Emulation Session node.
Used in procedures to end an existing Natural Screen Tester Host, RPC or Database session. To create an End Session Node: in the Procedure editor, drag and drop the End Session node (from within the Session divider) to the relevant position within the procedure. Refer to the Mapper for details on mapping.
Note:
In the case of connection pools (RPC or emulation session), "end session"
does not mean closing the session. The connection returns to the pool, and further action depends on how the pool has been
configured.
See Connection Poosl in this section and
Defining Natural Screen Tester RPC Application Parameters under Developing a Natural Screen Tester Application.
This node is used in procedures to create and initiate a database session against a database in order to perform a transaction. A transaction is a number of statements, which together create a process against the database. When performing one or a number of separate, unconnected statements, use DbSelect and DbExecute, which open and close sessions independently.
To Create a DB Session Node
In the Procedure editor, drag and drop the Create Emulation DB Session node (from within the Database divider) to the relevant position within the procedure.
In the attributes area (the bottom half of the screen), select the database.
Select Automatically commit to automatically commit every execute statement as it is completed (in such a case it is not possible to rollback). If Automatically commit is not selected, you must use the commit node at the end of the transaction in order for the execute statements be saved to the database.
Executes an SQL statement that returns a single ResultSet object. Refer to DbExecute.
To create a DbSelect node
In the Procedure editor, drag and drop the DbSelect node (from within the Database divider) to the relevant position within the procedure.
In the attributes area (the bottom half of the screen), select the database.
In the SQL statement text box, write the statement that you want to execute. If the statement has parameters that should be provided at runtime, use the following syntax:
$(varName) for the variable you want to convert to
the correct SQL format during the runtime (add an apostrophe before and after
the variable).
$(!varName) for the variable that will be used "as
is" (use it for table or field names).
You will see the defined variables in the right panel of the mapper. You can map the elements from the left panel to those variables.
In the Output parameter's panel, define the fields returned by the SQL statement (the order is important).
Use the refresh button to import the output parameters directly from the database (be sure the SQL statement is valid). After the node is executed the DbSelect output element, depending on the defined output parameters, is available at the procedure scope.
Executes an SQL INSERT, UPDATE or DELETE statement.
To create a DbExecute node
In the Procedure editor, drag and drop the DbExecute node (from within the Database divider) to the relevant position within the procedure.
From the database combo box, select the Natural Screen Tester database entity.
In the SQL statement text box, write the statement you want to execute. If the statement has parameters that should be provided at runtime, use the following syntax:
$(varName) for the variable you want to convert to
the correct SQL format during the runtime (add an apostrophe before and after
the variable).
$(!varName) for the variable that will be used "as
is" (use it for table or field names).
You will see the defined variables in the right panel of the mapper. You can map the elements from the left panel to those variables.
The DbExecute RecordCount element contains either the row count for
INSERT, UPDATE or DELETE statements, or "0" for SQL statements that return
nothing.
Drops all changes made since the previous commit/rollback and releases any database locks currently held by the database session.
To create a Rollback node
In the Procedure editor, drag and drop the Rollback node (from within the Database divider) to the relevant position within the procedure.
The existing database session ID must be provided.
Ensures all changes made since the previous commit/rollback are permanent and releases any database locks currently held by the database session. The existing database session ID should be provided.
The Parallel Actions node will perform actions in parallel. The Parallel Actions node enables these actions to be performed at the same time rather than one after the other. Only certain types of nodes can be used as Parallel Actions:
Send Mail
Execute Procedure
Create Emulation Session
Create DB Session
DbSelect
DbExecute
Rollback
Commit
Create RPC Session
End Session
To create a Parallel Actions Node
In the Procedure editor, drag and drop the Parallel Actions node (from within the Workflow divider) to the relevant position within the procedure.
Right-click on the node and choose and then the relevant node.
Note:
Failure of one action in the node will cause the node, together with
all other actions, to fail. The error returned is always that of the first
child node that failed.
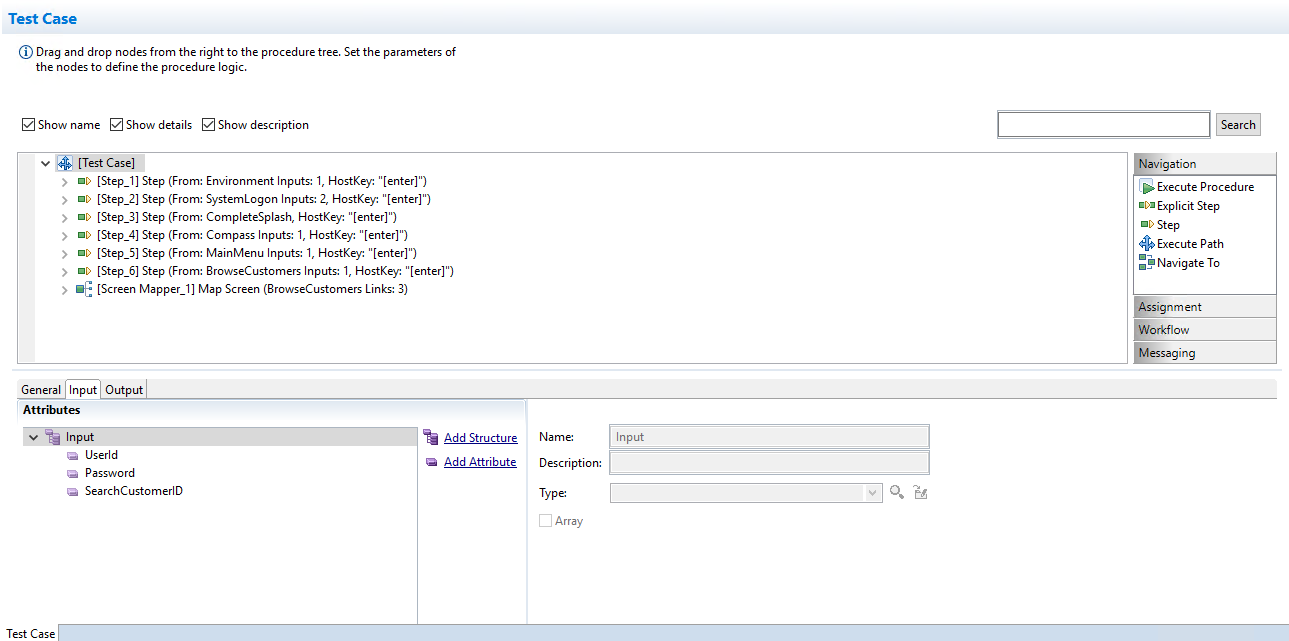
Step is the basic building block of a test case. It defines a single act of navigation between a source screen/screen group and a target screen/screen group in the host. A step defines the data to set into fields of the source screen/screen group and the key to send (Enter, PF3...). It may define "wait" expressions, to make sure the host has enough time to process the input and reach the target screen\screen group. Once the target screen/screen group is reached, it may be collected (for response) or map values from its fields to the Procedure's output structures.
To Create an Explicit Step Node
In the Procedure editor, drag and drop the Step node (from within the Navigation divider) to the relevant position within the procedure.
Select the Source screen\screen group: The Source screen\screen group selection box allows the selection of the start screen\screen group of the step. This screen\screen group is used for validation at the beginning of the step, and to build the screen's schema for the input tab. Multiple Source screens/screen groups can be defined.
The Target screen\screen group selection box allows the selection of the end screen or screens of the step. This screen\screen group is used for validation after sending data to the host, for execution of "wait for screen" expressions and to build the screen's schema for the output tab. Multiple Target screens can be defined.
The input tab uses the mapper component to map values into the source screen(s), to set the cursor, and to send host keys:
Source screens - The mapping target shows the selected source screens and their mapped fields. If the screen is unknown, no fields are available.
Cursor - The mapping target will show a Cursor node with row, column and field. Mapping is possible to either row and column or field. In order to position the cursor in a certain application field, map a string containing the field's name to the cursor. It is also possible to set the cursor position using multiple fields. Instead of just mapping the field name to the field part of the cursor schema, the string contains the required field index, for example:
"action[3]" or "action[$(index)]" where the token $(index) is mapped to another runtime value.
Send host keys - The mapping target shows a HostKeys node and default keys expression ([ENTER]). The keys expression is based on the Free Text expression, but it allows adding the key strings by selecting them from a predefined list.
Define the Wait conditions in the Wait tab: Wait conditions indicate to the Natural Screen Tester Server that a screen has fully arrived. A Wait condition is the condition by which the Natural Screen Tester Server decides that the host has finished sending screen data. The screen is then returned to the Natural Screen Tester Base Object. It uses the expression wizard mechanism to build wait conditions, whereby multiple conditions can be combined. Processing continues when all conditions are successfully met.
Click on (<wait>) to define the wait expression. To define additional wait conditions, click on <...>.
Note:
When no wait conditions are defined, there is a default timeout
of 10 seconds for each step.
Character-mode hosts (for example UNIX hosts): As character-mode hosts are character stream based and never stop sending data, it is necessary to divide the data sent to screens, by defining Wait conditions.
Define outputs: The output tab contains a Screen Mapper node for each Target screen. The mapper area displays the output schema of the screen that is selected in the Map from target screen selection box. On the other side it displays the scope elements and input schema, allowing mapping values from the current screen, to other structures. When the test case procedure is executed using the ABO, the entire screen can be added to the response using the Send to Base Object checkbox.
Enter the repeat limit: The same step may repeat itself several times. In order to avoid infinite loops it is possible to set a limit to the number of times the step may be repeated during one execution. It is recommended to set this limitation using the flow logic, though it can also be done by setting a repeat limit.
This node defines the data to set into the source screen and the key to send. It may define "wait" expressions, to make sure the host has enough time to process the input.
To create a Step node
In the Procedure editor, drag and drop the Step node (from within the Navigation divider) to the relevant position within the procedure.
Select the Source screen: The Source screen selection box allows the selection of the start screen of the step. This screen is used for validation at the beginning of the step, and to build the screen's schema for the input tab. Multiple Source screens can be defined.
Define the content of the current screen: This tab contains a Screen Mapper node for each Target screen. The mapper area displays the output schema of the screen that is selected in the "Source" selection box. On the other side it displays the scope elements and input schema, allowing mapping values from the current screen, to other structures. When the test case procedure is executed using the ABO, the entire screen can be added to the response using the "Send to Base Object" checkbox.
The input tab uses the mapper component to map values into the source screen(s), to set the cursor, and to send host keys:
Source screens - The mapping target shows the selected source screens and their mapped fields. If the screen is unknown, no fields are available.
Cursor - The mapping target will show a Cursor node with row, column and field. Mapping is possible to either row and column or field. In order to position the cursor in a certain application field, map a string containing the field's name to the cursor. It is also possible to set the cursor position using multiple fields. Instead of just mapping the field name to the field part of the cursor schema, the string contains the required field index, for example:
"action[3]" or "action[$(index)]" where the token $(index) is mapped to another runtime value.
Send host keys - The mapping target shows a HostKeys node and default keys expression ([ENTER]). The keys expression is based on the Free Text expression, but it allows adding the key strings by selecting them from a predefined list.
Define the Wait conditions in the Wait tab: Wait conditions indicate to the Natural Screen Tester Server that a screen has fully arrived. A Wait condition is the condition by which the Natural Screen Tester Server decides that the host has finished sending screen data. The screen is then returned to the Natural Screen Tester Base Object. It uses the expression wizard mechanism to build wait conditions, whereby multiple conditions can be combined. Processing continues when all conditions are successfully met.
Click on (<wait>) to define the wait expression. To define additional wait conditions, click on <...>.
Note:
When no wait conditions are defined, there is a default timeout
of 10 seconds for each step.
Character-mode hosts (for example UNIX hosts): As character-mode hosts are character stream based and never stop sending data, it is necessary to divide the data sent to screens, by defining Wait conditions.
Enter the repeat limit: The same step may repeat itself several times. In order to avoid infinite loops it is possible to set a limit to the number of times the step may be repeated during one execution. It is recommended to set this limitation using the flow logic, though it can also be done by setting a repeat limit.
This node calls another test case procedure or map. Just as in the Step node, you are required to define the source and target screens/screen groups. The mapper area shows the selected test case's input schema (screen fields and variables).
Nodes that are placed after the test case node in the same scope can access the path execution output schema using mappers.
To create an execute procedure node
In the Procedure editor, drag and drop the execute procedure node (from within the Navigation divider) to the relevant position within the procedure.
Select the procedure to execute.
Select the source and target screens/screen groups.
Map values to the fields and variables.
Properties Tab (optional). Enter the repeat limit: The same step may repeat itself several times. In order to avoid infinite loops it is possible to set a limit to the number of times the step may be repeated during one execution. It is recommended to set this limitation using the flow logic, though it can also be done by setting a repeat limit.
Use this node to use the Test Project Map to navigate to a specific screen.
To create a Navigate To node
In the Procedure editor, drag and drop the Navigate To node (from within the Navigation divider) to the relevant position within the procedure.
Select the required screen from the list of screens.
When the current screen matches the screen defined in the Screen Mapper node, the defined mappings are performed, allowing retrieving values from the host screen schema. The mapper area displays the output schema of the screen that is selected in the Map from current screen selection box. On the other side it displays the scope elements and the procedure's input schema, allowing mapping values from the current screen, to other structures. When the procedure is executed using the Natural Screen Tester Base Object, the entire screen can be added to the response using the Send to Base Object checkbox. The screen schema contains the following structures:
Cursor - the cursor structure allows reading the current screen's cursor position (row, column). In addition, if the cursor is in a field, its name can be retrieved too.
Screen Fields - the fields which are mapped to the screen are visible in the screen's schema, and their content can be retrieved using the mapper. For other field attributes, use expressions.
Host Table - when the host screen contains a host table, it is reflected in the screen schema as an array of row objects, whose simple attributes are the table's columns. The screen fields that represent the columns will also appear as separate arrays outside the table's schema, providing more flexibility when mapping.
A Switch Screen function, depending on the switch value (the current screen), selects one of several possible cases. Each case is defined to handle one or more screens. If the current screen isn't one of the screens specifically handled in one of the cases, then the default case is used. There can't be more than one case that handles a specific screen.
To create a Switch Screen node
In the Procedure editor, drag and drop the Switch Screen node (from within the Workflow divider) to the relevant position within the procedure.
To add cases, right-click on the Switch... node and choose . In the Case panel, click on Assign Screens to view a list of the screens. It is possible to select and add multiple screens.
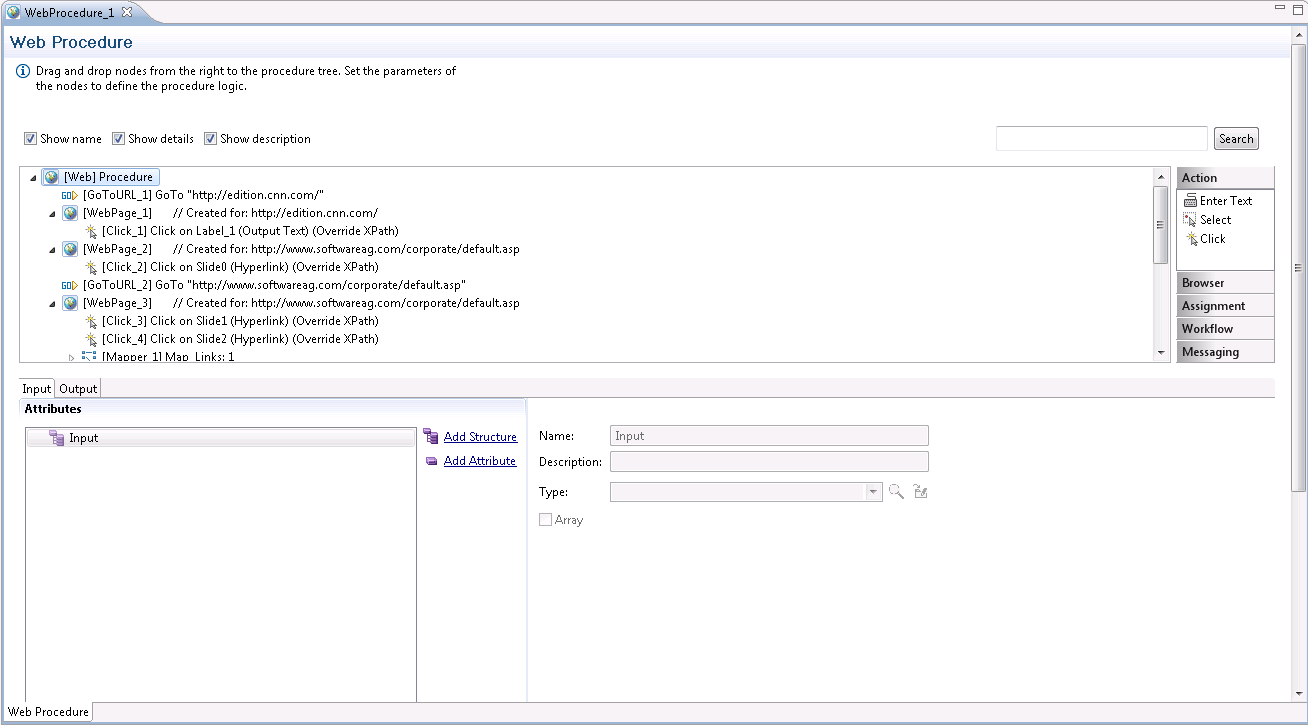
Used in the Web Procedure to navigate to a URL. This node reflects the
URL entered in the Web Procedure Recorder. In the Editor, you can add
navigation to other Web pages using this node (from within the Browser tab to
the right of the procedure). It contains the URL and can be edited by
right-clicking on the URL link and selecting Open. The URL
passes parameters to the Web page. For example, in the following URL, the
parameter country receives the value
"US":
http://www.foo.com/bar?country=us. Within the procedure
Editor, you can edit the URL as as any Free Text expression and replace the value with a token:
http://www.foo.com/bar?country=$(country). This allows
replacing the token dynamically, for example, using a Procedure Input attribute
to set the value.
For every page where an action was performed, a new Web Page node is created. This node includes all the actions performed on the page as child nodes. The child nodes of the Web Page can use all the elements on this page. When selecting the Web Page Node, you can see all the Web Elements defined in it. It is possible to add more elements to a Web Page by right-clicking on the root node of the Web Page. For each Web Element, you can copy its XPath or delete it.
This action node enables entering text within a specific input element within a Web Page. In the Editor you can add additional Enter Text nodes or edit existing ones. Note that when the action relates to an element within a list of elements, you must define an expression that specifies on which index within the list the action should be performed.
Value: The value that will be entered in this element when running the Web procedure. Click on the value link and use expressions to define the value.
Web Element: Select a web element from the list of elements of this type that have been captured in this Web Page. When editing an existing Enter Text node, you can use the override XPath option to change the element.
This action node enables selecting a specific value that will be placed in the element of a Web Page when running the procedure. In the Editor you can add additional Select nodes or edit existing ones. Note that when the action relates to an element within a list of elements, you must define an expression that specifies on which index within the list the action should be performed.
Element Type: It is possible to toggle between the element types: Check Box, Drop-Down List and Radio Buttons and change the type.
Web Element: Select a web element from the list of elements of this type that have been captured in this Web Page. When editing an existing Enter Text node, you can use the override XPath option to change the element.
Value: You can determine the value to select in this element. For drop-down lists it is possible to determine that these values will be according to according to the value, according to the index or according to name. For Radio buttons, it is possible to determine that these values will be according to index or value.
For example (in a drop-down list of countries list) :
by name: "United States" - this is what the user see in the drop-down list options
by value: "USA" - this is the value that the drop-down list will send in the form to the web server
by index: 5 - the country United States was the 5th option in the drop-down list
This action simulates clicking on an element such as a button or hyperlink in a Web Page, when running the procedure. Note that when the action relates to an element within a list of elements, you must define an expression that specifies on which index within the list the action should be performed.
Web Element: Select a web element from the list of elements of this type that have been captured in this Web Page. Once a Web Element is selected, the type of element (such as hyperlink), and the Override XPath option enabling editing the XPath, also appear in the format.
The following expressions are relevant for flow, test case and web procedures. Expressions are used in nodes and child nodes of flow procedures to compute and assign values to variables and to help control the execution flow of a procedure. The object of an expression is to perform the computation indicated by the elements of the expression and to return a value that is the result of the computation. The expression types available vary according to the node you are defining.
Standard fixed Natural Screen Tester syntax, used for these functions.
In the Free Text dialog box, type in any text and add tokens in order to use values from the context. Click . Click on the token link to define the variable. When previewing the text, line breaks are replaced with semicolons to simplify the display.
- Example
Enter text and replaceable tokens in the Free Text tab: "Your account number is - $(var)"." $(var)" being a replaceable token. Click Finish. Use expressions to define a value for the token.
Refer to Mapper
The Value Of expression returns the value of the selected object.
To define the Value Of expression
Select an item from the available scope.
Double-click to select this item as the expression's value.
Note:
When selecting an expression which has a complex input or output
structure which includes arrays, it is possible to select a specific
index.
The Count Of expression returns a count of an array item.
To define the Count Of expression
Select an array item.
Double-click to select this item as the expression's value.
The Conditional Operator expression is short-hand
for an if-else statement. The Conditional Operator returns
<expr1> if <condition> is true or returns
<expr2> if <condition> is false.
- Format
If <condition> Then <expr1> Else <expr2>- Implementation
Click on each
<expr>and define the expression.- Example
If (( In/AccountNumber ) = 23453) Then TRUE Else FALSE
Returns a string array.
- Format
StringArray (expr, ...)- Implementation
Use the
<expr>link to define the first string. To define additional strings click the "..." link.
An expression that executes a Natural Screen Tester Procedure and returns its output.
- Implementation
In the Input tab, select a procedure. Map values to the procedure's input using the mapper. In the Output tab, click the expression's output.
Now expression returns the current date and time according to the setting of your computer system's date and time.
Create Date returns a date for a specified year, month, day, hour, minutes and seconds.
- Format
CreateDate (<year> , <month> , <day> , <hour> , <minute> , <second>)- Implementation
Click the links to define the expressions for the different parts of the date/time.
- Example
CreateDate (1982 , 07 , 19 , 09 , 20 , 13)will return "1982-07-19 09:20:13:000"
To Date creates a date from a date/time string according to the given date format.
- Format
ToDate (<datestring> , <format>)- Implementation
Click the links to define the expressions for the date string and format.
- Example
ToDate (19/07/1982 , dd/MM/yyyy)will return" 1982-07-19 00:00:00:000"
Date Part extracts a part of the date (year, month, hour etc.) from a date expression.
- Format
YearOf(<date>)
MonthOf (<date>)
DayOf(<date>)
HourOf(<date>)
MinuteOf(<date>)
SecondOf(<date>)- Implementation
Select the date part: year, month, day, hour, minute or second. Click on the date expression and define the Date expression.
- Example
YearOf (Now)will return "2004"
Compare expression compares the values of two numeric or textual expressions.
Note:
When comparing two null expressions, the function will return
"false".
- Format
Is (<expr> = <expr>)
Is (<expr> > <expr>)
Is (<expr> < <expr>)
Is (<expr> >= <expr>)
Is (<expr> <= <expr>)- Implementation
Click
'Is'/'Is not'to switch between the two options. Select the required comparison operator. Click the<expr>links to edit.
An expression that applies a logical AND or OR to several boolean expressions.
- Format
Is (<expr> AND ...)
Is Not (<expr> AND ...)- Implementation
Click
'Is'/'Is not'to switch between the two options. Click the<expr>or"..."links to add expressions. Select the required boolean operator (AND or OR).
Is Null checks whether the selected object does not have an actual value during runtime.
To define the Is Null expression
Select an item from the available scope.
Click to select this item as the expression's value.
Calculate returns a calculation and may include variables and arithmetic calculations.
- Implementation
Type in the calculation formula using digits and operators. Click Finish. Click on the variable link to define an expression. A token representing this expression will appear in the calculation.
Returns the smallest value that is not less than the argument and is equal to a mathematical integer. The value is displayed in double format.
- Format
Ceil(<expr>)- Implementation
Click
<expr>to define the relevant expression.
- Example
ceil(2.645);will return "3.0"
Returns the largest value that is not greater than the argument and is equal to a mathematical integer. The value is displayed in double format.
- Format
Floor(<expr>)- Implementation
Click
<expr>to define the relevant expression.
- Example
floor(2.645);will return "2.0".
Returns the closest integer to the argument.
- Format
Round(<expr>)- Implementation
Click
<expr>to define the relevant expression.- Example
round(2.500); will return 3.
round(2.499); will return 2.
Returns the absolute value of the argument. The value is displayed in double format.
- Format
Absolute(<expr>)- Implementation
Click
<expr>to define the relevant expression.- Example
Absolute(2.300); will return 2.0.
Returns a string value containing the concatenation of two or more supplied strings.
- Format
Concat("<expr>",...)- Implementation
Use the <expr> link to define the first string. To define additional strings click the "..." link.
- Example
Concat("John", "Smith",...)will return "JohnSmith".
Trim expression returns a string containing a copy of a specified string with no leading or trailing spaces.
- Format
Trim(<expr>)- Implementation
Click the
<expr>to define the string expression to trim.- Example
Trim(" John ")will return "John".
StrIn expression returns the position of the first occurrence of one string within another.
- Format
StrIn (<string> , <substring>, <case
                                        sensitive>)
StrIn (<string> , <substring>, <case insensitive>)- Implementation
Click
<string> , <substring>to define the string in which to search and the string to search for. The expression will search for the first occurrence of the second string within the first string. Toggle between case insensitive and case sensitive to determine case sensitivity.- Example
StrIn ("Catwalk", "Cat")will return "0"
StrIn ("John", "Smith")will return" -1 "
StrIn ("Caterpillar", "pillar")will return "6"
SubString expression returns a substring that begins at a specified location, and has a specified length.
- Format
SubString (<string> , <start> , <length>)- Implementation
Click the links to define the original string, the start index and the required length of the substring.
- Example
SubString ("Caterpillar", 6, 6)will return "pillar".
Replaces either the first substring or all substrings in this string that match the given pattern, with the defined replacement.
- Format
ReplaceString( <string> , <patternToReplace> , <replacement>, <ReplaceFirst> )- Implementation
Click the links to define the original string, the regular expression pattern to be replaced, the replacement string, and whether to replace just the first substring or the whole string.
- Example
ReplaceString("elephant", "e..a", "ega")will yield the string "elegant".
Change Case expression returns a string that has been converted to a specified case (lowercase or uppercase).
- Format
ToLowerCase (<expr>)
ToUpperCase (<expr>)- Implementation
Select the relevant option to transform the expression to upper or lower case. Use the link to define the expression.
- Example
ToLowerCase ("JOHN")will return "john" .
ToUpperCase ("john")will return "JOHN".
StringLength expression returns the length of a string.
- Format
StrLen (<expr>)- Implementation
Click the
<expr>to define the string.- Example
StrLen ("John")will return "4".
Reverse expression returns the reverse of a string expression.
- Format
Reverse (<expr> )- Implementation
Click the
<expr>to define the string expression.- Example
Reverse ("caterpillar")will return "rallipretac".
FormatDate expression converts a date/time object into a date/time string, according to the given date format.
- Format
FormatDate (<date> , <format>)- Implementation
Click the links to define the expressions for the date/time object and format.
- Example
FormatDate (Now, "dd/MM/yyyy"), Now expression being the current date and time, will return "19/07/1982".
Formats a number according to the given format number.
- Format
FormatNumber( <number> , <format> )- Implementation
Click the links to define the expressions for the number and format.
- Example
For example if the number 18734573.07 is required as 18,734,573.07, use the format "#,##0.00". Refer to Number Format for further explanation about the format syntax.
Extract Number expression extracts a numeric value from a textual source number. When there is more than one number, it extracts the first number it locates. This expression may be used when needing to perform calculations on the source number.
- Format
ExtractNumber (<expr>, Decimal:dot)- Implementation
Select the relevant decimal symbol: dot or comma. The separator that you do not select will be recognized as the thousand separator and will be removed. Click the link to define the source expression.
- Example
When selecting the dot separator,
ExtractNumber
                                        ("1,000,876.321")
will return "1000876.321" When selecting the comma separator,ExtractNumber ("1.000.876,321")will return "1000876.321"
Character expression returns an ASCII or Unicode Character according to the decimal representation.
- Implementation
Insert the character's ASCII code or Unicode value.
- Example
Enter "13", the text in the Value field will display "carriage return" indicating the functionality.
The Wait expression is accessed from the Wait tab in the Step node of the test case procedure. The Wait tab lists expressions that represent the step waits. A Wait condition is the condition by which the Natural Screen Tester Server decides that the host has finished sending screen data, and returns the screen to the Natural Screen Tester Base Object. It uses the expression wizard mechanism to build wait conditions, whereby multiple conditions can be combined. Processing continues when all conditions are successfully met.
Select the Wait type and update the relevant attributes by clicking the expression links. You can use the session viewer for easy definition of strings and positions.
Waits for the host to stop sending data.
- Format
Wait for host quiet ( <timeout> , <flicker> )
- Implementation
Click <timeout> to determine the amount of time in milliseconds, that the Natural Screen Tester Server should wait for the screen to arrive. The initial need for Flicker arises when specific host screens are received 'split' between several buffers of data. Thus Natural Screen Tester Server needs to be informed to wait an additional amount of time for the complete screen to arrive. Click <flicker> to define this additional amount of time.
Waits for a specific string to be written in a specific place on the screen.
- Format
Wait for string ( <string> , <startPosition> , <endPosition> , <timeout> , <flicker> )
- Implementation
Select the Case sensitive checkbox to determine that the specific string is case sensitive. Click <string> to define the specific string. Click <startPosition> and <endPosition> to define the start position and end position that determine the boundaries of a rectangle inside which it is possible for the string to appear. The start position is mandatory, and the end position is optional. Click <timeout> to determine the amount of time in milliseconds, that the Natural Screen Tester Server should wait for the screen to arrive. The initial need for Flicker arises when specific host screens are received 'split' between several buffers of data. Thus Natural Screen Tester Server needs to be informed to wait an additional amount of time for the complete screen to arrive. Click <flicker> to define this additional amount of time.
Waits for the cursor to reach a certain position on the screen.
- Format
Wait for cursor ( <startPosition> , <endPosition> , <timeout> , <flicker> )
- Implementation
Click <startPosition> and <endPosition> to define the start position and end position that determine the boundaries of a rectangle inside which it is possible for the string to appear. The start position is mandatory, and the end position is optional. Click <timeout> to determine the amount of time in milliseconds, that the Natural Screen Tester Server should wait for the screen to arrive. The initial need for Flicker arises when specific host screens are received 'split' between several buffers of data. Thus Natural Screen Tester Server needs to be informed to wait an additional amount of time for the complete screen to arrive. Click <flicker> to define this additional amount of time.
Waits for a specific screen ID and all of the screen's identification strings to appear.
- Format
Wait for screen (<all expected screens>, <timeout> , <flicker> )
- Implementation
Click <timeout> to determine the amount of time in milliseconds, that the Natural Screen Tester Server should wait for the screen to arrive. The initial need for Flicker arises when specific host screens are received 'split' between several buffers of data. Thus Natural Screen Tester Server needs to be informed to wait an additional amount of time for the complete screen to arrive. Click <flicker> to define this additional amount of time.
Natural Screen Tester Server waits while the screen displays the string of characters. The server realizes that all the data has arrived when the string is no longer displayed on the screen.
- Format
Wait while string ( <string> , <startPosition> , <endPosition> , <timeout> , <flicker> )
- Implementation
Select the Case sensitive checkbox to determine that the specific string is case sensitive. Click <string> to define the specific string. Click <startPosition> and <endPosition> to define the start position and end position that determine the boundaries of a rectangle inside which it is possible for the string to appear. The start position is mandatory, and the end position is optional. Click <timeout> to determine the amount of time in milliseconds, that the Natural Screen Tester Server should wait for the screen to arrive. The initial need for Flicker arises when specific host screens are received 'split' between several buffers of data. Thus Natural Screen Tester Server needs to be informed to wait an additional amount of time for the complete screen to arrive. Click <flicker> to define this additional amount of time.
Natural Screen Tester Server waits while the screen displays the cursor in a particular position. The server realizes that all the data has arrived when the cursor is no longer displayed on the screen.
- Format
Wait while cursor ( <startPosition> , <endPosition> , <timeout> , <flicker> )
- Implementation
Click <startPosition> and <endPosition> to define the start position and end position that determine the boundaries of a rectangle inside which it is possible for the string to appear. The start position is mandatory, and the end position is optional. Click <timeout> to determine the amount of time in milliseconds, that the Natural Screen Tester Server should wait for the screen to arrive. The initial need for Flicker arises when specific host screens are received 'split' between several buffers of data. Thus Natural Screen Tester Server needs to be informed to wait an additional amount of time for the complete screen to arrive. Click <flicker> to define this additional amount of time.
The Natural Screen Tester Server waits while the screen is displayed. The server realizes that all the data has arrived when one of the screen's identification strings are no longer displayed.
- Format
Wait while screen ( <timeout> , <flicker> )
- Implementation
Click <timeout> to determine the amount of time in milliseconds, that the Natural Screen Tester Server should wait for the screen to arrive. The initial need for Flicker arises when specific host screens are received 'split' between several buffers of data. Thus Natural Screen Tester Server needs to be informed to wait an additional amount of time for the complete screen to arrive. Click <flicker> to define this additional amount of time.
Wait while dynamic string ( <startPosition> , <endPosition> , <timeout> , <flicker> )
- Implementation
Click <startPosition> and <endPosition> to define the start position and end position that determine the boundaries of a rectangle inside which it is possible for the dynamic string to appear. The start position is mandatory, and the end position is optional. Click <timeout> to determine the amount of time in milliseconds, that the Natural Screen Tester Server should wait for the screen to arrive. The initial need for Flicker arises when specific host screens are received 'split' between several buffers of data. Thus Natural Screen Tester Server needs to be informed to wait an additional amount of time for the complete screen to arrive. Click <flicker> to define this additional amount of time.
Checks whether the selected screen matches the current host screen.
- Implementation
Select a screen to test.
Boolean test of a selected attribute in the current screen/screen group, according to position or field.
- Format
Is/Is not <Field Attribute> in Position (row,
                                        column)
Is/Is not <Field Attribute> in Field(<select field>)- Implementation
Click Is/Is not to define the condition.
Select an attribute: protected, hidden, intensified, reversed video, background color, foreground color, content, blinking or underlined.
Select whether to retrieve the attribute of a specific position (specify the row and column) or field (select a field).
Checks whether a certain text is within a defined rectangle or field in the current screen/screen group.
- Format
Is/Is not Content(text) in Rectangle(Start Position:(row,
                                        column), End Position: (row, column))
Is/Is not Content(text) in Position((row, column) (length))
Is/Is not Content(text) in Field(<select field>)- Implementation
Click Is/Is not to define the condition.
Click on
<text>to define the relevant text.Select whether the text is in a
rectangle (specify the start and end row and column)
specific position (specify the row, column and - optionally - length of the string)
Note:
If length is not specified, the default value is 1, so we recommend you provide a meaningful value.field (select a field)
Determines whether the current screen is a member of a specific Screen Group.
- Format
Is/Is not Screen member of (Screen Group).- Implementation
Select the relevant Screen Group.
Click Is/Is not to define the condition.
A free text editor that allows selecting host key constants.
- Implementation
Select a host key and then add tokens to use values from the context. Use replaceable tokens, using the Natural Screen Tester format
$(<Replaceable Token Name>). Click . Map the host key expression to the relevant output.- Example
Enter text and replaceable tokens:" Your account number is - $(number)".
$(number)being a replaceable token.
A row and column structure that defines a specific position.
- Format
Position( <row> , <column> )- Implementation
Define the position by clicking the row and column expressions.
Returns the name of the current host screen.
Returns the attributes of a position or field in the current screen/screen group.
- Format
Get Attributes from Position(row, column)
Get Attributes from Field (<select field>)- Implementation
Select whether to retrieve attributes from a specific position (specify the row and column) or field (select a field).
The attributes that are retrieved are:
Content - the content of the specific position (according to the defined length), or field.
isProtected - True when protected, and False when unprotected.
isIntensified - True when intensified, and False when not intensified.
isHidden - True when hidden, and False when not hidden.
isReversedVideo - True when reversed video, and False when not reversed video.
isBlinking - True when blinking, and False when not blinking.
isUnderlined - True when underlined, and False when not underlined.
backgroundColor - returns the background color code and name (see list below).
foregroundColor - returns the foreground color code and name (see list below).
| Color | Code # | Color | Code # | |
|---|---|---|---|---|
| None | -1 | Gray | 8 | |
| Black | 0 | Light blue | 9 | |
| Blue | 1 | Light green | 10 | |
| Green | 2 | Light aqua | 11 | |
| Aqua | 3 | Light red | 12 | |
| Red | 4 | Light purple | 13 | |
| Purple | 5 | Yellow | 14 | |
| Brown | 6 | Light white | 15 | |
| White | 7 |
Note:
These color codes are consistent with the codes that the Base
Object fields return.
Enables retrieving the following screen properties:
The row, column and/or field where the cursor is positioned.
The width and height of the screen.
Indication whether the screen is a window or not.
Retrieves the window title.
Retrieves the screen content as an array, where each index in the array is a row of the screen. Determine whether to retrieve the window content only or the whole screen.
- Format
Get Screen Buffer(onlyWindowBuffer)- Implementation
Click onlyWindowBuffer to define a boolean expression which will determine whether to retrieve just the window content or the whole screen.
Returns text from the current screen/screen group according to a position or field.
- Format
Get Screen Content from Position(row, column)
Get Screen Content from Field (<select field>)- Implementation
Select whether to retrieve text from a specific position (specify the row and column) or field (select a field).
Finds the index of the first occurrence, within a multiple field, that matches a specified criteria. Select the relevant multiple field and the type of attribute to search for, and then define the criteria.
- Format
Find the index where(Is/Is not <field attribute>(<comparison type> <text>) in Field (<select field>))- Implementation
Click Is/Is not to define the condition.
Select an attribute: protected, hidden, intensified, reversed video, background color, foreground color, content (define whether it is exact text or whether the field contains the text), blinking or underlined. According to the selected attribute, you may be required to determine further search parameters such as colors, the specific screen content etc.)
Select the relevant multiple field.
Returns the number of instances of a multiple field in the current screen\screen group.
- Format
Count of Field(<select field>)- Implementation
Click on select field. Select a specific screen\screen group and then select a field from the list of fields.
Boolean test of a selected XPath in the current page. This function does not wait for all the elements of the page to be loaded and is carried out straight away.
- Format
Is/Is not Web Element (<XPath>) exists- Implementation
Click Is/Is not to define the condition.
Click the XPath to open the Free Text dialog box and enter the XPath (you can copy-paste the XPath of an existing element by right-clicking an element and selecting Copy XPath to Clipboard).
Returns the content of the element according to the selected XPath. If the element is not found after a certain amount of time (by default 30 seconds), this expression will timeout. This time can be changed in the <Natural Screen Tester installation>/config/gxconfig.xml file:
<MainConfiguration>
   ...
    <ServerConfiguration>
      ...
         <webProcedureConfig>
              <waitElementTimeout>30000</waitElementTimeout>
         </webProcedureConfig>
    </ServerConfiguration>
</MainConfiguration>
- Format
Get Content from Web Element (<XPath>)- Implementation
Select the XPath from which to retrieve the content.
Double-click on the relevant Program Procedure from within the Repository. The Editor area displays the Procedure Program.
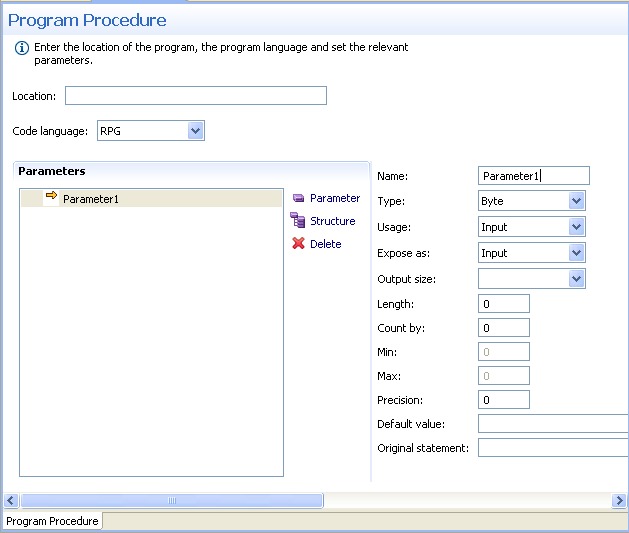
- Location
Fully qualified path of program in the host file system.
- Code language
RPG or COBOL.
- Name
Name of parameter
- Type
Data type of parameter
- Usage
Select the parameter usage: input, output, or input/output.
- Expose as
Select which parameters are exposed to the end user. By default, a parameter is exposed according to its usage (input, output, etc.)
- Length
Enter the parameter's length.
For RPG use only: You may either type a number or select from the drop-down list a reference to another numeric parameter.
- Output size (optional)
For RPG use only: If the output size for this parameter is different from its length (array etc.), enter the expected output size. You may either type a number or select from the drop-down list a reference to another numeric parameter.
- Count by (optional)
If this parameter is an array, enter the number of members in this array. Either type a number or select from the drop-down list a reference to another numeric parameter for dynamic arrays. For dynamic arrays you may also specify the minimum or maximum array boundaries.
- Default value (optional)
Enter a default value for this parameter.
- Precision (optional)
For numeric parameters, enter the number of digits that follow the decimal point.
- Original Statement (optional)
If imported by the program wizard, this box will display the original statement from the program's source file for this parameter.