
This section covers the following topics:
Each Super Natural user has a user ID and a user profile. User profiles consist of settings for options, files, profile and layout. These settings influence the appearance of screens, and many technical details concerning the environment, output and processing of transactions.
You can adapt the settings for each user of Super
Natural to suit his or her individual requirements. You can
either use the settings in the default user profile
******* or change each setting individually. You
can also change all users at once.
Note:
A user must be authorized to use at least one library.
You can perform the following commands on the object user:
| ADD | MODIFY | COPY | DELETE | IMPORT | MULTIMOD | |
| User | X | X | X | X | X | X |
Software AG supplies a default user profile with the user ID
******* with Super
Natural (known as global options in previous versions). When you
define a user, the default user profile of user
******* is copied to the user ID you have
specified.
You cannot delete the default user.
You can modify the default user *******
supplied by Software AG to suit the needs at your site.
When you add or import the next user, any modifications you have made
to the options and file list of the default user are copied to the user ID you
have specified. The standard profile and layout settings provided by Software
AG are always copied to new users created with the
Add or Import functions.
When you create a new user by copying the default user, any modifications you have made to the default user's profile and layout are copied to the user ID you have specified in addition to the modified options and file list.
The Super Natural user profile settings are organized into four groups of equal status as shown in the following diagram:

 To obtain a list of users currently defined to Super
Natural
To obtain a list of users currently defined to Super
Natural
Issue the USER command.
Or:
Select the object User from the Administration Menu.
The User List screen appears:
 13:57                      ***** Super Natural *****                 1999-05-21
                                  - User List -                            SNMUL
                                                                   More:     +
             Cmd  User ID  Files  Maintenance
                  *______
              __  *******      1       N
              __  A            1       N
              __  AA           1       N
              __  AA1         17       N
              __  AA2         17       N
              __  AA3         17       Y
              __  AA4         18       N
              __  AA5         17       N
              __  AA6         17       N
              __  AA7         17       N
              __  AA8         16       N
              __  AA9         15       N
              __  AA91        16       N
             Add  _______
 Cmd(s): Add, Modify, Copy, Delete
 Select one command from list
 Command ===>
 Enter-PF1---PF2---PF3---PF4---PF5---PF6---PF7---PF8---PF9---PF10--PF11--PF12---
       Help        Exit              Flip        +                       Canc
|
The User List screen shows the following:
List of the users defined to Super Natural.
The number of files each user can access.
Whether each user is authorized as an administrator.
Before you can add a user, you must decide which user ID to give him. The user IDs you can allocate depend on whether you are running Super Natural under Natural Security or not.
To use Super Natural with
Natural Security
Use the user's Natural Security logon ID.
You cannot override this.
Note:
If you import a user whose Natural
Security logon ID is longer than 7 characters, it is
truncated.
To run Super Natural without
Natural Security
Use the user's TP monitor user ID.
Or:
Use another ID of up to 7 non-blank characters.
In this case, a screen appears which asks you to enter an ID valid only for Super Natural. User IDs created like this are not password-protected. Each time the user accesses Super Natural, a logon screen appears where he must enter his Super Natural user ID.
To add a user
Issue the ADD USER
user-ID command.
Where user-ID is the ID of the new user.
The default user ******* is copied to
the user ID you specified and the Modify User
>Options screen appears. You can now modify the default user
settings for the user you have created. For further information, see
Modifying Single
Users.
Note:
Natural Security users can also use the
Import User function to define users to
Super Natural.
To modify a user
Issue the MODIFY USER
name command.
The Modify User >Options screen appears:
 17:23                      ***** Super Natural *****                 2000-06-16
 POR                      - Modify User POR >Options -                    SRMUMO


              _  Maintenance Authorization / Language / Prefixes

              _  Sizes / Numbers / User Files

              _  Database Access
              _  Database Access and JCL

              _  Data Maintenance Transaction Type / Data Selection
              _  Report Type / Report Level
              _  Report Destination / Run Mode / Batch Job Entry

              _  Service Generation Options
              _  Display Options


 >Files    >Profile  >Layout
 Mark function(s) or select by cursor
 Command ===>
 Enter-PF1---PF2---PF3---PF4---PF5---PF6---PF7---PF8---PF9---PF10--PF11--PF12---
       Help        Exit              Flip                                Canc
4A¦ 22,015 |
You can either modify the user options or select one of the following
setting groups using > Navigation:
File
Profile
Layout
Note:
For information on navigating between profile setting groups, see
Navigating Between Profile Setting
Groups.
To modify a user default setting
Overtype it.
Press Enter.
Note:
Users must restart their Super Natural
sessions before your modifications are valid. Your modifications are valid for
all new transactions but not for existing ones.
When you choose >Options, the
Modify User >Options screen appears.
To modify user options
Mark the group(s) of options you want to modify.
Press Enter.
Overtype existing entries as required.
Press Enter.
You can modify the following user options:
Note:
Options which the user can modify her or himself are marked with an
asterisk (*) in the following list.
| Option | Description | |
|---|---|---|
|
|
||
| Authorized for Maintenance | "Y" indicates that the user will be a Super Natural administrator. "N" indicates that the user will not be a Super Natural administrator. Default value = N. | |
| Language Code* | Indicates the language to be used for error messages, text constants, screens, help texts and commands. For example," 1" indicates English and "2" indicates German Default value = 1 . If Super Natural is available in one language only, the Language Code setting in all user profiles must indicate this language. | |
| Private Library | Prefix: Super Natural assigns a prefix to the ID of each private library. If you leave the prefix blank, the user will have no private library and will be offered a choice of the public or common libraries he is authorized to use when he logs on to Super Natural. If he is not authorized to use any public libraries, the user can choose which common library he wants to access. Default value = Y. You cannot assign the same default prefix to private and public libraries. | |
| Public Libraries | Prefix: Super Natural assigns a prefix to the ID of each public library. If you leave the prefix blank, the user will not be authorized to use public libraries. Default value = Z. | |
| Common Libraries | Prefix: The common library prefix
is assigned in SPPARM when Super
Natural is installed and cannot be modified here. Default value =
C (non-modifiable).
|
|
| Transaction Programs | Prefix: Super Natural assigns a prefix to the ID of each transaction program. Default value = I. Max. Numbers: The maximum number of transactions permitted within a private library. Default value = 999. | |
| Layouts | Prefix: Each
transaction has a layout member with the name layout-prefix transaction-name.
The layout member is in copy code. The layout prefix is assigned in
SPPARM when Super Natural is
installed and cannot be modified here. Default value = L
(non-modifiable).
|
|
| Prototype Programs | Prefix: Super Natural assigns a prefix to the ID of each prototype program. Default value = X. Max. Numbers: The maximum number of prototype programs permitted within a user library. Default value = 35. | |
| Application Programs | Prefix: Super Natural assigns a prefix to the ID of each application program. Default value = A. Max. Numbers: The maximum number of application programs permitted within a user library. Default value = 35. Other Applications access If you leave the program prefix for applications blank, users are not able to access Application Programs. Therefore there is no entry Application Programs on the Menu. | |
| Data Models | Prefix: Super Natural assigns a prefix to the ID of each data model. Default value = M. Max. Numbers: The maximum number of data models permitted within a user library. Default value = 35. | |
| Option | Description | |
|---|---|---|
|
|
||
| Online Screen Size* | Determines the screen size to be used when producing reports using Online Run mode. Depth: The number of lines. Default value = 24. The depth may not exceed the physical screen size of the terminal. Width: The width must exceed the display field length by at least 1. | |
| Printer Page Size* | Determines the page
size to be used when producing reports using Run Mode BATCH or Destination PRINTER. Depth: The number of lines.
Default value = 60. The depth may not exceed the physical page size of the
batch printer. Width: The number of characters per line.
Minimum value = 80. Maximum value = 250. Default value = 132. The width must
exceed the display field length by at least 1.
|
|
| Logical Printer Number* | Number of the
printer to be used for report/logging destination PRINTER. There are separate
settings for ONLINE and BATCH Run Mode.
|
|
| Work File Number* | Read: Work file number from which
data is to be received in data selection mode WORK
FILE. "Write:" Work file number to which data
is to be sent with report destination WORK
FILE.
|
|
| Personal Computer Number* | Read: Personal computer number from
which data is to be received in data selection mode PC. "Write:" Personal computer
number to which data is to be sent with report destination PC.
|
|
| User File Adabas Database ID | Database ID (DBID) of the physical Adabas file to be used as the Super Natural personal database for user files. For Natural Version 2.2 or Version 2.3 under Adabas Version 5, the range is 0 - 254. For Natural Version 2.3 under Adabas Version 6 the range is 0 - 65535. Default value = zero. Do not enter a database ID if you think you may want to change it in the future. You cannot change the database ID for existing transactions! | |
| User File Adabas File Number | File number (FNR) of the physical Adabas file to be used as the Super Natural personal database for user files. For Natural Version 2.2 or Version 2.3 under Adabas Version 5, the range is 1 - 255. For Natural Version 2.3 under Adabas Version 6 the range is 1 - 5000. The value zero indicates that no user file is defined for the current user. | |
| User File DDM Prefix | Super Natural assigns a prefix to the name of each file created by a user. Default value = UF. | |
| Maximum Number of User Files | The maximum number of user files permitted per user. Default value = 255. | |
| User File Retention Period | Time limit for user files in years, months and days. User files are deleted when they have existed for the time specified in this option. Default value = blank (no time limit defined). | |
| Option | Description | |
|---|---|---|
|
|
||
| Multi-File Transaction Allowed | "Y" indicates that multiple-file transactions are allowed. "N" indicates that multiple-file transactions are not allowed. Default value = N. | |
| Physical Read Allowed | "Y" indicates that a physical read of an entire file is allowed if required by the transaction's selection criteria in Online Run mode. "N" indicates that a physical read of an entire file is not allowed. There are separate settings for Online and Batch Run mode. Default value = Y. This option must be set to "N" for DL/ I files. | |
| Non-Descriptor Criteria Allowed | "Y" indicates that a transaction may use selection criteria that contain non-descriptors, i.e., fields that have not been defined as key fields. "N" indicates that the transaction may only use selection criteria comprised of key fields. There are separate settings for Online and Batch Run mode. Default value = Y. | |
| Maximum Number of Criteria | The maximum number of criteria permitted within a transaction. There are separate settings for online and batch run mode. Default value = 99. | |
| Display Values For Key Fields Allowed | "Y" indicates that the user can use the Values for Key Fields functions which is available from the Information column of the Worksheet. "N" indicates that the user may not use the Values for Key Fields function. Default value = N. | |
| Processing Sequence* | Used to control the order in which the following are processed: File look-up (F), Calculations (C), Logical conditions (L), inter-field Arithmetic (A), external Sort (S) and Updating records (U) during transaction processing. Default sequence = FCLASU. | |
| Flatten Repeating Fields* | Specifies when
the individual occurrences of multiple-valuefields or fields contained in a
periodic group should be presented as individual records when changing data for
a report or updating data." B" indicates flattening before
processing: When you run a data maintenance or data change transaction using
this option, Super Natural displays a flattened version of the selected data
for editing. The occurrences of periodic groups are presented one at a time as
individual records which you can update or change. Once you have updated or
changed a record, you are shown how it will be output (still in flattened form)
before moving on to the next record. "A" indicates
flattening after processing (only available for data change): when you run a
data maintenance or data change transaction using this option,
Super Natural displays a continuous list of the
selected data for editing. All occurrences are numbered. Once you have updated
or changed a record, you are shown how it will be output before moving on to
the next record The data is flattened and each occurrence is displayed as a
separate record. "blank" indicates that no flattening is
to be performed: when you run a data maintenance or data change transaction
using this option, Super Natural displays a
continuous list of the selected data for editing as for flattening after
processing. Once you have updated or changed a record, you are shown how it
will be output before moving on to the next record. The data is not flattened.
Default value = blank.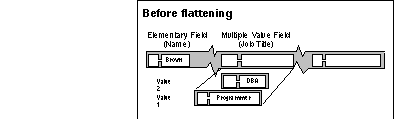 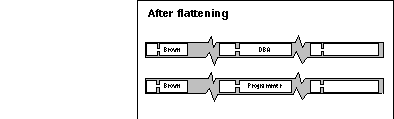 |
|
System Functions per Outer
Loop* |
Defines the evaluation of system functions used for control break processing when two files have been linked for the transaction. "Y" indicates that system functions are to be evaluated for all records found in the primary file (outer loop). "N" indicates that system functions are to be evaluated for all records found in the secondary file (inner loop). Default value = N. The above is only relevant if two files are linked via the File Selection screen. If more than two files are linked via the Lookup function (1:n), system functions are processed per outer loop. | |
| Adabas Sorting Allowed | "Y" indicates that the Adabas internal sort feature may be used for a transaction that contains sort criteria comprised of one to three key fields. "N" indicates that the Adabas internal sort feature may not be used. Default value = Y. There are separate settings for online and batch run mode. This option must be set to "N "for DL/ I files. | |
| Buffer/External Sorting Allowed | "Y" indicates that a buffer or external sort feature may be used. "N" indicates that a buffer or external sort feature may not be used. Default value = Y. This option allows separate settings for online and batch run mode. | |
| Option | Description | |
|---|---|---|
|
|
||
| DDM Checking on Modify | "Y" indicates that each time a Super Natural transaction is modified, a check is made to see if the transaction is still consistent with the data definition module (DDM) for the file or files involved. A warning is issued when a user modifies a transaction if the DDM has been changed." N" indicates that no check is to be made. Any changes made to the DDM since the transaction was created/last modified are ignored. The default is N. | |
| Maximum Number of Records | The maximum
number of records that may be processed for a transaction. If you leave this
setting blank, Super Natural will not enforce any
limit on the number of records processed. This option allows separate settings
for online and batch run mode. Default value = 999999. Users can reduce the
maximum number of records to be read for test purposes by changing the
transaction option Number of Records to be Read using the
OPTIONS command for each transaction separately.
|
|
| Maximum Report Pages | The maximum number of pages permitted for a transaction report. This option allows separate settings for online and batch run mode. Default value = 9999. | |
| Adabas Password | If an Adabas file which is security protected is to be available to Super Natural transactions, the password for the file must be provided. See the Adabas Security documentation for additional information on Adabas security. | |
| Adabas Cipher Code | If an Adabas file which is ciphered is to be available to Super Natural transactions, the cipher code for the file must be provided. See the Adabas Security documentation for additional information on Adabas ciphering. | |
| JCL ID | Any user-given name. By default, each JCL/JCS member is stored in the library ZJCL. Default value = JCL01. | |
The following groups of settings concern the user's transaction modes for data maintenance and for reporting:
Data Maintenance Transaction Type / Data Selection
Data Change / Report Type / Report Level
Report Destination / Run Mode / Batch Job Entry
To authorize the user to use a mode
Enter "Y" next to the entry.
To prevent the user from using a transaction type
Enter" N" next to the transaction type entry.
To define the user's default for each group of transaction
modes
Enter the corresponding character in the Default field.
Note:
The data maintenance functions are intended for use on user files
only, not on production or live data.
| Transaction Mode | Description | |
|---|---|---|
|
|
||
| Reporting (I) | Allows the user to execute reporting transactions. | |
| Add Records (A) | Allows the user to add records to a file (corporate file or user file) provided the corresponding authorization level has been assigned for the file to be used. | |
| Update Records (U) | Allows the user to update records in a file (corporate file or user file) provided the corresponding authorization level has been assigned for the file to be used. | |
| Delete Records (D) | Allows the user to delete records from a file (corporate file or user file) provided the corresponding authorization level has been assigned for the file to be used. | |
| Edit Data (E) | Allows the user to use the data editor for updating records. Default mode setting = I. | |
| Transaction Mode | Description | |
|---|---|---|
|
|
||
| Full-Screen (F) | The user can enter selection criteria using the Selection Editor. | |
| SQL Select (S) | Users of DB2 and SQL/DS can
access the SQL SELECT Editor to write SQL SELECT statements. Super
Natural does not check whether Natural DB2 is installed. If
Natural DB2 is not installed, the user can still access the SQL SELECT Editor
and write SELECT statements. However, when you
CHECK, RUN or
SAVE the transaction a
Natural syntax error occurs (even if the syntax
would be correct for SQL).
|
|
| Data from Work File (W) | Allows the user to read data from a work file. | |
| Data from PC File (P) | Allows the user to read data from a PC file. Default mode setting = F. | |
| Transaction Mode | Description | |
|---|---|---|
|
|
||
| Map (M) | The user can use an automatically generated map to change data for a report. Data stored in the file or database is not affected by this change mode. For example, the user can use this mode to modify data before sending it to a user file or a printer. | |
| None (N) | Data may not be changed for a report. Default mode setting = N. | |
| Transaction Mode | Description | |
|---|---|---|
|
|
||
| List (L) | Report data is displayed with a title (optional) and column headers. | |
| Vertical List (V) | The report is displayed vertically (one or more pages per record). | |
| Table (T) | The report is displayed in tabular form. | |
| CON-NECT (C) | The report is processed by Con-nect. Default mode setting = L. | |
| Transaction Mode | Description | |
|---|---|---|
|
|
||
| Detail (D) | "Y" indicates that all output is desired. | |
| Summary (S) | "Y" indicates that only the information that results from a control break is shown in the report. If no system functions are defined at control breaks, the records found are counted. Default mode setting = D. | |
| Transaction Mode | Description | |
|---|---|---|
|
|
||
| Data Maintenance Logging | The logging mode
for data maintenance transactions can be set to the following values: "Y" indicates that the logging option for data maintenance transactions is enabled and set to to the default value Y. "N" indicates that the logging option for data maintenance transactions is enabled and set to the default value N. "P" indicates that the logging option for data maintenance transactions is disabled and no logging can be specified by the user. "F" indicates that the logging option for data maintenance transactions is always performed. |
|
| Transaction Mode | Description | |
|---|---|---|
|
|
||
| Screen (S) | Display on the user's screen. | |
| Printer (P) | Report data is routed to a printer. Output may be routed to a printer only if Com-plete or Natural Advanced Facilities is installed at the user site. Output may be routed to a PC only if Entire Connection is installed at the user site. | |
| Editor (E) | Report data is written to a Natural editor source program work area. Once the output has been placed in the source program work area, the Natural editor is invoked and may then be used to edit and, if desired, to save the output in a Natural library. "Y" indicates that destination EDITOR is available. "N" indicates that destination EDITOR is not available. Default mode = N. If the EDITOR option is disabled, the user may not generate prototype programs. | |
| Work File (W) | Report data is written to a Natural work file. If any setting other than "N" is entered, a number that represents the logical identification of the sequential work file must be defined as described in the section Setting Global Options. Be sure to check whether your environment supports the use of work files. See the Natural documentation for further information on the usage and assignment of sequential work files. | |
| PC File (F) | Report data is transferred to a Personal Computer (PC). If any setting other than "N" is entered, a number that represents the logical identification of the personal computer must be defined as described in the section Setting Global Options. This feature is only supported if Entire Connection is installed at the user site. The connection between the host and the PC must be activated by entering "%+". | |
| User File (U) | The transaction data is written to a user file, that will be generated automatically during transaction execution. The use of the user file feature is only supported if Adabas is installed at the user site. | |
| CON-NECT (C) | The report is written as a document to a Connect system folder where it can be processed using Con-nect. The use of this feature is only supported if Con-nect is installed at the user site. Default mode setting = S. | |
| Transaction Mode | Description | |
|---|---|---|
|
|
||
| Online (O) | ONLINE
run mode permits the creation and execution of transactions from an online
terminal. "Y" indicates that online mode is available.
"N" indicates that online mode is not available. The
default is Y.
|
|
| Batch (B) | BATCH run
mode may be used to submit a transaction for execution in batch mode using a
remote job entry facility. "Y" indicates that batch mode
is available." N" indicates that batch mode is not
available. Default mode setting = Y.
|
|
| Transaction Mode | Description | |
|---|---|---|
|
|
||
| RJE available | Super Natural transactions may be submitted for batch mode execution if the Natural RJE facility is available at the user site. "Y" indicates that remote job entry is available. "N" indicates that remote job entry is not available, i.e. a transaction for batch execution may be created but not submitted. Default mode setting = N. | |
| Option | Description | |
|---|---|---|
|
|
||
| Service Type | Here you can define which
service generation is allowed: "N" No service generation is allowed. "R" RPC Service is allowed. |
|
| Generation Mode | Here you can define which
generation mode is used. "C" Context: A context area is defined where all data is stored. The client reads the data side by side. Thereby the 30K limit can be exceeded. "D" Direct: All data sets are read out directly. If there are more result sets than the 30K limit allows, you receive a hint for the further data |
|
| Library Type for Service Objects | Defines
in which kind of library the service objects are stored. "S" Super Natural Library: The service object is stored in the same library as the transaction and receives the same name as the transaction but with the prefix defined for prototyping. It is not necessary to fill in the field Library Name. "N" Specific Natural Library: You have to specify the library name (in the field Library Name for type N) where the service objects are stored. Here, the service object name and the transaction name are identical. "F "Free: The user can choose the library and object name without any restrictions. |
|
Note:
Setting the library type is important to meet the requirements of
the RPC logon feature that is set on the client side. For further information
see section Create Client Side
Parameters.
| Option | Description | |
|---|---|---|
|
|
||
| Display Occurrences (MU)* | Here you can define which range of occurrences is to be displayed for a field defined as a multiple-value field. You can define a start value and an end value. Default value = 1. | |
| Display Occurrences (PE)* | The default number of occurrences to be displayed for a field contained within a periodic group. You can define a start value and an end value. Default value = 1. | |
| Suppress Empty Lines* | "Y" indicates that each empty line on a transaction report is to be suppressed." N" indicates that empty lines are not to be suppressed. Default value = N. | |
| Suppress Identical Values* | "Y" indicates that each identical line on a transaction report is to be suppressed. "N" indicates that identical lines are not to be suppressed. Default value = N. | |
| Suppress Zero Values* | "Y" indicates that a value of zero for a field is to be suppressed on the transaction report. "N" indicates that zero values are not to be suppressed. Default value = N. | |
| Suppress Numeric Sign* | "Y" indicates that the sign of a numeric field is to be suppressed on the transaction report. "N" indicates that the signs of numeric fields are not to be suppressed. Default value = N. | |
| Heading Width Override* | "Y" indicates that Super Natural may truncate headers on the transaction report if it is necessary to do so in order to prevent a line overflow condition. "N" indicates that header truncation may not be performed. If "N" is specified, a screen appears when the headers are too long where the action to be taken can be entered. Default value = N. | |
| Map Filling Character* | Characters chosen
to differentiate between alphanumeric and numeric fields in transactions
generated for adding or updating data or for reporting using the Data Change
mode MAP. Default value for alphanumeric fields = _
(underscore). Default value for numeric fields = . (period).
|
|
When you choose >Files, the
Modify User >Files screen appears:
 13:59                      ***** Super Natural *****                 1999-05-21
                           - Modify User SBE >Files -                     SRMUMF
                                                                   More:   - +
             Cmd  File Name                         Access  Password
                  *_______________________________
              __  SAG-TOURS-E-CH-PRICES               R
              __  SAG-TOURS-E-COMPANY                 R
              __  SAG-TOURS-E-CONTRACT                D
              __  SAG-TOURS-E-CRUISE                  R
              __  SAG-TOURS-E-PERSON                  R
              __  SAG-TOURS-E-YACHT                   R
              __  SUE-SUPER                           D
              __  SUE1                                D        <
              __  SUPER                               R
              __  UF-SBE-NEW                          F        <
              __  UF-SBE-SAMPLE4                      F
             Add  ________________________________  Add Multiple: _

 >Options  >Profile  >Layout
 Cmd(s): Add, Modify, Delete
 File deleted from file list
 Command ===>
 Enter-PF1---PF2---PF3---PF4---PF5---PF6---PF7---PF8---PF9---PF10--PF11--PF12---
       Help        Exit              Flip        +                       Canc
|
The Modify User Files screen displays the following:
Files which the user can access
Code for the data access level the user has for each file
Whether the user has an Adabas password for password protected files.
You use the Modify User >Files screen to link a user to (give him/her authorization to use) a file or to modify or delete existing links.
To add (link) a single file to a user
Issue the ADD
file-name command.
where file-name is the name of a file
defined to Super Natural.
To obtain a
selection list of files defined to Super Natural,
use the Add Multiple File function.
The Add/Modify Link to File window appears:
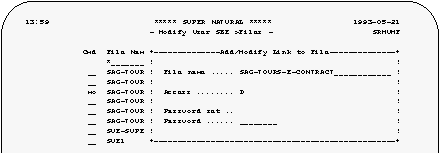
Determine the user's access level to the file by typing one of the following codes in the Access field:
| File Access Code | Description |
|---|---|
| R | Read only |
| U | Update (includes read). The user can update existing records in this file. Not available under Natural Security. |
| A | Add (includes update). The user can add new records to this file. Not available under Natural Security. |
| D | Delete (includes add). The user can delete records in this file. |
| F | If an F is entered in the Access field, the file is a user file created by the user you are modifying. All data maintenance functions are available (read, add, update and delete). For further information on user files, see User Files. |
Enter a password in the Password field (optional).
Users who do not have the same password cannot access transactions in public or common libraries created by this user using this file.
For further information on passwords, see User Profile, Option and Adabas Password Hierarchies in Technical Information.
Press Enter.
The user is now authorized to use the file at the access level specified.
To link multiple files to a user
Mark the Add Multiple Files field on the Modify User >File screen.
The Add Multiple Files window appears:
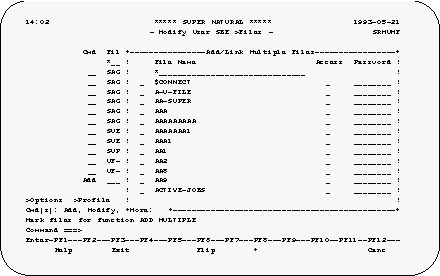
Mark each file you want to the user to be able to use.
Type in a file access code for each file.
For further information on file access codes, see Adding / Linking Single Files to a User in Users.
Type in a password for each file (optional).
Press Enter.
The user is now authorized to use the files at the access levels specified.
You can modify the access code and Adabas password for files the user is already authorized to use.
To modify entries in the file list
Issue the MODIFY
file-name command.
The Add/Modify Link to File window appears.
Modify the file access code (optional).
If the Password Set field is marked, a password is already defined for the file. You can either change or delete the password.
Type a new password in the Password field to change the current password (optional).
Or:
Type blanks in the Password field to delete
the current password (optional) and press Enter.
The user is now authorized to use the file at the access level specified.
You can delete the link from a user to a file, the access code and Adabas password for files the user is already authorized to use.
To delete a file from the file list
Issue the DELETE
file-name command.
Confirm the deletion in the window which appears.
The user is no longer authorized to the file named.
When you choose >Profile the
Modify User >Profile screen appears:
 14:02                      ***** Super Natural *****                 1999-05-21
                          - Modify User SBE >Profile -                    SRMUMP


              _  Screen Colors

              _  Screen Defaults

              _  Date/Time Formats

              _  PF-Key Settings

              _  Checklist


 >Options  >Files    >Layout
 Mark function(s) or select by cursor
 Command ===>
 Enter-PF1---PF2---PF3---PF4---PF5---PF6---PF7---PF8---PF9---PF10--PF11--PF12---
       Help        Exit              Flip                                Canc
|
The User >Profile screen is a reduced version of the Modify Profile screen in the Super Natural Processor.
Determines the user's default screen colors. On the left-hand side of the Screen Colors window there is a list of the field types and screen areas which can be colored individually with their current color code settings. The right-hand side shows a list of the colors available with their color codes.
If you mark the Mark for Default field and press Enter, you return to the default settings supplied by Software AG.
Determines the message line position. There are three choices:
ISA (above the command line)
TOP (at top of the screen)
BOT (at bottom of the screen)
Determines the position of the date, time, program name, object and day within the Super Natural header.
The Hello screen is the screen which welcomes you to Super Natural. You can choose to switch this screen off.
Determines which of the following screens appears after the Hello screen when the user enters Super Natural:
Main Menu
Transaction List screen
Prototype Program List screen
Model List screen
Spreadsheet List screen
Application List screen
User File List screen.
Determines how the date and time are displayed. You can choose to display the time either in 24 hour format e.g. 17.30 or in am/pm format e.g. 5.30 pm.
Determines the time delimiter (the character which comes between the hours and the minutes when a time is written). You can choose which character you want to use as the time delimiter.
Determines how the date is displayed. You can choose to display the date in any format you wish. The following are some examples of dates in different formats and with different delimiters:
| American | MM/DD/YY |
| European | DD/MM/YY |
| German | DD.MM.YY |
| International | YY-MM-DD |
| Date in format | YYYYMMDD |
Determines the PF key display format. You can choose
between ISA format,
SAA format and action bar format.
Determines whether the user is to use the Automatic
Checklist function by default and at which level.
When you choose >Layout, the
Profile Menu appears. You are now using the
Modify User Profile
                           user-id
part of the product
Natural Report Manager.
To specify the Layout
Mark Layout Options.
Press Enter.
The Layout Options: Screen Handling screen appears as in the following example:
 14:03                   *** Natural REPORT MANAGER ***               1999-05-21
 Layout                   - Modify User Profile SBE -                    NRMPROA
                                                                   More:     +
 Layout Options: Screen Handling

   Layout overview as default .................... X

   Layout element literals on right side ......... X

   Layout Element Sorting (Choose one)
     No sorting decided .......................... _
     Manual sorting via command .................. _
     Automatic sorting after every modification .. X

   Layout Editor Screen State (Choose one)
     Full screen without PF-Keys ................. _
     Full screen with    PF-Keys ................. X


 You are on the first page.
 Command ===>
 Enter-PF1---PF2---PF3---PF4---PF5---PF6---PF7---PF8---PF9---PF10--PF11--PF12---
       Help        Exit              Flip        +     Tech              Canc
|
You can modify the following options:
| Option | Description | |
|---|---|---|
|
|
||
| Layout overview as default | If you mark this field, the Layout Overview screen is the first screen the user will see when he invokes Natural Report Manager. If you leave this field blank, the Layout Editor (split screen) appears with all elements in the edit area. | |
| Layout element literals on right side | If you mark this field, layout element literals (the Type column) appear on the right-hand side of the Layout Editor edit area. If you leave this field blank, layout element literals (the Type column) appear on the left-hand side of the Layout Editor edit area. | |
To specify the Layout Element Sorting
Mark one of the following options:
| Option | Description | |
|---|---|---|
|
|
||
| No sorting decided | Layout elements are shown in the Layout Editor in the order they were defined. The elements appear in logical order when the report is run. | |
| Manual sorting via command | The user can
issue the SORT command to sort layout elements into
logical order in the Layout Editor.
|
|
| Automatic sorting after every modification | Layout elements are sorted into logical order in the Layout Editor when the user presses Enter. Default value: Automatic sorting. | |
To specify the Layout Editor Screen State
Mark one of the following options:
| Option | Description | |
|---|---|---|
|
|
||
| Full screen without PF keys | When the user invokes the Layout Editor full screen, the PF key line is replaced by two extra editor lines. | |
| Full screen with PF keys | When the user invokes the Layout Editor full screen, the PF key line is displayed. Default value: Full screen with PF keys. | |
When you page forwards, the following screen appears:
 14:03                   *** Natural REPORT MANAGER ***               1999-05-21
 Layout                   - Modify User Profile SBE -                    NRMPROC
                                                                   More:   -
 Layout Options: Delimiter

            Class      Attribut   Color     Delimiter
            Text____   Default_   ________  Blank
            Text____   Intens._   ________   _
            Output__   Default_   ________   (
            Output__   Intens._   ________   )
            ________   ________   ________
            ________   ________   ________
            ________   ________   ________
            ________   ________   ________
            ________   ________   ________
            ________   ________   ________
            ________   ________   ________
            ________   ________   ________


 You are on the last page.
 Command ===>
 Enter-PF1---PF2---PF3---PF4---PF5---PF6---PF7---PF8---PF9---PF10--PF11--PF12---
       Help        Exit              Flip  -           Tech              Canc
|
You can create delimiters for the user to use in the Layout Editor using the following columns.
| Column | Description | |
|---|---|---|
|
|
||
| Class | The following classes are available: Text and Output Only. | |
| Attribute | The following attributes are available: Italic/Cursive Normal (default), Intensified, Not displayed (for passwords etc.), Underlined, Reverse video, Dynamic (not available). | |
| Color | The following colors are available: Blue, Green, Neutral, Pink, Red, Turquoise, Yellow. | |
| Delimiter | Use special characters as delimiters to represent the combinations of class, attribute and colors you have specified. | |
The Modify Multiple Users function is
available from the Special Services menu. For further
information, see Modifying Multiple
Users in Special Services.
To copy a user
Issue the COPY USER source-user-id
target-user-id command.
A new user is created with the general options, file list, profile options and layout options of the source user.
To delete a user
Issue the DELETE USER
user-id command.
Confirm the deletion in the window which appears.
When Super Natural is operating under the
Natural Security system, you can use the
Import User function instead of the Add
User function to define users.
The Import User function is listed on the Special Services menu. For further information, see Importing Users in Special Services.