This section describes how to start using Super Natural.
This section covers the following topics:
A system of screens and windows guides you through Super Natural. From these screens and windows you can select object types and functions.
This documentation describes and shows Super Natural screens and windows as they are distributed by Software AG.
Some of the screens and windows shown in this documentation may look different from those you see on your terminal screen. If this is the case, your Super Natural administrator has changed your user profile. For further information on user profiles, see User Profile or ask your administrator.
The following are a few examples of differences due to user profile modifications:
The Menu is not the first screen to appear when you log on to Super Natural
Screen layout is different
Functions or options shown in the documentation are missing.
The word screen is used in this documentation for a page which a program displays on your terminal screen. Screens display information and also allow you to make entries which are then processed by Super Natural. Screens provide the basis for complex functions.
All Super Natural screens are similarly structured and can be divided into the three sections: Header, Work Area and Command Area.
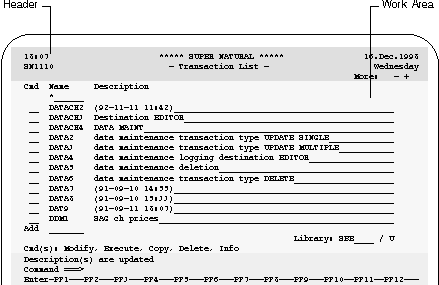
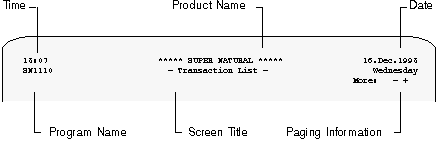
The first section of each Super Natural screen is the header. By default, the first line shows the time on the left, the product name in the center and part of the date on the right. The second line shows the title of the screen and, the program name and the rest of the date. The program name is displayed for administrative purposes only. You can change the position and contents of the items in the first two header lines. For further information, see User Profile. The third line is an information line which displays paging information when relevant.
The second section is individual to each screen. The work area is where you interact with Super Natural by making entries and receiving results. You use the work area to determine how data is processed. The following figure shows a sample work area:
 Cmd  Name     Description
      *______
  __  DATACH2  (92-11-11 11:42)____________________________________________
  __  DATACH3  Destination EDITOR__________________________________________
  __  DATACH4  DATA MAINT__________________________________________________
  __  DATA2    data maintenance transaction type UPDATE SINGLE_____________
  __  DATA3    data maintenance transaction type UPDATE MULTIPLE___________
  __  DATA4    data maintenance logging destination EDITOR_________________
  __  DATA5    data maintenance deletion___________________________________
  __  DATA6    data maintenance transaction type DELETE____________________
  __  DATA7    (91-09-10 14:55)____________________________________________
  __  DATA8    (91-09-10 15:33)____________________________________________
  __  DAT9     (91-09-11 18:07)____________________________________________
  __  DDM1     SAG ch prices_______________________________________________
 Add  _______
                                                       Library: SBE____ / U
 Cmd(s): Modify, Execute, Copy, Delete, Info
|
The third section of each Super Natural screen is the command area. The command area contains the message line, the command line and the PF key lines. You can change the position of the message and PF key lines; for further information, see User Profile.
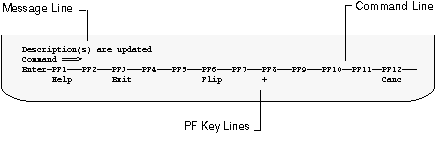
The Super Natural message line displays Super Natural system messages. There are several types of system messages:
Acknowledgements tell you when a function has been successfully or unsuccessfully performed
Error messages tell you if you have made a mistake. Error messages are identified by a four-figure number before the text.
You can enter commands and command abbreviations in the Super Natural command line.
For further information on commands, see Commands.
The PF key lines show which PF keys (program function keys) are allocated to which functions. The PF key lines only show the functions available from the screen currently displayed. PF keys are described later in this section.
You can display the PF key lines in ISA format, SAA format or as a cursor-sensitive bar by changing your user profile. For further information, see PF Key Settings in User Profile.
The ENTER key is also listed in the PF key lines and is described later in this section.
If you think of a screen as a piece of paper, a window is like a smaller piece of paper placed on top of it. Windows can also appear placed on top of each other. Windows are always relevant to the screen underneath them.
The following diagram shows the Application List screen with the Add Application window:
 11:34                      ***** Super Natural *****                11.Jan.1993
 SN1130                        - Application List -                       Monday

 Cmd  Name     Descriptio +------------------Add Application-------------------+
      *______             !                                                    !
  __  APPL1    __________ ! Application ID .... _______                        !
  __  APPL2    __________ ! Description ....... ______________________________ !
  __           __________ !                     ______________________________ !
  __           __________ ! Application name .. ________                       !
  __           __________ ! Start-up program .. MENU____                       !
  __           __________ !                                                    !
  __           __________ ! More parameters ... N (Y/N)                        !
  __           __________ ! More commands ..... N (Y/N)                        !
  __           __________ !                                                    !
  __           __________ +----------------------------------------------------+
|
The following diagram shows the Application List screen with a series of 3 open windows:
 16:41                      ***** Super Natural *****                06.Jan.1993
 SN1130                        - Application List -                    Wednesday

 Cmd  Name     Descriptio +--------------- +- +------Application Command-------+
      APPL3__             !                !  !                                !
  __           __________ ! Application ID !  ! Additional command .. ________ !
  __           __________ ! Description .. !  !                                !
  __           __________ !                !  ! More parameters ..... N        !
  __           __________ ! Application na !  ! More commands ....... N        !
  __           __________ ! Start-up progr !  !                                !
  __           __________ !                !  +--------------------------------+
  __           __________ ! More parameter !                                   !
  __           __________ ! More commands  +-----------------------------------+
  __           __________ !                                                    !
  __           __________ +----------------------------------------------------+
|
Windows offer you information or a list of options or functions to choose from. Windows do not contain the Super Natural header or command area but use the command area of the underlying screen.
There are five types of windows:
Dialog windows
Selection list windows
Message windows
Confirmation windows
Help windows
Dialog windows offer functions additional to the underlying screen. The Define Field Output window is a typical dialog window:
 11:54                      ***** Super Natural *****                11.Jan.1993
 SN3011                           - Worksheet -                           Monday

 Ref DB    Field Na +-------------------Define Field Output--------------------+
 AA  1K    YACHT-ID ! Field: YACHT-ID                                          !
 AB  1K    YACHT-NA !                                                          !
 AC  1     YACHT-BR ! Format/Length ....... N8                                 !
 AD  1K    ID-CH-BA ! Numeric sign ........ _ (Y/N)                            !
 AE  1K    ID-S-OWN ! Output length ....... 8__                                !
 AF  1K    DID-DESC !        dec. places .. _                                  !
 AG  1K    YACHT-TY ! Heading ............. ______________________________     !
 AH  1     LENGTH . !                       ______________________________     !
 AI  1     WIDTH .. !                       ______________________________     !
 AJ  1     DRAFT .. ! Edit mask                                                !
 AK  1     SAIL-SUR !   ______________________________________________________ !
 AL  1     MOTOR .. ! Suppress identical values .. _ (Y/N)                     !
 AM  1     HEAD-ROO ! Print zero values .......... _ (Y/N)                     !
 AN  1     BUNKS .. ! Occurrences (1)  ___ : ___  (2)  ___ : ___               !
                    !                                                          !
                    +----------------------------------------------------------+
|
Selection list windows show lists of objects or options which you can select or on which you can perform commands. The Field Selection List window is a typical selection list window:
 11:57                      ***** Super Natural *****                11.Jan.1993
 SN3011                           - Worksheet -                           Monday

 Ref DB    Field Name     +----------------Field Selection List----------------+
 AA  1K    YACHT-ID ..... !     Field Name                        Format  Info !
 AB  1K    YACHT-NAME ... !  _  YACHT-BRANCH                      A1      __   !
 AD  1K    ID-CH-BASE ... !  _  ID-S-OWNER                        N8      __   !
 BB  2K    ID-YACHT ..... !  _  DID-DESCRIPTION                   A8      __   !
 BV        ______________ !  _  YACHT-TYPE                        A30     __   !
 BW        ______________ !  _  LENGTH                            P3.2    __   !
 BX        *_____________ !  _  WIDTH                             P3.2    __   !
 BY        ______________ !  _  DRAFT                             P3.2    __   !
 BZ        ______________ !  _  SAIL-SURFACE                      P3      __   !
 CA        ______________ !  _  MOTOR                             P3      __   !
 CB        ______________ !  _  HEAD-ROOM                         P3.2    __   !
 CC        ______________ !  _  BUNKS                             P3      __   !
 CD        ______________ !  _  YACHT-NAME-PH                     A30     __   !
 CE        ______________ !  _  YACHT-BRANCH-SP                   A9      __   !
                          !                                                    !
                          +More:   +-------------------------------------------+
|
Message windows display Super Natural system messages. There are several types of system messages:
Acknowledgements tell you when a function has been successfully or unsuccessfully performed
Prompts tell you what to do next
Error messages tell you if an error has occurred
Warnings
Confirmation windows give you a chance to cancel functions which have important consequences such as deleting an object. Confirmation windows can also offer you alternatives to the current function.
For information on help windows, see Online Help in Using Super Natural.
There are two ways to select items from a screen or window:
![]() To select an item from a screen or window
To select an item from a screen or window
Type any non-blank character in the selection column next to the item and press Enter.
Or:
Position the cursor in the selection column next to the item and
press Enter.
Once you have marked an item or items with a non-blank character in the selection column, the cursor position is ignored.
When you are looking at object list screens, reports, list windows or at a series of windows, you need to know where you are in the list or series and to look at the pages before or after.
The third line of the Super Natural header gives you paging information for screens containing lists or information which is wider or longer than the screen (for example, reports and layouts). No paging information is shown if only the current screen of information is available. In windows, the paging information is displayed in the bottom left-hand corner of the window frame. Paging information is indicated as follows:
| Paging Information | Description |
|---|---|
| More: + | Page(s) after |
| More: -+ | Page(s) before and after |
| More: - | Last page |
| More: > | Page(s) available to the right |
| More: < | Page(s) available to the left |
Be careful not to confuse the plus sign (+) which forms the corner of each window frame on some terminals with the paging information.
The following commands are available for paging in screens and windows:
| Command | Description |
|---|---|
| + | One page forwards |
| +-+ | Go to last page |
| - | One page backwards |
| -- | Go to first page |
| > | Page to the right |
| < | Page to the left |
Note:
In the Object List Screens, you can also
position to a name, letter or character in the list using the Start
Value field. For further information, see
Object List
Screens in Starting Up.
Commands are instructions which tell Super Natural what to do with an object, invoke a screen or start a function.
If you enter an incorrect command or a command which is not available at the current location, the Command List window appears.
For a complete list of the commands available in Super Natural, see Command List.
Super Natural commands are structured as follows:
command-keyword object-type object-name
You can abbreviate commands as long as the commands remain unique. For
example the command DELETE TRANSACTION TEST can be
abbreviated as follows in the Transaction List
screen:
D TR TEST
On a screen where the commands LOCK and
LOGICS are both available, you cannot use the
abbreviation L. The shortest abbreviations possible
are as follows:
LOC
LOG
There are three ways to issue commands:
![]() To issue a command
To issue a command
Enter the command in the command line.
Or:
Enter the command abbreviation in the command column next to the
object it is to act on.
When a list of objects is displayed, the commands you can use with the object type are listed in the line above the message line (legend).
Or:
Press the PF key allocated to the command.
You can often choose which way you want to issue a command.
Note:
When a window is displayed, you can only issue the commands relevant
to the window. When an object name is the same as a command keyword, in direct
commands the object name must be preceded by the data-delimiter character. The
default data-delimiter character is #.
Example: DELETE
#JCL
![]() To list the commands available from the current screen
To list the commands available from the current screen
Enter an asterisk (*) in the command
line.
Only the commands which you can currently use are displayed. For example, when you enter an asterisk (*) in the command line of Natural Report Manager, the command list you get is different from the list you get when you enter an asterisk (*) in the command line of the Menu.
The ENTER key is listed in the PF key line. Whenever you type information in a command line or input field, you must submit it for processing by pressing the ENTER key.
If you have specified or selected functions, pressing Enter executes the functions you have selected and displays the next screen or window.
Commands can be allocated to PF keys (program function keys) so that pressing a PF key executes a particular function. The PF key allocations which are available for a particular screen are listed in the PF key lines.
For further information on the PF key lines, see Screens in UsingSuper Natural.
![]() To issue a command using a PF key
To issue a command using a PF key
Press the PF key.
You do not need to press Enter.
You can change the format and position of the PF key line by modifying your user profile. For further information on modifying your user profile, see User Profile.
Super Natural provides the following default PF key allocations in accordance with the Software AG ISA (Integrated open Software Architecture) standards. The PF keys execute the same functions on every screen where they are available.
You can invoke a help window for every screen in Super Natural by pressing PF1. For further information on the Super Natural help system, see Online Help in Using Super Natural.
The Exit function ends the function you are
performing and saves your modifications.
If you leave a transaction using the EXIT
command which hasn't yet been saved, the Exit Handling window gives you a
choice of the following:
Save and exit
Keep and exit
Exit without keeping or saving
Resume the current function
There are twenty-four PF keys, but you can only see twelve PF keys in the PF key line.
If you use the Flip function, the other
twelve PF keys are displayed.
For example, if the keys PF1 to PF12 are
displayed, the Flip function displays the keys
PF12 to PF24.
Whichever twelve keys are displayed, you can still use any of the other twelve keys which have a function allocated to them.
The Flip function is not relevant for SAA
PF key display format.
If you use the Page Backwards (-) function,
the previous screen or window of information is displayed.
If you use the Page Forwards (+) function,
the next screen or window of information is displayed.
If you have more columns in a report than you can see at one time, the
Shift Left (<) function allows you to look at
data to the left of your present screen contents.
If you have more columns in a report than you can see at one time, the
Shift Right (>) function allows you to look at
data to the right of your present screen contents.
The CANCEL function interrupts the current
function without saving. If a window is displayed, the
CANCEL command closes it and if a screen is
displayed, the CANCEL command invokes the previous
screen.
Note:
The Confirmation window does not appear and entries made since you
last saved or pressed Enter are cancelled!
The Menu function interrupts the current
function without saving and takes you back to the Menu from any point
inSuper Natural.
Note:
The Confirmation window does not appear and entries made since you
last saved or pressed Enter are cancelled!
The Top function (--) takes you to the top
or beginning of the information or list you are looking at.
The Bottom function (++) takes you to the
bottom or end of the information or list you are looking at.
The Asterisk (*) List function helps you if
you don't know which libraries, files, fields, commands or objects for a
particular command are available.
![]() To obtain a list of the libraries available
To obtain a list of the libraries available
Enter an asterisk (*) in the
Library field on a List Object
Screen.
![]() To obtain a list of the files available
To obtain a list of the files available
Enter an asterisk (*) in the
Enter File Name field in the Add
Transaction window.
![]() To obtain a list of the fields available
To obtain a list of the fields available
Enter an asterisk (*) in the
Fieldname column in the Worksheet.
![]() To obtain a list of the commands available
To obtain a list of the commands available
Enter an asterisk (*) in the command
line.
![]() To obtain a list of objects available for a particular command
To obtain a list of objects available for a particular command
Enter the command followed by a blank and an asterisk (*) in the command line.
In each case a window appears displaying a selection list of the items available.
The list of commands displayed depends on your position
within Super Natural. For example, when you enter an
asterisk (*) in the command line of Natural Report
Manager, the command list you get is different from the list you
get when you enter an asterisk (*) in the command
line of the Menu.
The Checklist function provides a
framework which guides you through adding and modifying transactions. The
Checklist window tells you which steps are available,
which are mandatory and which are optional. You choose the steps you want to
take and the Checklist function takes you from step
to step automatically. Using the Checklist function,
you only need the NEXT commands to navigate within
Super Natural.
The Checklist function is intended for users
less familiar with Super Natural. Users who are more
familiar with Super Natural can invoke the
Checklist window as a type of online help.
![]() To switch the Checklist function on
To switch the Checklist function on
Issue the PROFILE command from the Menu
or an Object List screen.
Choose Language Code and Checklist
Mark the Automatic Checklist field.
Type in "1", "2" or "3" in the On Level field.
Press Enter.
The levels for the Checklist function
determine how much guidance you are given when using the Worksheet.
| Level | Description | |
|---|---|---|
|
|
||
| 1 (Global) | The Worksheet as a whole is offered as one option. When you invoke the Worksheet, all the columns available for the transaction modes you are working with are open. | |
| 2 (Mixed) | The Worksheet as a whole is is offered as one option and each input column of the Worksheet is shown additionally as a separate option (see description for Level 3). | |
| 3 (Detailed) | Each column of the Worksheet is offered as a separate option. When you invoke the Worksheet, you can only work on the columns which you have chosen in the Checklist window. These columns are presented one at a time as separate steps. In addition, the Fieldname column and the Information column are always open. | |
![]() To switch the Checklist function off
To switch the Checklist function off
Remove the mark in the Automatic Checklist field in your user profile.
For further information, see above.
When you add or modify a transaction with the
Checklist function switched on, the
Checklist window is the first thing to appear.
The Checklist window displays a selection list of all the steps you can take in your present situation and shows which you have already taken.
The Checklist window only offers the steps which are available according to the transaction modes you are using.
The following shows an example of the
Checklist window for a reporting transaction with the
transaction modes Data Selection FULL-SCREEN and Report
Type LIST.
 18:10                      ***** Super Natural *****                18.Dec.1998
 SNZUL-S                       - Selection Editor -                       Friday

                                            +------------Checklist-------------+
       1  < AA                              !      Step                 Status !
       2  <                                 !  __  Worksheet            O.K.   !
       3  <                                 !  __  Selection            O.K.   !
       4  <                                 !  __  Calculation                 !
       5  <                                 !  __  Logic                       !
       6  <                                 !  __  Userexit                    !
       7  <                                 !  __                              !
       8  <                                 !  __                              !
       9  <                                 !  __                              !
      10  <                                 !  __                              !
      11  <                                 !  __                              !
      12  <                                 !  __                              !
      13  <                                 !  __                              !
      14  <                                 !                                  !
      15  <                                 +----------------------------------+
|
The Status column can contain the following entries:
| Status | Description | |
|---|---|---|
|
|
||
| O.K. | Step successfully completed | |
| Incomplete | Step incomplete/ incorrect | |
| No code | Step not carried out | |
You then use the Checklist window to select the step or steps you want to carry out.
![]() To select a step
To select a step
Mark it with a number or any other non-blank character.
If you number steps, the step with the lowest number is carried out first and the step with the highest number is carried out last. The steps you mark with any other non-blank character are carried out in the order they appear in the list. If you mark the steps with a mixture of numbers and non-blank characters, the numbered steps are carried out first.
![]() To take a step
To take a step
Issue the NEXT command.
When you have successfully completed a step, issue the
NEXT command to take you directly to the next step
on your list. You can also issue direct commands to continue working with the
transaction independently of the Checklist
function.
If you have completed all the steps you selected in the
Checklist window, issuing the
NEXT command invokes the
Checklist window again.
You can invoke the Checklist window at any
point when you are adding or modifying a transaction by issuing the
CHECKLIST command.
If you are not working with the Checklist
function, you can still invoke the Checklist window to
help you when you are adding or modifying transactions.
![]() To invoke the Checklist window
To invoke the Checklist window
Issue the CHECKLIST command.
The Checklist window functions as described above.
When you are adding or modifying a transaction, you can use the
Next function without invoking the
Checklist function. The
Next function takes you through a default sequence
of the steps necessary to complete the transaction and then invokes the
Checklist window for further optional processing.
As mentioned earlier in this section, Super Natural presents functions and information in screens and windows. There are several ways of moving or navigating between screens and windows in Super Natural.
There are several methods for moving forwards through Super Natural (from the beginning of a function or a series of functions to the end):
![]() To navigate forwards in Super
Natural
To navigate forwards in Super
Natural
Select a menu option.
For example, selecting the Profile option from the Menu invokes the Modify Profile screen.
Or:
Enter a command in the command line which invokes another screen or
window.
Or:
Press a PF key which invokes another screen or
window.
For example, issuing the command
PROTOTYPE from the Transaction
List screen invokes thePrototype List
screen.
You can invoke a list of the commands available at any point in
Super Natural by entering an asterisk
(*) in the command line.
Or:
Enter a command abbreviation in the work area of a screen or
window.
For example, issuing the command abbreviation
MO next to a transaction name on the
Transaction List screen invokes the Worksheet.
Or:
Use the Checklist and
Next functions.
The Checklist and
Next functions take care of navigation for you, as
described earlier in this section.
Or:
Issue a paging command.
You use paging commands to navigate within Object List screens, reports, List windows or a series of windows as described earlier in this section.
You can use commands to interrupt or end a function and return to a previous stage in processing (navigate backwards).
![]() To navigate backwards in Super
Natural
To navigate backwards in Super
Natural
Issue one of the following commands, as available:
EXIT
CANCEL
MENU
These functions are described in the section PF Keys earlier in this section.
![]() To leave a screen
To leave a screen
Use the methods for navigating forwards and backwards described in the previous sections.
Making another entry on a screen and pressing Enter results in processing and display of the results on the same screen.
![]() To leave a window
To leave a window
Type in any data required.
Press Enter.
Either the next window in the series appears or the screen from which the window was invoked reappears.
The Super Natural help text system provides you with online help from any point in Super Natural. You can either invoke help for the particular situation you are in (field help) or invoke help on general topics independent of the situation you in (general help glossary). You can also invoke help on a particular command (command help glossary).
Note:
When you are looking at online help, no further help is
available.
You can obtain information on the function of and possible input for a particular field.
![]() To invoke help for a certain field
To invoke help for a certain field
Enter a question mark (?) in it.
Many help windows and screens provide interactive help. You can select from a list of options given in the help screen and your selection is carried over onto the original screen.
You can obtain information on general topics from any point in Super Natural. The general help glossary also tells you where each topic is described in the User's Guide.
![]() To invoke the general help glossary
To invoke the general help glossary
Position the cursor in the command line and press PF1.
Or:
Issue the HELP command.
A selection window containing a list of help topics appears.
Select the topic you want information on.
A help window containing the help glossary entry appears. The window also tells you where the topic is described in the User's Guide.
You can obtain information on a particular Super Natural command by invoking the command help glossary.
The command help glossary gives the following information on the commands known to Super Natural:
A description of each command.
Where to issue each command.
You can find the command help glossary (command list) in this documentation. The shortest possible abbreviation of each command is underlined.
![]() To invoke the command information in this appendix online
To invoke the command information in this appendix online
Enter an asterisk (*) in the command
line.
The Command List window appears.
Position the cursor next to or on the command about which you want information.
Press PF1.
A help window containing the help glossary entry appears.
Super Natural stores objects in libraries. There are three types of libraries in Super Natural:
Private libraries (single-user access)
Common libraries (multiple-user access).
Public libraries (multiple-user access read only)
All libraries can contain transactions, prototype programs and application programs.
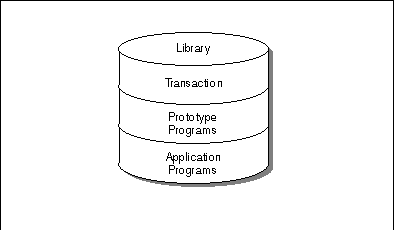
Each Super Natural user has a private library (except in special cases). When you start a Super Natural session, you enter your private library when you invoke an Object List screen or the Modify Profile screen.
Note:
If you don't have a private library, the Select
Library window appears when you log on. The window contains a
selection list of the libraries you are authorized to use.
No other user can access your private library. Your private library ID is the same as your user ID.
Common libraries are created by the Super Natural administrator for use by multiple users.
The difference between private and common libraries is that all users can access common libraries.
Note:
You cannot copy a transaction which creates a user file into a
common library.
Users can perform the following commands on objects in common libraries:
EXECUTE
MODIFY
DELETE
COPY
INFO
ADD
If you copy a transaction of Report Type CON-NECT into a common library, the Con-nect document it is linked to must be stored in a shared Connect cabinet with the same name as the common library.
When you copy a transaction into a common library, you can choose to restrict other users to executing it only.
![]() To restrict transaction access to
To restrict transaction access to EXECUTE
only
Enter the character which corresponds to H4F on your keyboard in the first position in the Description column. For example, this character might be an exclamation mark (!).
For further information, contact your administrator.
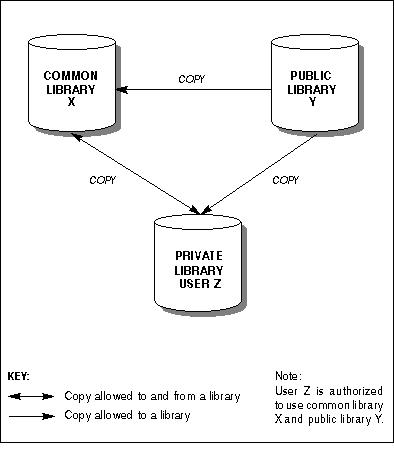
Public libraries are created by the Super Natural administrator for use by multiple users. The administrator creates the objects contained in public libraries and decides which users may access each public library.
Users have read-only access to the objects in public libraries.
Users can perform the following commands on objects in public libraries:
EXECUTE
COPY
INFO
Note:
If you want to modify an item stored in a public library, you must
first copy it into your private library.
Only the administrator can copy objects into a public library.
The following diagram shows how you can use the Copy function to copy objects between libraries of different types:
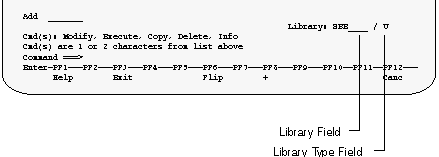
The Super Natural List Object screens contain a field named Library which displays the name of the library you are working in. By default, you work in your own private library and the field contains your user ID. Only the List User Files screen does not contain the Library field.
The field next to the Library field displays which type of library you are working in. The code "U" indicates a private library, "C" a common library and "P" a public library.
![]() To change libraries
To change libraries
Access any Super Natural List Object screen.
Type the ID of the library you want to access in the Library field.
Type the library type code of the library you want to access in the Library Type field.
Press Enter.
If you enter a library name or type which does not exist, a selection list of the libraries or library types available appears.
![]() To obtain a selection list of all the library types available
To obtain a selection list of all the library types available
Enter an asterisk (*) in the
Library Type field.
![]() To obtain a selection list of all the libraries available for the
library type displayed
To obtain a selection list of all the libraries available for the
library type displayed
Enter an asterisk (*) in the
Library field.
If you want to make notes whilst using Super Natural, you can use the notepad provided just as you would a piece of paper - the advantage is that it won't get lost!
![]() To write a note
To write a note
Issue the NOTEPAD command from any point
in Super Natural.
The following window appears:
 18:20                      ***** Super Natural *****                18.Dec.1998
 SNZUL-S                       - Selection Editor -                       Friday

                                     +-----------------Notepad-----------------+
       1  <                          !                                         !
       2  <                          ! Notepad subject: ( * to select)         !
       3  <                          !   ________________________________      !
       4  <                          ! Description:                            !
       5  <                          !   _____________________________________ !
       6  <                          !   _____________________________________ !
       7  <                          !   _____________________________________ !
       8  <                          !   _____________________________________ !
       9  <                          !   _____________________________________ !
      10  <                          !   _____________________________________ !
      11  <                          !   _____________________________________ !
      12  <                          !   _____________________________________ !
      13  <                          !   _____________________________________ !
      14  <                          !   _____________________________________ !
      15  <                          !                                         !
                                     +-----------------------------------------+

 Command ===>
 Enter-PF1---PF2---PF3---PF4---PF5---PF6---PF7---PF8---PF9---PF10--PF11--PF12---
                   Exit              Flip                                Canc
|
If you have already written notes, the note whose title is first in the alphabet is displayed.
Type in a name to identify your note in the Notepad Subject field.
Or:
Overtype the title of the note which is displayed.
Type the text of the note in the Description lines.
Or:
Overtype the text of the note which is displayed with the text of
the note you are writing.
Press Enter.
![]() To get a list of all existing notes
To get a list of all existing notes
Enter an asterisk (*) in the
title line.
A window appears displaying a selection list of the notes available.
![]() To display the note you want to see
To display the note you want to see
Mark it.
Press Enter.
![]() To delete the note displayed
To delete the note displayed
Enter X in the input field below (X to
erase).
![]() To modify the text of a note
To modify the text of a note
Type over the existing text.
Press Enter.
![]() To close the notepad
To close the notepad
Press PF8.
The last note is automatically saved.
The Technical Information function provides
you with technical information concerning your environment as in the following
example:
 18:01                      ***** Super Natural *****                18.Dec.1998
 SN1110                       - Transaction List -                        Friday
                                                                   More:     +
 Cmd  Na +------------------------Technical Information------------------------+
      *_ ! NSN Version ......... 3.0.0            Operating System .. MVS/XA   !
  __  AD ! PersonalDB-File ..... (0,90)           TP Monitor ........ COMPLETE !
  __  AS !                                        Device Type ....... PC       !
  __  AU ! NATURAL Version ..... 2.2.4                                         !
  __  CH ! PREDICT Version ..... 3.2.0            AOS Version ....... 2.2.2    !
  __  CO ! CON-NECT Version .... 0.0.0            NSC Version ....... 0.0.0    !
  __  CO !                                                                     !
  __  CO ! Buffer Sizes:   Esize ..  35 k  DATsize ... 45 k  Usize .. 31 k     !
  __  CO !                 Fsize ..  20 k  SORTsize .. 10 k  Csize ..  1 k     !
  __  CO !                                                                     !
  __  CO ! Last Error Number ... 1101                                          !
  __  DA ! Last Error Program ..                  Last Error Line ...   34     !
  __  DA !                                                                     !
 Add  __ ! Program: ________ was cataloged at                                  !
         !                                                                     !
 Cmd(s): +---------------------------------------------------------------------+

 Command ===>
 Enter-PF1---PF2---PF3---PF4---PF5---PF6---PF7---PF8---PF9---PF10--PF11--PF12---
       Help        Exit              Flip                                Canc
|
The Technical Information function is always
available.
![]() To invoke the Technical Information screen
To invoke the Technical Information screen
Issue the TECH command.