
This section describes step by step how to complete the installation of Entire Operations (product code: NOP) on a z/OS, BS2000 or z/VSE mainframe operating system, or a UNIX operating system.
Information that only applies to a specific operating system is indicated where relevant.
Note:
Do not proceed with the installation steps described in this
section until you have completed installation of System Automation Tools
(product code: SAT). Refer to the separate System Automation
Tools documentation.
- Operating Systems
The following internal (old) terms are used for operating systems:
MVS for z/OS
VSE for z/VSE
- Notation vrs or vr
The notation vrs or vr represents a three or two-digit product version.
- install-dir
The term install-dir represents the name of an installation directory for UNIX.
This document covers the following topics:
Installing Entire Operations Using Software AG Installer (UNIX only)
Uninstalling Entire Operations Using Software AG Installer (UNIX only)
The installation medium (for example, tape or CD ROM) contains the following data sets/files listed in the following table. The sequence in which the files are located on the medium is shown in the Software AG Product Delivery Report which accompanies the installation medium.
| File Name | Contents |
|---|---|
| NOPvrs.JOBS | Entire Operations Installation Jobs (z/OS and BS2000). |
| NOPvrs.LIBJ | Entire Operations Installation Jobs (z/VSE). |
| NOPvrs.SYS1 | Entire Operations System File 1 (Adabas). |
| NOPvrs.SYS4 | Entire Operations System File 4 (Adabas Accounting File). |
| NOPvrs.SYS5 | Entire Operations System File 5 (Adabas Log Selection File). |
| NOPvrs.INPL | Entire Operations System Libraries (Natural). |
| NOPvrs.DATA | Input data (sample network definitions) for Entire Operations import operations. |
The installation medium can contain files with problem fixes. Refer to the problem descriptions before applying them.
The notation vrs in file names represents the version number of the product.
System Automation Tools (SAT) files are included as described in the System Automation Tools documentation.
This section covers the following topics:
Copy the data sets from the supplied installation medium to your disk before you perform the individual installation procedure for each component to be installed.
The way you copy the data sets depends on the installation method and the medium used:
If you use System Maintenance Aid (SMA), refer to the copy job instructions provided in the System Maintenance Aid documentation.
If you are not using SMA and want to copy the data sets from CD-ROM, refer to the README.TXT file on the CD-ROM.
If you are not using SMA and want to copy the data sets from tape, follow the instructions in this section.
This section explains how to copy all data sets from tape to disk.
Modify the following sample job according to your requirements:
//SAGTAPE JOB SAG,CLASS=1,MSGCLASS=X
//* ---------------------------------
//COPY EXEC PGM=IEBGENER
//SYSUT1 DD DSN=COPY.JOB,
// DISP=(OLD,PASS),
// UNIT=(CASS,,DEFER),
// VOL=(,RETAIN,SER=tape-volser),
// LABEL=(2,SL)
//SYSUT2 DD DSN=hilev.COPY.JOB,
// DISP=(NEW,CATLG,DELETE),
// UNIT=3390,VOL=SER=disk-volser,
// SPACE=(TRK,(1,1),RLSE),
// DCB=*.SYSUT1
//SYSPRINT DD SYSOUT=*
//SYSIN DD DUMMY
//
where:
tape-volser is the VOLSER
of the tape, for example: T12345,
hilev is a valid high-level
qualifier, and
disk-volser is the VOLSER
of the disk.
Execute the job to copy the data set COPY.JOB to your
disk.
Modify hilev.COPY.JOB according
to your requirements:
Set EXPDT to a valid expiration date, for example,
99365.
Set HILEV to a valid high-level qualifier, for example,
USERLIB.
Set LOCATION to a storage location, for example,
STORCLAS=ABC or UNIT=3390,VOL=SER=USR123.
Execute hilev.COPY.JOB to copy
single, multiple, or all data sets to your disk.
Copy the files (data sets) from the supplied installation medium to your disk before you perform the individual installation procedure for each component to be installed.
The way you copy the files depends on the installation method and the medium used:
If you use System Maintenance Aid (SMA), refer to the copy job instructions provided in the System Maintenance Aid documentation.
If you are not using SMA and want to copy the files from CD-ROM, refer to the README.TXT file on the CD-ROM.
If you are not using SMA and want to copy the files from tape, follow the instructions in this section.
This section explains how to copy all files from tape to disk.
This step is not necessary if you have already copied the library
SRVvrs.LIB from another Software AG
installation tape. For further information, refer to the element
#READ-ME in this library. The library
SRVvrs.LIB is stored on the tape as a
sequential file named SRVvrs.LIBS
containing LMS commands. The current version
vrs can be obtained from the
Software AG Product Delivery Report.
Execute the following commands to convert
SRVvrs.LIBS into an LMS library:
/IMPORT-FILE  SUPPORT=*TAPE(FILE-NAME=SRVvrs.LIBS,-
/   VOLUME=volser, DEV-TYPE=tape-device)
/ADD-FILE-LINK  LINK-NAME=EDTSAM, FILE-NAME=SRVvrs.LIBS,-
/   SUPPORT=*TAPE(FILE-SEQ=3), ACC-METH=*BY-CAT,-
/   BUF-LEN=*BY-CAT, REC-FORM=*BY-CAT, REC-SIZE=*BY-CAT
/START-EDT
@READ  '/'
@SYSTEM 'REMOVE-FILE-LINK  EDTSAM'
@SYSTEM 'EXPORT-FILE  FILE-NAME=SRVvrs.LIBS'
@WRITE  'SRVvrs.LIBS'
@HALT
/ASS-SYSDTA  SRVvrs.LIBS
/MOD-JOB-SW  ON=1
/START-PROG  $LMS
/MOD-JOB-SW  OFF=1
/ASS-SYSDTA  *PRIMARY
where:
tape-device is the device
type of the tape, for example, TAPE-C4, and
volser is the VOLSER of the
tape (see the Software AG Product Delivery
Report).
Call the procedure P.COPYTAPE in the library
SRVvrs.LIB to copy the procedure
COPY.PROC to disk:
/CALL-PROCEDURE  (SRVvrs.LIB,P.COPYTAPE), -
/   (VSNT=volser, DEVT=tape-device)
If you use a TAPE-C4 device, you can omit the parameter
DEVT.
Enter the procedure COPY.PROC to copy all product files to
disk:
/ENTER-PROCEDURE COPY.PROC, DEVT=tape-device
If you use a TAPE-C4 device, you can omit the parameter
DEVT.
The result of this procedure is written to the file
L.REPORT.SRV.
Copy the data sets from the supplied installation medium to your disk before you perform the individual installation procedure for each component to be installed.
The way you copy the data sets depends on the installation method and the medium used:
If you use System Maintenance Aid (SMA), refer to the copy job instructions provided in the System Maintenance Aid documentation.
If you are not using SMA and want to copy the data sets from CD-ROM, refer to the README.TXT file on the CD-ROM.
If you are not using SMA and want to copy the data sets from tape, follow the instructions in this section.
This section explains how to copy the data sets .LIBJ,
.LIBR and .LICS (if supplied) from tape to disk. All
other data sets can be installed directly from the tape.
Modify the following sample job according to your requirements:
* $$ JOB JNM=LIBRCAT,CLASS=0,                                          +
* $$ DISP=D,LDEST=(*,UID),SYSID=1
* $$ LST CLASS=A,DISP=D
// JOB LIBRCAT
* *****************************************
*     STORE COPYTAPE.JOB IN LIBRARY
* *****************************************
// ASSGN SYS004,nnn
// MTC REW,SYS004
// MTC FSF,SYS004,4
ASSGN SYSIPT,SYS004
// TLBL IJSYSIN,'COPYTAPE.JOB'
// EXEC LIBR,PARM='MSHP; ACC S=lib.sublib'
/*
// MTC REW,SYS004
ASSGN SYSIPT,FEC
/*
/&
* $$ EOJ
where:
nnn is the tape address,
and
lib.sublib is the library
and sublibrary in which the data set COPYTAPE.JOB is to be
stored.
Execute the job to copy the data set COPYTAPE.JOB to
disk.
COPYTAPE.JOB contains the JCL required to copy the data
sets .LIBJ, .LIBR and .LICS from tape to
disk.
Modify COPYTAPE.JOB according to your requirements and set
the disk space parameters as appropriate.
Execute COPYTAPE.JOB to copy the data sets
.LIBJ, .LIBR and .LICS to your disk.
The following applies to the Entire System Management products Entire Operations, Entire Output Management and Entire Event Management.
Before you update any production library or file using a single solution or an update medium containing a series of solutions supplied by Software AG, you must stop the Monitor of the relevant Entire System Management product. Do not start the Monitor before your entire update process is completed successfully. Use the Natural utility SYSBPM to purge all modules of the application SYSEOR from the Natural buffer pool.
This is necessary to avoid mixing the versions of the delivered software, for example in Natural libraries where such a mixture may lead to parameter errors like NAT0935, NAT0936 etc.
For each step of the installation procedure, System Maintenance Aid (SMA) generates an installation job according to your specifications in SMA. You then submit and run the generated job.
Before you can start generating the jobs, you have to load the
data set SMT111.TABS from the installation medium
into the SMA system file. SMT111.TABS contains the
tables SMA requires to build the jobs.
SMA is supplied with base Natural. For instructions on loading the data set and using SMA, refer to the System Maintenance Aid Documentation.
 To view a product-specific Readme
From the product list on an SMA Maintenance screen, execute the RM (Show Readme File) command for the required product(s).
This section covers the following topics:
Step 3: Load New Entire Operation Objects and Error Messages
Step 4: Copy Programs or Module in a Non-Security Environment
Step 5: Migration from Entire Operations Version 5.4.3 to Version 5.5.1
Step 6: Import Entire Operations Network Examples (optional)
Step 8: Adapt System Automation Tools Parameters for Entire Operations
(Job I050, Steps 2100, 2104, 2105)
If you want to install the product Entire Operations for the first time, load the System files by using the Adabas ADALOD utility.
Load the Entire Operations System File 1 contained in the data set NOPvrs.SYS1 by using the Adabas ADALOD utility.
Entire Operations System File 1 holds all definitions and information needed to control the batch job processing. The file supplied on the installation tape contains some examples. If you do not want these examples, load the file with the ADALOD parameter NUMREC=0.
Load the Entire Operations System File 4, contained in the data set NOPvrs.SYS4 by using the Adabas ADALOD utility.
Load the Entire Operations System File 5, contained in the data set NOPvrs.SYS5 by using the Adabas ADALOD utility.
Perform this step only if this is not a new installation.
Delete old objects starting with NOP* in the SYSTEM library on FNAT and FUSER.
Delete all objects of the previously installed version from the SYSEOR library.
Load the Entire Operations objects from the NOPvrs.INPL data set by using the Natural INPL utility.
Use the Natural system command INPL (which is described in the Natural System Commands documentation) to load the Entire Operations system objects.
The following libraries are loaded:
| Library | File | Contents |
|---|---|---|
| SYSEOR | FNAT | Entire Operations Programs |
| SYSEORH1 | FNAT | Entire Operations Help Data (English) |
| SYSEORH2 | FNAT | Entire Operations Help Data (German) |
| SYSTEM | FUSER | Entire Operations Programs starting with NOP... |
| SYSEORU | FNAT | Entire Operations Example User Exit |
(Job I082, Step 2111)
Copy program MENU from library SYSSAT to library SYSEOR (in non-security environments only).
(Job I082, Steps 2123, 2124, 2125, 2126, 2127, 2128, 2129)
Add or change fields in the Entire Operations System File 1:
Step 2123: Delete Entire Operations Version 5.4.3 fields.
Step 2124: Change Entire Operations Version 5.4.3 fields.
Step 2126: Release descriptors.
Step 2127: Add new fields for Version 5.5.1.
Step 2129: Add Version 5.5.1 descriptors.
Add or change fields in the Entire Operations System File 4:
Step 2125: Change Entire Operations Version 5.4.3 fields.
Step 2128: Add new fields for Version 5.5.1.
Note:
After migration of the Entire Operations System File 1,
invoke the direct command TECH from the Entire Operations command
line to update the internal version control record.
- Migration of System Automation Tools Log File
The format of the System Automation Tools log file has changed with System Automation Tools Version 3.5.1.
(Job I200, Step 2105)
If you want to install the product Entire Operations for the first time, import the examples networks.
Import the Entire Operations examples contained in the data set NOPvrs.DATA.
(Job I200, Step 2110)
Migrate the accounting data on the Entire Operations System File 4.
The data migration can be performed only if the Entire Operations Monitor is not active.
For more information, see the section Parameter Blocks and Parameters in the System Automation Tools documentation.
|
Parameter |
Parameter | Description |
|---|---|---|
| SATENV | NSC=YES/NO | Indicates whether Natural Security is installed or not. |
| NSCUSER= | If Natural Security is installed, this is the user ID for logging on to it. | |
| NSCPSWD= | Password for logging on to Natural Security. | |
| ESYUSER= | User ID for logging on to Entire System Server, if it is installed and an interface to an external security system is activated. | |
| NATTASK= | Name of the Natural subtask module for starting a server as a subtask. | |
| SATSTART | PRODUCT=NOP | 3-byte product code. |
| PREFIX= | PRODUCT and PREFIX are
compressed into a prefix which identifies the server-specific
parameters.
|
|
| TYPE=BATCH/SUBTASK | Entire Operations Servers can be started as subtasks or batch jobs. 1 | |
| APPLIB=SYSEOR | Name of the Natural library where Entire Operations Server is installed. | |
| SERVSYSF= | DBID and file number for Entire Operations System
File 1 (must be unique within all SATSTART instructions of this
node).
|
|
| NATENV | LFILE=(216,nopsysf1-dbid,nopsysf1-fnr) 2, 4 | |
| LFILE=(131,sat-log-dbid,sat-log-fnr) 3, 4 | ||
| LFILE=(85,nopsysf4-dbid,accounting-fnr) 4 | ||
| ID=',' | Input delimiter. | |
| IM=D | Input mode. | |
1 Under BS2000, these subtasks are simulated by Entire System Server.
2 Pointer to Entire Operations System File 1
3 Pointer to System Automation Tools log file.
4 These pointers can be alternately set in the
common Natural parameter module created for the System Automation Tools
products or in a Natural parameter profile indicated by the Natural parameter
PROFILE.
Furthermore, you can overwrite the
SATENV and NATENV parameters with
Entire Operations-specific assignments. The naming convention for the prefix
which identifies the parameter block is:
Prefix = NOPprefix-from-satstart-block
| Parameter Block | Parameter |
|---|---|
| SATSTART | MEMBER= 1 |
1 You can specify a member where Entire Operations-specific parameters are located.
This chapter is relevant only if you want to use Entire Operations GUI Client (OGC) with your installation.
Example of an RPC server SYSPARM profile
definition:
FNAT=(9,140),FUSER=(9,124),FSEC=(9,125),FDIC=(9,141)
AUTO=OFF,TQ=OFF,ETID=' ',INTENS=1
DU=ON
LFILE=(216,9,7)
LFILE=(131,9,15)
LFILE=(85,9,95)
LFILE=(206,9,242)
LFILE=(204,9,140)
RPC=(SERVER=ON,ACIVERS=4,SIZE=32,SRVNODE=broker-name,SRVNAME=service-name,
TIMEOUT=59,TRACE=1,MAXBUFF=28,NTASKS=2,SRVUSER='*NSC')
This section provides examples of System Automation Tools (SAT) and Natural environment settings required to start the Entire Operations Monitor.
For more information, see the section Parameter Blocks and Parameters in the System Automation Tools documentation.
- System Automation Tools (SAT) Environment Settings
Parameter Block Parameter SAT SATENV NATTASK=NSATT08
NATBATCH=NATvrsBA
NATSKEL=EORJSMVS
NSC=YES
NSCUSER=EORMON
NSCPSWD=EORMON1
NOPvrs SATENV NATTASK=NSATT08
NATBATCH=NATvrsBA
NATSKEL=EORJSMVS
NSC=YES
NSCUSER=EORMON
NSCPSWD=EORMON1
NOPBAT SATENV NATTASK=NSATT08
NATBATCH=NATvrsBA
NATSKEL=EORJSMVS
JOBPREF=SN
NSC=NO
NOPRPC SATENV NATTASK=NATSATvr
NUMTASK=2
SRVNAME=NOPvrSRV
SRVNODE=BKRvrs
PROFILE=WATCHDOG
- Natural Environment Settings
Parameter Block Parameter SAT NATENV DU=OFF SAT NATENV DU=OFF NOPvrs NATENV FUSER=(9,90) FNAT=(9,80) FSEC=(9,83) MAXCL=0 MADIO=0 MT=0 AUTO=OFF IM=D,ID=',' WH=ON LFILE=(216,9,89) LFILE=(131,9,23) LFILE=(85,9,95) LFILE=(251,21,16) LFILE=(206,9,111) LFILE=(204,9,80) NOPBAT NATENV PARM=E41200BP IM=D AUTO=OFF FUSER=(9,90) LFILE=(204,9,80) NOPRPC NATENV FNAT=(9,140) PROFILE=NOPvrsRP
- Product Automatic Start
Parameter Block Parameter SAT SATSTART PRODUCT=NOP
PREFIX=vrs
TYPE=SUBTASK
APPLLIB=SYSEOR
SERVSYSF=(9,89)
Notes:
- NOPvrs, NOPBAT and NOPRPC are the proposed names for Entire Operations subtask, Entire Operations batch and Entire Operations RPC server. They can be modified.
- If Natural Security is installed, specify
AUTO=OFFinNATENV; if not installed, specifyAUTO=ON.
Entire Operations is installed using the Software AG Installer, which you download from the Software AG Empower website at https://empower.softwareag.com/.
This documentation provides product-specific instructions for installing Entire Operations. It is intended for use with Using the Software AG Installer. That guide explains how to prepare your machine to use the Software AG Installer, and how to use the Software AG Installer and Software AG Uninstaller to install and uninstall your products. The most up-to-date version of Using the Software AG Installer is always available at http://documentation.softwareag.com/ (Empower login required).
This installation documentation provides just a brief description on how to install Entire Operations directly on the target machine using the Software AG Installer GUI. For detailed information on the Software AG Installer, see Using the Software AG Installer.
To install Entire Operations
Software AG provides a license file for Entire Operations; the installer requires them during a first-time installation. Copy the license file to the machine on which you want to install Entire Operations. You can copy the license file to any temporary location. The installer will ask for the location of your license file and will then copy it to the common/conf directory of your installation directory.
Start the Software AG Installer GUI as described in Using the Software AG Installer.
When the first page of the Software AG Installer GUI (the so-called Welcome panel) is shown, choose the button repeatedly (and specify all required information on the shown panels as described in Using the Software AG Installer) until the panel containing the product selection tree appears. This tree lists the products you have licensed and which can be installed on the operating system of the machine on which you are installing.
To install Entire Operations with all of its product components, expand the Natural Products node, expand the Entire Systems Management node and select Entire Operations 5.5 SP1.
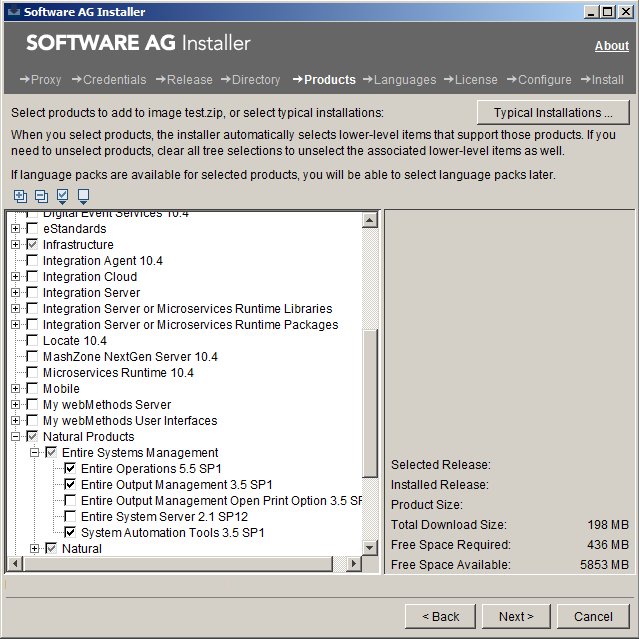
Note:
Products or product versions which are already installed in the
selected installation directory are shown as disabled.
The following products are prerequisite and will be selected too if not already installed:
Natural
Entire System Server
System Automation Tools
Choose the button.
Read the license agreement, select the check box to agree to the terms of the license agreement, and choose the button.
Choose the button.
First-time installation only:
Enter the full path to the Natural license file (or use the Browse button to select it from a dialog box).
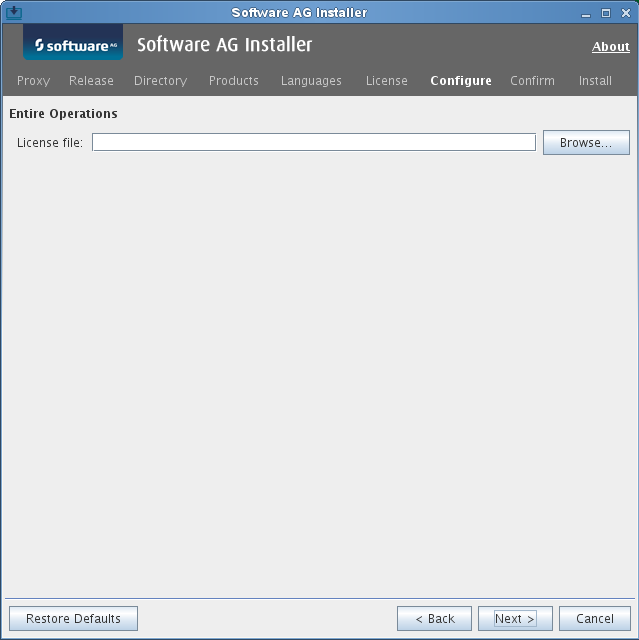
Choose the Next button.
First time installation only: enter a Node Name and a Broker ID.
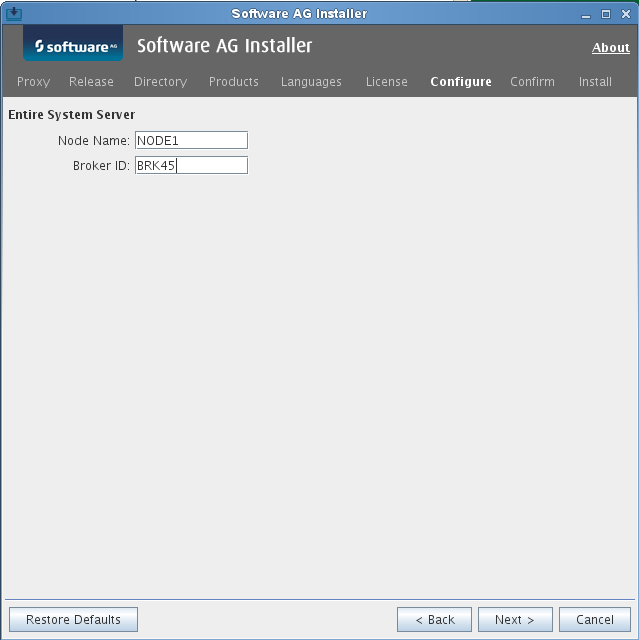
Choose the Next button.
On the last panel, review the list of products and items you have selected for installation. If the list is correct, choose the Next button to start the installation process. When the Software AG Installer has completed the first-time installation, additional configuration steps are required. See Completing the Installation for further details.
This section covers the following topics:
Before you start your product, it is recommended that you run (source) the sagenv.new script in the install-dir/bin directory. This sets the environment variables needed to run your product and other Software AG products.
Important:
The sagenv.new file is replaced
with every new installation. If you have set up your own environment settings
file (for example, with the name sagenv), replace only the
modified product-specific part in your existing sagenv
file.
Running the sagenv.new script is also recommended before configuring the installed products with the SYSPCI utility.
Important:
It is recommended that you start a new shell before
switching to a different installation directory and running the
sagenv.new script (for example, when switching from the
directory for a test environment to the directory for a production
environment).
After you have installed your product for the first time, you need to set up a number of files, parameters and individual settings depending on your environment. These are described below. To set them up, you use the SYSPCI utility. For detailed information on this utility, see SYSPCI Utility - Product Configuration and Initialization in the Natural Tools and Utilities documentation.
Before you can define Entire Operations system files, the System Automation Tools system file (LFILE 131) must be defined.
Entire Operations requires the following Adabas system files:
NOP-SYSF1 file, where the logical file number
(LFILE) is 216, NOP-SYSF2 file, where the logical file number
(LFILE) is 85.
The database IDs and file numbers of the new or existing files
(NOP-SYSF1, NOP-SYSF2) that you specify using the SYSPCI utility
are entered into the default parameter files Entire Operations
(NOPPARM), Entire Operations (NOMPARM, if available)
and Natural (NATPARM).
The required Adabas files can either be local or remote:
Remote Access
If the file is located in a remote database, Entire Net-Work must be active and the database must be accessible.
Note:
For Natural Security, see also Using Natural
Security on Multiple Platforms in the Natural
Security documentation.
Existing Local File
Before you start the SYSPCI utility, make sure that the Adabas database containing the required files is active. With this version, you can continue to use your existing files. No migration of data from the previous version to the current version is necessary.
New File
Before you start the SYSPCI utility, make sure that the Adabas database which will contain the required files is active. The SYSPCI utility will load and initialize these files. This should be also done if another file is required for your product.
Before you create new files with the SYSPCI utility, make sure that the ASSO and DATA sizes of your Adabas database are appropriate for these files. It is therefore recommended that you check the Adabas .fdu files in the install-dir/product/INSTALL/product-code directory for the used sizes. If required, change your database setup so that the files can be created.
For Natural Security, for example, the ASSO and DATA sizes are not appropriate if you are using the default database. The .fdu files for Natural Security can be found in the install-dir/Natural/INSTALL/nsc directory.
In addition, make sure that the Adabas nucleus parameters listed in the following table are set for the database you want to use at database startup. They are not appropriate if you are using the default nucleus parameters.
LWP |
Must be at least 1,000,000. |
OPTIONS |
The option
TRUNCATION must be set in the
OPTIONS parameter.
|
Notes:
natsec and is located in the
install-dir/Natural/bin
directory. Start Natural Security with natsec parm=NSCPARM.
Alternatively, you can back up the nucleus called natural and
rename natsec to natural.
In order to invoke the SYSPCI utility, you must first invoke Natural. You can then invoke the SYSPCI utility using the Direct Command window.
To invoke the SYSPCI utility
Enter the following command at the UNIX system prompt to invoke Natural:
natural
Select the Direct menu and press ENTER to invoke the Direct Command window.
Enter the following command in the Direct Command window:
SYSPCI
For more information, see SYSPCI Utility - Product Configuration and Initialization in Natural's Tools and Utilities documentation.
The data for the sample networks of Entire Operations are contained in the directory $NOPDIR/$NOPVERS/ example. Before proceeding, ensure that you have completed the installation of System Automation Tools (SAT) as described in the System Automation Tools documentation.
Import the definitions of one sample network necessary for verification from the file x60-flow.imp. This file has standard ASCII format and must be assigned to Natural Workfile 1 using the appropriate Natural parameter module. For information on import/export functions, see the relevant documentation
Note:
Alternatively, you can import all sample network definitions
from the file example.imp. However, this would take considerably
longer and only a few examples are designed for UNIX environments. Though the
other examples in the example file help you understand some functions, they
must be adapted before they can be used in a UNIX environment.
For more information about installation verification, see Installation Verification.
The script nopmon.bsh (example below) is to be used to start the Entire Operations Monitor.
#! /bin/sh
# set -xv
# // Copyright © 2013-2019 Software AG, Darmstadt, Germany and/or
#    Software AG USA Inc., Reston, VA, USA, and/or its subsidiaries
#    and/or its affiliates and/or their licensors

# Entire Operations (NOP)
# Monitor task startup
#
# NOP versions: 551 and above
#
# ------------------------------------------------------------------------
# Parameters:
#   1.  NOP Monitor task ID (optional)
#
# Notes:
# - Please adapt this script for your installation,
#   if necessary.
# - If the NOP Monitor node is not local, please make sure that
#   all necessary environment variables are set and exported.
# ------------------------------------------------------------------------

TASK_ID=1
if [ $# -ge 1 ]; then
   TASK_ID=$1
fi

# sagenv=/opt/softwareag/sagenv             #
# if [ -f $sagenv ]; then
#    . $sagenv
# fi                                        #
sagenv={{INSTALLDIR}}/bin/sagenv.new      #
if [ -f $sagenv ]; then
   . $sagenv
fi                                        #

# if [ "$NPRDIR" = "" ]; then
#    echo "NPRDIR is not set"; exit 1
# fi
# if [ "$NPRVERS" = "" ]; then
#    echo "NPRVERS is not set"; exit 1
# fi
# if [ ! -d $NPRDIR/$NPRVERS ]; then
#    echo "directory $NPRDIR/$NPRVERS not found"; exit 1
# fi

#
if [ "$NPR_HOME" = "" ]; then
   echo "NPR_HOME is not set"; exit 1
fi
if [ ! -d $NPR_HOME ]; then
   echo "directory $NPR_HOME not found"; exit 1
fi

#
# if [ "$NOPDIR" = "" ]; then
#    echo "NOPDIR is not set"; exit 1
# fi
# if [ "$NOPVERS" = "" ]; then
#    echo "NOPVERS is not set"; exit 1
# fi
# if [ ! -d $NPRDIR/$NPRVERS ]; then
#    echo "directory $NOPDIR/$NOPVERS not found"; exit 1
# fi

#
if [ "$NOP_HOME" = "" ]; then
   echo "NOP_HOME is not set"; exit 1
fi
if [ ! -d $NOP_HOME ]; then
   echo "directory $NOP_HOME not found"; exit 1
fi

# NATUSER=`ls $NPRDIR/$NPRVERS/lib/natnpr.s[lo]`     # 'sl' or 'so'
NATUSER=`ls $NPR_HOME/lib/natnpr.s[lo]`     # 'sl' or 'so'
export NATUSER

# if [ "$ETBLNK" = "" ]; then           #
#    ETBLNK=`ls $NOPDIR/$NOPVERS/exx/*/lib/broker.s[lo]`
#    export ETBLNK
# fi                                    #

if [ "$ETBLNK" = "" ]; then           #
   ETBLNK=`ls {{INSTALLDIR}}/common/EntireX/lib/broker.s[lo]`
   export ETBLNK
fi                                    #

CMOBJIN=cmobjin.dummy
export CMOBJIN
if [ ! -f $CMOBJIN ]; then
   echo "." > $CMOBJIN     # create a dummy file
fi

CMSYNIN=cmsynin.dummy
export CMSYNIN
if [ ! -f $CMSYNIN ]; then
   echo "." > $CMSYNIN     # create a dummy file
fi

sysout_dir=/tmp        # directory for the Monitor sysout files

time_now=`date +%Y%m%d.%H%M%S`
CMPRINT=${sysout_dir}/${time_now}.task$TASK_ID.log
export CMPRINT

nat=natural               # Natural executable
parm=nopparm              # Natural parameter module
natlib=syseor             # Natural library

$nat batchmode=yes parm=$parm noapplerr "stack=(logon $natlib;mo-ini-p XB $TASK_ID;fin)" &
You uninstall Entire Operations using the Software AG Uninstaller. For detailed information on how to use the uninstaller, see the Using the Software AG Installer guide.
In short: to uninstall Entire Operations, proceed as follows:
Open a command window and go to the bin directory of your main installation directory.
Run the command uninstall. This
starts the Software AG Uninstaller.
The following files are not removed:
All files created by the user, for example, Entire Operations
modules in FUSER or parameter files.
NOPPARM.
This section covers the following topics:
During the installation, the Sudo panel may appear. This happens because Entire Operations depends on the installation of Natural where the Sudo panel may be used. For the installation of Entire Operations, however, you do not need sudoers privileges.
Entire Operations depends on Natural. Therefore, the user ID under which you run the Software AG Installer must not be longer than eight characters. If you use a longer user ID, an error message is shown. You can then exit the installer and use a different user ID or - in case you also want to install other products - return to the product selection tree and deselect Natural.
During the installation, you are asked to specify an installation directory. The installation of Entire Operations requires the installation of Natural. If Natural is already installed, choose the directory of your Natural installation. Otherwise, see Installation in the Natural for UNIX documentation for detailed information regarding the installation directory. The user that you are using to install must have full read and write permissions to this directory.
The user who starts the installation owns all files that are installed.
The user file-creation mode mask (umask command)
determines the file permissions for newly created files. Make sure that the
umask command you are using for the installation will not prevent
users from accessing and executing the installed files. On UNIX systems, for
example, the command umask 022 allows full access rights for the
file owner and read-only access rights for group members and others.
By default, a new FNAT system file is created in
the installation directory during the installation of Natural
install-dir/Natural/fnat. This
FNAT must always exist, and the global configuration file must
have an entry which defines this FNAT.
Entire Operations can only be installed into this
FNAT.
Note:
If you want to check or edit the settings in the global
configuration file, use the Natural Configuration Utility.
The Software AG Installer maintains an internal list of
installed products, which must coincide with the add-ons that are currently
installed in the FNAT. This is important for updates and
uninstallations to work correctly.
For this reason:
Do not install products into the FNAT without
the use of the Software AG Installer.
Do not replace the default FNAT
(install-dir/Natural/fnat) with
another FNAT.
Make sure to complete the installation of Entire Operations by using the SYSPCI utility (this is explained later in this documentation).
If an error occurs due to the above-mentioned scenarios, the only way to solve the problem is a new installation. In some situations, one of the following workarounds may help:
Workaround 1: Complete the previous installation by using the SYSPCI utility.
Workaround 2: Uninstall the product and then start the installation once more.
When one of the first two digits of the version number changes, we consider an installation as an upgrade installation.
When the first two digits of the version number remain the same and the third or fourth digit changes, we consider an installation as an update installation.
An update installation does not prompt again for license files. The existing license files will be used.
Scripts located in the install-dir/EntireOperations/INSTALL directory will not be replaced. Thus, user changes in scripts will be kept. If a script changes with an Entire Operations update, you can find the updated scripts in the install-dir/EntireOperations/INSTALL/tpl directory. The name of an updated script consists of the original name followed by .tpl. For example, nopenv is then named nopenv.tpl. Administrators and users can adapt any scripts manually according to their own needs.
If an update for Entire Operations is to be installed, do the following:
Ensure that the Entire Operations Monitor is not active and that online users have logged off. Otherwise, data can be lost or corrupted.
Copy the update completely to the affected target libraries. Verify this.
When the new modules are in place, purge the Natural buffer pool for online and/or Monitor usage.
In the Entire Operations main menu, enter the direct command
TECH. The version information is displayed and
updated for Monitor usage.
The Monitor error transaction is able to detect a version mix if a runtime error occurs. In this case, all Monitor tasks will immediately be terminated with an error message.
This section covers the following topics:
If you want to use the Entire Output Management (NOM) Application Programming Interface to pass SYSOUT and files to Entire Output Management, you must:
Define the LFILE 206 for the Entire Output Management system file in the System Automation Tools startup parameters, and/or define the NTLFILE 206 in the Natural parameter module for Entire Operations.
Add the library SYSNOM (Entire Output Management Application Programming Interface) to the STEPLIB definitions of Entire Operations in Natural Security.
This section covers the following topics:
CA-LIBRARIAN Interface
To activate the CA-LIBRARIAN interface, you must assemble
and link the Entire System Server module NATPAML into the Entire System Server
Load Library. For instructions, see the Entire System Server
Reference documentation.
Force Job Display to Console
To recognize whether a job has terminated normally, Entire
Operations needs the terminate message (IEF404I ...) for each job. If not yet
installed, modify each member CONSOLxx in the
SYS1.PARMLIB library, which defines the z/OS master console and alternate
consoles.
Insert the entry MONITOR(JOBNAMES-T) for automatic job display. Make sure there is no entry in any MPFLSTxx member in SYS1.PARMLIB to suppress message IEF404I.
LMS Interface
For access to LMS elements from Entire Operations, LMS
Version V1.4A or higher is required.
UCON Interface
For the following functions the UCON interface of Entire
System Server is required:
Sending messages via an Entire System Server node
Cancel jobs
Hold jobs
Release jobs
The UCON interface is accessed by the Entire System Server view CONSOLE. This means that the Entire System Server jobs for the console must have been started.
If you use Entire System Server in multi-user mode (node number other than 148) these tasks will be started by Entire System Server nucleus. In single user mode, the UCON interface is only available from the user ID where the active and passive console tasks of Entire System Server are running.
For more information related to UNIX and Windows system access, see the section Entire Operations in Client/Server Environments.
For more information related to SAP R/3 access, see SAP Definitions (UNIX and Windows) in the Administration documentation, and Operating System and Environment Defaults and job type SAP in the User's Guide.
This section covers the following topics:
If Natural Security is installed at your site, you must create the following definitions:
| SYSEOR | Entire Operations Programs |
|---|---|
| SYSEORH1 | Entire Operations Help Data (English) |
| SYSEORH2 | Entire Operations Help Data (German) |
| SYSEORU | Entire Operations User Exits & JCL (NAT & MAC) |
For all applications:
Do not define a startup program. Do not define Clear
Source area by Logon within Security Options. These security parameters must
also be installed for any additional user applications.
STEPLIB=SYSSAT
STEPLIB=SYSNOM (only if Entire Output Management is available)
STEPLIB=SYSLIBS (only if the Entire Operations SYSEOR system library is not on the Natural FNAT system file)
STEPLIB=SYSEXT
STEPLIB=SYSTEM
Do not define the error transaction: NOPERROR. (This had to be done explicitly in former versions of Entire Operations).
STEPLIB=SYSEOR
STEPLIB=SYSSAT
STEPLIB=SYSLIBS (only if the Entire Operations SYSEOR system library is not on the Natural FNAT system file)
STEPLIB=SYSEXT
STEPLIB=SYSTEM
(defined as a person in Natural Security)
| EORMON | Entire Operations Monitor |
|---|
Note:
Link user EORMON to all Entire Operations
applications as listed above.
If Natural Security is not installed at your site, proceed as follows:
Edit the System Automation Tools member as described in the
sections Parameter Blocks and Parameters
of the System Automation Tools documentation. Add the
following lines to the parameter block of Entire Operations
(SATENV):
STEPLIB1=(SYSEOR, dbid, fnr)
STEPLIB2=(SYSSAT, dbid, fnr)
STEPLIB3=(SYSNOM, dbid, fnr)
STEPLIB4=(SYSLIBS, dbid, fnr)
STEPLIB5=(SYSEXT, dbid, fnr)
STEPLIB6=(SYSTEM, dbid, fnr)
Copy the module SATSLS-P from SYSSAT to SYSEOR (if not already existing in SYSEOR).
If Entire System Server is installed with an external security system (RACF, ACF2, TOP SECRET), a user ID for the Entire Operations Monitor must be defined in the security system. The user ID is EORnnn01, where nnn is the Monitor node number. For example, if the Monitor node is 148, define the user ID as EOR14801.
- BS2000
Define the BS2000 user ID under which the Entire Operations Monitor runs (usually TSOS).
Note:
Link user for the Entire Operations Monitor to all Entire Operations applications as listed above.
If you are logged on to the SYSEOR library, you must enter the
direct command INSTALL.
After the first start, the Entire Operations Installation screen is automatically invoked:
  20.11.10               ***** Entire Operations *****                    10:29:29
                                   Installation

  ------------------------------------------------------------------------------
  This program will help to make some initial definitions for and within
  Entire Operations.
  The most definitions can be modified later, by using the
  'System Administration' online functions.

  If you do not want to continue, please press the PF3 key.
  If you want to continue, please enter the following:


       User ID of the Entire Operations System Administrator ===> SYSDBA__


  Enter  ==> Continue Installation
  PF3    ==> End


 Enter-PF1---PF2---PF3---PF4---PF5---PF6---PF7---PF8---PF9---PF10--PF11--PF12---
End |
To proceed with installation
Enter "SYSDBA" in the User ID field of this screen and press ENTER.
During the installation procedure, you can add your own user ID.
This enables you to customize Entire Operations by following the steps described in the section System Administrator Services. This includes:
Entire Operations Defaults - BS2000 only:
If necessary, modify the activation and submission escape
characters, since the dollar ($), section (§) and
commercial at (@) signs cannot be used in BS2000.
Definition of Nodes - the user can delete unnecessary node definitions and add the appropriate ones;
User Maintenance.
Notes:
INSTALL, you must start a new Natural
session.
This section covers the following topics:
If you run your Natural under TIAM, it is possible to access Entire System Server as well as the Natural Software AG Editor in single-user mode. To do this, the following FILE statements must be given before starting Natural:
- For Entire System Server:
in ISP format:
/FILE npr-lib,LINK=DDLIB2where npr-lib is the Entire System Server load library.
- For Natural Software AG Editor single-user mode:
in ISP format:
/FILE workfile,LINK=CMEDITwhere workfile must be the user-specific work file, and workfile may not be accessed by any other task (refer to Installing Software AG Editor in the Natural Installation documentation.)
For information on the Natural editor work file, see the section Editor Work File in the Natural Operations documentation.
Note:
If you run your Natural under openUTM, you must not
use single-user mode for Entire System Server or the Natural Software AG
Editor. This means that node number 148 may not be given in any definition
within Entire Operations, and a Software AG Editor buffer pool must
have been installed.
If you have installed Entire Operations properly, issue the
TECH command to display technical information for
your installation. For details, see the section
Online
Technical Information in the section
Logging on to Entire
Operations of the User's Guide.
Note:
The TECH command must be used to
synchronize the version and date of both your online Entire Operations system
and your Entire Operations Monitor - for example, if the error message
wrong Monitor version appears after the INPL of an
Entire Operations update tape. The TECH command is
invoked automatically within the INSTALL program.
After having started the Entire Operations Monitor, you can now
start some sample networks that are included in System File 1 on the
installation tape. You can find these sample networks under the owner
EXAMPLE. See also the
sample
network shown in the Import/Export Functions
documentation.
Notes:
NUMREC=0.
To adapt the sample job
networks
Adapt the job networks of the owner EXAMPLE,
which you want to use for the installation verification.
We recommended that you use the following networks:
| Operating System | Network | Description |
|---|---|---|
| BS2000 | B60-FLOW | BS2000 Job Flow |
| z/OS | E60-FLOW | z/OS Job Flow |
| z/VSE | V60-FLOW | z/VSE Job Flow |
| UNIX | X60-FLOW | UNIX Job Flow |
Check whether the node table contains all operating system server nodes you need (see Definition of Nodes in the System Administration documentation.
For each node you want to use: enter the direct command
LOGON NODE
                                                  node-number
and perform a
logon with a valid user ID and password. This must be done to check the
availability of the node, and to obtain the operating system information from
the node.
Go to the Network Modification window (described in the User's Guide) and set the fields Execution Node and JCL Node to a valid node number. If you are using network B60-FLOW or X60-FLOW, you must also check the special defaults using PF6 from this window; then set the field Submit User ID (and for B60-FLOW also SYSOUT User ID) to a user ID valid in your environment. See also Operating System and Environment Defaults in the User's Guide.
The node numbers above must be propagated to all jobs of
the network. Choose PF9 in the
Network
Modification window to display the screen
Application of Network Defaults to Jobs. Enter
S before Exec Node and
JCL Node and press ENTER to modify the jobs.
For network B60-FLOW or X60-FLOW, you must also enter
S before the User ID field(s)
you modified in the previous step.
For most of the sample job networks, you will find the
name of a symbol table in the
Network
Modification window. Choose PF7 to display the
symbols within that table. Check the symbols listed in the table and, if
necessary, adapt them for your needs. Use the line command
M for modifications.
Go to the
Calendar
Maintenance screen (described in the User's
Guide). Make sure that the calendar EXAMPLECAL is
defined for the current year.
If you use Natural Security: Make sure that the library SYSEORU is defined as Public Library. If it is defined as People Protected, you need a link to your user ID and to the user ID of the Entire Operations Monitor.
To activate a
sample job network
Open the Entire Operations Main Menu (described in the User's Guide).
If you are not under the owner EXAMPLE, enter
in the command line:
SET OWNER EXAMPLE
Press ENTER. (If this does not work, check your user definition for the linked owners.)
On the Entire Operations Main Menu,
enter 1 () in the
Command line and press ENTER.
A screen (described in the User's Guide) appears.
Enter R in the input field of
the Cmd column next to the network you want to activate to
open the Network Activation window:
 12.03.18                ***** Entire Operations *****                17:38:44
 Owner EXAMP +--------------------------------------------------------+
 Selection O |                                                        |
------------ |                  Network Activation                    | -------
 Cmd Runs Ow |                                                        |
          *- |                     Owner ==> EXAMPLE                  |
 _        EX |                   Network ==> B60-FLOW                 |
 _        EX |                   Version ==> __________               |
 R P      EX |                   No Network Versions                  |
 _ P      EX |                                                        |
 _ P      EX |     Last Schedule Extract ==> 12.03.18                 |
 _ P      EX |                        at ==> 10:00:46                 |
 _ P      EX |       Last Execution Date ==> 12.03.18                 |
 _ P      EX |           Last Run Number ==> 2722                     |
 _        EX |                                                        |
 _        EX |      Preferred Run Number ==> ______                   |
 _ P      EX |    Use Time from Schedule ==> N  (Y/N)                 |
 *********** |       or activate at Date ==> 12.03.18__               | *******
  A Active C |                      Time ==> 17:38:54                 |  Deact
  P Descr R  |            JCL Check only ==> N  (Y/N)                 | ory
 Command =>  |   Enter----PF1---PF3-------------------------------    |
             |   Activate Help  End                                   |
             +--------------------------------------------------------+


Enter-PF1---PF2---PF3---PF4---PF5---PF6---PF7---PF8---PF9---PF10--PF11--PF12---
Help Add End Save Up Down NxtSt Menu |
Press ENTER.
To check the Entire Operations
log
Enter LOG in the
Command => line and press ENTER. The sample
jobs of your network should have been started and have ended OK. If this is not
the case, check that you have performed the installation correctly.
Note:
In a z/VSE environment, before activating network
V60-FLOW, you are recommended to verify the definitions of End-of-Job actions
for JOB-01 of this network. For this job, some message recipients are defined
which may not exist in your environment. You can either overwrite these
recipients with valid destination IDs, or else delete all recipient
definitions. For details, see the section
Defining
Notification Messages in the
User's
Guide.
If your installation verification fails and you cannot start Entire Operations properly, consider the following:
You may have forgotten to use some Natural Security definitions.
You may use improper versions of Adabas, Natural or Entire System Server.
There are errors in your Natural definition (linkage, parameter module, etc.).
You may have forgotten some System Automation Tools parameters or have defined them incorrectly.
You may not have performed the installation procedure correctly.
If your Entire Operations Monitor subtask does not start an you receive a NAT0838 error message in the System Automation Tools output, proceed as follows:
Log on online to SYSEOR and change the password there.
Modify the NSCPSWD= settings in
NOPvrsSATENV in the System Automation Tools
parameters as well.
Retry the System Automation Tools start.
- Sample Networks of Previous Entire Operations Versions
In general, the installation verification can also be carried out using the sample networks delivered with previous versions of Entire Operations. However, these network definitions contained some minor inconsistencies which have been corrected in the current version. The current version also contains some additional sample network definitions, in particular those demonstrating access to UNIX nodes. It is therefore recommended that you update the sample networks by importing them from the DATA file supplied with the current Entire Operations version. For further information, see the section Import and Export of Entire Operations Data.
Entire Operations provides import/export functions. It can be used to transfer Entire Operations data (networks, jobs and all other objects) from one system file to another by exporting and importing the data via a work file.
For detailed information, see the Import/Export Functions documentation.
This section covers the following topics:
Import/export functions can also be used to update sample network definitions (see the Import/Export Functions documentation) supplied with previous Entire Operations versions by importing the definitions from the system files supplied with the previous versions.
Step 3 in the section Importing Updated Sample Networks (optional) describes what must be done for this purpose.
This step is recommended when migrating from any previous
version of Entire Operations. It can also be useful for backing out
modifications made to sample network definitions, or for loading the sample
networks into your system file if your Entire Operations system files were
initially loaded with NUMREC=0.
To import updated sample networks
Assign the Natural Workfile 1 to the NOPvrs.DATA file and invoke the import function to load the sample networks. This can be done online in a TIAM (BS2000) or TSO (z/OS) Natural environment, or preferably in batch mode as described in the section Using Import/Export Functions in Batch Mode in the Import/Export Functions documentation.
If you intend to update the sample network B60-FLOW (see the Import/Export Functions documentation), you are recommended to delete this network manually from the Entire Operations Network Maintenance screen (described in the User's Guide) prior to the steps following below. You can omit this deletion step if you do not use BS2000 functionality, or if you have defined your own jobs within network B60-FLOW.
Use the Initial Mode A to load some new sample networks,
especially demonstrating access to UNIX nodes, and/or use the Initial Mode U to
update existing examples belonging to the owner EXAMPLE. In either
case, you are advised to set the parameters ERROR LIMIT
and WARNING LIMIT to 9999. See
Job I200, Step 2105. This is only
necessary if this is a first-time installation and not an update.
To use the sample networks
In the network definition (see Fields and Commands: Network Definition in the User's Guide), adapt the JCL node and execution node to a node you want to use.
In the operating system specific entries, check the JCL User ID and Submit User ID fields: see Input Fields: Network Defaults in the section Operating System and Environment Defaults in the User's Guide.
With the function Application of Network Defaults to Jobs (see the User's Guide), copy the modified definitions into the jobs.
For MAC-type jobs (Macro), you must edit the JCL and enter
the command MACRO to get an executable Macro
program. This must be done prior to the first execution of the network or
job.
Entire Operations creates its own work files if jobs are executed on one of the following operating systems:
BS2000
UNIX
Windows
Work files are deleted automatically by the Entire Operations Monitor during the cleanup of active job networks.
This section covers the following topics:
BS2000 work files are created with the following names:
:catid:$sysout-userid.owner.network.run.job#suffix
| Variable | Explanation |
|---|---|
| catid | BS2000 catalog ID for the file. |
| sysout-userid | BS2000 user ID, under which the file is created.
If a SYSOUT user ID (see Job Maintenance in the User's Guide) has been defined, then it will be used. |
| owner | Entire Operations owner of network. |
| network | Entire Operations network. |
| run | Entire Operations run number (with network). Run numbers from 1 to 9999 are filled up to contain 4 digits with leading zeros. For run numbers containing 5 digits, the dot between run number and job name will be omitted for reasons of space. |
| job | Name of the job. If a suffix follows, then the field
will be filled up to a length of 10 characters using the number sign
(#).
|
| suffix | Suffix to clearly distinguish between several work files of a job. |
- Work File Extensions
Extension Explanation None Current SYSOUT file. 1 through 9 Previous SYSOUT files. E Temporary Enter file. Will be deleted after job submission. M Monitor job variable. A through Z, apart from E, M SYSOUT file copies which are to be passed to Entire Output Management. Note:
The maximum file length in BS2000 is 54.- Special Work File Names
BS2000 temporary print files are created with the following names:
:catid:$bs2000-userid.EOR.PRINT.node.date.time
Variable Explanation catid BS2000 catalog ID for the file. bs2000-userid BS2000 user ID (submit user ID or SYSOUT user ID). node Entire System Server node (3 digits). date Current date (YYYYMMDD). time Current time (HHMMSS).
All work files created by Entire Operations are contained in the directory $EOR_WORK or one of its subdirectories.
The environment variable EOR_WORK is set during the installation of Entire System Server for UNIX. This variable may contain any valid directory name. The default is $NPDDIR/$NPRVERS/work. See also Establish Environment Variables in the section Installing Entire System Server (NPR) under UNIX in the Entire System Server documentation.
The directory $EOR_WORK should have the
access drwxrwxrwx because its subdirectories may belong to various
UNIX owners and groups. Ensure that enough space for work file creation is
available.
UNIX work files are created with the following names:
$EOR_WORK/unix-userid/dbid-fnr/owner/network/run-upper/run-lower/owner/job.extension
| Variable | Explanation |
|---|---|
| unix-userid | The submit user ID of the job.
If it is not specified explicitly in the job definition, the UNIX default submit user ID is used. |
| dbid-fnr | Entire Operations System File 1 database ID and file number, from the caller's environment (concatenated to 10 digits, with leading zeros). |
| owner | Entire Operations owner of network. |
| network | Entire Operations network. |
| run-upper | Upper 4 digits of Entire Operations run number (with leading zeros). |
| run-lower | Lower 4 digits of Entire Operations run number (with leading zeros). |
| job | Entire Operations job name. |
| extension | Extension (see below). |
The name of the work directory for an active network is available in the pre-defined symbol P-NADIR (see Table of Predefined Symbols in the User's Guide). Application-specific work files may be stored there, as long as there are no name conflicts with files generated by Entire Operations.
Work files created by Entire Operations and by the application are deleted during the network or job deactivation by the Entire Operations monitor.
- UNIX Work File Extensions
Extension Explanation current.sysout.txt Current SYSOUT file. 01.sysout.txt through 99.sysout.txt Previous SYSOUT files. current.sh Shell script which was actually submitted. current.sh.pid File containing the process ID of the shell script. current.frame.sh Shell script frame. Notes:
- Since owner, network and job are defined in upper case within Entire Operations, they also appear in upper case in the generated file names.
- The access rights of the UNIX work files and of the intermediate directories depend on the
umasksetting of the Entire System Server for UNIX. You can define aumaskcommand in the Entire System Server for UNIX startup script (for example startups).
All work files created by Entire Operations are contained in the directory %EOR_WORK% or one of its subdirectories.
The environment variable EOR_WORK
is set during the installation of Entire System Server for Windows.
Windows work files are created with the following names:
%EOR_WORK%\userid\dbid-fnr\owner\network\run-upper\run-lower\job.extension
| Variable | Explanation |
|---|---|
| userid | Windows user ID (submit user ID of the job). |
| dbid-fnr | Entire Operations System File 1 database ID and file number, from the caller's environment (concatenated to 10 digits, with leading zeros). |
| owner | Entire Operations owner of network. |
| network | Entire Operations network. |
| run-upper | Upper 4 digits of Entire Operations run number (with leading zeros). |
| run-lower | Lower 4 digits of Entire Operations run number (with leading zeros). |
| job | Entire Operations job name. |
| extension | Extension (see below). |
- Windows Work File Extensions
Extension Explanation current.frame.bat Frame batch file. This frame invokes the executable batch file or a directly executable program.
current.bat Executable batch file current.sysout.txt Current SYSOUT file. 01.sysout.txt through 99.sysout.txt Previous SYSOUT files. Note:
Since owner, network and job are defined in upper case within Entire Operations, they also appear in upper case in the generated file names.
It is possible to generate work file names using a generic logic (an exit). For this purpose, all generated file names must be unique.