
When you start the Output Management GUI Client, its main application window is displayed:

This window contains:
the object workspace on the left, and
the content pane on the right.
To modify the size of a pane, move the mouse pointer over the border
separating the panes until the pointer changes, showing two arrows pointing in
opposite directions
![]() . Then
drag the border using the mouse until the panes have the desired size.
. Then
drag the border using the mouse until the panes have the desired size.
The main application window also contains:
above the object workspace: the menu bar and the tool bar,
below the object workspace: the command line and the status bar.
From a list of objects in the object workspace or content pane, you can invoke a context menu, containing a list of commands for a selected object.
The navigation with F-keys and other function keys corresponds closely to that of the Windows Explorer.
The individual components are explained below:
The object workspace is on the left side of the main window:

In the object workspace you can list existing objects, create new ones, and perform various operations on them by invoking a context menu.
![]() To expand a branch in the object workspace and list the objects
contained in it:
To expand a branch in the object workspace and list the objects
contained in it:
With the left mouse button, click on the plus sign
![]() preceding the
object.
preceding the
object.
In the following example, all defined printers are listed:
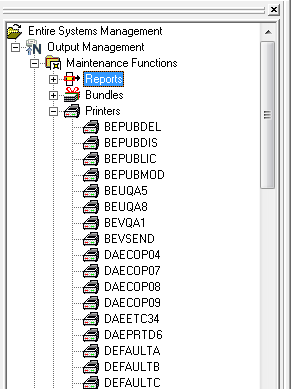
An object preceded by a minus sign
![]() has been
fully expanded.
has been
fully expanded.
To switch the display of the object workspace on or off, you use the View options in the menu bar.
The display and the options to change it correspond closely to those of the Windows Explorer.
Note:
With the System Automation Tools server user exit
ESEXIT1N, it is possible to hide an inaccessible application node,
depending on the reason why the application cannot be accessed. For details,
see the source code of ESEXIT1N in the library
SYSSAT.
Whenever you use a command or expand an object type, normally all objects of that type would be listed. However, you may wish to list only certain objects. For this purpose, you can use the command to specify selection criteria. Only objects which meet these criteria will then be listed.
The selection criteria specified via a command apply to all subsequent commands and object expansions for this object type. They are retained until you change them or remove them with another command.
If you want to save your Filter selection criteria for the next Output Management GUI Client session, you use the My Desktop option in the menu bar (option Store my desktop > during shutdown > Filter).
The selection criteria you can use are different for each object type; they are described for each object type in the corresponding section.
If it takes a long time before a list of objects is displayed, this may be due to the fact that many objects of that type exist, and therefore a large number of object records has to be read. By pressing the ESC key, you can stop the reading of records. Only the objects read so far will then be listed.
To avoid the time-consuming reading of large numbers of object records, you can use the command, as outlined above, to narrow down the number of objects to be listed.
A context menu provides a list of operations. It enables you to perform one of the listed operations on the selected object.
![]() To invoke a context menu and choose a command:
To invoke a context menu and choose a command:
Select an object - either in the object workspace or in the content pane.
Click the right mouse button, or press SHIFT+F10, or press MENU.
The context menu is displayed, showing the commands available - for example:
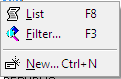
Choose the desired command.
Commands that are greyed-out are not available for the selected object.
As an alternative to invoking commands by selecting them from the context menu, you can also invoke most commands by pressing a key or a combination of keys. In the context menu, the corresponding key or key combination is shown after the command.
In the example above, instead of selecting the command from the context menu, you can invoke it by pressing the key F8.
The content pane takes up the right side of the main application window. The appropriate list, window or dialog is displayed here when you invoke a command for an object.
Whenever a list of objects is displayed, several columns of information are displayed for each item on the list. You can change the sequence in which the columns are displayed, and you can also choose which columns to display and which not.
![]() To change the columns display of a list:
To change the columns display of a list:
Invoke the context menu and choose Columns....
The Choose List Columns window is displayed.
To display or not display a column, select or clear the corresponding check box.
The columns are displayed in the sequence in which they are listed in the Choose List Columns window. To change the sequence, select a column and use the Move Up or Move Down button.
To show all columns in their system default sequence again, choose Reset.
When all columns to be displayed are in the desired sequence, choose OK.
The menu bar is at the top of the main application window on the left:

![]() To choose a command from the menu bar:
To choose a command from the menu bar:
Select the appropriate menu.
A drop-down menu of options is displayed.
From the drop-down menu, choose the desired command and object options.
The following menus are available:
| Menu | Functions |
|---|---|
| Object | Perform various functions on the selected objects; or exit the Output Management GUI Client. |
| View | Show/hide the display of the following elements:
|
| Options | Set the following options:
|
| My Desktop | Store the following for subsequent Output
Management GUI Client sessions:
You can select to store them in two ways:
You can reset the storage settings either by deselecting them individually, or via the menu item My Desktop > Reset. |
| Window | Select the next, previous or desired content pane; or close all panes. |
| Help | For a selected Output Management GUI Client
node:
|
The tool bar is just below the menu bar at the top of the screen:
![]()
![]() To invoke a function from the tool bar:
To invoke a function from the tool bar:
Choose the appropriate icon.
If an icon is greyed-out, the function is not available for the selected object.
The command line is at the bottom of the main application window, below the object workspace:

In the command line, you can enter a direct command to execute a function directly. From the drop-down list box next to the input field, you can select a command you executed previously during the current session.
![]() To execute a direct command:
To execute a direct command:
In the object workspace, select the object to which the command is to be applied.
In the command line, either type in the command, or select it from the drop-down list box.
For a description of all direct commands, see Direct Commands in the Commands documentation.
To show/hide the display of the command line, you use the View options in the menu bar.
The status bar is on the bottom left of the main application window, below the object workspace:
![]()
To show/hide the display of the status bar, you use the View options in the menu bar.