
This section describes how to use the Help Text subsystem to create help text for your applications. The following topics are covered:
The following diagram illustrates the structure of the Help Text subsystem and the functions available on the Help Text main menu:
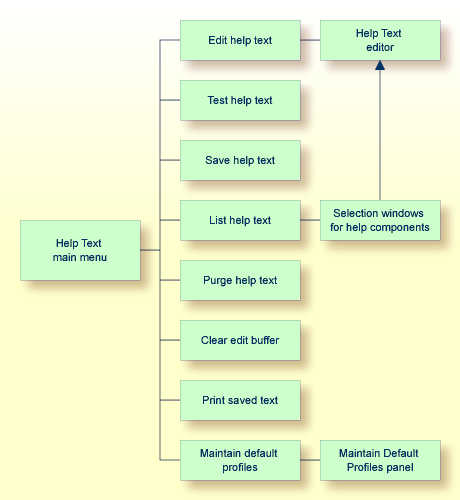
The Help Text main menu is displayed when you invoke the Help Text subsystem. For example:
 CSHMAIN               N a t u r a l   C o n s t r u c t                CSHMNM0
 Aug 17                       Help Text Main Menu                        1 of 1

                      Functions
                      -----------------------------------------------
                      E  Edit Help Text
                      T  Test Help Text
                      S  Save Help Text
                      L  List Help Text
                      P  Purge Help Text
                      C  Clear Edit Buffer
                      H  Print Saved Help Text
                      M  Maintain Default Profiles
                      ?  Help
                      .  Return
                      -----------------------------------------------
 Function ........... _
 Type ............... P *
 Major .............. ________________________________
 Minor .............. ________________________________
 Language ........... 1_   Profile ............ NCSTHELP_
 Enter-PF1---PF2---PF3---PF4---PF5---PF6---PF7---PF8---PF9---PF10--PF11--PF12---
help retrn quit lang |
Notes:
The fields on the Help Text main menu are:
| Field | Description |
|---|---|
| Function | Code corresponding to the function you want to perform. For example, type "E" to edit a help member. |
| Type | Code corresponding to the Type component for the
help text. Valid Type components are:
|
| Major | Major component for the help text you want to
create, view, or modify. Along with the Minor and Type components, the Major
component uniquely identifies a help member so that it can be located and
displayed when help is requested.
For example, to set up passive help for the #CUSTOMER-NUM field on a panel (using Natural Construct naming conventions), enter the following values: Type ............... F * Major .............. #_______________________________ Minor .............. CUSTOMER-NUM____________________ When a user requests help in the Customer Number field, the program retrieves the help text using the Type/Major/Minor component names. |
| Minor | Minor component for the help text you want to create, view, or modify. Along with the Major and Type components, the Minor component uniquely identifies a help member so that it can be located and displayed when help is requested. |
| Language | Code corresponding to the language in which the
help member will be created. For example, for an English help member, type
"1", for German, type
"2", for French, type
"3", etc. The help member corresponding to the
current language is displayed when a user requests help.
Notes:
|
| Profile | Name of the default help profile (for example, NCSTHELP). Help profiles define the size and placement of help windows. For information, see Maintain Default Profiles Function. |
 To access a function on the Help Text main menu
Type the appropriate code in the Function field.
Type the Type, Major, Minor, and Language components for a help member.
Optionally, type the profile name for the help member.
Press Enter.
This section covers the following topics:
This function on the Help Text main menu invokes the Help Text editor, where you can create new help members or edit existing ones.
To create or edit a help member
Type "E" in the Function field.
Type the Type component in the Type field.
Type the Major and Minor components in their respective fields.
To select from a list of Major and Minor components, use the List function (see List Help Text Function).
Type the code for the language in which the help member will be set up in the Language field.
To select from a list of language codes, use the List function.
Type the name of the default profile you are using in the Profile field.
To select from a list of default profiles, remove the value from the Profile field and press Enter. The Select Profile window is displayed. This window is described in List Help Text Function.
Press Enter.
The Help Text editor is displayed.
Notes:
This function on the Help Text main menu displays the help member currently in the edit buffer as it will appear to a user. Use this function to:
Review the layout of your help window
Test any hotlinks
Ensure the correct message numbers have been used
To test the current help member
Type "T" in the Function field.
Type the Type, Major, Minor, and Language components in their respective fields.
Press Enter.
The help member is displayed. For example:
                               Maint Help
                           Standard Parameters

  The Standard Parameters panel allows for the specification of
  parameters which are not generator definition specific, but
  pertain to all programs or class of programs.
  For model details see: <<Maint>>

  Field Description
   <<Module>>
   <<System>>
   <<Global data area>>
   <<With block>>
   <<Title>>
   <<Description>>
   <<First header>>
   <<Second header>>
   <<Command>>
  Page ... 1  / 2
  Enter-PF1---PF2---PF3---PF4---PF5---PF6---PF7---PF8---PF9---PF10--PF1
frwrd help retrn quit bkwrd frwrd |
Tip:
You can also test the current help member by entering
"Test" on the command line of the Help Text
editor.
If there is more than one page of help text, you can navigate through the pages as follows:
| Action | Method |
|---|---|
| Display the next page. | Press PF8 (frwrd) or Enter. |
| Display the previous page. | Press PF7 (bkwrd). |
| Display a page that is one or more pages before or after the current page. | Type the page number in the Page field and press Enter. |
| Return to the Help Text main menu. | Press PF2 (retrn). |
Notes:
This function on the Help Text main menu saves the help text currently in the edit buffer to the help text file.
To save the current help member
Type "S" in the Function field.
Ensure that the Type, Major, Minor, Language, and Profile values are correct.
Press Enter.
A message is displayed confirming that you saved (or replaced) the help text.
Tip:
You can also save a help member by entering
"SAVEH" on the command line of the Help Text
editor.
This function on the Help Text main menu lists existing help text components for selection.
To list the current help text components
Type "L" in the Function field.
Press Enter.
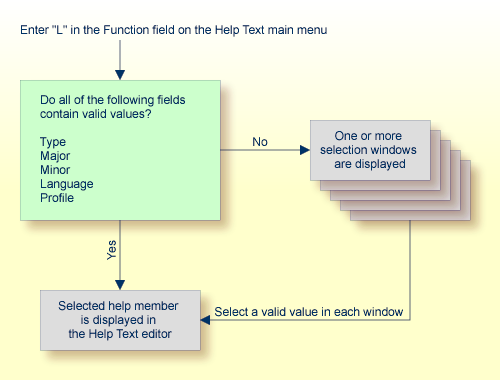
A window is displayed for each blank field or field containing a non-valid value on the Help Text main menu. When all the fields are blank or contain non-valid values, one selection window is displayed for each of the following fields:
Type
Major
Minor
Language
Default profile
Select the appropriate component in each selection window.
After selecting the components, the help member is displayed in the editor.
Note:
If you enter a non-valid value in any field, the selection values in
the corresponding window are displayed in alphanumeric order beginning with the
next valid value. For example, if you enter "N" and
it is not a valid value, the list will begin with values that begin with the
letter N.
The following diagram illustrates the process the List function follows:
The selection windows are:
   CSHLTYPE            Natural Construct              CSHTYPE0
   Aug 17            Select Type Component              1 of 1

             D File - DB field
             F Program - field
             P System - program
             O Other
  Type ... _
  Enter-PF1---PF2---PF3---PF4---PF5---PF6---PF7---PF8---PF9---
        help  retrn quit
Enter selection |
This window displays the valid Type components. These are:
| Type Component | Description |
|---|---|
| D | Help for a database field (Minor component) within a file (Major component). |
| F | Help for a field within a program. |
| P | Help for a program or map. |
| O | Miscellaneous help (the Major and Minor components may have any value; for example, any procedure or glossary type help text). |
To select a Type component
Type the appropriate code in the Type field.
Tip:
You can also move the cursor to the line containing the Type
component.
Press Enter.
  CSHLMAJR                    Natural Construct                     CSHLMJR0
  Aug 17                    Select Major Component                    1 of 1

  Type P
  --------------------------------------------------------------------------
  CN
  CP
  CS
  CT
  CU
  CUFMPDA
  CUMNPDA
  CUOMPDA
  CUSCPDA
                            End of Data

  Major .............. ________________________________
  Enter-PF1---PF2---PF3---PF4---PF5---PF6---PF7---PF8---PF9---PF10--PF11--PF
        help  retrn                         bkwrd frwrd
Position cursor or enter screen value to select |
This window displays the Major components associated with the selected Type component. Press PF8 (frwrd) to scroll forward through the list; press PF7 (bkwrd) to scroll backward through the list.
To select a Major component
Type the appropriate value in the Major field.
Tip:
You can also move the cursor to the line containing the Major
component.
Press Enter.
  CSHLMINR                    Natural Construct                     CSHLMIR0
  Aug 17                    Select Minor Component                    1 of 1

  Type P / Major CU
  --------------------------------------------------------------------------
  CU--DWM0                         Window Help
  CU--DYM0                         Dynamic Attributes Help
  CUBAMA0                          Batch Help
  CUBAMB0                          Batch Help
  CUBAMC0                          Batch Help
  CUBAMD10                         Batch Help
  CUBAMD20                         Batch Help
  CUBAMD30                         Batch Help
  CUBAME0                          Batch Help
  CUBOKMA0                         BROWSE-OBJECT-KEY-PDA Help
  CUBOMA0                          BROWSE-OBJECT-SUBP Help
  Minor .............. ________________________________
  Enter-PF1---PF2---PF3---PF4---PF5---PF6---PF7---PF8---PF9---PF10--PF11--PF
        help  retrn                         bkwrd frwrd
Position cursor or enter screen value to select |
This window displays the Minor components associated with the selected Type/Major component. Press PF8 (frwrd) to scroll forward through the list; press PF7 (bkwrd) to scroll backward through the list.
To select a Minor component
Type the appropriate value in the Minor field.
Tip:
You can also move the cursor to the line containing the Minor
component.
Press Enter.
 CSHLLANG                    Natural Construct                     CSHLLAN0
 Aug 17                  Select Language Component                   1 of 1

 Type P / Major CU / Minor CUBOMA0
 --------------------------------------------------------------------------
  1 English                        Standard Parameters
                           End of Data


 Language ........... __
 Enter-PF1---PF2---PF3---PF4---PF5---PF6---PF7---PF8---PF9---PF10--PF11--PF
       help  retrn                         bkwrd frwrd
Position cursor or enter screen value to select |
This window displays the selected help member in all defined languages (in this example, only English is defined). Press PF8 (frwrd) to scroll forward through the list; press PF7 (bkwrd) to scroll backward through the list.
To select a Language component
Type the appropriate code in the Language field.
Tip:
You can also move the cursor to the line containing the Language
component.
Press Enter.
  CSHPLIST                  Natural Construct                       CSHPLST0
  Aug 17                      Select Profile                          1 of 1

  Profile    Description
  ---------- ------------------------------------------------
  ACTION     ** Automatically created during batch load **
  CSUSEREX   Natural Construct user exit sample profile
  SYSCSTDE   ** Automatically created during batch load **
  NCSTHELP   Default CST451 help text profile
  PREDICT    Default Predict extended description profile
  Profile name ................. ________
  Enter-PF1---PF2---PF3---PF4---PF5---PF6---PF7---PF8---PF9---PF10--PF11--PF
        help  retrn                         bkwrd frwrd
Position cursor or enter screen value to select |
This window displays the valid help profiles. Press PF8 (frwrd) to scroll forward through the list; press PF7 (bkwrd) to scroll backward through the list.
To select a profile
Type the name of the help profile in the Profile name field.
Tip:
You can also move the cursor to the line containing the help
profile name.
Press Enter.
The selected help member is read into the edit buffer and the Help Text editor is displayed. For a description of this editor, see Editing Help Text.
This function on the Help Text main menu purges a help member from the help text file. The help text does not have to be read into the edit buffer before the purge.
To purge a help member
Type "P" in the Function field.
Type the Type component in the Type field.
Type the Major component in the Major field.
Type the Minor component in the Minor field.
Type the Language component in the Language field.
Press Enter.
The message "Help text exists, Press enter to confirm purge" is displayed.
Press Enter again to confirm the purge.
Note:
To cancel the purge, enter a blank or another code in the
Function field.
This function on the Help Text main menu clears the help text from the edit buffer. In addition, all values except the language code and the profile name are cleared from the Help Text main menu.
Note:
This function only clears the edit buffer; it does not delete the
saved help text.
To clear the edit buffer
Type "C" in the Function field.
Press Enter.
If the contents of the editor were saved, the message "Edit buffer successfully cleared" is displayed.
Note:
If the contents of the editor were not saved, the message
"Current Help Text NOT Saved. Press Enter to Confirm
CLEAR" is displayed. You can then use the Save Help Text function
to save the help member or press Enter to clear the buffer without saving the
help member.
This function on the Help Text main menu prints a hardcopy (paper copy) of the help text currently in the edit buffer. To use the Print Saved Help Text function, the following conditions apply:
| Platform | Condition |
|---|---|
| Mainframe | Your machine must be capable of printing from Natural. For more information, see the Natural documentation. |
| Unix | Device LPT1 (in your NATPARM module) must be associated with a hardcopy printer. Contact your Systems personnel. |
To print a hardcopy of the help text
Type "H" in the Function field.
Type the Type component in the Type field.
Type the Major component in the Major field.
Type the Minor component in the Minor field.
Type the Language component in the Language field.
Press Enter.
The headers, date, and time are printed at the top of each page. The document name (a unique identifier of the help text in the order Type/Major/Minor/Language) and page number are printed at the bottom of each page. Natural Construct fits as many help text pages on each hardcopy page as there is room.
Note:
Batch hardcopy of help text is also available. For information, see
CSHHCOPY Hardcopy
Utility.
This function on the Help Text main menu maintains the help profiles used for help text. These profiles determine the size and placement of the help windows that use them.
To view, create, or modify profiles
Type "M" in the Function field.
Type the name of the profile in the Profile field.
Press Enter.
The Maintain Default Profiles panel is displayed, showing the profile specified in the Profile field. For example:
 CSHPFM               N a t u r a l   C o n s t r u c t                 CSHPFM0
 Aug 17                   Maintain Default Profiles                      1 of 1


 Action ......................... __      A,B,C,D,M,N,P,R
 Profile ........................ SYSTEM__
 Description .................... DEFAULT USER HELP PROFILE.___________________
 Lines per page ................. 15_
 Message Library ................ CSTLDA__
 Window Settings
 Top left .....    Line ......... ___
                   Column ....... ___
                   %W setting ... ____
 Size .........    Width ........ 80_
                   Height ....... ___
                   Frame  ....... X
 Dynamic Attributes
 Hotlink Begin .................. <<__
 Hotlink End .................... >>__
Enter-PF1---PF2---PF3---PF4---PF5---PF6---PF7---PF8---PF9---PF10--PF11--PF12---
help retrn quit test main |
You can use this panel to perform the following tasks:
| Task | Procedure |
|---|---|
| Add a help profile. | Type "A" in Action and specify the values for the new profile. |
| Display the profile names in alphanumeric order. | Type "B" in
Action as follows:
|
| Clear the settings for the current profile from the panel. | Type "C" in Action. |
| Display the settings for the profile specified in Profile. | Type "D" in Action. |
| Modify the settings for the profile specified in Profile. | Type "M" in
Action and modify the values for the profile.
Note: |
| Display the settings for the next profile in the file. | Type "N" in Action. |
| Purge (delete) the profile specified in Profile. | Type "P" in
Action.
Note: |
| Recall the settings for the last profile purged from the file. | Type "R" in
Action.
Note: |
| Change the name of the current profile. | Type over the name displayed in Profile with a new name. |
| Change the description for the current profile. | Type over the information displayed in Description with a new description. |
| Change the number of lines available for help text. | Type over the number displayed in Lines per page. The default number of lines on each page of help text is 15. In addition to the lines that make up the body of the help member, each help window contains up to two header lines, an input line (that displays the Page fields), and two PF-key lines. |
| Use a different library to store message numbers and text for the current help member. | Type over the name displayed in
Message library. Natural Construct uses this name to
locate the library in which message numbers and their associated text are
stored. This field is required if you are using message numbers in the
Header 1, Header 2, and
Hotlink fields, as well as in the body of the help
member.
This field defaults to the CSTLDA library, which contains messages for Natural Construct help members. You can create a custom message library to store help members for your generated applications. |
| Modify the window settings. | Type over or specify the following window
settings:
|
| Test the window settings. | Press PF4 (test). For information, see Test the Help Window. |
| Change the dynamic attribute characters. | Type over or specify the following dynamic
attribute values. The character(s) must be unique:
|
Press PF2 to return to the Help Text editor.
Notes:
You can test the help window to see how the headings will appear and to ensure the size and position of the help window are appropriate. The dimensions specified on the Maintain Default Profiles panel are used in the test.
Tip:
You can test a help window before performing the Add or Modify
action for a profile.
To test the help window
Press PF4 (test).
A window is displayed. For example:
Specify headings for test window HD 1 HD 2 |
Type the heading(s) for the test window (required to calculate the height of the window).
For example, if your help member has two headings, type a value in each of the heading fields. For example:
Specify headings for test window HD 1 N a t u r a l C o n s t r u c t HD 2 - TEST WINDOW SETTINGS - |
Press Enter.
The Test Window Settings window is displayed as users will see it. For example:
                         N a t u r a l   C o n s t r u c t
                              - TEST WINDOW SETTINGS -

    Help text line                    1
    Help text line                    2
    Help text line                    3
    Help text line                    4
    Help text line                    5
    Help text line                    6
    Help text line                    7
    Help text line                    8
    Help text line                    9
    Help text line                   10
    Help text line                   11
    Help text line                   12
    Help text line                   13
    Help text line                   14
    Help text line                   15
  PAGE:  1 of  1
  Enter-PF1---PF2---PF3---PF4---PF5---PF6---PF7---PF8---PF9---PF10--PF11--PF1
              retrn                         bkwrd frwrd
Help for T/Major/Minor/Language |
Press Enter again to return to the Maintain Default Profiles panel.
You can either keep the window settings as they are or modify them as desired and test the window again.