
This section describes Natural Construct and the features and functions of the Help Text subsystem. It includes a detailed overview of the procedure to create help text for your applications.
This section covers the following topics:
Natural Construct is a functionally rich productivity and standardization tool. Using Natural Construct, application developers can enhance their Natural environment and speed up the design and implementation of their Natural applications.
This section introduces Natural Construct and describes:
How to access the Natural Construct subsystems
How to use direct commands
The PF-key functions
The standard menu codes
How to use online help
How modules are saved and stored
The following topics are covered:
Written for Software AG's Natural/Predict environment, Natural Construct assists developers in achieving higher productivity goals than are obtainable using Natural and Predict alone. At the same time, Natural Construct helps to standardize and control the quality of the application development process.
Natural Construct can be used by a variety of users on a number of platforms. It consists of the following subsystems:
| Subsystem | Description |
|---|---|
| Help Text | Used by the documenter or developer to create and maintain help text at the panel (map) and/or field level. |
| Administration | Used by the administrator to define and maintain the models Natural Construct uses to generate programs. For information, see Natural Construct Administration and Modeling. |
| Generation | Used by the developer to generate development
modules, including:
For information, see Natural Construct Generation. |
This section describes how to access the Natural Construct Help subsystem.
Notes:
 To access the Help Text subsystem
Type "ncsth" at the Next prompt.
Press Enter.
Note:
To access the Help Text subsystem in this way, your user ID must be
set up to access the Natural Construct SYSLIBS library. If necessary, have your
system administrator set up your user ID correctly.
To access the Help Text subsystem
Type "csth" at the Next prompt.
Press Enter.
Each of the three subsystems (Help Text, Generation, and Administration) has its own main menu, which is displayed when you access the subsystem. However, as this documentation addresses the needs of Natural Construct documenters, the Help Text main menu is the only Natural Construct main menu referred to.
Note:
For a description of this menu, see
Structure of the
Help Text Subsystem.
You can move around within the Help Text subsystem by entering codes on menus, pressing PF-keys, or issuing direct commands. Direct commands allow you to go directly to any function or menu within the subsystem — without using intervening menus. They are useful for experienced users who know the menu structure, the valid menu codes, and the required parameters at each menu level. The following example shows the direct command line:
Command ______________________________________________________________ |
When specifying direct commands, the following conventions apply:
You can string together as many commands as you like. If one of the codes specified is not valid on a menu, Natural Construct displays that menu so you can enter a valid code.
To indicate a new menu or level, leave a space between function codes.
To indicate parameters that are at the same level, separate them with a slash (/).
The following diagram illustrates a sample direct command:
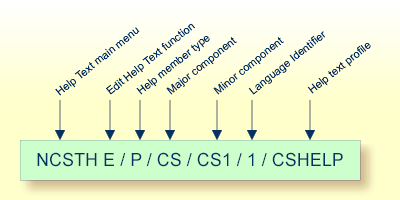
This command accesses the Help Text main menu (NCSTH), the Edit Help text function (E) on the main menu, the Type (P), Major (CS), and Minor (CS1) components, as well as the Language component (1) and help profile (CSHELP) for a sample help member.
Note:
The help profile is only required when creating a new help
member.
When a direct command is entered on the command line for a menu, Natural Construct first determines whether the code is a valid option on that menu. If no code matches the first code in the command, Natural Construct checks the main menu for a match.
Note:
You can also issue a direct command at the Natural Next prompt
(Direct command box for Unix). While you are in the SYSCST library, for
example, you can enter "CSTH E/P/CS/CS1/1/CSHELP" to
perform the sample command above.
Throughout the Natural Construct system, certain PF-keys have standard functions (pressing the PF1 key accesses online help, for example). The PF-key lines, which are located at the bottom of most panels, display the PF-key functions for that panel.
Notes:
The standard PF-keys and functions are:
| PF-Key | Name | Function |
|---|---|---|
| PF1 | help | Displays help for a particular panel or field.
Note: |
| PF2 | retrn | Displays the previous panel. Pressing PF2 is equivalent to entering a period (.) in the Function field on a menu. |
| PF3 | quit | Terminates the Natural Construct session. In most cases, a confirmation window is displayed when you press PF3. Press PF3 again to complete the termination process. |
| PF7 | bkwrd | Scrolls backward (up) through data. |
| PF8 | frwrd | Scrolls forward (down) through data. |
| PF10 | left | Displays the panel to the left of the current panel. If you are currently on the first panel in a series of panels, pressing PF10 displays the last panel in the series. |
| PF11 | right | Displays the panel to the right of the current panel. If you are currently on the last panel in a series of panels, pressing PF11 displays the first panel in the series. |
| PF12 | main | Displays the Natural Construct Help Text main menu. |
The following menu codes are available on each menu throughout the Natural Construct system:
| Code | Function | Description |
|---|---|---|
| . | Return | Typing a period (.) and pressing Enter terminates the current program and returns you to the previous menu. It is equivalent to pressing PF2 (retrn). |
| ? | Help | Typing a question mark (?) and pressing Enter displays help for that panel. It is equivalent to pressing PF1 (help). |
While you are using Natural Construct, you can display help information about the current panel by moving the cursor anywhere on the panel (except an input field) and pressing PF1 (help).
If your cursor is not on an input field when you request help, Natural Construct displays the passive panel-level help containing an explanation of the functionality of that screen, as well as the hotlinks to a model overview and descriptions of all input fields and PF-keys.
Note:
If the cursor is in an input field when you request help, Natural
Construct displays help information for that field. For more information, see
Field-Level
Help.
The following example shows the first help window for the Help Text main menu:
                              Panel Help
                          Help Text Main Menu

 This menu lists the available help text functions, as well as the
 code you enter to invoke each function. In addition to the Function
 field, other input fields are also provided. These additional input
 fields are required for some of the functions listed.

 You use the functions available through this menu to create and
 maintain help text for your generated modules. All Construct-
 generated modules contain the code required to access the help text.

 Field Help
  <<Function>>
  <<Type>>
  <<Major>>
  <<Minor>>
  <<Language>>
 Page ... : 1  / 2
 Enter-PF1---PF2---PF3---PF4---PF5---PF6---PF7---PF8---PF9---PF10--PF1
 frwrd help  retrn quit                    bkwrd frwrd
Help for: P/CS/CSHMNM0/1 |
Within this window, you can perform the following tasks:
| Task | Description |
|---|---|
| Scroll forward through the pages of help text. | Do one of the following:
|
| Scroll backward through the pages of help text. | Do one of the following:
|
| Return to the main help window. | Do one of the following:
|
| Display help about how to use the online help facility. | Press PF1 (help) in any help window. |
| Display information about a particular field or PF-key. | Move the cursor to the hotlink (indicated by the << >> brackets) and press Enter. A window is displayed, containing help information about the selected topic. |
The following example shows the help window for the Function field:
                              Field Help
                               Function

 Type the code for the function you want to invoke. The codes and
 functions are:
  E        <<Edit Help Text>>
  T        <<Test Help Text>>
  S        <<Save Help Text>>
  L        <<List Help Text>>
  P        <<Purge Help Text>>
  C        <<Clear Edit Buffer>>
  H        <<Print Saved Help Text>>
  M        <<Maintain Default Profiles>>
  .        <<Help>>
  ?        <<Return>>


 Page ... : 1  / 1
 Enter-PF1---PF2---PF3---PF4---PF5---PF6---PF7---PF8---PF9---PF10--PF1
 frwrd help  retrn quit                    bkwrd frwrd
Help for: F/#CODE/CSHMNM0/1 |
To display information about each function
Move the cursor to the function name.
Press Enter.
For example, if you move the cursor to <<Edit Help Text>> and press Enter, information about the Edit Help Text function is displayed.
Natural Construct has the following two types of field-level help:
Passive field-level help displays a description of a field on a panel. Passive help eliminates unnecessary screen navigation and takes users directly to the information they need. This eliminates much of the unnecessary reading and search effort required to traverse several screens before help information is located. In addition, since one help text member is referenced, the same information is always displayed for the same screen prompt.
Active field-level help displays a selection window containing the valid values for a field. If active help is available, the field is followed by an asterisk (*).
To display help for a field followed by an *
Move the cursor to the field.
Press PF1 (help).
Or:
Type a question mark (?) in the first-character position of the
field and press Enter.
The active help window for that field is displayed. For example, the following window is displayed when you request help for the Type field:
  CSHLTYPE            Natural Construct              CSHTYPE0
  Aug 17            Select Type Component              1 of 1

            D File - DB field
            F Program - field
            P System - program
            O Other
 Type ............ _
 Enter-PF1---PF2---PF3---PF4---PF5---PF6---PF7---PF8---PF9---
help retrn quit |
To select a value from an active help window
Type the appropriate code in the Type field.
Tip:
You can also move the cursor to the line containing the
code.
Press Enter.
You are returned to the original panel and the selected value is displayed in the field for which you requested help.
Tip:
You can display help about how to use the online help facility by
pressing PF1 (help) in any help window.
This section provides an overview of the procedure to create passive help for your generated applications. The steps in this procedure are:
Note:
Active help is set up by the application developer, not the
documenter. For information, see Field-Level
Help.
This step is preformed during the set up of your application in Natural Construct; it is the responsibility of the application developer.
To enable passive help for a panel or field, the help parameter for the panel or field must be defined with CD-HELPR. CD-HELPR is a subprogram that acts as a link between the application and the help member. When a user selects help on a panel or field, the application uses CD-HELPR to locate and display the correct help member. For example:
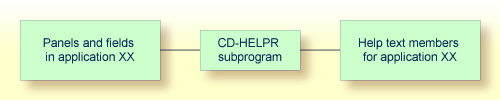
To set up passive help, the Help parameter for a panel (map) or the HE
parameter for a field must be defined with 'CD-HELPR',=. When a
user requests help, the CD-HELPR subprogram determines which help member to
display based on the internal name of the panel or field.
Note:
Help parameters should be set up by someone who is familiar with the
Natural programming language and with Natural Construct. For more information,
see Enable Passive
Help.
Fields that require active help do not use CD-HELPR; instead, the developer inserts the name of the active help module in the HE parameter of the field. In most cases, the active help module is generated using the Browse-Helpr or Browse-Select-Helpr model.
This step is performed by the person responsible for setting up and writing the help text. This can be either the application developer or a documenter. This step requires no programming knowledge.
Note:
This section provides an overview of the tasks to create help
members, while the remaining chapters in this documentation provide more
detailed information.
To create a help member:
Use the Help Text main menu to set up a help member for each panel and field that requires passive help.
To set up a help member
Type "E" in the Function field on the Help Text main menu.
Type the Type component in the Type field.
Type the Major and Minor components in their respective fields.
Type the code for the language in which the help member will be set up in the Language field.
Type the name of the default profile you are using in the Profile field.
Press Enter.
The Help Text editor is displayed.
Note:
For information about the Help Text editor, see
Editing Help
Text.
When setting up a help member, the first three components of the help member name (Type, Major, and Minor) must be consistent with CD-HELPR's internal logic. When help is requested on a panel or field, CD-HELPR determines the help member to display based on the internal name of the panel or field.
For example, assume the internal name of the
Profile field is +Profile-Name. Based on
CD-HELPR's internal logic, Natural Construct attempts to display a help member
with the following component names when help is requested for the field:
F/+/Profile-Name
where F is the Type, + is the Major, and
Profile-Name is the Minor component. To set up passive help for
the Profile field, create a help member with the same
three component names.
Tip:
To create multilingual help members, specify a different Language
component on the Help Text main menu and provide help text in that language. At
runtime, the help member corresponding to the selected language will be
displayed when a user requests help. For more information, see
Provide Multilingual
Support.
If your Natural Construct-generated application is enabled for passive help, you can determine the valid help member name (Type, Major, and Minor components) for a panel or field by placing your cursor on the panel or field and pressing PF1 (Help). The name of the help member is displayed. For example:
+-----------------------------------------------------------------------------+ | Help ID.......: P/CS/CD-HELP | | No Help text has been entered for the requested object. | +-----------------------------------------------------------------------------+ |
Note:
If a help member has already been set up for the panel or field,
the corresponding help window is displayed and the member name is shown at the
bottom of the window.
Tip:
You can also determine valid help member names if you understand
CD-HELPR's internal logic. For information, see
Enable Passive
Help.
Once the help member has been set up with the correct component names, you can write the content of your help in the Help Text editor. When writing this help information, specify the first and second level headings and the hotlink name at the top of the editor window.
Note:
You can either use the Header 1,
Header 2, and Hotlink names or
use message numbers, which are linked to text strings in the Natural SYSERR
utility. At runtime, the message number is replaced with its associated
text.
To write the help information
Type the first-level heading in Header 1.
The headings identify the help topic and are displayed at the top of the help text window.
Type the second-level heading in Header 2.
Second-level headings are also displayed in various selection windows and help documenters identify an existing help member for editing.
Type the hotlink name in Hotlink.
This name identifies this help topic whenever the hotlink is used in a help window.
Type the help information on the lines provided.
Notes:
Hotlinks (hyperlinks) identify additional help available in help text windows. They provide the user with a means of moving (navigating) through help text. For example, the help displayed for a panel may have a hotlink set up for each field on the panel. To access help for a field, the user moves the cursor to the hotlink and presses Enter. A window containing the additional help is displayed.
When a user selects a hotlink, the corresponding help text member is
displayed, similar to hypertext. For example, if a help text member for a panel
description has the embedded hotlink, <<Header 1>>,
the help member for the Header 1 field is displayed when
a user selects the area between the angle brackets.
Hotlinks allow you to reuse help members, therefore eliminating the need to maintain multiple help text definitions. For example, assume you have a standard definition for the Function field and this field is displayed on many panels throughout your application. Instead of adding a definition for the Function field to each panel-level help member, you can add a hotlink to the help member containing the Function field definition. And because the Function field is referenced throughout your application, any modifications to the field definition are instantly updated.
A hotlink is displayed in a help window as a bolded word or phrase enclosed within double angle brackets (<< >>). The following example shows the first help window for the Help Text main menu:
                              Panel Help
                          Help Text Main Menu

 This menu lists the available help text functions, as well as the
 code you enter to invoke each function. In addition to the Function
 field, other input fields are also provided. These additional input
 fields are required for some of the functions listed.

 You use the functions available through this menu to create and
 maintain help text for your generated modules. All Construct-
 generated modules contain the code required to access the help text.

 Field Description
  <<Function>>
  <<Type>>
  <<Major>>
  <<Minor>>
  <<Language>>
 Page ... : 1  / 2
 Enter-PF1---PF2---PF3---PF4---PF5---PF6---PF7---PF8---PF9---PF10--PF1
 frwrd help  retrn quit                    bkwrd frwrd
Help for: P/CS/CSHMNM0/1 |
The hotlinks available from this window are:
Function
Type
Major
Minor
Language
Hotlink entries consist of a Type, Major, and Minor component name
separated with a slash (/) delimiter. In the following example, a hotlink to
the Function field help member
(<<f/#code/cshmnm0>>) is shown in the help member for
the Help Text main menu:
  Header 1 . *1132.1                                                     Profile
  Header 2 . *0304.1                                                    NCSTHELP
  Hotlink .. *1132.1
  >                                                > + ABS X X-Y _ S 23   L 1
  TOP ....+....1....+....2....+....3....+....4....+....5....+....6....+...   AD
    > This menu lists the available help text functions, as well as the    <
    | code you enter to invoke each function. In addition to the Function  |
    | field, other input fields are also provided. These additional input  |
    | fields are required for some of the functions listed.                |
    |                                                                      |
    | You use the functions available through this menu to create and      |
    | maintain help text for your generated modules. All Construct-        |
    | generated modules contain the code required to access the help text. |
    |                                                                      |
    | *0210.1                                                              |
| <<f/#code/cshmnm0>> | |
When the help window is accessed, the hotlink is displayed as follows:
             Panel Help
                          Help Text Main Menu

 This menu lists the available help text functions, as well as the
 code you enter to invoke each function. In addition to the Function
 field, other input fields are also provided. These additional input
 fields are required for some of the functions listed.

 You use the functions available through this menu to create and
 maintain help text for your generated modules. All Construct-
 generated modules contain the code required to access the help text.

 Field Description
<<Function>> |
The following information is derived for this window:
The first heading is derived from the Header 1
field for the help member for the Help Text main menu
(p/cs/cshmnm0/1)
The second heading is derived from the Header 2 field for the help member for the Help Text main menu
The column description is derived from a text string SYSERR (message number *0210.1)
The name displayed between the hotlink identifiers is derived from
the Hotlink field for the help member for the
Function field (f/#code/cshmnm0)
To add a hotlink
Access a help member in the Help Text editor.
For information about accessing the editor, see Access the Help Text Editor.
At the location within the help text where you want to place the hotlink, type the first three component names (Type/Major/Minor) of the help member within double angle brackets (<< >>).
For example:
<<F/+/Profile-Name>>
Tip:
Place hotlinks on a separate line with no other text. Otherwise,
the hotlink may be truncated and all information may not be visible within the
window.
Save the help member.
To the user viewing the hotlink from a help window, it is displayed as follows:
<<Help Profile>>
The hotlink name in this example (Help Profile) is derived from the Hotlink field in the help text member for the Profile field.
Note:
For more information, see
Fields in the Help
Text Editor.
Natural Construct provides enhanced support for multilingual applications and application help text. This support includes:
You can use the Help Text editor to set up translations for help members in each supported language. When help is requested, the help information for the appropriate language is displayed.
For example, assume you are setting up help for the Help Text main menu and your application supports three languages: English (Language 1), German (Language 2), and French (Language 3).
To set up language-independent help members
Create three help members with the same component names except for the Language component.
For example:
p/cs/cshmnm0/1
p/cs/cshmnm0/2
p/cs/cshmnm0/3
Note:
For more information, see Editing Help
Text.
Provide help information for each help member in the appropriate language.
When help is requested for the Help Text main menu, the system
displays the p/cs/cshmnm0 help member for the current language
(for example, p/cs/cshmnm0/1).
Note:
If a help member for the current language does not exist, the
English language help member is displayed by default.
You can use message numbers to set up translations for heading and hotlink names in each supported language. Message numbers are linked to text strings in the Natural SYSERR utility, such as heading names, panel names, field names, etc. When creating multilingual help text, use message numbers in place of the actual names. At runtime, each message number is replaced with its associated text. The application user does not see the message numbers; the user only sees the text.
For example, assume your application supports three languages: English, German, and French. Each heading or hotlink message number will have three corresponding text strings — one in each language. Based on the system language currently being used, the correct heading or name will be displayed when the user requests help. Because you can use the same message numbers in your help and in your application, panel and field names are kept consistent throughout your application and application help.
Notes:
This section describes how to enable message numbers for use in your help text and how to insert a message number into a help text member. The following topics are covered:
To enable message numbers for use in your help text
Use the Natural SYSERR utility to set up the appropriate text and message numbers.
For information about the SYSERR utility, see the Natural Utilities documentation.
Use the Maintain Default Profiles function to set up the help profile attached to the help member.
To set up the help profile, specify the name of the library in which your message numbers are stored in the Message Library field on the Maintain Default Profiles panel. For information, see Maintain Default Profiles Function.
You can insert message numbers in the Header 1 and Header 2 fields, in the Hotlink field, and in the body of the help text.
Tip:
When placing message numbers within the body of help text, place
each number (or series of numbers) on a separate line with no other text.
Otherwise, help text may be truncated and all information may not be visible in
the help window.
To insert a message number into a help member
Access a help member in the Help Text editor.
For information about accessing the editor, see Access the Help Text Editor.
This step differs, based on whether you are inserting a message number into a field or into the body of your help text:
To insert a message number into the Header 1, Header 2, or Hotlink field, place the cursor over one of the fields and press Enter. Pressing Enter removes the protection on the fields so that you can type a value.
Note:
If you do not enter a value in the
Hotlink field, the value in the Heading
2 field is used. We recommend that your second heading and hotlink
names be identical and that they identify the topic for which the help member
applies, such as a panel or field name.
To insert a message number into the body of your help text, place the cursor on an empty line containing no additional text. For example, on a line where the message number will be used to represent a subheading.
Type the message number in the following format:
*NNNN.A
where:
| * | Is a variable that is replaced by the library name defined in your help profile at runtime. |
| NNNN | Is the message number in the message file. |
| .A | Is the sequential position of text within the message number (each message number can contain up to 15 separate text positions). |
For example, the help member for the Help Text main menu specifies *1132.1 in the Header 2 field. When the user requests help on the Help Text main menu, the help text for the CSTLDA library (by default), message number 1132, and position 1 is displayed as the second heading in the help window (in this case, Help Text Main Menu).
Note:
When specifying text positions within message numbers, the
values 1–9 represent the first nine text positions and the values A to F
represent text positions 10–15. For example, *1132.A represents the 10th
position of text within message number 1132. If the message number contains one
text position only, we recommend that you still use the .1 notation (for
example, *NNNN.1). This will ensure that the correct text will be displayed if
positions are added to the message number in the future.
Save the help member.
For information, see Save Help Text Function.
You can use a message number in conjunction with up to three substitution values. At runtime, substitution value(s) are displayed with the message text. A substitution value can either be a text string or another message number.
For example, assume you have two message numbers: *8910.1 (which represents the text "Due Date Field") and *9002.1 (which represents the text "Help"). You can insert the following entry in the Header 2 field for the help member for the Due Date field:
Header 2: *9002.1,*8910.1
In this example, the *9002.1 message number is set up to have substitution values placed before the text string "Help". Therefore, the second heading will be displayed as "Due Date Field" at runtime.
To use substitution values with message numbers:
To set up message numbers with place holders
Access the SYSERR utility.
To access SYSERR, enter "SYSERR" at the Next prompt (mainframe) or in the Direct command box (Unix). For information about this utility, see the Natural Utilities documentation.
Display the message number.
To set up a new message number, select "AD" (Add new messages).
To set up an existing message number, select "MO" (Modify messages).
In the text segment within the message number you are setting up, type the place holder characters in the following format:
:1::2::3:XXX
where:
| :1::2::3: | Are place holders for up to three substitution values that can be used with the message text. |
| XXX | Is the text within the message number. |
Note:
To limit the number of substitution values to one or two, type
:1:XXX or :1::2:XXX, respectively.
For example, to set up the*9002.1 message number (representing the message text "Help") so it can be used with up to three substitution values, specify the following:
:1::2::3:Help
In this example, substitution values are placed before the message text.
Note:
To have substitution values placed after the message text, type
the place holders after the text (for example,
Help:1::2::3:).
Save your changes.
For information, see Save Help Text Function.
To insert message numbers with substitution values
Complete steps 1 and 2 in the procedure for inserting message numbers into a help member.
For information, see Insert a Message Number into a Help Member.
Type the message number and substitution values in the following format:
*NNNN.X,ZZZZ,ZZZZ,ZZZZ
where:
| *NNNN.X | Is a message number set up for use with up to three substitution values. |
| ZZZZ | Is each substitution value — either a text block or a message number. |
For example, to display "Due Date Field Help" as the second heading, insert the *9002.1 (Help) message number with the substitution value *8910.1 (Due Date Field) into the Header 2 field as follows:
Header 2: *9002.1,*8910.1
At runtime, the message text is displayed as "Due Date Field Help".