The program editor supports bi-directional languages where text is written from right-to-left (for example, Arabic and Hebrew), and multi-byte character set languages such as Japanese and Chinese.
We recommend that you create source code in structured mode rather than reporting mode. Otherwise, you cannot use the expand/collapse editor feature (see Showing and Hiding Source Code).
For the differences between structured and reporting mode, see the section Natural Programming Modes in the Programming Guide. If you want to check whether structured mode has been activated or switch structured mode on, proceed as described in Programming Modes in the First Steps documentation.
For programming advice, see Using Context-Sensitive Help and the documentation in the Language section of the main overview page of Natural for Windows.
This section contains the following topics:
You start entering text in the first line (numbered with
0010) of an empty editor window.
When you add lines to the source code of an object, Natural numbers the
added lines in increments of ten. When you insert lines in source code, Natural
numbers the inserted lines in increments of one. Upon saving the source code,
Natural automatically renumbers all lines contained in the source code in
increments of ten beginning with 0010 at the first line.
Apart from that, you can renumber all source-code lines any time by using the renumber command as described in Renumbering Lines.
 To insert text
Place the cursor at the position in the source code where you want to insert text (the current line is highlighted by default) and type in new text or paste text from the clipboard (see Copying, Cutting and Pasting Text). See also Importing Data Fields.
Or:
To insert a blank line, place the cursor at the beginning of the
source-code line above which you want the new line to be inserted and press
ENTER.
The new text is inserted in the source code.
You can select one of the following:
A whole word.
A series of consecutive characters within a source-code line.
A series of consecutive characters that spans one or more lines.
Double-click on the word to be selected.
Or:
Position the cursor on the first character to be selected by using
either the left mouse button or the arrow keys. Drag the cursor to the last
character to be selected by pressing and holding down SHIFT and
using the arrow keys.
The selected word is highlighted.
Position the cursor on the first character to be selected by using either the left mouse button or the arrow keys.
Drag the cursor to the last character to be selected by holding down the left mouse button or by pressing and holding down SHIFT and using the arrow keys.
The selected text is highlighted.
Release the mouse button or the keys.
To select the entire text
From the menu, choose .
Or:
Choose the following toolbar button:
![]()
To deselect text
Click anywhere in the source code.
Or:
Press an arrow key.
The text is no longer highlighted.
The copy/cut and paste functions of the program editor are used to copy, move or delete text within a single object source or between multiple object sources (see also Dragging and Dropping Text).
It is possible to revoke a cut or paste operation after it has been performed. See Undoing or Redoing Modifications.
If you want to create data fields, as an alternative to using copy and paste, you can import fields from another source object as described in Importing Data Fields.
To copy or cut and paste text
Select the text you want to copy or cut as described in Selecting Text.
From the menu, choose or .
Or:
Choose either of the following toolbar buttons:
![]() () or
() or
![]() ()
()
Or:
Press CTRL+C (to copy) or CTRL+X (to cut).
The selected text is placed on the clipboard and can be pasted in the source code contained in the active editor window.
If the text is to be pasted in another object source, open the appropriate source.
Position the cursor on the source-code line above which the copied or cut text is to be pasted.
From the or context menu, choose .
Or:
Choose the following toolbar button:
![]()
Or:
Press CTRL+V.
The text is pasted at the specified position in the source code contained in the active editor window.
If you want to paste the same text again, repeat Steps 4 and 5.
Drag-and-drop operations can be used to move or copy text. The drag source and drop target may be Natural Studio or a different application that supports drag-and-drop.
It is possible to revoke a drag and drop operation after it has been performed. See Undoing or Redoing Modifications.
To move or copy text using drag-and-drop functionality
Select the text you want to move or copy (see also Selecting Text) and position the mouse pointer anywhere in the selected (highlighted) text.
Press and hold down the left mouse button and move the mouse. In addition, hold down CTRL if you want to copy the text instead of moving it which is the default.
The mouse pointer changes to an arrow pointer inside a rectangle indicating that drag-and-drop editing is enabled. For a copy operation, a plus sign (+) is attached to the rectangle. A text insertion caret next to the arrow pointer indicates the position where the selected text can be dropped.
If the mouse pointer changes to a "no drop" pointer (slashed circle), the current target location does not accept a drop. This happens when you attempt to insert text into protected source code (see also Protecting Source-Code Lines) or when the drop target has no drag-and-drop capabilities. If you execute a move operation on protected source code, the text will be copied rather than moved to the target location.
You can press ESC if you want to cancel drag-and-drop editing.
Release the mouse button where you want to drop the text.
The selected text is dropped at the current position of the caret.
If the mouse button is released when the "no drop" pointer is visible, the drag-and-drop operation is canceled.
The editing actions you perform in the editor window can be revoked by
using the command or redone (after being
undone) by using the command. The
or command
applies to any source-code modifications that are not made via the
command line (for example, RENUMBER or STRUCT).
The number of actions which can be undone or redone is determined by the value specified in the preferences for the program editor and is limited by the memory allocated: see the editor options Max undo mem (MB) and Max no of undo described in Program Editor Options in the Using Natural Studio documentation.
The undo/redo buffer is cleared when you close the editor window.
Undo operations restore line numbering to its status before the operation. Redo operations restore line numbering to its status before the previous undo operation.
To undo an action
From the or context menu, choose .
Or:
Press CTRL+Z.
Or:
Choose the following toolbar button:
![]()
The source code is restored to its condition before the previous editing action or redo operation.
To redo an action that has been undone
From the menu, choose .
Or:
Press CTRL+Y.
Or:
Choose the following toolbar button:
![]()
The source code is restored to its condition before the previous undo operation.
When you delete text, it is cut from the object but is not placed on the clipboard. The only way to recover deleted text is by undoing the delete operation. See Undoing or Redoing Modifications.
Note that when text is deleted from a source, no warning is provided.
To delete text
Select text as described in Selecting Text.
From the or context menu, choose .
Or:
Choose the following toolbar button:
![]()
Or:
Press DEL.
The text is deleted from the source code contained in the active editor window.
You can mark or unmark an entire source-code line as a comment line or place a commentary text within a line.
To add a comment line
At the beginning of a source-code line, enter an asterisk (*)
followed by at least one blank character. For example: * This is a
comment line.
Or:
At the beginning of a source-code line, enter two asterisks (**),
with or without subsequent blanks. For example: **This is a comment
line.
Or:
At the beginning of a source-code line, enter the character string
slash-asterisk (/*), with or without subsequent blanks. For example:
/*This is a comment line.
To append a comment to a statement
In a source-code line, at the end of a statement, enter the character string blank-slash-asterisk ( /*).
For example: DEFINE DATA /*This is a comment.
To mark lines as comment lines
Place the cursor anywhere in the source-code line you want to mark.
Or:
Select one or more source-code lines as described in
Selecting
Text.
From the or context menu, choose > .
Or:
Press CTRL+M.
A comment mark (*) followed by a blank character is
added to the beginning of the specified source-code line(s).
To unmark lines as comment lines
Place the cursor anywhere in the comment line you want to unmark.
Or:
Select one or more source-code lines as described in
Selecting
Text.
From the or context menu, choose > .
Or:
Press CTRL+SHIFT+M.
A comment mark (* , ** or /*)
is removed from the beginning of the specified source-code
line(s).
To renumber source-code lines
From the menu, choose .
Or:
Choose the following toolbar button:
![]()
Or:
In the command line, enter the following system command:
RENUMBER
See also RENUMBER in
the System Commands documentation.
The source-code lines of the object in the active window are renumbered in increments of ten.
Renumbering of Source-Code Line Number References - Programming Guide
You can translate source code from upper to lower case or from lower to upper case.
To translate text from upper to lower case or vice versa
Select the text you want to translate as described in Selecting Text.
From the or context menu, choose either > or > .
Or:
Press CTRL+SHIFT+U for upper case or
CTRL+SHIFT+L for lower case.
You can switch automatic upper-case translation on by setting the
corresponding editor option as described in
Program
Editor Options in the Using Natural
Studio documentation. With automatic upper-case translation, the
entire source code (except commentary text) is translated to upper case
whenever you save, check or catalog the source code. Automatic upper-case
translation is useful in a remote environment on a mainframe computer where the
LOWSRCE (Allow Lower-Case Source) compilation option is set to
OFF. For details, see LOWSRCE in
COMPOPT in the System Commands
documentation for mainframes.
The program editor provides the option of inserting automatic line breaks at a specified column while editing text or after selecting existing text.
The following rules apply when this option is active:
A line break is inserted whenever the cursor crosses the ruler while entering new text or modifying existing text. (For information on setting a ruler position, see Program Editor Options in the Using Natural Studio documentation.)
A line break is inserted at the blank character located next to the ruler (blank characters at the beginning of a line are ignored).
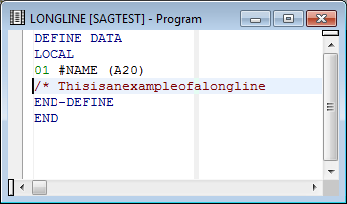
If there is no blank, the editor generates a long line which extends beyond the ruler as shown in the example below:
If you insert text or replace text strings that generate a long line, no automatic line break is performed. A line break will only be inserted if you modify this text and move over the ruler.
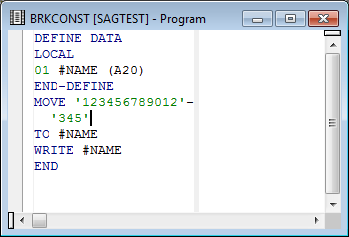
A text constant is continued on the next line(s).
An apostrophe (') or a quotation mark (") followed by a minus sign (-) is inserted at the line break where the cursor crosses the ruler or, if the constant contains one or more blank characters, at the blank located next to the ruler. Additionally, an apostrophe (') or a quotation mark (") is added to the beginning of the new line(s). For example:
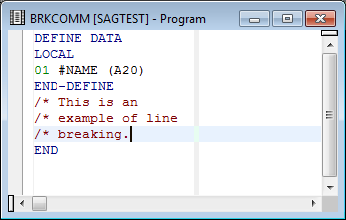
A comment is continued on the next line(s) if it contains a blank
character or if it is preceded by a blank character. The mark that indicates a
comment (*, ** or /*) is automatically
added to the beginning of the new line(s). For example:
If BACKSPACE is used at the end of a split line, this line will be concatenated with the next one. Any marks resulting from a previous line break will be retained in the new line and must be removed manually.
To activate automatic line breaking
In the Options dialog box, set the position of the ruler by using the Ruler position spin box and select the Automatic line breaks check box as described in Program Editor Options in the Using Natural Studio documentation.
A line break is inserted automatically whenever you move the cursor over the ruler while typing in text.
To insert automatic line breaks for existing text
Select the desired text section.
From the or context menu, choose > .
Automatic line breaks are inserted into the text according to the rules described earlier.
The program editor provides options to display the hexadecimal Unicode format of characters contained in a text constant and to convert these characters to their equivalent hexadecimal format. You can convert characters either to hexadecimal code page format or hexadecimal Unicode format, or vice versa. For conversion to hexadecimal code page format, the code page defined for the source is used. If no code page is defined for the source, the code page defined for the current Natural Studio session is used.
To display hexadecimal Unicode format
Hover the mouse pointer over a character contained in a text constant to display the hexadecimal value of the character.
Or:
Select multiple characters from a text constant and hover the mouse
pointer over the selected characters to display the hexadecimal value of the
characters.
A tool tip shows the hexadecimal Unicode representation of the character(s).
To convert characters to hexadecimal format
For hexadecimal code page format, select single or multiple characters from a text constant and press CRTL+ALT+X.
Or:
For hexadecimal Unicode format, select single or multiple characters
from a text constant and press CRTL+ALT+U.
The selected character(s) are replaced by the equivalent hexadecimal
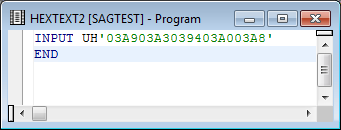
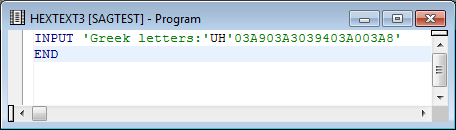
format as shown in the Unicode example with the Greek letters
ΩΣΔΠΨ below:

For hexadecimal code page format: a character that cannot be converted will be replaced by the substitution character of the defined code page.
Place either of the following prefixes before the apostrophe that precedes the constant:
For hexadecimal Unicode format: UH
For hexadecimal code page format: H
The constant must start with the hexadecimal value as shown in the Unicode example below:
Therefore, if you only convert part of a text constant, you may have to split the constant into multiple constants to avoid syntactical errors as shown in the Unicode example below:
To convert hexadecimal to character format
Select the hexadecimal string you want to convert and press CRTL+ALT+C. For example:
All digits selected in '41424344' are converted to
'ABCD'.
If the hexadecimal string selected is prefixed with UH
or H, it is interpreted as a Unicode character.
For example:
All digits selected in U'0041004200430044' or
UH'0041004200430044' are converted to U'ABCD' or
UH'ABCD' respectively.
A hexadecimal value that cannot be interpreted by the defined code page is substituted by non-printable characters.
For example:
All digits selected in '0041004200430044' are converted
to '[NUL]A[NUL]B[NUL]C[NUL]D'.
The keystroke recorder records and replays only input from the keyboard; mouse movements and operations are ignored. The keystroke sequence recorded last is retained for the duration of the Natural Studio session. The keystroke sequence can be saved as a macro for permanent use during any subsequent sessions.
This section contains the following topics:
To record a keystroke sequence
Place the cursor at the position where you want to begin recording.
From the menu, select > .
Or:
Choose the following toolbar button:
![]()
Or:
Press CTRL+SHIFT+R.
The mouse pointer changes to an arrow pointer with a symbol illustrating a cassette tape. This indicates that recording is in progress.
Press the keys in the sequence you want to record.
To stop recording
From the menu, select > .
Or:
Choose the following toolbar button:
![]()
Or:
Press CTRL+SHIFT+S.
Recording ends. The recording is retained for the duration of the current session and is overwritten by any subsequent recordings.
To replay a recorded keystroke sequence
Place the cursor at the position where you want to begin replaying the recording.
From the menu, select > .
Or:
Choose the following toolbar button:
![]()
Or:
Press CTRL+SHIFT+P.
The keystroke sequence recorded last is replayed.
You can save a recording as a macro, which can be used permanently, in any Natural Studio session. You can add a most frequently used macro or a macro command to the toolbar or menu bar or create shortcuts. You can overwrite macro code or delete a macro that is no longer required.
To save a recording as a macro
When you have stopped recording, from the menu, choose > .
The Save Macro dialog box appears.
In the Name box, type a name of up to 32 characters and choose OK to save the macro.
If a macro with the specified name already exists, an appropriate message appears asking whether to overwrite the contents of the existing macro or save the macro under a different name: choose Yes to overwrite or No to rename the macro.
The macro is saved under the specified name, added to your user profile and listed in the submenu of Tools.
You can save a maximum of 16 macros.
To run a macro
From the menu, choose .
All macros saved in your user profile are listed in the submenu.
From the macro list, choose the required macro.
The macro is executed and replays the recorded keystroke sequence.
To delete a macro
From the menu, choose > Delete Macro.
The Delete Macros window appears with a list of all macros saved in your user profile.
Select the macro you want to delete and choose Delete.
The macro is deleted from the list.
Choose OK to confirm the action and remove the macro from your user profile.
Or:
Choose Cancel to exit the dialog box without
any action.
To add a macro or a macro command to the toolbar or menu bar
Invoke the Customize dialog box and open the Commands page as described in Customizing Natural Studio in the Using Natural Studio documentation.
From the Categories drop-down list box, select Tools.Macros.
All macro commands and available macros are listed in the Commands list box.
Select a command or a macro and drag it to the menu bar. For detailed instructions, see Customizing Natural Studio.
To assign a shortcut to a macro or a macro command
Invoke the Customize dialog box and open the Keyboard page as described in Customizing Natural Studio.
From the Categories drop-down list box, select Tools.Macros.
All macro commands and available macros are listed in the Commands list box.
Select a command or a macro and press the key combination you want to assign as a shortcut to the selected command or macro. For detailed instructions, see Keyboard in Customizing Natural Studio.
The keyboard shortcut is now assigned to the macro or macro command and appears next to the associated macro command or macro name listed in the Macros submenu of Tools.
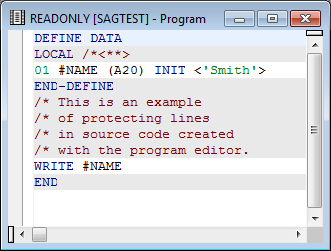
You can protect a single source-code line or a block of source-code lines against unauthorized modification by using read-only tags.
Protected source-code lines cannot be edited. In addition, you cannot
add lines to the beginning or end of source code where a protected block of
lines starts in the first line (0010) and ends in the last (here:
0090) as shown in
Example of Line
Protection. You can only add lines if the protected block
is preceded or followed by an unprotected line.
The following editor functions cannot be performed on protected source-code lines:
Cut and paste
Delete
Replace
Add/remove comment mark(s)
Upper/lower case translation
Insert/add line at top/bottom of protected block that starts in the first line of the source and ends in the last
| Warning: Read-only tags cannot be modified or deleted once the corresponding source object has been reloaded into the source buffer. |
Read-only tags are stored in the source object in the Natural system
file. They are removed from the source buffer and are therefore hidden when the
corresponding source object is reloaded into the source buffer. A source object
is reloaded into the source buffer, for example, when you execute a system
command such as STRUCT or
RENUMBER on the source, or when you open the source
object in the editor window.
You can exclude protected source-code lines from structural indentation
as described for the STRUCT command under
Indentation of Source Code
Lines in the System Commands
documentation.
In a reloaded source object where read-only tags are hidden, protected source-code lines are grayed out as shown in Example of Line Protection. (You can specify a different background color by changing the color definition as described in Program Editor Options in the Using Natural Studio documentation.)
To protect a single line
At the end of the line to be protected, enter a blank character and append the following tag:
/*<RO>
To protect a code block
At the end of the line where the block to be protected begins, enter a blank character and append the following tag:
/*<RO>>
At the end of the line where the block to be protected ends, enter a blank character and append the following tag:
/*<<RO>
Read-only tags are reinserted into the source buffer whenever you save the source object. You can prevent read-only tags from being reinserted by following the instructions below.
To stop reinsertion of read-only tags
At the end of the first source-code line, enter a blank character and append the following tag:
/*<**>
If the first source-code line contains a read-only tag, place this tag immediately (not separated by a blank character) in front of the read-only tag.
See also Example of Line Protection below.
In the example of a source object below, the lines of the
DEFINE DATA statement and the consecutive comment
lines are protected with read-only tags. The tag /*<**>
guarantees that the read-only tags are not reinserted into the source
buffer.
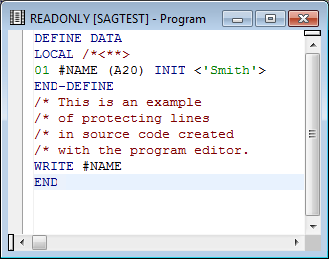
Read-only tags are hidden when the source object is reloaded into the source buffer as shown in the example below. Protected lines are grayed out.