
This document explains how to change Natural Studio's command, toolbar and shortcut key assignments. For example, you can add commands to Natural Studio's menu bar or toolbar (including user-defined commands) or you can define different or additional shortcut keys. You can thus adapt Natural Studio's user interface to your requirements.
The following topics are covered below:
Many changes in the Customize dialog box are immediately reflected in the Natural Studio window. For example, when you switch the display of a specific toolbar on, this toolbar is immediately shown in the Natural Studio window; it is not necessary to apply this change. It is also possible, for example, to drag a command from the Customize dialog box to a menu in the Natural Studio window.
 To invoke the Customize dialog box
From the menu, choose .
The Customize dialog box appears. Different pages are provided for different types of customization.
Select one of the pages in this dialog box and proceed as described below under the following headings.
All of your changes are automatically saved. You can simply close the dialog box after you have made your changes.
Choose the button to close the dialog box.
When you invoke the Commands page of the Customize dialog box, you can add, move and delete commands (in the menu bar and in a context menu) and toolbar buttons.
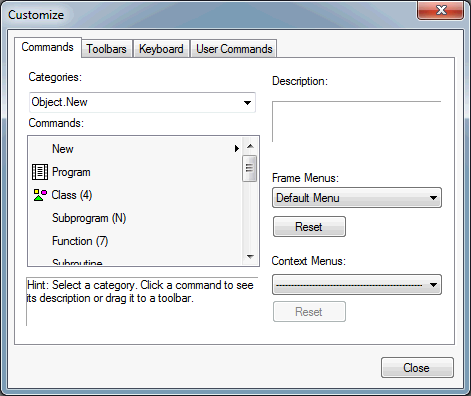
The following controls are available:
| Control | Description |
|---|---|
| Categories / Commands / Description | The Categories drop-down list box lists all menus which are available in Natural Studio. When you select such a menu from the drop-down list box, all commands in this menu are shown in the Commands list box; when a toolbar button is available for a command, the corresponding image is also shown. When you select a command, a description for this command is shown in the Description text box (if available). This is the same text that is also shown in the status bar, when this command is selected. |
| Frame Menus / | When you invoke the
Customize dialog box, the name of the currently active
frame menu is automatically selected in the Frame Menus
drop-down list box. For example, when the program editor was active before the
Customize dialog box was invoked, Program
Editor is selected. When you select another frame menu, for
example, Map Editor, this change is immediately
reflected in the Natural Studio window which is shown in the background: the
menu bar of the Natural Studio window changes to show all menus which are
normally shown when the map editor is active. This is helpful, if you want to
customize the menu for a specific editor without having to invoke this editor
first. For example, you can then drag a command from the
Customize dialog box to a menu. See the descriptions below
for further information.
When you choose the button, your own definitions for the currently selected frame menu are reset to the default settings of Natural Studio. You are asked whether you really want to reset the settings. |
| Context Menus / | The Context Menus
drop-down list box lists all context menus which are available in Natural
Studio. When you select, for example,
Node.Lib.Object.ProgramDialog from this drop-down
list box, a context menu appears containing the commands which are normally
available when you invoke the context menu for a program or dialog from the
library workspace. You can then drag, for example, a command from the
Customize dialog box to the context menu. See the
descriptions below for further information.
When you choose the button, your own definitions for the currently selected context menu are reset to the default settings of Natural Studio. You are asked whether you really want to reset the settings. |
Notes:
To add a command to the menu bar
Select the required entry in the Frame Menus drop-down list box.
The corresponding menus are shown in the menu bar of the Natural Studio window.
Select the required menu in the Categories drop-down list box.
The commands for this menu are shown in the Customize dialog box.
Select a command and drag it to the menu bar.
While dragging the command along the menu bar, the menu below the mouse pointer is opened.
Drop the command at the desired position.
To add a command to a context menu
Select the required entry in the Context Menus drop-down list box.
The corresponding context menu appears in a dialog box.
Select the required menu in the Categories drop-down list box.
The commands for this menu are shown in the Customize dialog box.
Select a command and drag it to the dialog box containing the context menu.
Drop the command at the desired position.
Select the required menu in the Categories drop-down list box.
The commands for this menu are shown.
Select a command and drag it to a toolbar.
Drop the command at the desired position.
When an image has already been defined for the command, a button with this image appears in the toolbar.
When an image has not yet been defined, the Button Appearance dialog box appears. See below.
Note:
For the command (which is
used in the menu), an edit control (drop-down list box)
is shown in the Commands list box. When you drag this
command to a vertical toolbar, the toolbar button is shown (the control is not
shown). When you move this toolbar to a horizontal position, the control is
then shown instead of the toolbar button.
To move a command or toolbar button
In the Natural Studio window, select the command in the menu bar or the toolbar button that you want to move.
Drag the command or toolbar button to another position.
It is possible to drag a command from a menu to a toolbar, and vice versa.
To delete a command or toolbar button
In the Natural Studio window, select the command in the menu bar or the toolbar button that you want to delete.
Or:
If you want to delete a command from a context menu, select
the required context menu in the Context Menus drop-down
list box of the Customize dialog box and then select the
command in the resulting dialog box.
Invoke the context menu and choose the command.
Or:
Simply drag the command or toolbar button out of the menu or
toolbar. Make sure not to drag it into another menu or toolbar; this would be a
move.
To change the appearance of a toolbar button
In the Natural Studio window, select the command in the menu bar or the toolbar button for which you want to change the appearance.
Or:
If you want to change the appearance of a command in a context
menu, select the required context menu in the Context
Menus drop-down list box of the Customize
dialog box and then select the command in the resulting dialog box.
Invoke the context menu and choose the command.
The Button Appearance dialog box appears. Example:
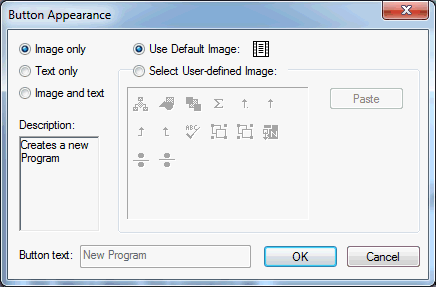
The option buttons for displaying image and/or text are only available when you have selected a toolbar button. They do not apply to the menu commands.
Note:
The options for displaying image and/or text are also
available as commands when you invoke the context menu for a toolbar button. A
check mark next to a command indicates that this option has been
set.
If applicable, specify whether an image and/or text is to be shown in the toolbar by selecting the corresponding option button.
If an image other than the default image is to be shown, select the option button Select user-defined image (only available when one of the option buttons for displaying the image is selected) and then select one of the images provided in this dialog box.
If you have created your own image, go to the Windows application in which you are currently editing your image and copy it to the Windows clipboard. Then paste it into this dialog box using the button. It is recommended that your image has a size of 16x16 pixels.
Note:
The images are stored in the file
nideres.bmp which is located in Natural's
bin folder. If you have prepared a file containing
different images, you can overwrite the file nideres.bmp
with your own image file. Your own images will then be available for selection
in the Button Appearance dialog box.
When one of the text options is selected, you can specify a different text in the Button text text box. This text is then shown in the toolbar. It has no influence on the tooltip.
This text box is only available when you have selected a toolbar button. It does not apply to the menu commands.
Choose the button.
To start a new group in a menu or toolbar
In the Natural Studio window, select the command in the menu bar or the toolbar button before which a separator bar is to be added.
Or:
If you want to add a separator bar to a context menu, select
the required context menu in the Context Menus drop-down
list box of the Customize dialog box and then select the
command in the resulting dialog box.
Invoke the context menu and choose the command.
This is a toggle command which switches the display of the separator bar on and off. A check mark next to the command indicates that a separator bar appears before the currently selected command or toolbar button.
To reset the assignments for a command or toolbar button to the
default
In the Natural Studio window, select the command in the menu bar or the toolbar button that is to be reset.
Or:
If you want to reset a command in a context menu, select the
required context menu in the Context Menus drop-down list
box of the Customize dialog box and then select the
command in the resulting dialog box.
Invoke the context menu and choose the command.
When you invoke the Toolbars page of the Customize dialog box, you can switch the display of specific toolbars on and off. You can also create your own toolbars.
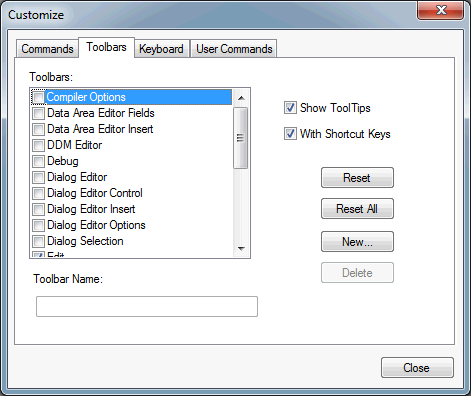
The following controls are available:
| Control | Description |
|---|---|
| Toolbars | This list box contains all toolbars that are currently defined. When a check mark is shown next to a toolbar name, this toolbar is shown in the Natural Studio window. |
| Toolbar Name | You can specify a different name for the currently selected user-defined toolbar. Toolbars that are provided with Natural Studio cannot be renamed. |
| Show Tooltips | When this check box is selected, tooltips are shown for the toolbar buttons. |
| With Shortcut Keys | Can only be selected when Show
Tooltips is also selected. When this check box is selected, the
shortcut keys are also shown in the tooltips.
Note: |
| Resets the currently selected toolbar to the default. User-defined toolbars cannot be reset. | |
| Resets all toolbars (except user-defined toolbars) to the default. | |
| Creates a user-defined toolbar. See below. | |
| Deletes the currently selected user-defined toolbar. Toolbars that are provided with Natural Studio cannot be deleted. |
To switch the display of a toolbar on and off
To display a toolbar in the Natural Studio window, activate the check box next to the toolbar name.
Or:
If a toolbar is no longer to be shown in the Natural Studio
window, deactivate the check box next to the toolbar name.
This change is immediately reflected in the Natural Studio window which is shown in the background.
Choose the button.
In the resulting dialog box, specify a name for the toolbar and choose the button.
An empty toolbar is shown as an undocked window. The name you have just provided is shown in its title bar. An entry for the new toolbar is shown in the Toolbars list box.
Go to Commands page of the Customize dialog box, select a category and drag all required commands to the new toolbar.
When an image has not yet been defined for a command, the Button Appearance dialog box appears. Proceed as described previously for the Button Appearance dialog box.
Optional. You can dock the toolbar. See Dockable Windows for further information.
Note:
For information on how to manage the buttons in a toolbar (for
example, move and delete), see the description of the
Commands
page.
When you invoke the Keyboard page of the Customize dialog box, you can change the assignments for the shortcut keys. See also Shortcut Keys which lists the default assignments of the shortcut keys which can be changed by the user.
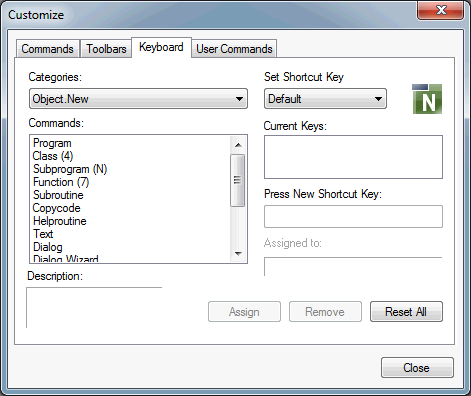
Select the required menu in the Categories drop-down list box.
The commands for this menu are shown.
From the Set Shortcut Key drop-down list box, select the scope in which the shortcut key is to be used.
For example, when you select Program Editor, the shortcut key can only be used when the program editor is active. When you select Default, the shortcut is always available.
In the Commands list box, select the command to which you want to assign a shortcut key.
If one or more shortcut keys have already been defined, they are shown in the Current Keys list box.
When "(Default)" is shown behind a shortcut key, this key has been defined when Default was active in the Set Shortcut Key drop-down list box.
The description which is shown at the bottom of the dialog box is shown in the status bar when this command is selected.
Place the mouse pointer in the Press New Shortcut Key text box.
Press the key combination that you want to use as the new shortcut key.
The Assigned to text box informs whether this shortcut key can be used:
When the shortcut key has not yet been defined, it can be used. In this case, a message appears informing you that the key is available.
When the shortcut key has already been defined, you are informed for which command it has been defined. You have to define another shortcut key.
When you are informed that this is a reserved keyword, you have to define another shortcut key.
When your shortcut key can be used, choose the button.
The new shortcut key is added to the Current Keys list box. It can then be used in addition to any previously defined shortcut keys.
Select the required menu in the Categories drop-down list box.
The commands for this menu are shown.
From the Set Shortcut Key drop-down list box, select the scope in which the shortcut key is currently used.
In the Commands list box, select the command for which you want to remove the shortcut key.
If one or more shortcut keys have been defined for this command, they are shown in the Current Keys list box.
When "(Default)" is shown behind a shortcut key, this key can only be removed when Default is selected in the Set Shortcut Key drop-down list box.
In the Current Keys list box, select the shortcut key that you want to remove.
Caution:
Keep in mind that you cannot use Natural Studio's
default assignments, which are mentioned in this documentation, when you remove
them here.
Choose the button.
To reset all shortcut key assignments
Choose the button.
All changed and deleted assignments are restored to the defaults of Natural Studio. All of your own assignments are deleted.
When you invoke the User Commands page of the Customize dialog box, you can define your own commands. Each command may contain a series of Natural commands. You can use all commands that can also be entered in the command line.
You can define up to 16 user commands. By default, empty entries for these user commands are provided in the User Commands list box. When a user command has already been defined, the Natural commands you have specified are shown in the list box. For example:
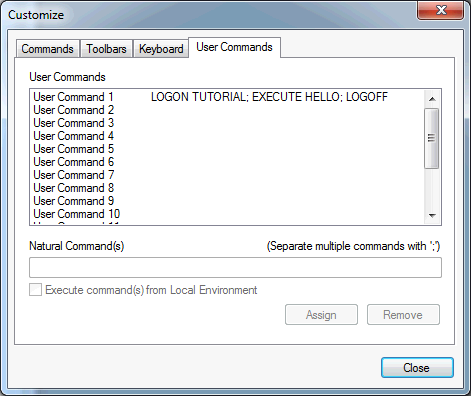
In the User Commands list box, select the entry for which you want to define Natural commands.
When Natural commands have already been defined for the selected entry, they are shown in the Natural Command(s) text box. When Natural commands have not yet been defined, this text box is empty.
Specify the required Natural command(s). When you specify more than one command, separate the commands with semicolons. For example:
LOGON TUTORIAL; EXECUTE HELLO; LOGOFF
The syntax is not checked. Make sure to specify valid commands.
Optional. If you are working in a SPoD environment, activate the Execute command(s) from Local Environment check box to make sure that your user command is always executed in the local environment.
When this check box is not activated and you invoke the user command while a library in the remote environment is selected, Natural tries to execute your command in the remote environment.
Choose the button.
Your (new) definition is saved. It appears in the list box.
So that the user command can be invoked, you have to add it to a menu and/or toolbar as described below.
To add a user command to a menu or toolbar
If you want to add the user command to a toolbar (this can also be a user-defined toolbar), make sure that this toolbar has been activated on Toolbars page of the Customize dialog box.
Go to the Commands page of the Customize dialog box.
Select the required frame menu or context menu.
From the Categories drop-down list box, select User Commands.
The user commands are shown.
Drag the required user command to the menu bar, context menu or toolbar as described previously in the Commands section.
The user command is shown with the default name and/or image.
Note:
When a Natural command has not been assigned to a user
command, the corresponding menu command or toolbar button is
dimmed.
To define another name and image for a user command in a menu or
toolbar
Select the user command in the menu bar, context menu or toolbar.
Invoke the context menu and choose the command.
Proceed as described previously for the Button Appearance dialog box.
To define a shortcut key for a user command
Go to the Keyboard page of the Customize dialog box.
From the Categories drop-down list box, select User Commands.
Select the user command for which you want to assign a shortcut key.
Assign a shortcut key as described previously in the Keyboard section.
To remove the Natural commands from a user command
Select the user command on the User Commands page.
Choose the button.
The defined Natural commands are deleted. The entry for the user command, however, is still shown in the list box.
When you remove the Natural commands, the user command is still available in all menus or toolbars to which it has been added. As long as a Natural command is not assigned, the corresponding menu command or toolbar button is dimmed.