
You can save a DDM as a source object and/or a cataloged object (generated program) in the specified Natural library (if applicable) in the current Natural system file (see also Storing DDMs - FDDM System File).
In a remote environment on a mainframe platform, you can only save a DDM as a cataloged object.
For the naming conventions that apply to an object, refer to Object Naming Conventions in the Using Natural Studio documentation.
 To save a DDM
Proceed as described in Saving Objects in the Using Natural Studio documentation.
To save and catalog a DDM
Proceed as described in either Stowing Objects or Cataloging Objects in the Using Natural Studio documentation.
The additional information you can specify for a DDM generated from a VSAM file are described in Additional Options for VSAM Files.
The DDM editor provides the option to specify additional information for DDMs generated from VSAM files.
The additional options for VSAM files can be specified when saving a DDM source as a cataloged object. The additional options consist of two parts: VSAM file information and VSAM file organization.
To specify additional options for DDMs from VSAM files
Catalog a DDM source generated from a VSAM file.
The Additional Options for VSAM Files dialog box appears as shown in the example below:
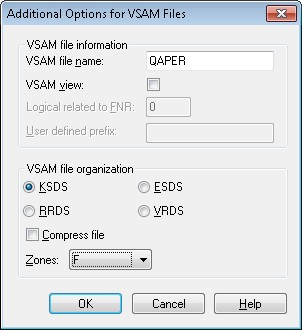
In the VSAM file name text box, enter the DDNAME/FCT entry as defined to the TP monitor or when using batch mode.
If the VSAM view check box is set, this DDM represents a logical DDM. If the check box is not set, it represents a physical DDM.
If the VSAM view check box is set:
In the Logical related to FNR text box, enter the file number of the physical DDM from which the logical file or DDM is derived.
In the User defined prefix text box, enter the prefix value to be assigned to the logical file.
In the VSAM file organization section, set the type of the VSAM file by selecting one of the option buttons.
Set the Compress file check box if the file is to be compressed.
From the Zones combo box, select the zone for
the VSAM file. F indicates that all packed data is written to the
VSAM file with the zone X'0F'. C indicates that all
packed values are written to the VSAM file with the zone
X'0C'.
For details on the options displayed in the Additional Options for VSAM Files dialog box, refer to Natural File Access in the Natural for VSAM documentation.