
A library in Natural terms is the container for Natural objects. A Natural application can access objects in multiple libraries depending on how the environment is set up.
Libraries are managed in the library workspace or in a list view window that has been opened from the library workspace.
Note:
The applications in the application workspace also contain
libraries and objects. However, these are just links to the libraries and
objects which are normally available in the library workspace. See
Managing
Applications in the Remote Development Using
SPoD documentation for further information.
This document covers the following topics:
The following types of libraries are available.
| Library Type | Description |
|---|---|
| System library |
The system libraries are also known as the
The system libraries are reserved for Software AG purposes only and are subject to change without notice. Important: Notes:
|
| User library |
The user libraries are also known as the
|
| Inactive library |
All system files that are defined in the global configuration file and which are not defined in the parameter file that was used to start the current Natural session are inactive system files. See also System Files in the Overview of Configuration File Parameters section of the Configuration Utility documentation. It is not possible to execute a Natural object in an inactive library. However, it is possible to delete or rename objects in an inactive library and to copy or move objects from an inactive library to an active library, and vice versa. If you want to use an inactive library, the corresponding
inactive system file must become an active system file (either
|
See also Icons for the Nodes and Library Naming Conventions.
A steplib is a Natural user library or system library that is concatenated with the current user or system library. This avoids redundant storage of identical objects and helps organize applications. In addition, if Natural Security is installed, a steplib can be used to restrict access to particular objects.
Natural searches in a steplib when an object is not found in the
current library (see Search
Sequence for Object Execution for further information).
The standard steplibs are the libraries SYSTEM in the
FUSER and the FNAT system files.
If Natural Security is active, you can define additional steplibs in the security profile of each library. The entries in a library security profile override any definitions made outside Natural Security.
If Natural Security is not active, you can specify additional
steplibs in the Configuration
Utility, with the profile parameter
STEPLIB.
In addition, you can define further steplibs by using one of the application
programming interfaces (for example, USR1025N or
USR3025N) that are supplied for this purpose in the Natural system
library SYSEXT.
The additional steplibs are searched for an object before the
standard steplibs SYSTEM (FUSER and
FNAT).
The currently active steplibs are shown on the Steplibs page of the TECH dialog box. See Technical Information for further information.
This section describes the sequence in which Natural libraries and system files are searched for a requested object that is to be executed from either a user library or a system library.
Note:
If the profile parameter BPSFI is set to
"ON" (the default setting is
"OFF"), objects are searched
for in the buffer pool first.
The current library in the FUSER system file as defined by the system
variable *LIBRARY-ID.
The steplibs (in sequence) as specified in the Natural Security profile for the current library or in the steplib table.
The default steplib as defined by the system variable
*STEPLIB.
The library SYSTEM in the FUSER system
file.
The library SYSTEM in the FNAT system
file.
The current "SYS" library in the
FNAT
system file as defined by the system variable
*LIBRARY-ID.
The steplibs (in sequence) as specified in the Natural Security profile for the current library or in the steplib table.
The library SYSLIBS in the FNAT system
file, which contains objects shared by system commands and utilities.
The library SYSTEM in the FNAT system
file.
The library SYSTEM in the FUSER system
file.
Since the FUSER system file is searched last, you
must provide an object that is used in both the FUSER and
the FNAT system files (for example, a
user exit routine for a Natural utility) only in one location, namely in
FUSER.
In order to work with objects in a Natural library or to start an application inside a specific library, you must first log on to this library.
With Natural Studio, you can log on to a library in two different ways: automatically and manually. The name of the library to which you are logged on is always shown in the command line.
Note:
When Natural
Security is active, all libraries that you are not allowed to use
are not visible in the library workspace.
 To perform an automatic logon to a library
Select the required library in the library workspace or in a list view window.
Or:
Select an object in the library workspace or in a list view
window.
Or:
Activate an open editor window.
Note:
When you expand or collapse the node for a library in the tree by
clicking the plus or minus sign in front of a node, you do not automatically
logon to this library. A logon is only performed when you select the library
(for example, by clicking on its name).
To perform a manual logon to a library
Enter the following system command in the command line:
LOGON library-ID
where library-ID is the ID (name) of the library you want to access.
See also the description of the system command
LOGON.
A new library can only be created in a system file
(FNAT or FUSER) located inside the local or remote
environment. Inactive libraries cannot be created; they are read-only.
Only one library can be created at a time.
To create a new library
In the library workspace, select the node for the system file that is to contain the new library (either below the node for the local environment or below the node of the development server to which you have previously connected).
The nodes for the system files have different names, depending on the current view. For example, if you want to create a user library in the logical view, you have to select the node named User Libraries.
From the menu, choose .
Or:
Invoke the context menu and choose
.
A new library with the default name "USRNEW" is now shown in the tree. The default name is selected so that you can immediately enter a new name. Any text you enter automatically deletes the selection.
Enter a name for the library.
See also Library Naming Conventions.
Note:
When the name is in edit mode, you can invoke a context
menu. In addition to the standard Windows editing commands such as
and , the
context menu may also contain Windows commands for Unicode. See your Windows
documentation for further information.
Press ENTER.
Or:
Click any other position in the library workspace.
Your new library is now available in all views (sorted alphabetically). When a filter is currently active, it may happen that your new library is not shown since its name starts with different characters. See Filtering Libraries and Objects for further information.
Using a filter, you can reduce the number of items that are shown in the library workspace, in the application workspace and in the list view windows that are opened from these workspaces.
When a filter has been defined in the library workspace, the same filter applies for the application workspace, and vice versa. All views (logical view, file view and flat view) reflect this filter. In a remote environment, all views which belong to the environment specified by server name and port number reflect this filter. It may be necessary to refresh the display in the other workspace before the change can be seen there.
The type of filter that is applied depends on your selection. When you select a system file, a library filter will be applied. When you select a library, an object filter will be applied; this object filter also allows the definition of resources.
The following exception applies for DDMs: When
FDDM
mode has been activated for the local environment or for a remote
UNIX, OpenVMS or Windows environment, you have to select the FDDM
system file in order to apply an object filter for the DDMs. In a remote
mainframe environment, the DDMs are always stored in the system file
FDIC; therefore, you have to select the FDIC system
file in order to apply an object filter for the DDMs.
When a filter has been applied, the icons that are shown in the tree contain an additional plus sign:
|
|
System file with an active filter. |
|
|
Library with an active filter. |
To define a filter
To define a filter for libraries, select a system file.
Or:
To define a filter for the objects and resources in a library,
select the library.
Note:
In a list view
window, it is possible to select several libraries at the same time.
Thus, you can define the same filter for all selected libraries at once.
Or:
To define a filter for DDMs, select the system file
FDDM (if FDDM mode is active in the local environment or in the
remote UNIX, OpenVMS or Windows environment) or FDIC (remote
mainframe environment).
From the menu, choose .
Or:
Invoke the context menu and choose .
The following dialog box appears when you have selected a system file (except a system file for DDMs):
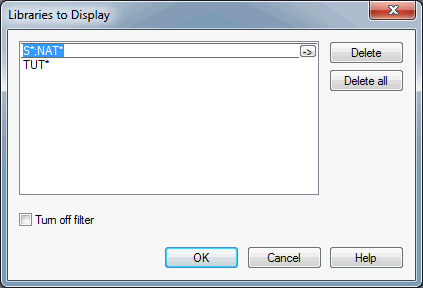
A similar dialog box appears when you have selected a library or a system file for DDMs. It has a different title:
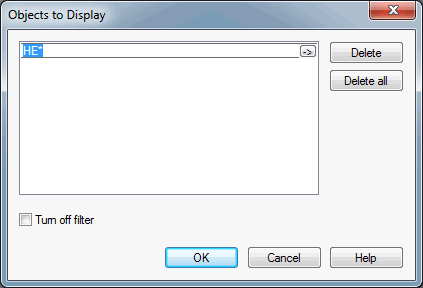
When a filter has already been defined, it is shown in the dialog box (as in the above examples).
In the text box, enter the names of the libraries or objects/resources that are to be shown. All names must be separated by a semicolon.
The Natural-specific naming conventions for libraries and objects apply for the definition of a filter. See Rules and Naming Conventions.
Instead of entering the names in a single text box, you can also enter them using several text boxes. When you have defined at least one name, you can click the empty area below the text box to add an additional text box in which you can enter further names.
You can use wildcards (? or *) within the names, if you do not want to enter each name individually. The question mark (?) may be specified at any position inside the name. The asterisk (*) is only allowed at the end of a name. Instead of typing the wildcards, it also is possible to enter them by choosing the button to the right of the text box (the button contains an arrow pointing to the right); in this case, you can see short explanations for the wildcards.
You can also enter a range of names. Ranges must be entered as follows:
name1 - name2
When defining a range, it is important that you enter a space before and after the hyphen. The spaces are necessary since names may contain hyphens. Without the spaces, name1-name2 would be interpreted as the name of a single library or object/resource.
Each name in a range definition may contain wildcards (see above). Example:
AL* - AM?TEST
Or:
Choose the button to the right of a text box (the button
contains an arrow pointing to the right) and then choose Select from
list. You can now select all required libraries or objects/resources
from a selection list which appears in an additional dialog box. When you press
CTRL in the selection list, you can select multiple names; when you
press SHIFT, you can select a range of names. When you choose the
button, the dialog box containing the selection list
is closed and the selected names are shown in the text box.
Choose the button.
The content of the library workspace, application workspace and of the corresponding list view window changes. Now, just the libraries or objects/resources that match your filter criteria are shown.
To disable or delete a filter
Invoke the dialog box in which the filter has been defined as described above.
To disable the filter (without deleting all of the entries in the dialog box), activate the Turn off filter check box.
Or:
To delete just the entries in the currently
selected text box, choose the button.
Or:
To delete all entries in all text boxes, choose the
button.
Choose the button.
The content of the library workspace, application workspace and of the corresponding list view window changes. When you have deactivated the filter or deleted all entries, all libraries or objects/resources are shown again. However, when you have just deleted one of several text boxes containing entries, just the libraries or objects/resources that match the new filter criteria are shown.
You can search, for example, for objects containing specific text or for objects with a specific user ID. It is also possible to replace or delete found text.
The found objects are shown in the results window. An active filter is not considered.
See also the description of the system command
SCAN.
To find objects
Optional. Select a node in the library workspace or application workspace, or select one or more entries in a list view window. This selection will be considered in the Find Objects dialog box.
From the menu, choose .
Or:
Invoke the context menu and choose .
Or:
When the Library toolbar is shown, choose the following
toolbar button.
![]()
The Find Objects dialog box appears. This dialog box provides several pages:
When a library, object or a specific object type was selected before invoking the command, this selection is considered in the Find Objects dialog box.
Specify your search criteria on the different pages as described below.
Make sure to fill all required edit controls. Problems may occur, for example, if you are searching for the objects of a specific user and the text boxes Names and Libraries are blank; in this case, no objects will be found. If you do not want to specify a specific object name or library, specify an asterisk (*) in the corresponding text boxes.
Choose the button.
The find process is started. Depending on the number of libraries and objects in the libraries, this may take a while.
A button is available as long as the find process is running. You may choose this command button to abort the find process. All objects that have been found so far, are shown in the results window.
When the find process has completed, all found objects are shown in the results window. Any previous find results are overwritten. See Results Window for further information.
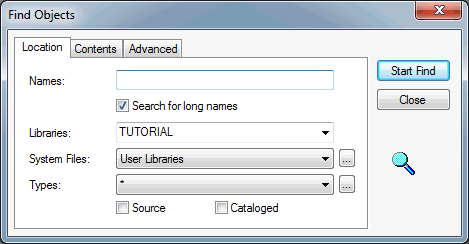
Note:
If both the Source and the
Cataloged check boxes are activated, both the source and
the generated program of the object must exist in order for the object to be
found.
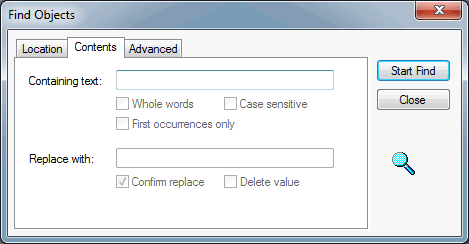
| Option | Description |
|---|---|
| Containing text | The text that is to be found. The edit controls on this page are only available when you have entered text in this text box. |
| Whole words | If activated, only whole words are taken into account. |
| Case sensitive | If activated, a distinction is made between uppercase and lowercase characters. |
| First occurrences only | If activated, the objects containing the specified text are only displayed once in the result window. |
| Replace with | If you want to replace the found text, specify the new text in this text box. |
| Confirm replace | Only available, if a replace text has been specified or if the Delete value check box has been activated. If activated, the Confirm Replace dialog box is shown when the specified text has been found. You can confirm each replace or delete operation separately, or you can confirm all replace or delete operations at once. |
| Delete value | Only available, when a replace text has not been specified. If you want to delete the found text, activate this check box. |
| Option | Description |
|---|---|
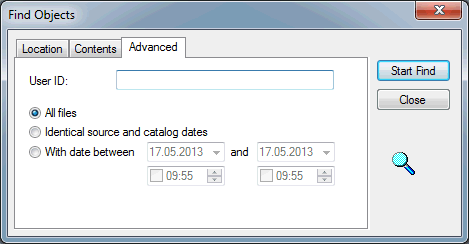
| User ID | The ID of the user who has created or modified an object. If specified, only objects with a matching user ID are found. If you specify more than one user ID, separate the IDs with semicolons. You can also use wildcards (* or ?). |
| All files | If selected, all specified Natural objects are searched. |
| Identical source and catalog dates | If selected, only those objects are found where the catalog date is identical with the source date. |
| With date between | If selected, only those objects are found where the last modification took place in the specified date and time range. You can specify the dates manually or select them from the drop-down list boxes. When you activate the check boxes for the dates, this information is also taken into account. You can specify a start time, an end time or both. You can specify the time either manually or with the spin boxes. |
Normally, line numbers are written to the source code when you save an object to the file system. However, you can define that these line numbers are not written. This is important if you are storing your objects in a source control system. The suppression of line numbers is defined in the properties of a library (see also Properties for the Nodes).
When line numbers are suppressed in a library, the library icon that is shown in the tree looks as follows:
![]()
In addition to the local environment, you can also define the suppression of line numbers for the libraries in a remote UNIX, OpenVMS or Windows environment.
When line numbers are suppressed, any line number reference that is contained in the source code is replaced by a placeholder. The first line number reference is replaced by the placeholder "!0". For each further line number reference, the number following the exclamation mark (!) is incremented by 1. You cannot see these placeholders when you open a source in Natural Studio, you can only see them directly in the file system (remember that this is important for storing the objects in a source control system). When you open a source in Natural Studio, the line number references are always shown. It may happen that line number references have changed after reopening a source in Natural Studio, however, this will only happen when an irregular line number increment was previously used. When reopening a source for which line numbers are suppressed, the line numbers are always consistently incremented (just like after renumbering the lines).
Notes:
FTOUCH utility.
Libraries are copied and moved in the same way as any other object in the library workspace (that is: with , and , or with drag-and-drop). See General Information on Copying and Moving Objects for further information.
The target node of the copy or the move of a library can be any system file node (user libraries, system libraries or an inactive system file) in the local or remote environment. It can even be any other library node; in this case, all objects of the source library are copied.
When a library is copied or moved to a system file node for user
libraries (FUSER), the new library must conform to the
library naming
conventions. Thus, when you copy or move a system library which
starts with "SYS" to the user libraries, a dialog
box appears and you have to specify another name. The default library name
"USRLIB" that is provided in this dialog box can be
overwritten.
The same applies when copying or moving a user library to the system
libraries (FNAT) where the library names must start with
"SYS". In this case, the dialog box mentioned above
offers the default name "SYSLIB".
In all other cases, for example, when copying a system library to an inactive system file, the name of the source library is taken as the target library name.
A library is renamed in the same way as a Natural object. See Renaming Objects for further information.
When renaming a library, make sure to adhere to the
library naming
conventions. It is not possible to rename the library
SYSTEM.
A library is deleted in the same way as a Natural object. See Deleting Objects for further information.
If you are working in a multiple-user environment, you should only
delete a Natural library if you have exclusive access to the library involved.
It is not possible to delete the library SYSTEM.
When you access Natural Studio for the first time, you log on to the
library SYSTEM by default.
To log on to a different library at startup
This description applies only when Natural Security is not active. Different rules apply if you logon to Natural under Natural Security; see Logging On in the Natural Security documentation.
Use the Configuration Utility to create your own Natural parameter file.
Select your new parameter file in the Configuration Utility.
Locate the parameter INIT-LIB.
Tip:
Locate this parameter by searching for
"INIT-LIB". See
Finding a
Parameter in the Configuration
Utility documentation for further information.
Specify the name of the startup library with the
INIT-LIB parameter.
A startup library can be one of your own libraries or a library set up for you by your administrator.
Make sure that the parameter AUTO (which is
defined on the same page as INIT-LIB) has been set to
"ON". Otherwise INIT-LIB is
not used.
Save your changes.
Invoke Natural Studio with your own parameter file. See Invoking Natural with an Alternative Parameter File in the Configuration Utility documentation.
The library SYSEXV contains several example programs
which illustrate some of the new features of various Natural versions. See also
SYSEXV Utility
in the Tools and Utilities documentation.