
From the SYSERR - Error Messages window, you can invoke all SYSERR utility functions available for creating and maintaining user-defined or Natural system messages:
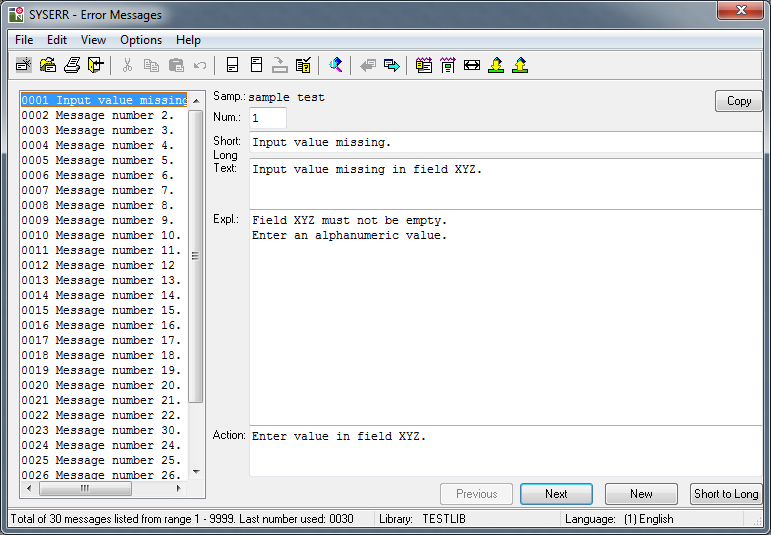
The window is divided into two sections that contain data on messages available in the current library:
The left section with a list box displaying all messages available for the current language.
The right section displaying the fields with the text of the current message. The current message is the message selected (highlighted) in the list box.
If no message exists for the specified library, both sections are empty.
The SYSERR - Error Messages window provides menus and command buttons for executing SYSERR utility functions. As an alternative to menus and command buttons, you can execute most of the functions by using toolbar buttons.
There are context menus available for several elements in the list box and the dialog boxes provided with the SYSERR functions. To invoke the context menu for an element, click on the element required with the right mouse button or select the element and press SHIFT+F10. The commands available are either cut and paste functions or correspond to the commands in the menus or to command buttons.
Some menu items are used to switch between modes or set a status. The check mark next to a menu item indicates which mode or status is active.
This section covers the following topics:
The list box appears in the left section of the SYSERR - Error Messages window. It contains the short messages of one language for one library. The short texts are preceded by the message number. The messages are sorted by the message number in ascending order.
If a message file contains more than 200 messages, for performance reasons, not all messages are read in one step. When initially opening the SYSERR - Error Messages window, up to 200 messages are read from the message file at once, and about 30 of them are displayed in the list box. Scrolling down the list with the vertical scroll bar, the next 200 messages are read and displayed as soon as the scroll bar reaches the bottom of the list box.
Choose the menu option, to read all remaining messages in one step as described in Edit Menu.
The selected (highlighted) short message is the current message. It is displayed in the right section of the window. There, you can modify the short and long texts of the current message. See also Fields.
The following fields appear in the right section of the SYSERR - Error Messages window:
The following commands can be executed by using command buttons:
| Command | Explanation | ||||||
|---|---|---|---|---|---|---|---|
| This button is only visible if a sample message exists for the
current language and library. appears under the
toolbar, in the right upper section of the SYSERR - Error
Messages window.
Copies the text of a sample message (see in Options Menu) into the Short field (see Fields) of the current message. |
|||||||
Toggles between and
, and and
depending on the status of the current message:
Note: |
|||||||
| / | Toggles between and
, depending on the status of the current message:
|
||||||
| Searches for the next free message number starting from the
current message, and opens input fields to create a message for the number
found. Free means that this message number is available and has not been
assigned to another message of any language.
The search direction is downwards by default. However, the default direction can change to upwards if a previous search was performed in an upward direction by using the alternative function (see Edit Menu). Upwards searches for the next lower message number, downwards searches for the next higher message number from the current message. As an alternative to or , you can also create a new message by replacing the number in the Num. field. |
|||||||
| Copies the text of the Short field to the first line of the Long field. |
This section describes the functions available in the menu.
| Function | Explanation |
|---|---|
| Only applies to libraries and languages for which no messages
exist.
Opens a new library and/or adds a new language. See also To switch libraries and/or languages. |
|
| Only applies to libraries and languages for which messages
already exist.
Opens another library and/or changes the language. See also To switch libraries and/or languages. |
|
| This function does not apply for accessing data on mainframe
servers.
Selects an existing message file from a Natural Err directory (FNAT or FUSER) or from another directory. See also the section Generating Message and Text Files. |
|
| Invokes the print function.
A dialog box prompts you to:
See also To print all Natural system messages. |
|
| Terminates the SYSERR utility. |
![]() To print all Natural system
messages
To print all Natural system
messages
Perform the steps described in Invoking SYSERR for Natural System Messages.
From the menu, select .
![]() To switch
libraries and/or languages
To switch
libraries and/or languages
From the menu, select if no messages exist.
Or:
From the menu, select if messages exist.
A SYSERR - New Lib/Lang or SYSERR - Open Lib/Lang dialog box similar to the example below appears:
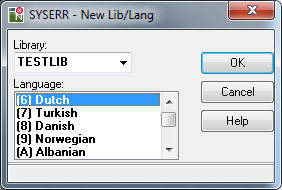
From the Library drop-down list box, select a library and a language.
In the example above, the new language code 6 (Dutch) is selected for the library TESTLIB. TESTLIB already contains messages but no messages for language code 6.
Choose to confirm your selection.
An empty SYSERR - Error Messages window appears for the specified library and language.
Or:
If the menu
option was selected, a list of messages appears that exist for the specified
library and language.
This section describes the functions available in the menu.
| Command | Explanation |
|---|---|
| Supported clipboard functions. | |
| Standard edit functions. | |
| Searches for the next free message number starting from the
current message, and opens input fields to create a message for the number
found. Free means that this message number is available and has not been
assigned to another message of any language.
or specifies the search direction: searches for the next lower message number, searches for the next higher message number from the current message. See also the alternative command button. As an alternative to or the command button, you can also create a new message by replacing the number in the Num. field. |
|
| Removes all messages selected (highlighted) in the list box. A dialog box prompts you to confirm the action. | |
| Removes all messages displayed in the list box. A dialog box
prompts you to confirm the action.
When all messages of a message file have been deleted, the message file is deleted too. |
|
| Reads all messages from a message file into the list box in one
step. This command applies to message files with more than 200 messages. Otherwise, for performance reasons, only 200 messages are read by default when the SYSERR - Error Messages window is opened. Additional messages can be displayed by scrolling down the list box to the end or by using the menu option. |
|
| Supports the creation of messages for different languages. Applies to short messages only. See To translate languages below. |
A SYSERR - Select Languages dialog box similar to the example below appears:
![]()
Select one language or more into which you wish to translate the current message and choose .
A SYSERR - Translate dialog box similar to the example below appears:
![]()
The dialog box always lists the current language of the short text
(in the example above, English) in the first position followed by
the new language(s) selected in Step 1.
The SYSERR - Translate dialog box provides the following menu options, command buttons and fields:
| > | Closes the SYSERR - Translate dialog box and returns to the SYSERR - Error Messages window. |
| > | Invokes a dialog box from which you can select one or more languages to be added to the current message number (unless selected earlier, during Step 1). |
| Available languages | The language code(s) of the language(s) already available for the current message number. |
| Language |
The code and language of the current language and the new
language(s) selected. |
| Short Text | The text of the short message. |
| / | Same as described for / in Command Buttons. |
| / | Same as described for / in Command Buttons. |
| > | Displays help text on SYSERR utility functions. |
Enter the translation in the Short Text field of the relevant language(s).
Choose . The language code(s) of the new language(s) appears under Available languages.
This section describes the functions available in the menu.
| Function | Explanation | ||||||||||||||
|---|---|---|---|---|---|---|---|---|---|---|---|---|---|---|---|
|
|||||||||||||||
| Applies in connection with the function.
If is enabled, the function displays the short messages that match the filter criteria defined with the function. If is enabled, the filter criteria specified with the function are displayed above the list box. To disable the and list all messages, again choose the option from the menu. See also Filtering Messages. |
|||||||||||||||
| Defines a filter for displaying short messages and shows the
filtered messages in the list box. See also
Filtering
Messages.
must be enabled in order to use the function. |
|||||||||||||||

In the example above, the short text (Short)
for message number 14 exists in English = (1), German
(2), Spanish (4), and Italian (5). The
long text (Long) for message number 14 exists in
English (1).
![]() To filter short messages
To filter short messages
From the menu, choose .
A SYSERR - Set Filter dialog box similar to the example below appears:
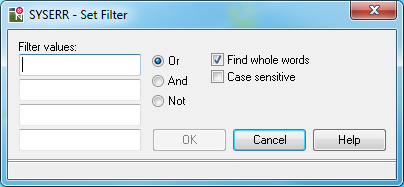
The dialog box provides the following filtering options:
| Filter values | There are four fields in which you can enter the character string(s) to be used in the filter. | ||||||||||||||
| Or / And / Not |
|
||||||||||||||
| Find whole words | If marked (default), the filter only allows searching for entire words and not parts of words. | ||||||||||||||
| Case sensitive | If marked, the filter only allows searching for letters that exactly match the lower and/or upper case specified. | ||||||||||||||
Specify the criteria to be used for the filter:

In the example above, the filter selects all short messages that
contain both the words buffer and pool.
Choose .
If the search criteria entered match the character strings contained in the short messages, the matches are displayed in the list box and the and functions are enabled.
To remove a filter and list all messages, choose to disable the function.
If the function is enabled, alternatively, you can execute the filter function by choosing .
This section describes the functions available in the menu.
| Function | Explanation | |||||||||||||||||||||
|---|---|---|---|---|---|---|---|---|---|---|---|---|---|---|---|---|---|---|---|---|---|---|
| Invokes the SYSERR - Maintain Sample
Message dialog box where you create a sample message to be used as a
master for creating new short messages or replace the text of existing short
messages.
If you enter the string You can define one sample message for each language and library. If you created a sample message, the Samp. field appears with the text of the sample message. To copy the text of the sample message into the Short field, use the command button (see Edit Menu). Alternatively, you can enter.C in the Short field if this field is
empty.
|
||||||||||||||||||||||
| See Layout. | ||||||||||||||||||||||
| If enabled, automatically shifts the text of a short message to the left margin when adding a new message or choosing after modification. | ||||||||||||||||||||||
| This option does not apply to a remote environment located on a
UNIX, OpenVMS or mainframe platform.
If enabled, the Short field (see Fields) is extended to a maximum input of 72 characters. The default field length is 65 characters, which is the maximum input in UNIX, OpenVMS and mainframe environments. |
||||||||||||||||||||||
|
||||||||||||||||||||||
| Enables/disables a pop-up window to confirm: | ||||||||||||||||||||||
|
||||||||||||||||||||||
|
||||||||||||||||||||||
The option allows specification of valid message ranges to categorize messages. Overlapping of ranges is possible. A new message can only be added if its number is within the range specified in the layout.
The layout definition applies to all languages. It is stored in the English message file.
An example layout definition is shown below:
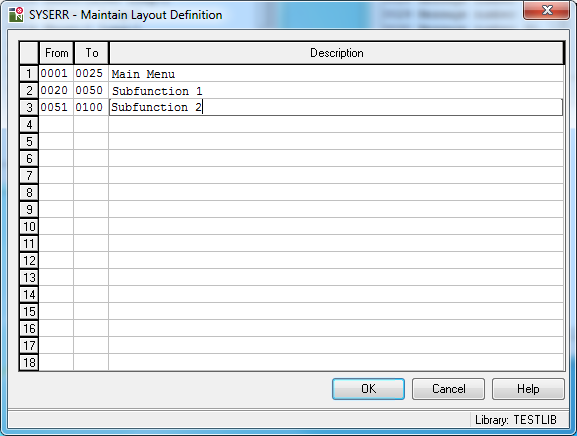
In the fields From and To, specify the message range. In the Description field, enter text that describes the message category.
To insert or delete rows, mark a row and press the INS or DEL key. If the maximum of 18 rows is displayed, you may have to delete or overwrite another row before you can insert a new one.
The toolbar buttons represent the following menu items or command buttons:
| Toolbar Button | Menu Item/Command Button | Menu |
|---|---|---|
|
|
||
|
|
||
|
|
||
|
|
||
|
|
||
|
|
||
|
|
||
|
|
||
|
|
> | |
|
|
> | |
|
|
||
|
|
||
|
|
||
|
|
||
|
|
||
|
|
> | |
|
|
||
|
|
||
|
|
- | |
|
|
- | |
|
|
- | |
|
|
- |
The status bar on the bottom of the SYSERR - Error Messages window displays the following:
The total number of messages that exist in the specified library for the current language, the possible message range 1 to 9999, and the last message number used.
This information is only displayed when initializing SYSERR, opening another library or when using the menu option described under Edit Menu.
Natural system messages or the ID of the current library.
The code and name of the current language.
You can obtain online information on using the SYSERR utility.
![]() To view the overview of the online documentation
To view the overview of the online documentation
Choose the menu.
Or:
Press F1 when no dialog box is open.
The overview page of the SYSERR Utility documentation appears.
![]() To view context-sensitive help
To view context-sensitive help
Choose the button in a dialog box.
Or:
Press F1 in a dialog box.
Help information specific to the task you are performing appears.