
You will now write a short program which reads specific data from a database file and displays the corresponding output.
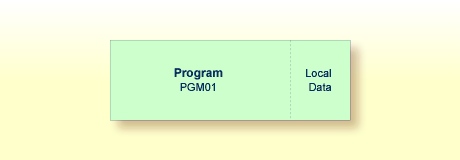
When you have completed the exercises below, your sample application will consist of just one module (the data fields that are used by the program are defined within the program):
This document contains the following exercises:
You will now create a new program which will be used in the remainder of this tutorial. It will be created by saving your Hello World program under a new name.
 To save the program under a new name
In the program editor's command line, enter one of the following:
SAVE PGM01
SA PGM01
The current program is saved with the new name PGM01.
The program named HELLO is still shown in the program
editor.
Read the newly created program into the program editor by entering the following in the program editor's command line:
READ PGM01
The program name which is displayed in the program editor changes to
PGM01.
Delete all code in the program editor. To do so, enter the following line command at the beginning of each line to be deleted and press ENTER:
.D
Example:
> > + Program PGM01 Lib TUTORIAL All ....+....1....+....2....+....3....+....4....+....5....+....6....+....7.. 0010 .DThe "Hello world!" example in Natural. 0020 .D 0030 .DSPLAY "Hello world!" 0040 .DD /* End of program 0050 |
Or:
Enter the following line command at the beginning of the first line
and press ENTER:
.D(4)
where the number in parentheses indicates the number of lines to be deleted.
The database file and the fields that are to be used by your program
have to be specified between DEFINE DATA and
END-DEFINE at the top of the program.
For Natural to be able to access a database file, a logical definition of the physical database file is required. Such a logical file definition is called a data definition module (DDM). The DDM contains information about the individual fields of the file. DDMs are usually defined by the Natural administrator.
To be able to use the database fields in a Natural program, you must
specify the fields from the DDM in a view. For this
tutorial, we will use the DDM for the EMPLOYEES database file.
To specify the DEFINE DATA block
Enter the following code in the program editor:
DEFINE DATA
LOCAL

END-DEFINE
*
END
LOCAL means that the variables that you will define with
the next step are local variables which apply only to this program.
To display the data fields from the DDM in a split screen
In the program editor's command line, enter the following:
SPLIT VIEW EMPLOYEES SHORT
SHORT indicates that the data fields are to be listed in
short form (that is, only the Adabas short names and corresponding Natural
field names are displayed).
The screen is divided into two sections. The data fields from the DDM displayed in the lower half of the screen. It is not possible to edit the data in the lower half of the screen.
>                                       > +  Program     PGM01    Lib TUTORIAL
All    ....+....1....+....2....+....3....+....4....+....5....+....6....+....7..
  0010 DEFINE DATA
  0020 LOCAL
  0040 END-DEFINE
  0050 *
  0060 END
  0070
  0080
  0090
  0100
  0110
       ....+....1....+....2....+....3....+....4....+....5....+... S 5    L 1
Split Top  View EMPLOYEES                    DBID     0 FNR     1 Def seq
    1  AA  PERSONNEL-ID                     A    8    D CNNNNNNN
  G 1  AB  FULL-NAME                                    NAME INFORMATION
    2  AC  FIRST-NAME                       A   20  N   FIRST/CHRISTIAN NA
    2  AD  MIDDLE-I                         A    1  N   MIDDLE INITIAL
    2  AE  NAME                             A   20    D SURNAME/FAMILY NAM
    1  AD  MIDDLE-NAME                      A   20  N   SECOND/MIDDLE NAME
    1  AF  MAR-STAT                         A    1  F   M=MARRIED
    1  AG  SEX                              A    1  F
1 AH BIRTH D 6 N D BIRTH-DATE (YYYY-M |
You can now page through the view to see which data fields are used and how they have been defined. To do so, use the following commands:
| Command | Description |
|---|---|
SPLIT
                                    				+
or S +
|
Page forward in the view. |
SPLIT
                                    				-
or S -
|
Page backward in the view. |
SPLIT
                                    				.
or S .
|
Terminate split-screen mode. |
The next step assumes that split-screen mode has been terminated.
Place the cursor in the first position of the line containing
LOCAL and enter the following:
.I
In full-screen mode, 9 blank lines are inserted. Only 4 blank lines would have been inserted in split-screen mode.
Enter the following code below LOCAL:
1 EMPLOYEES-VIEW VIEW OF EMPLOYEES
  2 FULL-NAME
    3 NAME (A20)
  2 DEPT (A6)
  2 LEAVE-DATA
    3 LEAVE-DUE (N2)
Press ENTER.
The remaining blank lines are eliminated.
Note:
The remaining blank lines are not eliminated, when the
default setting in the editor profile has been changed, that is: when the
option Empty Line Suppression has been set to
"N".
The first line contains the name of your view and the name of the database file from which the fields have been taken. This is always defined on level 1. The level is indicated at the beginning of the line. The names of the database fields from the DDM are defined at levels 2 and 3.
Levels are used in conjunction with field grouping. Fields assigned a level number of 2 or greater are considered to be a part of the immediately preceding group which has been assigned a lower level number. The definition of a group enables reference to a series of fields (this may also be only one field) by using the group name. This is a convenient and efficient method of referencing a series of consecutive fields.
Format and length of each field is indicated in parentheses. "A" stands for alphanumeric, and "N" stands for numeric.
Now that you have defined the required data, you will add a
READ loop. This reads the data from the database file using the
defined view. With each loop, one employee is read from the database file.
Name, department and remaining days of vacation for this employee are
displayed. Data are read until all employees have been displayed.
Note:
It may happen that an error message is displayed indicating that
the last transaction has been backed out of the database. This
usually happens when the non-activity time limit which is determined by Adabas
has been exceeded. When such an error occurs, you should simply repeat your
last action (for example, issue the RUN command once
more).
To read data from a database
Insert the following below END-DEFINE (use the .I command as described above to insert blank
lines):
READ EMPLOYEES-VIEW BY NAME
*
  DISPLAY NAME 3X DEPT 3X LEAVE-DUE
*
END-READ
BY NAME indicates that the data which is read from the
database is to be sorted alphabetically by name.
The DISPLAY statement arranges the output in column
format. A column is created for each specified field and a header is placed
over the column. 3X means that 3 spaces are to be inserted between
the columns.
Run the program.
The following output appears.
MORE
Page      1                                                  09-06-30  16:06:49

        NAME           DEPARTMENT   LEAVE
                          CODE       DUE
--------------------   ----------   -----

ABELLAN                PROD04        20
ACHIESON               COMP02        25
ADAM                   VENT59        19
ADKINSON               TECH10        38
ADKINSON               TECH10        18
ADKINSON               TECH05        17
ADKINSON               MGMT10        28
ADKINSON               TECH10        26
ADKINSON               SALE30        36
ADKINSON               SALE20        37
ADKINSON               SALE20        30
AECKERLE               SALE47        31
AFANASSIEV             MGMT30        26
AFANASSIEV             TECH10        35
AHL                    MARK09        30
AKROYD                 COMP03        20
ALEMAN                 FINA03        20
As a result of the DISPLAY statement, the column headers
(which are taken from the DDM) are underlined and one blank line is inserted
between the underlining and the data. Each column has the same width as defined
in the DEFINE DATA block (that is: as defined in the view).
The title at the top of each page, which contains the page number,
date and time, is also caused by the DISPLAY statement.
Press ENTER repeatedly to display all pages.
You will return to the program editor when all employees have been displayed.
Tip:
If you want to return to the program editor before all employees
have been displayed, enter EDIT or its abbreviation
E at the MORE prompt. It is also
possible to enter the terminal command %., which
interrupts the current Natural operation, at the MORE prompt. By
default, each terminal command starts with the control character
%. Your administrator, however, may have defined another control
character.
Since the previous output was very long, you will now restrict it. Only the data for a range of names is to be displayed, starting with "Adkinson" and ending with "Bennett". These names are defined in the demo database.
To restrict the output to a range of data
Before you can use new variables, you have to define them. Therefore,
insert the following below LOCAL:
1 #NAME-START        (A20) INIT <"ADKINSON">
1 #NAME-END          (A20) INIT <"BENNETT">
These are user-defined variables; they are not defined in demo database. The hash (#) at the beginning of the name is used to distinguish the user-defined variables from the fields defined in the demo database; however, it is not a required character.
INIT defines the default value for the field. The
default value must be specified in pointed brackets and quotation marks.
Insert the following below the READ statement:
STARTING FROM #NAME-START
ENDING AT #NAME-END
Your program should now look as follows:
DEFINE DATA
LOCAL
  1 #NAME-START        (A20) INIT <"ADKINSON">
  1 #NAME-END          (A20) INIT <"BENNETT">
  1 EMPLOYEES-VIEW VIEW OF EMPLOYEES
    2 FULL-NAME
      3 NAME (A20)
    2 DEPT (A6)
    2 LEAVE-DATA
      3 LEAVE-DUE (N2)
END-DEFINE
*
READ EMPLOYEES-VIEW BY NAME
  STARTING FROM #NAME-START
  ENDING AT #NAME-END
*
  DISPLAY NAME 3X DEPT 3X LEAVE-DUE
*
END-READ
*
END
Your program code now exceeds one screen page. To navigate in the program source, you can use the following commands or keys:
| Command | Description |
|---|---|
BOT |
Go to the end of the program. |
TOP |
Return to the beginning of the program. |
| Key | Description |
| PF8 or ENTER | Scroll down one page in the program. |
| PF7 | Scroll up one page in the program. |
Run the program.
The output is shown. When you press ENTER repeatedly, you will notice that you will return to the program editor after a couple of pages (that is: when the data for the last employee named Bennett has been displayed).
Stow the program.
You can now proceed with the next exercises: User Input.