
This document covers the following topics:
The Natural Web I/O Interface client offers a configuration tool. The configuration tool is used to create the session configurations which are then available in the logon page. It can also be used for logging purposes in case of problems; however, this should only be done when requested by Software AG support.
The configuration tool is automatically installed when you install the Natural Web I/O Interface client.
![]() To invoke the configuration tool
To invoke the configuration tool
Enter the following URL in your browser:
http://<host>:<port>/natuniweb/conf_index.jsp
where <host> and <port> are the host name and port number of your application server.
Note:
You might wish to protect the configuration tool against
unauthorized access. See Configuring Container-Managed
Security for information on how to restrict the access to
sensitive areas of the application server environment. If you have restricted
access to the configuration tool, an authentication dialog appears. The
appearance of this dialog depends on the authentication model you have
chosen.
The configuration tool appears.
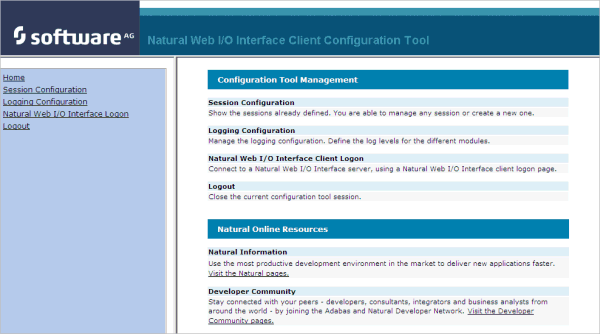
The configuration tool has two frames.
The home page of the configuration tool is initially shown in the right frame. It provides brief descriptions for the links provided in the left frame. It also provides links to several Software AG pages on the web.
When you have invoked a function (for example, when you are currently viewing the session configuration), you can always choose the Home link in the left frame to return to the home page of the configuration tool.
The functions that are invoked by the other links in the left frame are described below.
This section explains how to manage the content of the configuration file for the sessions. It covers the following topics:
The content of the configuration file for the sessions is managed using the Session Configuration page.
![]() To invoke the Session Configuration page
To invoke the Session Configuration page
In the frame on the left, choose the Session Configuration link.
The Session Configuration page appears in the right frame. It shows the global settings and lists all sessions and users that are currently defined. For a session, some of the configuration file information is shown. Example:
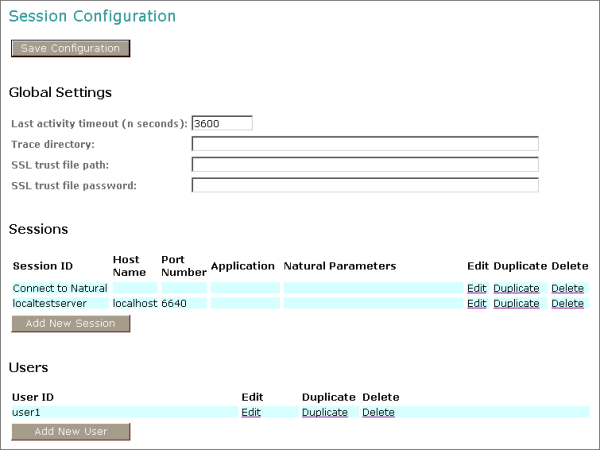
The global settings apply for all defined sessions. You can define the following global settings in the configuration file:
| Option | Description |
|---|---|
| Last activity timeout (n seconds) |
The number of seconds that the client waits for the next user activity. When the defined number of seconds has been reached without user activity, the session is closed. The default is 3600 seconds. |
| Trace directory |
Optional. Location of a different trace directory. When a different trace directory is not defined, the trace files
are written to the default trace directory. By default, the trace files are
written to the directory which has been set by the Java property
You can also set this property in the start script for the application server. Tracing can be enabled individually for each session (see Overview of Session Options below). However, it should only be enabled when requested by Software AG support. |
| SSL trust file path |
Optional. The path to your trust file. See Configuring SSL for further information. |
| SSL trust file password |
If your trust file is password-protected, you have to specify the appropriate password. When you do not specify the password for a password-protected trust file, the trust file cannot be opened and it is thus not possible to open an SSL session. When your trust file is not password-protected, you should not specify a password. |
You can add a new session to the configuration file.
![]() To add a new session
To add a new session
Choose the button.
The Edit Session page appears.
Specify all required information as described below in the section Overview of Session Options.
Choose the OK button to return to the Session Configuration page.
The new session is not yet available in the configuration file.
Choose the button to write the new session to the configuration file.
You can edit any existing session in the configuration file.
![]() To edit a session
To edit a session
Choose the Edit link that is shown next to the session that you want to edit.
The Edit Session page appears.
Specify all required information as described below in the section Overview of Session Options.
Choose the OK button to return to the Session Configuration page.
The modifications are not yet available in the configuration file.
Choose the button to write the modifications to the configuration file.
The Edit Session page appears when you
Example:
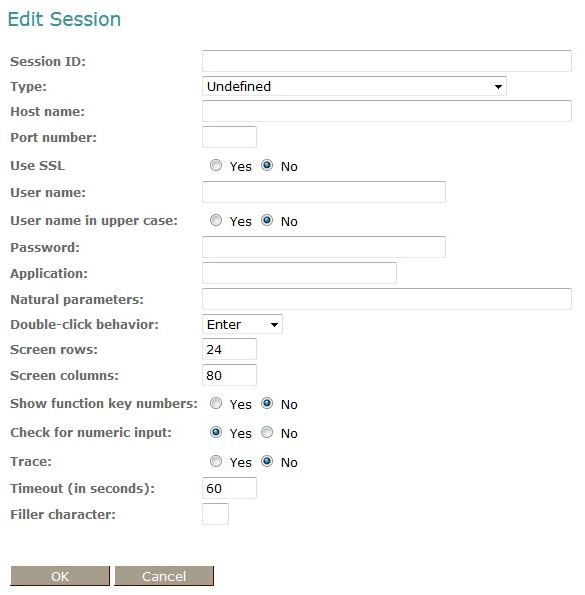
The Edit Session page provides the following options:
| Option | Description |
|---|---|
| Session ID | Mandatory. A session name of your choice. On the logon page, the session name is provided in a drop-down list box. |
| Type | The platform on which user ID and password are
authenticated. You can select the required setting from the drop-down list box.
|
| Host name | The name or TCP/IP address of the server on which Natural and the Natural Web I/O Interface server are running. When this is specified, the corresponding field does not appear on the logon page. |
| Port number | The TCP/IP port number on which the Natural Web I/O Interface server is listening. When this is specified, the corresponding field does not appear on the logon page. |
| Use SSL | If set to Yes, a secure
connection is established between the Natural Web I/O
Interface client on the
application server and the Natural Web I/O Interface server.
Important: |
| User name | Optional. A valid user ID for the current machine. When this is specified, the corresponding field does not appear on the logon page. |
| User name in upper case | If selected, the input field for the user ID is in upper-case mode. |
| Password |
Optional. A valid password for the above user ID. Under Windows, UNIX and OpenVMS, this is always the operating system password of the user, even if Natural Security is active. On the mainframe, this is different: When Natural Security is not active, this is the operating system password of the user. When Natural Security is active, this is the Natural Security password. When a password is specified, the corresponding field does not appear on the logon page. The configuration tool saves the password in encrypted form. |
| Application |
When this is specified, the corresponding field does not appear on the logon page. |
| Natural parameters |
Optional. Parameters for starting the Natural application. This can be stack parameters, a parameter file/module or other Natural-specific information.
|
| Double-click behavior |
The key that is to be simulated when double-clicking an output field. By default, this is the ENTER key. It is possible to disable the double-click behavior, or to define a function key (PF1 through PF12). You can select the required setting from the drop-down list box. Tip: |
| Screen rows |
The number of rows in the output window. Possible values: minimum 24, no upper limit. Default: 24. Not used by Natural for Mainframes which uses the profile
parameter |
| Screen columns |
The number of columns in the output window. Possible values: minimum 80, no upper limit. Default: 80. Not used by Natural for Mainframes which uses the profile
parameter |
| Show function key numbers |
If set to Yes, the PF key numbers are shown next to the PF keys. |
| Trace | Should only be set to Yes when requested by Software AG support. |
| Check for numeric input |
If set to Yes (default), numeric input fields are validated. In this case, only the following characters are allowed in numeric input fields (in addition to the numbers "0" through "9"):
blank If set to No, numeric input fields are not validated. |
| Timeout (in seconds) | The number of seconds that the client waits for a response after an updated page was sent to the Natural session. When the defined number of seconds has been reached without response, the session is closed. The default is 60 seconds. Normally, you need not change this value. |
| Filler character |
Optional. The filler character that is to be removed from the input fields. An application can define, for example, an underscore (_) as the filler character. Trailing filler characters will be removed from the input fields, and leading filler characters will be replaced with blanks. |
You can add a copy of any existing session to the configuration file.
![]() To duplicate a session
To duplicate a session
Choose the Duplicate link that is shown next to the session that you want to duplicate.
A new entry is shown at the bottom of the list of sessions. Its name is "Copy of session-ID". The duplicated session is not yet available in the configuration file.
Edit and save the duplicated session as described above.
You can delete any existing session from the configuration file.
![]() To delete a session
To delete a session
Choose the Delete link that is shown next to the session that you want to delete.
The session is deleted from the list of sessions. It is not yet deleted in the configuration file.
Choose the button to delete the session from the configuration file.
You can predefine Natural users and their passwords in the configuration file.
When a Natural page is opened with a URL that specifies a user in the
URL parameter natuser, the specified user is matched against the
list of users in the configuration file. When the specified user is defined in
the configuration file, the corresponding password is used to authenticate the
user when the Natural session is started. See also
Starting a Natural Application with
a URL.
Example - when the following URL is used, the password defined for "user1" is used:
http://myhost:8080/natuniweb/natural.jsp?natuser=user1...
![]() To add a new user
To add a new user
Choose the button.
The Edit User page appears.
Specify a user name and passwort
Choose the OK button to return to the Session Configuration page.
The new user is not yet available in the configuration file.
Choose the button to write the new user to the configuration file.
Note:
You edit, duplicate and delete a user in the same way as a session
(see the corresponding descriptions above).
When you choose the button, all of your changes are written to the configuration file. The server picks up the new settings automatically the next time it reads data from the configuration file.
Caution:
If you do not choose the button but log out instead or leave the configuration
tool by entering another URL, the new settings are not written to the
configuration file.
The content of the configuration file for logging is managed using the Logging Configuration page. See the section Logging for detailed information.
The configuration tool provides the following link in the left frame:
Natural Web I/O Interface Logon
This link opens the logon page in the right frame.
The logon page uses the current settings in the configuration file. When you select a session from the drop-down list box, you can check whether the connection details are shown as desired. If not, you can go back to the session configuration and modify the settings of the corresponding session.
See also About the Logon Page.
When the configuration tool is protected against unauthorized access and you log out of the configuration tool, you make sure that no other user can change the client configuration when you leave your PC unattended for a while.
![]() To log out
To log out
In the frame on the left, choose the Logout link.
When the configuration tool is protected against unauthorized access, the authentication dialog is shown again.
When it is not protected, the home page is shown again.