When you start Natural Studio for the very first time, only the library workspace is displayed on the left side of the Natural Studio window with the current logon library selected.
When several elements of the Natural Studio window have been activated and you are currently editing a program, the window may look as follows:
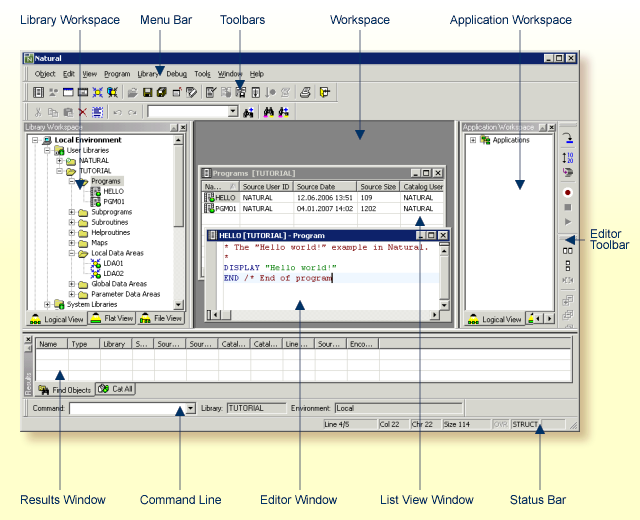
When you start Natural Studio, your startup library is automatically selected in the library workspace; see also Defining Your Own Startup Library. The startup library and many other profile parameters can be changed permanently using the Configuration Utility. Thus you can set up your own user profile. See the Configuration Utility documentation for further information. If you only want to change specific settings for the current session, you change them from within Natural Studio; see Using Session Parameters.
This document covers the following topics:
The following menus are always available:
| Menu | Using the commands in this menu, you can ... |
|---|---|
| Manage (for example, create or delete) Natural objects, or exit Natural Studio. The commands shown in this menu depend on the editor window or list view window which is currently active. | |
| Show or hide the various elements of the Natural Studio window, define a filter for the libraries or objects shown in the library workspace, refresh the display, print a tree view or list view, or display the properties of an object. | |
| Create a new library, catalog all objects in a library, or find objects. | |
| Debug stowed or cataloged Natural programs and dialogs. | |
| Display system information, invoke development and configuration tools, specify session parameters, customize Natural Studio (for example, define the toolbars to be shown), define options (for example, for a specific editor), map a remote environment or an application server. | |
| Invoke the online documentation or access Software AG web sites. |
See the Debugger documentation for detailed information on the commands in the menu.
Additional menus are available when a list view window or an editor window has been opened. When at least one of these windows is open, the menu is available. See Managing the Different Types of Windows for further information.
When an editor window is active, additional menus are shown. For example, when the program editor is currently active, the menus and are shown, and when the data area editor is active, the menus , and are shown. Additional editor-specific commands are then also available from the menus listed in the above table. See Invoking Editors for further information.
You can also define different commands (including your own user commands) to be shown in a menu. See Customizing Natural Studio for further information.
Notes:
Many commands can also be chosen from a toolbar and/or context menu.
You can execute the most important functions using a toolbar button.
Natural Studio provides several toolbars. Only a few of them are initially shown in the Natural Studio window. Each editor has one or more special toolbars which provide fast access to the commands available in the editor-specific menus. When an editor window is active, the toolbars for this editor are shown. When you invoke the context menu by clicking the workspace or a toolbar, you can enable or disable the display of specific toolbars which apply to the current context (for example, when the program editor is currently active, you can enable further toolbars which apply to the program editor).
When you move the mouse pointer over a toolbar, a brief description for the button is shown in the status bar. In addition, tooltips may appear for the buttons when this feature has been switched on in the Customize dialog box. In the Customize dialog box, it is also possible to switch the display of a specific toolbar on and off, to add your own toolbars, or to define different buttons for an existing toolbar. See Customizing Natural Studio for further information.
Note:
When Natural Security
is active, all toolbar buttons which are not allowed to be used are
dimmed.
The library workspace is a tree view window. It is used to administer the Natural system files in the current environment in a hierarchical manner.
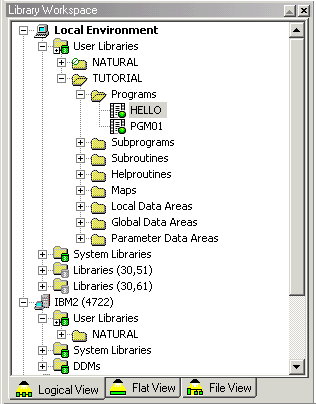
Tabs are provided for different views: logical view, flat view and file view. See Environments and Views in the Library Workspace for further information.
In the different views, you can expand or collapse the nodes in the tree by clicking the plus or minus sign in front of a node. When using the keyboard, select the node and press RIGHT-ARROW or LEFT-ARROW.
When you expand or collapse a node in one view, this action is not applied to the other views. Thus, it is possible to view the contents of different nodes in different views.
Depending on the current selection, the nodes in the library workspace can be opened into editor windows or list view windows. See Workspace below.
In the library workspace, only one node can be selected at a time. If you want to select several nodes (for example, in order to delete several nodes at the same time) you have to open a list view window. See List View Windows for further information.
The library workspace provides access to two different types of environment: the local environment and a remote environment. The remote environment requires that Natural Development Server has been installed on the mainframe, UNIX, OpenVMS or Windows. This is also known as the Single Point of Development (SPoD) concept. See Accessing a Remote Development Environment in the Remote Development Using SPoD documentation for further information.
Using a filter, you can reduce the number of items that are shown in the tree. See Filtering Libraries and Objects for further information.
![]() To switch the library workspace display on and off
To switch the library workspace display on and off
From the menu, choose .
Or:
Press ALT+1.
When the library workspace is displayed in the Natural Studio window, a check mark is shown next to this menu command.
Editor windows and list view windows are opened in the workspace.
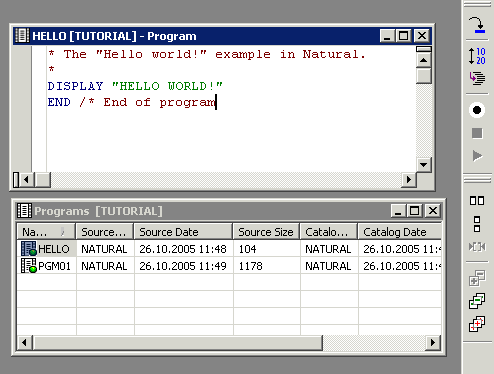
When you create a new object (for example, a program) an editor window appears. An editor window also appears when you open an existing object from the library workspace. See Invoking Editors for further information.
When an editor window is active, an editor-specific toolbar is shown. By default, this type of toolbar appears to the right of the workspace. See the Editors documentation for information on the commands that can be chosen from such a toolbar.
For each group node in the library workspace (for example, the Programs node in the logical view), a list view window can be opened in order to display more detailed information on the selected node. See Opening a List View Window for further information.
A wallpaper can be used for the workspace. See Workspace Options for further information.
See also Managing the Different Types of Windows.
Initially, the application workspace is not shown.
The application workspace can only be used when you are working with Natural Studio in a remote development environment (on a mainframe, UNIX,OpenVMS or Windows computer) using Natural Single Point of Development (SPoD). It is used to administer Natural applications in a remote environment in a hierarchical manner.
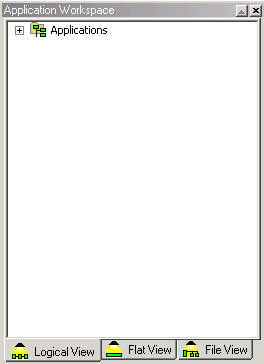
Like the library workspace, the application workspace is also a tree view window and it also has tabs for different views: logical view, flat view and file view. See Managing Applications in the Remote Development Using SPoD documentation for detailed information.
![]() To switch the application workspace display on and off
To switch the application workspace display on and off
From the menu, choose .
Or:
Press ALT+2.
When the application workspace is displayed in the Natural Studio window, a check mark is shown next to this menu command.
Initially, the results window is not shown.
By default, a tab for the results of the command and another tab listing the objects that were not cataloged successfully with the command are shown (see Finding Objects in a Library and Cataloging the Objects in a Library for detailed information on these commands). Example:

As a rule, when you select an entry on the Find Objects or Cat All tab, you can use most of the commands that can also be used in a list view window (menu bar, context menu or toolbar button).
When an entry is not selected on the Find Objects or Cat All tab, the following commands are available in the context menu:
| Command | Description |
|---|---|
| Define another view for the results window (for example, large icons). | |
| Copy the content of the results window, including
the column headers, as normal text in column format. The individual columns are
separated by tab characters. Thus, the copied content can easily be pasted into
an application such as Microsoft Excel.
Note: |
|
| Remove all entries from a tab of the results window. This does not delete the objects. | |
| Select all entries in the results window. | |
| Print the content of the result window as normal text in column format. See also Printing Views. | |
| Save the content of the result window as normal text in column format. The individual columns are separated by tab characters. A Save As dialog box appears in which you enter a file name and location. The resulting file can be opened, for example, with Microsoft Excel. |
Additional user-defined tabs may be shown that have been created with the Results Interface (see Results Interface in the Programming Guide) or for activated plug-ins (see Plug-in Manager later in this documentation). An additional tab is also shown when you try to unlock objects in a remote development environment (see Unlocking Objects Manually in the Remote Development Using SPoD documentation). These tabs may provide different commands in their context menus (not the commands listed above).
![]() To switch the results window display on and off
To switch the results window display on and off
From the menu, choose .
Or:
Press ALT+5.
When the results window is displayed in the Natural Studio window, a check mark is shown next to this menu command.
Initially, the debugger window is not shown.
When the debugger is not active, you can invoke the debugger window. It shows all breakpoints and watchpoints which have been set in the active environment. You can switch between the display of the breakpoints and watchpoints by choosing the corresponding tab at the bottom of the debugger window.
The question mark (?) in the first column indicates that the breakpoint or watchpoint has not been validated. Breakpoints and watchpoints can only be validated when the debugger is active and has reached the corresponding line in the editor.
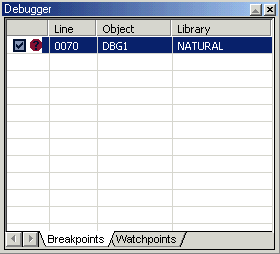
It is possible to add or remove (toggle) breakpoints in the editor even if the debugger is not active. See Adding and Removing a Breakpoint in the Debugger documentation.
When you invoke a context menu in the debugger window, you can, for example, deactivate or delete breakpoints or watchpoints. For detailed information on the context menu commands, see Setting Breakpoints and Watchpoints in the Debugger documentation.
When the debugger is started, the debugger windows which are described in Debugger documentation are shown instead of the above debugger window. When the debugger is stopped, the above debugger window will be shown again - provided that its display has previously been switched on in the menu.
![]() To switch the debugger window display on and off
To switch the debugger window display on and off
From the menu, choose .
Or:
Press ALT+6.
When the debugger window is displayed in the Natural Studio window, a check mark is shown next to this menu command.
Note:
When the debugger is active, the above command is not available in
the menu.
Initially, the command line is not shown.
![]()
The command line consists of the following elements:
You can execute system commands, utilities, generated programs and generated dialogs directly from the Command drop-down list box. See Issuing Commands in the Command Line for detailed information.
The name of the current library is always indicated in the Library text box (read-only).
The current library is the library which is currently selected in the library workspace or in the application workspace. Or it is the library which contains the object that is currently selected in the library workspace or application workspace. When you select an editor window or a list view window, the corresponding library is considered as the current library. See Using Natural Libraries for further information.
The active environment is always indicated in the Environment text box (read-only).
There are two types of environment:
local environment on a workstation (this is also the runtime environment of Natural Studio),
remote environment on a development server (only available in a SPoD environment).
All commands that you issue are always applied to the active environment. When you edit a Natural object, the corresponding editor is invoked and the object is taken from the active environment. When you execute an object, it is executed in the active environment. Only one environment can be active at one point in time. See Environments and Views in the Library Workspace for further information.
![]() To switch the command line display on and off
To switch the command line display on and off
From the menu, choose .
Or:
Press ALT+3.
When the command line is displayed in the Natural Studio window, a check mark is shown next to this menu command.
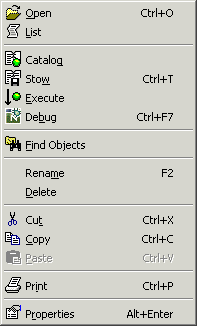
Context menus provide for selection of commands that are valid in the current context. The content of a context menu depends on the currently selected object or the position within the Natural Studio window.
For example, the following context menu is available when you select a program in the library workspace:
Or when you invoke the context menu by clicking, for example, the workspace or toolbar with the right mouse button when the program editor is currently active, the following context menu appears:
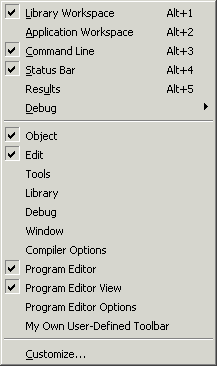
Using the above context menu, you can switch the display of a specific element of the Natural Studio window on and off. The commands listed below the first divider apply to toolbars. Different toolbars will be listed when a different type of editor window is currently active.
You can also define different commands (including your own user commands) to be shown in a context menu. See Customizing Natural Studio for further information.
Note:
When Natural Security
is active, all commands which are not allowed to be used are dimmed.
Select the element for which you want to invoke a context menu.
Click the right mouse button.
Or:
Press SHIFT+F10.
The context menu appears and you can now choose the required command.
The status bar is the horizontal information line at the bottom of the Natural Studio window. It shows short help texts for the commands in the menu bar and context menu.
When a list view window is active, the name of the corresponding library is shown and the number of objects.
When an editor window is active, editor-specific information is shown at the right of the status bar. For example, the following information is shown for the program editor:
![]()
![]() To switch the status bar display on and off
To switch the status bar display on and off
From the menu, choose .
Or:
Press ALT+4.
When the status bar is displayed in the Natural Studio window, a check mark is shown next to this menu command.
The different editors show different information in the status bar.
When the corresponding option has been set in the Options dialog box, a status bar is also shown in an editor window.
Note:
The information provided in the tables below applies to the status
bars which are available in the different editor windows. In the status bar at
the bottom of the application window, this information is in some cases shown
in a different way and in a different sequence.
When the display of the status bar has been activated in the program editor options, the following information is shown in the program editor window:
| Information | Description |
|---|---|
| Line: x of y | x stands for the line in which the cursor is currently positioned. y stands for the total number of lines in the object. |
| Col | The column in which the cursor is currently positioned. |
| Size | The total number of characters in the source code. |
| Structured or Report | The programming mode of the active object. For further information, see Natural Programming Modes in the Programming Guide. |
| Modified | Indicates that the object has been modified since the last save. If "Modified" is not displayed, the object has not been modified since the last save. |
| INS or OVR | INS stands for insert mode: input does not overwrite existing text. OVR stands for overwrite mode: input overwrites existing text. |
When the display of the status bar has been activated in the data area editor options, the following information is shown in the data area editor window:
| Information | Description |
|---|---|
| Line: x of y | x stands for the line which is currently selected. y stands for the total number of lines in the source area. |
| Size | The total number of bytes in the data area. |
When the display of the status bar has been activated in the map editor options, the following information is shown in the map editor window:
| Information | Description |
|---|---|
| Name | The name of the active field. |
| Row | The top-most row in which the active field begins. |
| Col | The left-most column in which the active field begins. |
| Len | The length (characters) of the active field. |
| Format | The format of the active field. |
| Structured or Report | The programming mode of the active object. For further information, see Natural Programming Modes in the Programming Guide. |
When the display of the status bar has been activated in the DDM editor options, the following information is shown in the DDM editor window:
| Information | Description |
|---|---|
| Line: x of y | x stands for the line which is currently selected. y stands for the total number of lines in the DDM source. |
| DBID | The database ID from which the DDM is derived. |
| File | The number of the database file from which the DDM is derived. |
| Type | The type of database from which the DDM is derived. |
Note:
To modify the database ID, file number and default sequence, see
DDM Header
Information in the DDM Editor section
of the Editors documentation.
When the display of the status bar has been activated in the dialog editor options, the following information is shown in the dialog editor window:
| Information | Description |
|---|---|
| Modified | Indicates that the dialog has been modified since the last save. If "Modified" is not displayed, the dialog has not been modified since the last save. |
| Selected | The handle name of the selected dialog element. You can select a different dialog element from this drop-down list box. |
| x: n y: n | Coordinates indicating the position of the selected dialog element. |
| w: n h: n | Width and height of the selected dialog element. |
See Dialog Editor Window in the Dialog Editor section of the Editors documentation for more detailed information.