This document covers the following topics:
Two types of entries can be defined in a program for debugging purposes:
Breakpoints
A breakpoint is a point at which control is returned to the user while
a Natural object is executing.
Breakpoints cannot be set on any statement line other than the first one if a single statement occupies more than one line.
If you accidentally try to set a breakpoint on a non-executable line (for example, a comment line), the breakpoint is automatically moved to the next executable line.
Watchpoints
Using watchpoints, you can rapidly detect unexpected alterations to
Natural variables by objects that contain errors.
By default, watchpoints are used to instruct the debugger to interrupt the execution of Natural objects when the content of a variable changes. However, by specifying a certain value to the variable together with a watchpoint operator when setting a watchpoint, a condition can be set which only activates the watchpoint when the condition becomes true.
A variable is considered to have changed either when its current value differs from the value recorded when the watchpoint was last triggered, or when it differs from the initial value.
Each breakpoint or watchpoint is displayed in the corresponding tab of the break- and watchpoints window. For each breakpoint, the number of the line is shown in which the breakpoint has been defined. For each watchpoint, a name is assigned that corresponds to the name of the variable to which it belongs and the break condition is shown.
Using the check box in the first column of a tab, a breakpoint or watchpoint can be activated or deactivated at any time during a debugging session. See Deactivating Breakpoints and Watchpoints Temporarily.
Every breakpoint or watchpoint has a hit count which increases every time the debug entry is passed. The number of executions of a debug entry, however, can be restricted in the following ways:
A number of skips can be specified before the breakpoint or watchpoint is executed. The debug entry is then ignored until the event count is higher than the number of skips specified.
A maximum number of executions can be specified, so that the breakpoint or watchpoint is ignored as soon as the event count exceeds the specified number of executions.
When a breakpoint or watchpoint is hit inside another object but the currently active one, a new editor window is opened displaying the source of this new object.
You can add a breakpoint for the current cursor position to the Breakpoints tab of the break- and watchpoints window. Or, if a breakpoint already exists for this cursor position, you can remove it from the Breakpoints tab.
A dialog box does not appear in this case. If you want to modify the breakpoint (for example, to define the maximum number of breaks), see Modifying a Breakpoint.
See also Deleting Breakpoints and Watchpoints.
Note:
In the local environment and in a remote environment (SPoD), it is
also possible to set and remove breakpoints as described below when the
debugger is not active. Each breakpoint which has been defined in the editor
will then be verified when the debugger is started. When the breakpoint is not
allowed at the defined position, it will then be moved to the next line in
which it is possible to define a breakpoint. See also
Debugger
Window in the documentation Using Natural
Studio.
![]() To toggle a breakpoint
To toggle a breakpoint
Select the line on which you want to set or remove a breakpoint.
Invoke the context menu in the editor and choose .
Or:
Press F9.
Or:
When the Debug toolbar is shown, choose the following toolbar
button:
![]()
Or:
In the left margin of the editor window (where the symbols for the
breakpoints are usually shown), click a position next to the required line.
When a breakpoint is set, a symbol is now shown in the left margin of the editor window. See Symbols Used in the Editor Window. An entry for the breakpoint is also shown on the Breakpoints tab of the break- and watchpoints window.
When a breakpoint has been removed, the corresponding symbol is no longer shown. The entry for the breakpoint is removed from the Breakpoints tab of the break- and watchpoints window.
You can modify each breakpoint which is currently shown in the break- and watchpoints window.
![]() To modify a breakpoint
To modify a breakpoint
Select the required breakpoint, invoke the context menu and choose .
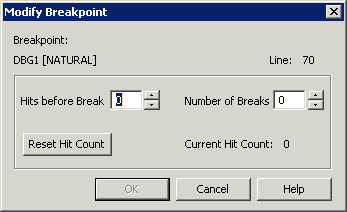
The following dialog box appears:

Set the required options:
The number of skips before execution of the breakpoint if it is not to be executed until the program has run a certain number of times. The default is 0.
The maximum number of executions of the breakpoint. After this number has been reached, the breakpoint is ignored. The default is 0.
When you choose this command button, the current hit count is reset to 0.
Choose the button.
Watchpoints are shown on the Watchpoints tab of the break- and watchpoints window.
You can add watchpoints in different ways:
You can add the variable at the current cursor position in the editor window to the Watchpoints tab of the break- and watchpoints window. A dialog is not shown in this case.
![]() To define a variable as a watchpoint
To define a variable as a watchpoint
Select the variable in the editor by placing the cursor at any position within the variable name.
Invoke the context menu and choose .
Or:
Press CTRL+SHIFT+W.
Or:
Select the variable in the editor. Use the mouse to drag the
selected variable to the Watchpoints tab and drop it
there.
You can add a variable from the variables window to the Watchpoints tab of the break- and watchpoints window. A dialog is not shown in this case.
![]() To define a variable as a watchpoint
To define a variable as a watchpoint
Select the desired variable in the variables window.
Invoke the context menu and choose .
Or:
Press CTRL+SHIFT+W.
You can use a dialog box to add a watchpoint to the Watchpoints tab of the break- and watchpoints window.
![]() To add a watchpoint
To add a watchpoint
From the menu, choose .
Or:
In the Watchpoints tab of break- and
watchpoints window, invoke the context menu and choose
. Make sure that no other entry is selected.
Otherwise, the context menu does not show this command.
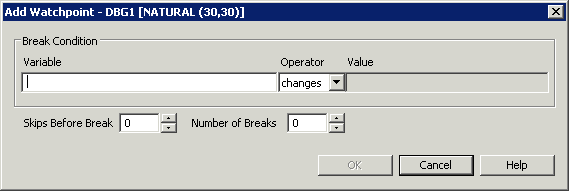
The Add Watchpoint dialog box appears. The
title bar indicates the names of the current program and library as well as the
database ID and file number of the current FUSER.

Set the required options:
The variable that is to be watched in the debugged program.
To define a condition for the watchpoint, select an appropriate watchpoint operator and specify a value for this operator. If you do not specify a condition, the default setting ("changes") applies.
The watchpoint operators are:
| Operator | Activation of the Watchpoint |
|---|---|
| changes | Each time the variable is changed. Default. |
| EQ (=) | Only when the current value of the variable is equal to the specified value. |
| NE (!=) | Only when the current value of the variable is not equal to the specified value. |
| GT (>) | Only when the current value of the variable is greater than the specified value. |
| LT (<) | Only when the current value of the variable is less than the specified value. |
| GE (>=) | Only when the current value of the variable is greater than or equal to the specified value. |
| LE (<=) | Only when the current value of the variable is less than or equal to the specified value. |
The number of skips before execution of the watchpoint if it is not to be executed until the program has run a certain number of times. The default is 0.
The maximum number of executions of the watchpoint. After this number has been reached, the watchpoint is ignored. The default is 0.
Choose the button.
The name of the selected variable is now shown on the Watchpoints tab of the break- and watchpoints window.
You can modify each watchpoint which is shown in the break- and watchpoints window.
![]() To modify a watchpoint
To modify a watchpoint
Select the required watchpoint, invoke the context menu and choose .
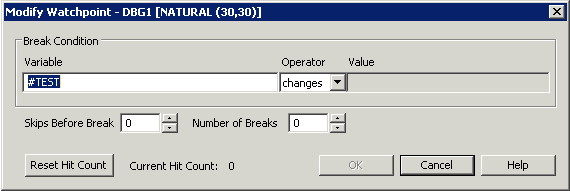
The Modify Watchpoint dialog box appears.

This dialog box provides the same options as the Add Watchpoint dialog box. See Adding a Watchpoint Using a Dialog Box for a description of the options which can be specified in this dialog box.
In addition, this dialog box provides the Reset Hit Count button. When you choose this command button, the current hit count is reset to 0.
Make all required changes and choose the button.
Each defined breakpoint or watchpoint can be deactivated temporarily.
![]() To deactivate a breakpoint or watchpoint
To deactivate a breakpoint or watchpoint
Select the required tab in the break- and watchpoints window.
For the desired entry, select the first column of the tab to remove the check mark.
Or:
Invoke the context menu and choose
.
When you have deactivated a breakpoint, the symbol which is shown in the left margin of the editor window changes. See Symbols Used in the Editor Window.
![]() To activate a deactivated breakpoint or watchpoint
To activate a deactivated breakpoint or watchpoint
Select the required tab in the break- and watchpoints window.
For the desired entry, select the first column of the tab so that a check mark is shown again.
Or:
Invoke the context menu and choose
.
When you have activated a breakpoint, the symbol which is shown in the left margin of the editor window changes. See Symbols Used in the Editor Window.
![]() To deactivate or activate all breakpoints or watchpoints
To deactivate or activate all breakpoints or watchpoints
Select the required tab in the break- and watchpoints window.
Make sure that no entry is selected (otherwise, the context menu does not show the required command), invoke the context menu and choose either or .
When you have deactivated or activated all breakpoints, the symbols which are shown in the left margin of the editor window change. See Symbols Used in the Editor Window.
For each defined breakpoint or watchpoint which is shown in the break- and watchpoints window (no matter whether it is active or not), you can go to the source in which this breakpoint or watchpoint has been defined.
![]() To go to the source in which a breakpoint or watchpoint has been
defined
To go to the source in which a breakpoint or watchpoint has been
defined
Select the required tab in the break- and watchpoints window.
Select the required entry, invoke the context menu and choose .
Or:
Double-click the required entry.
For a breakpoint, the trace position is shown next to the source code line in which the breakpoint has been defined.
For a watchpoint, the entire source code in which the watchpoint has been defined is shown.
You can either delete selected breakpoints or watchpoints or you can delete all breakpoints or watchpoints.
See also Adding and Removing a Breakpoint.
![]() To delete a breakpoint or watchpoint
To delete a breakpoint or watchpoint
Select the required tab in the break- and watchpoints window.
Select the required entry.
Invoke the context menu and choose .
Or:
Press DEL.
![]() To delete all breakpoints or watchpoints
To delete all breakpoints or watchpoints
Select the required tab in the break- and watchpoints window.
Make sure that no entry is selected (otherwise, the context menu does not show the required command), invoke the context menu and choose .
The following symbols may appear in the left margin of the editor window.
|
|
This line contains an active breakpoint. |
|
|
This line contains a deactivated breakpoint. |
|
|
This line contains an active breakpoint. It also contains the trace position. |
|
|
This line contains a deactivated breakpoint. It also contains the trace position. |
|
|
This line contains a breakpoint which has not yet been validated (that is, the debugger has not yet reached the marked line). The state can either be shown as active (red background) or inactive (white background). |
|
|
This line contains an invalid breakpoint (for
example, when the breakpoint has been set on a line after the END
statement). The state can either be shown as active (red background) or
inactive (white background).
|