In the example introducing the ROWTABLEAREA2 control, the header of the grid was built by arranging certain LABEL controls, where the LABEL controls where rendered as headers:
<rowtablearea2 griddataprop="lines" rowcount="10" withborder="true" width="100%">
    <tr>
        ...
        <label name="First Name" asheadline="true">
        </label>
        ...
    </tr>
    <repeat>
...
...
...
It is also possible to use the GRIDCOLHEADER control in order to define the header of a grid. The advantages are:
GRIDCOLHEADER controls are automatically rendered in "header style".
GRIDCOLHEADER controls allow to sort the grid content.
GRIDCOLHEADER controls allow to resize a grid.
This document covers the following topics:
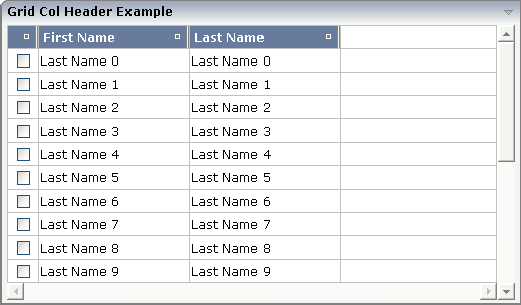
Let us have a look on the following grid definition:
<rowarea name="Grid Col Header Example">
    <rowtablearea2 griddataprop="lines" rowcount="10" width="100%" withborder="true"
                   hscroll="true" firstrowcolwidths="true">
        <tr>
            <gridcolheader name=" " width="30">
            </gridcolheader>
            <gridcolheader name="First Name" width="150">
            </gridcolheader>
            <gridcolheader name="Last Name" width="150">
            </gridcolheader>
            <hdist>
            </hdist>
        </tr>
        <repeat>
            <str valueprop="selected">
                <checkbox valueprop="selected" flush="screen" width="100%" align="center">
                </checkbox>
                <field valueprop="firstName" width="100%" noborder="true"
                       transparentbackground="true">
                </field>
                <field valueprop="lastName" width="100%" noborder="true"
                       transparentbackground="true">
                </field>
                <hdist>
                </hdist>
            </str>
        </repeat>
    </rowtablearea2>
</rowarea>
You see:
The ROWTABLEAREA2 definition was set to always follow the column widths of the first row. The first row of the grid is the row containing the GRIDCOLHEADER controls, this means that this row defines the column sizing for the whole grid.
The header row of the grid is built out of GRIDCOLHEADER controls, each one specifying a name and a width.
The header row is closed with an horizontal distance.This is quite important: if your column widths do not horizontally fill the grid, then the remaining space is typically equally distributed among the columns. Even if GRIDCOLHEADER specifies a certain width, this may still be overridden by the browser. A horizontal distance control (HDIST) at the end makes the browser assign the remaining space to the distance control, not to the GRIDCOLHEADER controls.
When the user moves the mouse over the border of the header columns, then the cursor will change and the user can change the width of the columns:
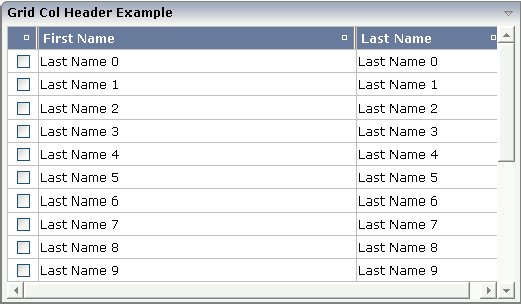
The GRIDCOLHEADER allows to bind to a property which is used for sorting. The XML definition of the previous example was extended to demonstrate this:
<rowarea name="Grid Col Header Example">
    <rowtablearea2 griddataprop="lines" rowcount="10" width="100%" withborder="true"
                   hscroll="true" firstrowcolwidths="true">
        <tr>
            <gridcolheader name=" " width="30" propref="selected">
            </gridcolheader>
            <gridcolheader name="First Name" width="150" propref="firstName">
            </gridcolheader>
            <gridcolheader name="Last Name" width="150" propref="lastName">
            </gridcolheader>
            <hdist>
            </hdist>
        </tr>
        <repeat>
            <str valueprop="selected">
                <checkbox valueprop="selected" flush="screen" width="100%" align="center">
                </checkbox>
                <field valueprop="firstName" width="100%" noborder="true"
                       transparentbackground="true">
                </field>
                <field valueprop="lastName" width="100%" noborder="true"
                       transparentbackground="true">
                </field>
                <hdist>
                </hdist>
            </str>
        </repeat>
    </rowtablearea2>
</rowarea>
Each GRIDCOLHEADER control now points to the property that is referenced in the subsequent FIELD/CHECKBOX definition. The control now displays small sort icons. The user can sort the information by choosing the icon.
| Basic | |||
| name |
Text that is displayed inside the control. Please do not specify the name when using the multi language management - but specify a "textid" instead. |
Sometimes obligatory | |
| textid |
Multi language dependent text that is displayed inside the control. The "textid" is translated into a corresponding string at runtime. Do not specify a "name" inside the control if specifying a "textid". |
Sometimes obligatory | |
| width |
Width of the control. There are three possibilities to define the width: (A) You do not define a width at all. In this case the width of the control will either be a default width or - in case of container controls - it will follow the width that is occupied by its content. (B) Pixel sizing: just input a number value (e.g. "100"). (C) Percentage sizing: input a percantage value (e.g. "50%"). Pay attention: percentage sizing will only bring up correct results if the parent element of the control properly defines a width this control can reference. If you specify this control to have a width of 50% then the parent element (e.g. an ITR-row) may itself define a width of "100%". If the parent element does not specify a width then the rendering result may not represent what you expect. |
Obligatory |
100 120 140 160 180 200 50% 100% |
| propref |
If the grid column visualizes data input the name of the property here. This property is located within the row item class. Example: if you use a FIELD or CHECKBOX control input the value of property VALUEPROP here. If the grid column does not visualize any data (e.g. you use a BUTTON control) input an unique column identifier. The PROPREF property is used as key when flushing 'column change events' to the application. |
Optional | |
| Appearance | |||
| title |
Text that is shown as tooltip for the control. Either specify the text "hard" by using this TITLE property - or use the TITLETEXTID in order to define a language dependent literal. |
Optional | |
| titletextid |
Text ID that is passed to the multi lanaguage management - representing the tooltip text that is used for the control. |
Optional | |
| withsorticon |
Flag that indicates if a small sort indicator is shown within the right corner of the control. Default is TRUE. |
Optional |
true false |
| image |
URL of image that is displayed inside the control. Any image type (.gif, .jpg, ...) that your browser does understand is valid. Use the following options to specify the URL: (A) Define the URL relative to your page. Your page is generated directly into your project's folder. Specifiying "images/xyz.gif" will point into a directory parallel to your page. Specifying "../HTMLBasedGUI/images/new.gif" will point to an image of a neighbour project. (B) Define a complete URL, like "http://www.softwareag.com/images/logo.gif". |
Optional | |
| stylevariant |
Some controls offer the possibility to define style variants. By this style variant you can address different styles inside your style sheet definition file (.css). If not defined "normal" styles are chosen, if defined (e.g. "VAR1") then other style definitions (xxxVAR1xxx) are chosen. Purpose: you can set up style variants in the style sheet defintion and use them multiple times by addressing them via the "stylevariant" property. CIS currently offerst two variants "VAR1" and "VAR2" but does not predefine any semantics behind - this is up to you! |
Optional |
VAR1 VAR2 VAR3 VAR4 |
| sorttitle |
Text that is shown as tooltip for the sort indicator. Either input text by using this SORTTITLE property - or use the SORTTITLETEXTID in order to define a language dependent literal. |
Optional | |
| sorttitletextid |
Text ID that is passed to the multi lanaguage management - representing the tooltip text for the sort indicator. |
Optional | |
| textalign |
Alignment of text inside the control. |
Optional |
left center right |
| tabindex |
Index that defines the tab order of the control. Controls are selected in increasing index order and in source order to resolve duplicates. |
Optional |
-1 0 1 2 5 10 32767 |
| rowspan |
Row spanning of control. If you use TR table rows then you may sometimes want to control the number of rows your control occupies. By default it is "1" - but you may want to define the control two span over more than one columns. The property only makes sense in table rows that are snychronized within one container (i.e. TR, STR table rows). It does not make sense in ITR rows, because these rows are explicitly not synched. |
Optional |
1 2 3 4 5 50 int-value |
| colspan |
Column spanning of control. If you use TR table rows then you may sometimes want to control the number of columns your control occupies. By default it is "1" - but you may want to define the control to span over more than one columns. The property only makes sense in table rows that are snychronized within one container (i.e. TR, STR table rows). It does not make sense in ITR rows, because these rows are explicitly not synched. |
Optional |
1 2 3 4 5 50 int-value |
| Binding | |||
| visibleprop |
Name of the adapter parameter that provides the information if the column is displayed or not. |
Optional | |
| Comment | |||
| comment |
Comment without any effect on rendering and behaviour. The comment is shown in the layout editor's tree view. |
Optional | |
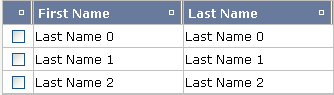
By using the SELECTOR control in combination with the STR control, you can build nice looking grids in which the user can select rows. Have a look at the following screen:
The SELECTOR control is typically is used in the leftmost column. The user can select the control with the mouse or keyboard. In case of using the control for multiple selections, the user can select mulitple rows using a combination of CTRL and click or SHIFT and click.
The SELECTOR control references a boolan property inside a row object that is representing the selection state. The XML layout definition looks as follows:
<rowtablearea2 griddataprop="lines" rowcount="10" width="100%" withborder="true"
               hscroll="true" firstrowcolwidths="true">
     <tr>
         <gridcolheader name=" " width="30" propref="selected">
         </gridcolheader>
         <gridcolheader name="First Name" width="150" propref="firstName">
         </gridcolheader>
         <gridcolheader name="Last Name" width="150" propref="lastName">
         </gridcolheader>
         <hdist>
         </hdist>
     </tr>
     <repeat>
         <str valueprop="selected">
             <selector valueprop="selected" width="30" withlinenum="false"
                       singleselect="false">
             </selector>
             <field valueprop="firstName" width="100%" noborder="true"
                    transparentbackground="true">
             </field>
             <field valueprop="lastName" width="100%" noborder="true"
                    transparentbackground="true">
             </field>
             <hdist>
             </hdist>
         </str>
     </repeat>
</rowtablearea2>
You see the following:
STR and SELECTOR are referencing the same property
selected so that selections done by the SELECTOR
control are automatically reflected in the selections of the row.
SELECTOR is switched to allow multiple selections.
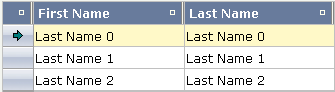
By using the property withlinenum, you
specify that inside the selector no line number is output. Instead, the
SELECTOR is left empty if not selected, or it displays an icon if selected.
The selector simplifies programming of the grid selection a lot. When clicking the selector control, it automatically manages the referenced selection property of all rows that are managed inside the corresponding grid collection.
| Basic | |||
| valueprop |
$en/popupwizard/njx_selector_attr_valueprop$ |
Optional | |
| width |
Width of the control. There are three possibilities to define the width: (A) You do not define a width at all. In this case the width of the control will either be a default width or - in case of container controls - it will follow the width that is occupied by its content. (B) Pixel sizing: just input a number value (e.g. "100"). (C) Percentage sizing: input a percantage value (e.g. "50%"). Pay attention: percentage sizing will only bring up correct results if the parent element of the control properly defines a width this control can reference. If you specify this control to have a width of 50% then the parent element (e.g. an ITR-row) may itself define a width of "100%". If the parent element does not specify a width then the rendering result may not represent what you expect. |
Optional |
100 120 140 160 180 200 50% 100% |
| singleselect |
Indicates if the multiple lines can be selected ("false") or only one line can be selected ("true"). Default is "true". |
Optional |
true false |
| comment |
Comment without any effect on rendering and behaviour. The comment is shown in the layout editor's tree view. |
Optional | |
| Binding | |||
| valueprop | (already explained above) | ||
| Appearance | |||
| withlinenum |
There are two usage variants: either the line number of the corresponding row is shown as content of the SELECTOR control ("true") - or nothing is shown inside ("false"). In case of selecting "true" then the line number is automatically retrieved, i.e. you do not have to specify a property on adapter side to indicate the value of the line number. |
Optional |
true false |
| image |
If specifying WITHLINENUM to be "false" then a small arrow icon is shown inside the control if selecting a corresponding row. Input the URL of the icon to be shown if you do not want to use the default icon. If specifying WITHLINENUM to be "true" then the line number of selected lines is output in bold font. |
Optional | |
| imageprop |
$en/popupwizard/njx_selector_attr_imageprop$ |
Optional | |
| alwaysshowicon |
Flag that indicates if the selector shows its image - independent from whether the corresponding line is selected or not. With ALWAYSHOWICON you can show icons on unselected lines, too. For that specify WITHLINENUM to be "false" and use IMAGEPROP. Default is "false". |
Optional |
true false |
| tabindex |
Index that defines the tab order of the control. Controls are selected in increasing index order and in source order to resolve duplicates. |
Optional |
-1 0 1 2 5 10 32767 |
| Miscellaneous | |||
| testtoolid |
Use this attribute to assign a fixed control identifier that can be later on used within your test tool in order to do the object identification |
Optional | |