This section covers the following topics:
This section describes the concept and the structure of the server for the Natural SQL Gateway.
This server is necessary if the Natural SQL Gateway runs within a TP environment. For additional information, see Product Structure in the section Introduction to Natural SQL Gateway.
A Natural SQL Gateway server is a multi-user, multi-tasking application.
The server is responsible for maintaining the persistent connection to the JDBC
server for each client, because a client running in a TP environment cannot
cope with persistent JDBC connections. The client opens a so called SQL session
at the Natural SQL Gateway server. This is done implicitly with the SQL
CONNECT statement. This session represents the client from the
JDBC server point of view and keeps the persistent connection. The client is
loosely coupled to this session just by maintaining a session identifier. The
session remains until the client disconnects with the SQL
DISCONNECT statement.
The Natural SQL Gateway server can host SQL sessions for multiple users and execute their requests concurrently.
To enable the administrator to monitor the status of the Natural SQL Gateway server, a monitor task is provided which is initialized automatically at server startup. Using the monitor commands, the administrator is able to control the server activities, cancel particular user sessions, terminate the entire server, etc. For further information, see Monitoring the Natural SQL Gateway Server in the section Operating the SQL Gateway Server.
This document describes how to install a server for the Natural SQL Gateway (product code NSB) under the operating system z/OS.
The installation of the Natural SQL Gateway server is performed by
installation jobs. The sample jobs are contained in the dataset
NSBvrs.JOBS and are prefixed with
NSB, or generated by System Maintenance Aid (SMA).
The following topics are covered:
For details, refer to Prerequisites in the section Installing Natural SQL Gateway.
The installation tape contains the datasets listed in the table below. The sequence of the datasets and the number of library blocks needed are shown in the Report of Tape Creation which accompanies the installation tape.
| Dataset Name | Contents |
|---|---|
NSBvrs.OBJS |
Contains the object modules of the server. |
NSBvrs.JOBS |
Example installation jobs. |
The notation vrs in dataset names represents the version, release and system maintenance level of the product.
(Job I008, Step 9510)
(Job I009 / Step 9510, 9520, 9530)
Step 9510 creates the NSBCONFG sample member for the
batch server.
Step 9520 creates a Clist sample member to ping and terminate a Natural SQL Gateway server.
Step 9530 creates a sample member with a batch job to ping and terminate a Natural SQL Gateway server.
The following parameters of the configuration file have to be defined. See Configuring the Natural SQL Gateway Server. For the other parameters, the default values may be used:
FRONTEND_NAME |
Specify the name of the Natural SQL Gateway server front-end module you will generate in one of the following steps. |
PORT_NUMBER |
Specify the TCP/IP port number under which the server can be connected. |
(Job I054, Step 9510)
The NSB object modules must be linked with the necessary
runtime extensions of your batch installations into executable load modules.
See sample job NSBI054 on dataset
NSBvrs.JOBS.
(Job I200, Step 9515)
Described in the section Configuring the Natural SQL Gateway
Server. See sample member NSBSTART on dataset
NSBvrs.JOBS.
Step 9515 creates a startup procedure for the batch server.
Sample:
//         PROC SRV=SAGNSB
//NSB      EXEC PGM=NATRNSV,
// REGION=4000K,TIME=1440,PARM='POSIX(ON),TRAP(ON,NOSPIE)/&SRV'
//STEPLIB  DD   DISP=SHR,DSN=NSBvrs.LOAD
//         DD   DISP=SHR,DSN=SMA.LOAD
//SYSUDUMP DD   SYSOUT=X
//CEEDUMP  DD   SYSOUT=X
//CMPRINT  DD   SYSOUT=X
//STGCONFG DD   DISP=SHR,
//              DSN=NSB.CONFIG(&SRV)
//STGTRACE DD   SYSOUT=X
//STGSTDO  DD   SYSOUT=X
//STGSTDE  DD   SYSOUT=X
//SYSOUT   DD   SYSOUT=X
Note:
The Natural SQL Gateway server account must be defined in the z/OS
UNIX System Services (OE segment). If the server account is not defined, the
server ends with U4093 and system message
CEE5101C in the trace file.
This document describes how to configure a Natural SQL Gateway server.
The following topics are covered:
A Natural SQL Gateway server requires the following z/OS language environment parameter configuration:
| Parameter | Definition |
|---|---|
POSIX(ON)
|
Enables a Natural SQL Gateway server to access
the POSIX functionality of z/OS. If you start a Natural SQL Gateway server
server with POSIX(OFF), it terminates immediately with a user
abend U4093 and the system message EDC5167.
IBM supplies the default value |
TERMTHDACT(UADUMP) |
Defines the level of information that is
produced in case of an abend. The option UADUMP generates a
Language Environment CEEDUMP and system dump of the user address space. The
CEEDUMP does not contain the Natural relevant storage areas.
IBM supplies the default value |
ENVAR(TZ=…) |
The ENVAR option enables you to set
UNIX environment variables. The only environment variable applicable for the
Natural SQL Gateway server is TZ (time zone). This variable allows
you to adjust the timestamp within the Natural SQL Gateway server's trace file
to your local time.
Example: ENVAR(TZ=CET-1DST) CET - 1 hour daylight saving time |
To set the z/OS language environment parameters, you have the following options:
Use the PARM parameter specified in the
EXEC card of the Natural SQL Gateway server startup job. The
length of the options is limited by the maximum length of the
PARM parameter.
Assemble an LE/370 runtime option module CEEUOPT and
link it to the Natural SQL Gateway server load module.
As of z/OS Version 1.8, you can define the DD card for
CEEOPTS to specify your LE options in a dataset.
A configuration file is allocated to the name
<serverid>C (for example,
NSBS1C) or STGCONFG alternatively.
The configuration file contains the server configuration parameters in the form of a keyword=value syntax. In addition, it may contain comments whose beginning is marked with a hash symbol (#).
See also the Natural SQL Gateway Server Configuration File Example shown below.
The following Natural SQL Gateway server configuration parameters are available:
This configuration parameter specifies the name of the CXX server front-end to be used to communicate with the JDBC server. The front-end resides on the CXX load library.
| Value | Explanation |
|---|---|
frontend-name |
Name of the CXX front-end to be used. Maximum
length: 8 characters.
The default value is |
Example:
FRONTEND_NAME=CXXNSERV
It is recommended that you leave this parameter on its default value
in order to limit the impact of an abend to a single user. If you set the value
of this parameter to NO, any abend in the server processing
terminates the complete server processing. That is, it affects all users
running on that server.
| Value | Explanation |
|---|---|
YES |
Trap abends in the server processing, write a
snap dump and abort the affected user.
This is the default value. |
NO |
Suspend the server abend handling. |
Example:
HANDLE_ABEND=NO
or
HANDLE_ABEND=NO
This optional configuration parameter is necessary only if the server host supports multiple TCP/IP stacks.
| Value | Explanation |
|---|---|
host-name |
If HOST_NAME is
specified, the server listens on the particular stack specified by
HOST_NAME, otherwise the server listens on all stacks.
No default value is provided. |
Example:
HOST_NAME=node1
or
HOST_NAME=157.189.160.55
This configuration parameter defines the password required for some
monitor activities (for example, Terminate Server) performed by
the HTML Monitor
Client.
| Value | Explanation |
|---|---|
character-string |
The password (any character string) to be
entered at the HTML Monitor Client for some monitor activities.
No default value is provided. |
Example:
HTPMON_ADMIN_PSW=GHAU129B
A Natural SQL Gateway server can be configured to host an HTTP monitor task which serves the HTML Monitor Client running in a web browser. It is not required to run this monitor task on each server. A single task allows you to monitor all servers running at one node.
This configuration parameter defines the TCP/IP port number under which the server monitor task can be connected from a web browser.
| Value | Explanation |
|---|---|
1 - 65535 |
The password to be entered at the HTML Monitor
Client for some monitor activities.
No default value is provided. |
Example:
HTPMON_PORT=3141
This configuration parameter defines the TCP/IP port number under which the server can be connected.
| Value | Explanation |
|---|---|
1 - 65535 |
TCP/IP port number.
No default value is provided. |
Example:
PORT_NUMBER=3140
This optional configuration parameter enables you to restrict the trace by a logical filter in order to reduce the volume of the server trace output, for example:
TRACE_FILTER="Client=(XYZ P*)"
Each request of the user ID XYZ and each request of the
user IDs starting with a P are traced.
See Trace Filter in the section Operating the Natural Gateway Server.
| Value | Explanation |
|---|---|
trace-level |
See Trace Level in the section Operating the Natural Gateway Server. |
0 |
This is the default value. |
Example:
TRACE_LEVEL=0x00000011
or alternatively
TRACE_LEVEL=31+27
The setting in the example switches on the TSW bits 31 and 27; see Trace Level in the section Operating the Natural Gateway Server.
For z/OS:
# This is a comment
FRONTEND_NAME=CXXNSERV       # and another comment
PORT_NUMBER=4811
TRACE_LEVEL=31+27
The Natural SQL Gateway server requires the following datasets:
| Dataset Name | Purpose |
|---|---|
STGCONFG
|
Defines the server configuration file. |
STGTRACE
|
The server trace output. |
STGSTDO
|
The stdo dataset.
|
STGSTDE
|
The stde error output.
|
Alternatively, you can qualify each dataset name by the server ID.
| Dataset Name | Purpose |
|---|---|
NSBS1C
|
Defines the server configuration file for the
server NSBS1.
|
NSBS1T
|
The server trace output for the server
NSBS1.
|
NSBS1O
|
The stdo dataset for the server
NSBS1.
|
NSBS1E
|
The stde error output for the server
NSBS1.
|
The following topics are covered below:
The Natural SQL Gateway server can be started as a "started task":
//NSBSRV  PROC
//SRV      EXEC PGM=NATRNSV,REGION=4000K,TIME=1440,
// PARM=('POSIX(ON)/NSBSRV1')
//STEPLIB  DD DISP=SHR,DSN=NSBvrs.LOAD
//CMPRINT  DD SYSOUT=X
//STGCONFG DD DISP=SHR,DSN=NSBvrs.CONFIG(SRV1)
//STGTRACE DD SYSOUT=X
//STGSTDO  DD SYSOUT=X
//STGSTDE  DD SYSOUT=X
- where NSB is the product code and
vrs is the version, release, system maintenance
level number of the Natural SQL Gateway server.
Note:PARM=('POSIX(ON)/NSBSRV1') - POSIX(ON) is required for
a proper LE370 initialization, and NSBSRV1 is the name of the
server for the communication with the monitor client.
The name of the started task must be defined under RACF and the z/OS UNIX System Services.
To enable the administrator to monitor the status of the Natural SQL Gateway server, a monitor task is provided which is initialized automatically at server startup. Using the monitor commands described below, the administrator is able to perform functions such as control the server activities, cancel particular user sessions, terminate the entire server, etc.
The following topics are covered below:
![]() To communicate with the monitor
To communicate with the monitor
Use the monitor client NATMOPI.
Or:
Use the HTML Monitor Client that supports a standard web
browser.
See HTML Monitor Client.
Or:
Under z/OS, you can alternatively use the operator command
MODIFY to execute the monitor commands described
below in the section Monitor
Commands.
The output of the executed monitor command will be written to the system log.
Example:
F jobname,APPL=ping
sends the command ping to the Natural SQL Gateway server running
under the job jobname.
The Natural SQL Gateway server supports the following monitor commands:
| Command Name | Action |
|---|---|
ping |
Verifies whether the server is active. The
server responds and sends the string
I'm still up |
terminate
|
Terminates the server. |
abort |
Terminates the server immediately without releasing any resources. |
set configvariable
                        value
|
With the set command, you can modify server
configuration settings. For example, to modify
TRACE_LEVEL:
set TRACE_LEVEL 0x00000012 |
list
sessions |
Returns a list of active Natural sessions
within the server. For each session, the server returns information about the
user who owns the session, the session initialization time, the last activity
time and an internal session identifier
(session-id).
|
cancel session
session-id |
Cancels a specific Natural session within the
Natural SQL Gateway server. To obtain the session ID, use the monitor command
list sessions.
|
help |
Returns help information about the monitor commands supported. |
For debugging purposes, the server code has a built-in trace facility which can be switched on, if desired.
The following topics are covered below:
Under z/OS, the Natural SQL Gateway server writes its runtime trace to
the logical system file STGTRACE.
The trace is configured by a trace level which defines the details of
the trace. Once a trace is switched on, it can be restricted to particular
clients or client requests by specifying a trace filter, see also Natural SQL
Gateway server configuration parameter TRACE_FILTER.
Every session is provided with a 32-bit trace status word (TSW) which
defines the trace level for this session. The value of the TSW is set in the
Natural SQL Gateway server configuration parameter
TRACE_LEVEL.
A value of zero (0) means that the trace is switched off.
Each bit of the TSW is responsible for certain trace information. Starting with the rightmost bit:
| Trace Bit | Trace Information |
|---|---|
| 31 | Trace main events (server initialization/termination, client request/result). |
| 30 | Detailed functions (session allocation, rollin/rollout calls, detailed request processing). |
| 29 | Dump internal storage areas. |
| 28 | Session directory access. |
| 27 | Dump send/reply buffer. |
| 26 | Dump send/reply buffer short. Only the first 64 bytes are dumped. |
| 25 - 16 | Free. |
| 15 | Trace error situations only. |
| 14 | Apply trace filter definitions. |
| 13 - 08 | Free. |
| 07 - 01 | Free. |
| 00 | Reserved for trace-level extension. |
It is possible to restrict the trace by a logical filter in order to reduce the volume of the server trace output.
The filter can be set with the configuration parameter
TRACE_FILTER.
The filter may consist of multiple
keyword=filtervalue assignments
separated by spaces.
To activate the filter definition, the trace bit 14 in the trace status word (see Trace Level) must be set.
The filter keyword is:
Client |
Filters the trace output by specific clients. |
The following rules apply:
If a keyword is defined multiple times, the values are cumulated.
The value must be enclosed in braces and can be a list of filter values separated by spaces.
The values are not case sensitive.
Asterisk notation is possible.
Example:
TRACE_FILTER="Client=(XYZ P*)"
Each request of the user ID XYZ and each request of the
user IDs starting with a P are traced.
This section covers the following topics:
The Monitor Client NATMOPI is a character-based command
interface for monitoring the various types of servers that are provided in a
mainframe Natural environment. Each of these servers has its own set of monitor
commands which is described in the corresponding server documentation. In
addition, a set of directory commands is available which can be used
independent of the server type. One NATMOPI can be used to monitor
different server types.
Basically the syntax of the command interface consists of a list of options where each option can/must have a value. For example:
-s <server-id> -c help
where -s and -c are options and
<server-id> and help are the option
values.
It is possible to specify multiple options, but each option can have only one value assigned.
The command options available are listed below.
Words enclosed in <> are user supplied values.
| Command Option | Action |
|---|---|
-s
<server-id> |
Specify a server ID for sending a
monitor command. If
the server ID is not unique in the server directory, NATMOPI
prompts the user to select a server.
|
-c <monitor
command> |
Specify a monitor command to be sent to
the server ID defined with the -s option
|
-d <directory
command> |
Specify a directory command to be executed. |
-a |
Suppress prompting for ambiguous server ID. Process all servers which apply to the specified server ID. |
-h |
Print NATMOPI help.
|
These are commands that are sent to a server for execution. The monitor
commands available depend on the type of server, however, each server is able
to support at least the commands ping,
terminate, and help.
For further commands, refer to Operating the Natural SQL Gateway Server where the corresponding server commands are described.
Directory commands are not executed by a server, but directly by the
monitor client NATMOPI.
You can use the directory commands to browse through the existing server entries and to remove stuck entries.
The following directory commands are available. Words enclosed in
<> are user supplied values and words enclosed in straight
brackets [] are optional.
| Directory Command | Action |
|---|---|
ls
[<server-id>] |
List all servers from the server directory that apply to the specified server ID. The server list is in short form. |
ll
[<server-id>] |
Same as ls, but the server list
contains extended server information.
|
rs
[<server-id>] |
Remove server entries from server directory.
Note: |
cl
[<server-id>] |
Clean up server directory. This command pings the specified server. If the server does not respond, its entry will be removed from the directory. |
ds |
Dump the content of the server directory. |
lm |
List pending IPC messages. |
Server in z/OS (started task or batch mode):
Execute NATMOPI in batch job:
NATMOPI,PARM=('-sServerName -cPING')Sample job:
//SAGMOPI  JOB  SAG,CLASS=K,MSGCLASS=X
//NATEX EXEC PGM=NATMOPI,REGION=3000K,
// PARM=('-Sname -CPING')
//* PARM=('-H')
//STEPLIB  DD DISP=SHR,DSN=NATURAL.XXXvr.LE.LOAD
//         DD DISP=SHR,DSN=CEE.SCEERUN
//SYSOUT   DD   SYSOUT=X
//SYSPRINT DD   SYSOUT=X
//*
Where XXX is the Natural SQL Gateway product code (NSB) and vr is the two-digit version number.
Execute NATMOPI in TSO (Command):
NATMOPI -sServerName -cPING
The NSB load library must be included in the steplib of TSO.
natmopi -dls |
List all servers registered in the directory in short format. |
natmopi -dcl TST -ls TST |
Clean up all servers with ID TST* (ping server and
remove it, if it does not respond), and list all servers with ID
TST* after cleanup.
|
natmopi -sSRV1 -cping -sSRV2 -sSRV3 -cterminate |
Send command ping to
SRV1. Send command terminate to
SRV2 and SRV3.
|
natmopi -cterminate -sSRV1 -cping -sSRV2 -sSRV3 |
Is equivalent to the previous example. That is,
NATMOPI sends the command following the
-s option to the server. If no
-c option follows the -s
option, the first -c option from the command line
will be used.
|
natmopi -sSRV1 -cterminate -a |
Send command terminate to
SRV1. If SRV1 is ambiguous in the server directory,
send the command to all SRV1 servers without prompting for
selection.
|
This section covers the following topics:
The HTML Monitor Client is a monitor interface that supports any web browser as a user interface for monitoring the various types of servers that are provided in a mainframe Natural environment. Each of these servers has its own set of monitor details which are described in the corresponding server documentation. The HTML Monitor Client enables you to list all existing servers and to select a server for monitoring.
To run the HTML Monitor Client, any server must host an HTTP Monitor
Server. The HTTP Monitor Server is a subtask that can run in any Natural SQL
Gateway server address space and is configured with the configuration parameter
HTPMON_PORT and HTPMON_ADMIN_PSW.
An HTTP Monitor Server is accessible through a TCP/IP port number and can
monitor all servers running on the current node (for SMARTS: running within the
current SMARTS). Although it is not necessary, you can run multiple HTTP
Monitor Servers on one node. But each one needs an exclusive port number.
Open your web browser and connect the HTTP Monitor Server using the
following url:
http://nodename:port,
where nodename is the name of the host
on which the Natural SQL Gateway server hosting the monitor is running. And
port is the port number the
administrator has assigned as the monitor port in the configuration file.
Example:
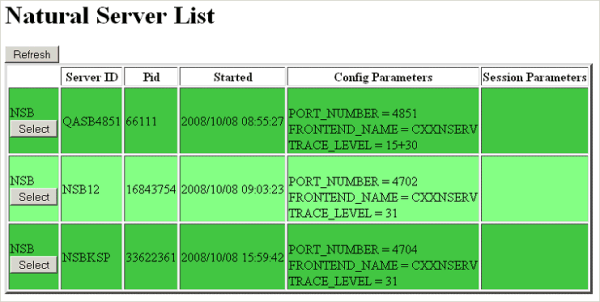
The server list consists of green and red entries. The red ones represent potentially dead server entries which can be deleted from the server directory by choosing the attached button. The button appears only for the red entries. "Potentially dead" means, that the HTTP Monitor Server "pinged" the server while assembling the server list, but the server did not answer within a 10 seconds timeout. Thus, even if you find a server entry marked red, it still might be active but could not respond to the ping. Choosing the button does not terminate such a server but removes its reference in the monitor directory. Hence, it cannot be reached by the monitor anymore.
Choosing the button opens a window for monitoring the selected server.
Example:

With the buttons, you can perform the labeled monitor commands.
The selection box allows you to modify the server configuration parameters. If you select a parameter for modification, it has a predefined value. This predefined value does not reflect the setting of the server. It is just a sample value.
If you choose the button, a list of all Natural sessions appears in the window, for example:
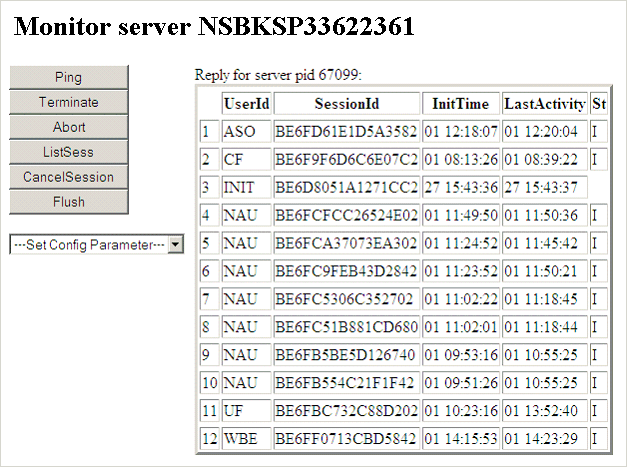
You can cancel sessions by selecting the session ID in the SessionId column and choosing the button.