
You can use the Event Replicator Target Adapter to replicate data to JMS queues and topics that are managed by webMethods Broker JNDI providers. Replicate the data to a JMS topic if you want to use publish-subscribe messaging; replicate the data to a JMS queue if you want to use point-to-point messaging. Once the data is published on a topic or queue, message consumers, such as webMethods Integration Server, can retrieve or consume it.
The following diagram depicts the interaction between the Event Replicator Target Adapter and the JNDI providers managed by webMethods Broker.
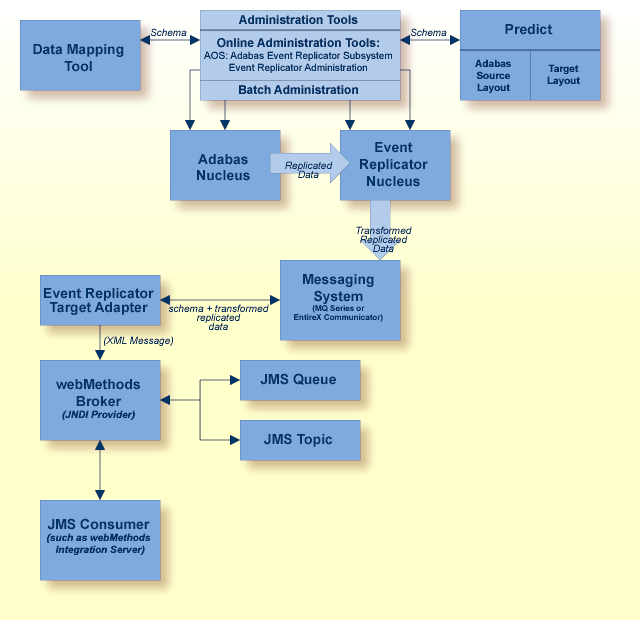
This document describes how to set up this JMS support in the Event Replicator Target Adapter and the high-level steps that must be taken in webMethods Broker.
webMethods Broker and My webMethods Version 7.1 or later must be installed. In addition, JMS support must be established within webMethods Broker. For complete information, read EntireX Message Service Provider (MSP), available in the IBM EntireX documentation on Software GmbH's Empower web site.
 To set up replication of Adabas data to a JMS topic or queue, complete the following
steps:
To set up replication of Adabas data to a JMS topic or queue, complete the following
steps:
Set up JMS support in webMethods Broker specific for use by the Event Replicator Target Adapter. Be sure to perform the following steps in webMethods Broker:
Establish a JNDI (Java Naming and Directory Interface) provider for use by the Event Replicator Target Adapter. The root location of the JNDI is called the initial context. The JNDI serves as a template for the JMS administered objects (connection factories and destinations), storing their property settings in specified locations relative to the initial context. These settings are applied when the JMS connection factories and destinations are created and used when the JMS application runs.
Add topic and queue connection factories that configure the connections between JMS programs and webMethods Broker Server.
Bind and create topic and queue destinations in the JNDI.
As necessary, update client group access permissions to ensure they have permission to publish and subscribe to the document types used in any durable subscriptions for the JNDI's topics.
As necessary, create durable subscriptions, linking specific document types to a topic. This is necessary for subscriptions whose data is persisted if the subscriber is disconnected.
For complete information, read EntireX Message Service Provider (MSP), available in the IBM EntireX documentation on Software GmbH's Empower web site.
Collect the following information about the JMS support in webMethods Broker:
The URL of the initial context of the JNDI provider established for use by the Event Replicator Target Adapter.
The lookup name of the JMS topic or queue destination (as defined to webMethods Broker) that should be used by the Event Replicator Target Adapter.
The name of the JMS topic or queue connection factory (as defined to webMethods Broker) that should be used by the Event Replicator Target Adapter.
Using the Event Replicator Target Adapter Administration tool, add a JMS target definition and save it. For more information, read Maintaining JMS Target Definitions.
Start the Event Replicator Target Adapter (if it is not already started), as described in Starting the Event Replicator Target Adapter.
Using the Adabas Event Replicator Subsystem (SYSRPTR), edit the Event Replicator subscriptions you want used to transform and submit data to the Event Replicator Target Adapter. For each subscription, verify that:
A global format buffer (GFB) and field table (GFFT) are generated for at least one SFILE definition in the subscription. The GFB and GFFT must be generated either by Event Replicator for Adabas using Predict file definitions or using the Data Mapping Tool.
At least one destination definition used by the subscription specifies a value of "SAGTARG" for the Destination Class field (DCLASS parameter).
Note
DCLASS=SAGTARG cannot be specified for Adabas or file destinations
(DTYPE=ADABAS or FILE). It is only valid for IBM EntireX, WebSphere MQ, or NULL
destinations. When DCLASS=SAGTARG is specified, the ADARUN RPLPARMS parameter
must be set to "FILE" or
"BOTH" to provide access to any field table (GFFT)
definitions.
Be sure to save the subscription definitions and any destination definitions you modified.
Activate the Event Replicator subscription and destination definitions. For more information, refer to your Event Replicator for Adabas documentation.
This section describes the structure of the XML messages containing replicated data that the Event Replicator Target Adapter publishes on JMS topics and queues. This structure is defined by an XML schema which is included with your Event Replicator Target Adapter.
This section is organized into the following topics:
The schema defining the JMS message structure is provided with the Event Replicator Target Adapter. It is called jms.xsd and can be found in the following locations:
| Platform | Directory |
|---|---|
| Windows Vista | C:\Program Files\Software AG\Event Replicator Target Adapter\vv.r.s\bin |
| Other Windows platforms | C:\Program Files\Software AG\Event Replicator Target Adapter\vv.r.s\bin |
| UNIX | $SAG/art/vvrs/bin |
The following XML elements are used in the XML messages sent to JMS topics and queues.
| Element Name | Hierarchy Level | Attributes | Subelements | Description |
|---|---|---|---|---|
<artdocument/> |
1 | version |
|
Identifies the message as an Event Replicator Target Adapter message containing replicated data from an Adabas database. |
<field/> |
3 |
length |
- | Identifies an individual field (column) in the table that is
affected by the data or table change and provides the details about that change.
The attributes that appear in the <field/>
element vary, based on the setting of the
<method/> element.
|
<fields/> |
2 | - | <field/> |
Surrounds the set of fields affected by the replicated data or table change. |
<method/> |
2 | - | - | Identifies the kind of change applied to the database. Valid
values are:
|
<tableName/> |
2 | - | - | Identifies the name of the table affected by the replicated data or table change. |
The following XML attributes are used in the XML messages sent to JMS topics and queues.
| Attribute Name | Element Used In | Prerequisite | Description |
|---|---|---|---|
| length | <field/> |
<method/> element must be
"create"
|
Identifies the length of a field being created. |
| name | <field/> |
always required | The name of the field (column). This is the name passed to
the Event Replicator Target Adapter in the generated GFB and GFFT used for Event Replicator Target Adapter
processing.
This name is assigned to a database field when the Adabas database is initially set up. It can be renamed using the Data Mapping Tool before the Data Mapping Tool is used to generate the GFB and associated GFFT. |
| pre | <field/> |
<method/> element must be
"create"
|
Identifies the precision of a field being created. Alphanumeric fields have a precision of "0" (zero). |
| type | <field/> |
<method/> element must be
"create"
|
Identifies the data type of a field being created. |
| value | <field/> |
<method/> element must be
"insert", "update", or
"delete"
|
The value of the field being inserted or updated. |
| version | <artdocument/> |
- | The version of the Event Replicator Target Adapter schema used to generate this XML message. |
This section includes examples of all possible types of messages submitted by the Event Replicator Target Adapter to JMS queues and topics.
The following is a sample XML message produced when a table is created. Note that the
<method/> element is set to
"create.".
<artdocument version="1">
   <method>create</method>
   <tableName>empldb31fnr5</tableName>
   <fields>
      <field name="ISN" type="integer" length="30" pre="0" />
      <field name="PERSONNEL-ID" type="string" length="8" pre="0" />
      <field name="FIRST-NAME" type="string" length="20" pre="0" />
      <field name="MIDDLE-I" type="string" length="1" pre="0" />
      <field name="NAME" type="string" length="20" pre="0" />
      <field name="MIDDLE-NAME" type="string" length="20" pre="0" />
      <field name="MAR-STAT" type="string" length="1" pre="0" />
      <field name="SEX" type="string" length="1" pre="0" />
      <field name="BIRTH" type="date" length="10" pre="0" />
      <field name="CITY" type="string" length="20" pre="0" />
      <field name="ZIP" type="string" length="10" pre="0" />
      <field name="POST-CODE" type="string" length="10" pre="0" />
      <field name="COUNTRY" type="string" length="3" pre="0" />
      <field name="AREA-CODE" type="string" length="6" pre="0" />
      <field name="PHONE" type="string" length="15" pre="0" />
      <field name="DEPT" type="string" length="6" pre="0" />
      <field name="JOB-TITLE" type="string" length="25" pre="0" />
      <field name="LEAVE-DUE" type="decimal" length="2" pre="0" />
      <field name="LEAVE-TAKEN" type="decimal" length="2" pre="0" />
   </fields>
</artdocument>
The following is a sample XML message produced when a table is dropped. Note that the
<method/> element is set to
"drop".
<artdocument version="1">
   <method>drop</method>
   <tableName>empldb31fnr5</tableName>
</artdocument>
The following is a sample XML message produced when a field (column) is inserted into
a table. Note that the <method/> element is set to
"insert".
<artdocument version="1">
   <method>insert</method>
   <tableName>empldb31fnr5_INCOME_BONUS</tableName>
   <fields>
      <field name="ISN_INCOME_INDEX" value="1_1" />
      <field name="BONUS" value="23000" />
      <field name="BONUS_IX2" value="1" />
   </fields>
</artdocument>
The following is a sample XML message produced when a field (column) value is updated
in a table. Note that the <method/> element is set to
"update".
<artdocument version="1">
   <method>update</method>
   <tableName>empldb31fnr5_INCOME_BONUS</tableName>
   <fields>
      <field name="ISN_INCOME_INDEX" value="1_1" />
      <field name="BONUS" value="230" />
      <field name="BONUS_IX2" value="1" />
   </fields>
</artdocument>
The following is a sample XML message produced when a field (column) is deleted from
a table. Note that the <method/> element is set to
"delete".
<artdocument version="1">
   <method>delete</method>
   <tableName>empldb31fnr5_INCOME_BONUS</tableName>
   <fields>
      <field name="ISN_INCOME_INDEX" value="1_1" />
      <field name="BONUS" value="23000" />
      <field name="BONUS_IX2" value="1" />
   </fields>
</artdocument>
The JMS User Target Plugin enables the Adabas Event Replicator Target Adapter (ART) to publish replicated data changes to systems that support the standard Java Message Service (JMS) interface.
The plugin works with JMS-compliant implementations such as Apache ActiveMQ Artemis and other JMS brokers.
Before deploying the JMS User Target Plugin, ensure that the following prerequisites are met:
Obtain the JMS client JAR for your JMS provider, for example, artemis-jms-client-all-2.44.0.jar for Apache ActiveMQ Artemis.
Copy the JMS client JAR into the following directory:
<sag_install_dir>/EventReplicatorTargetAdapter/art/TargetAdapter/webapps/sqlrep/WEB-INF/lib/
Note
The plugin requires a JMS implementation that fully supports the standard Java JMS
API.
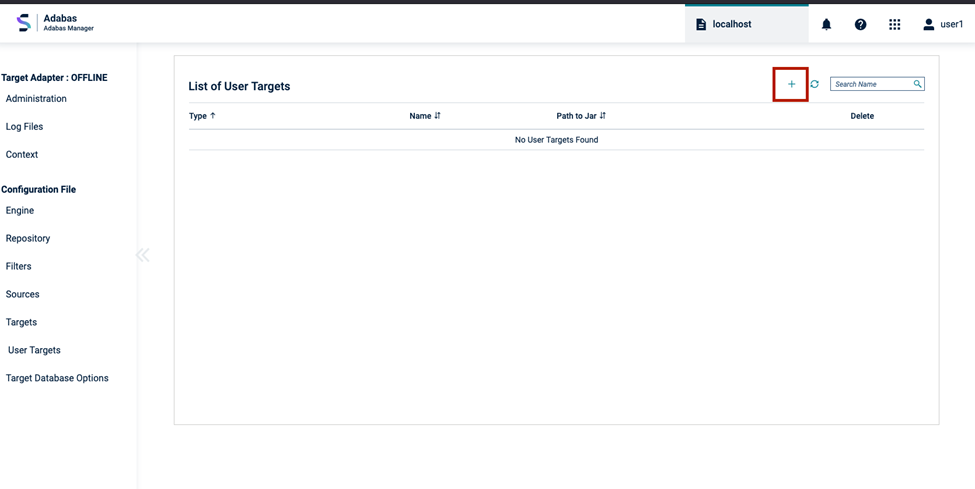
To install the JMS User Target Plugin:
Place the plugin JAR in a directory accessible by the Target Adapter.
Log in to Adabas Manager.
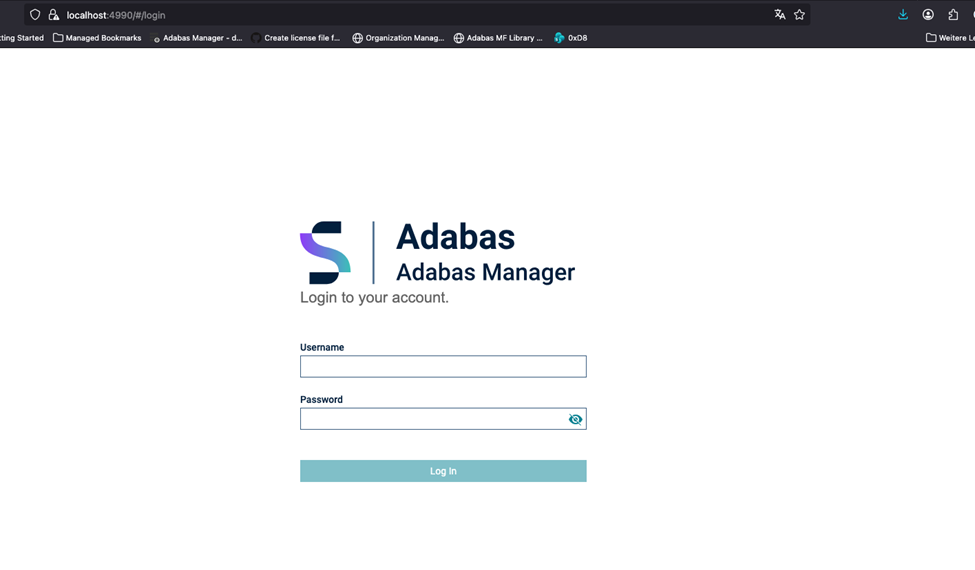
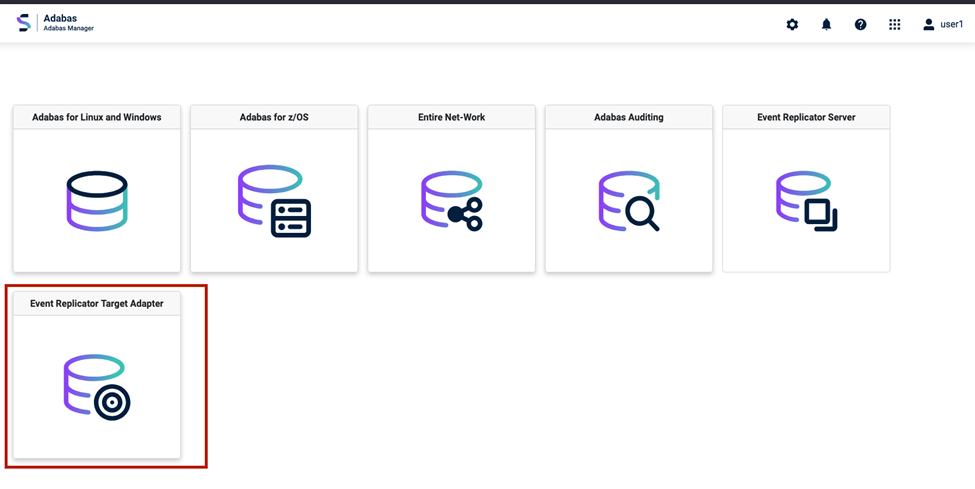
Navigate to and select .
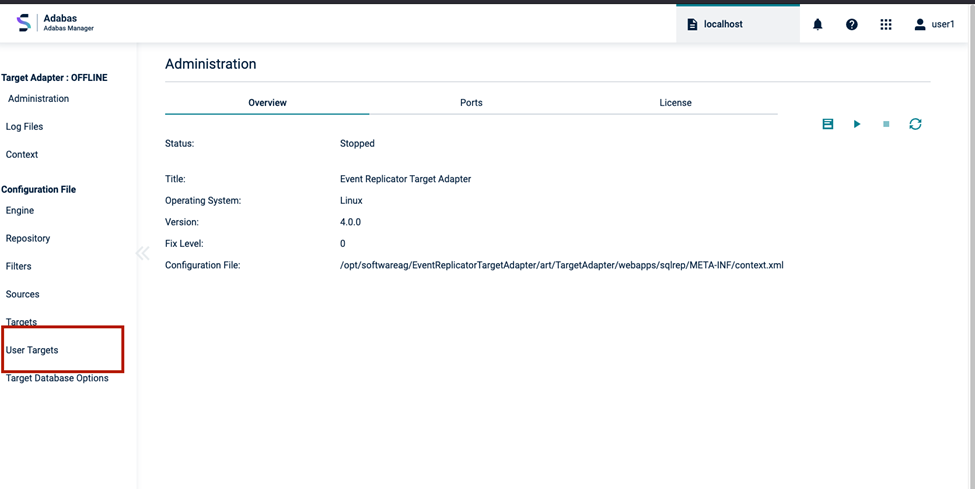
Click .
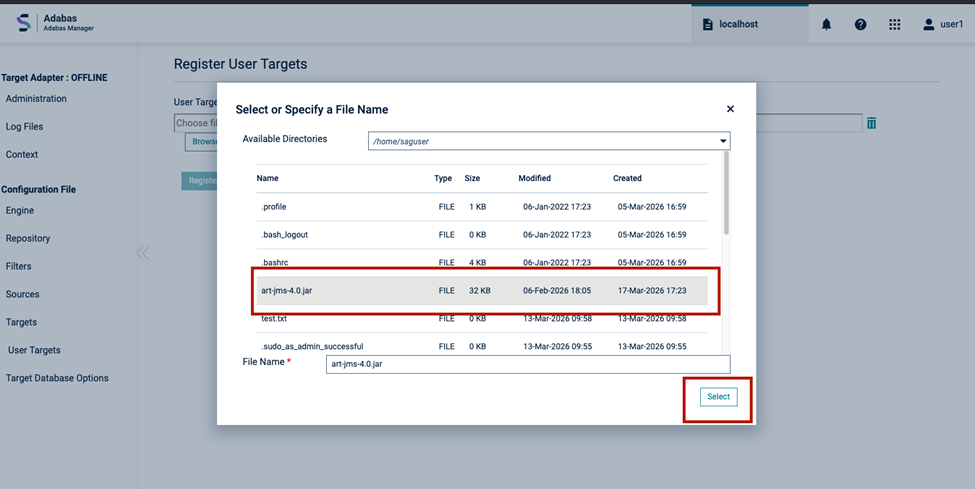
To use the Browse button in the user interface, configure the directories that users are allowed to browse.
Edit the following file:
/EventReplicatorTargetAdapter/art/program/browsable-dirs.json
Add the required directories to the JSON array:
	             [
	             "/home/saguser",
	             "/home/testuser"
	             ]
Note
Restart the ART REST server after making changes for them to take effect.
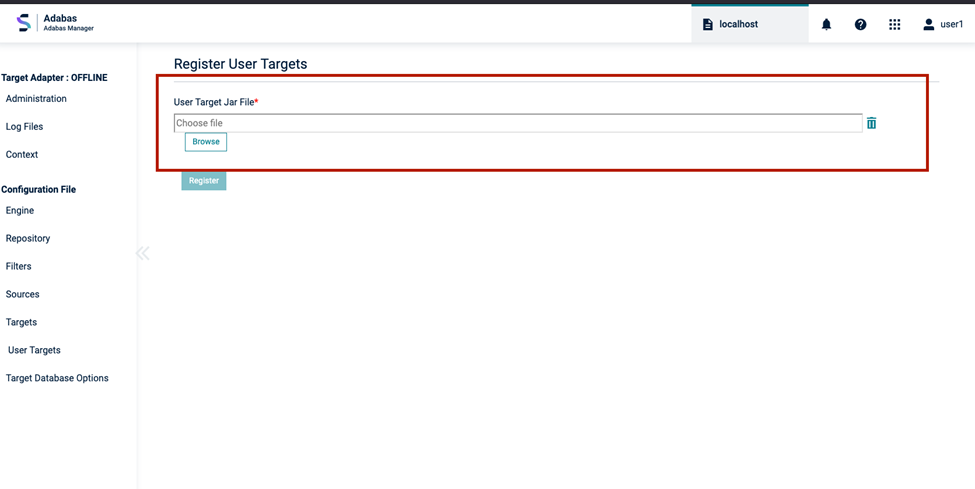
You can register the plugin using one of the following methods.
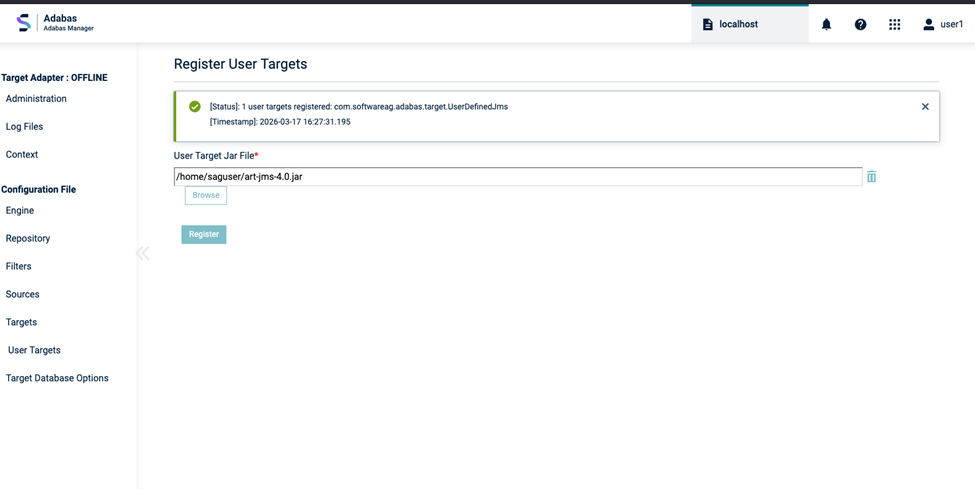
Use the Browse button in the Register User Targets form to navigate to and select the plugin JAR file from the file system.
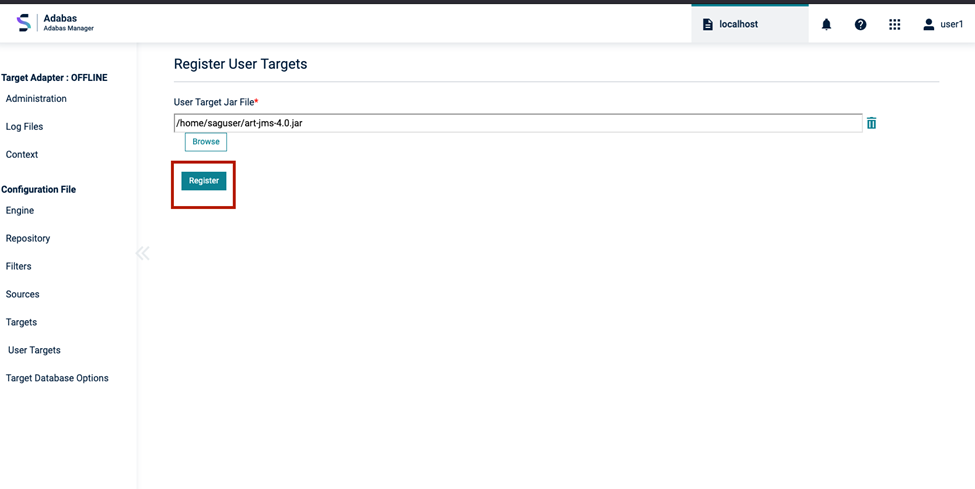
Manually enter the full file system path to the plugin JAR in the User Target Jar File field, then click to deploy the plugin.
For information about configuring Event Replicator Target Adapter source definitions, refer to the Configuring Source Definitions for Event Replicator Target Adapter documentation.
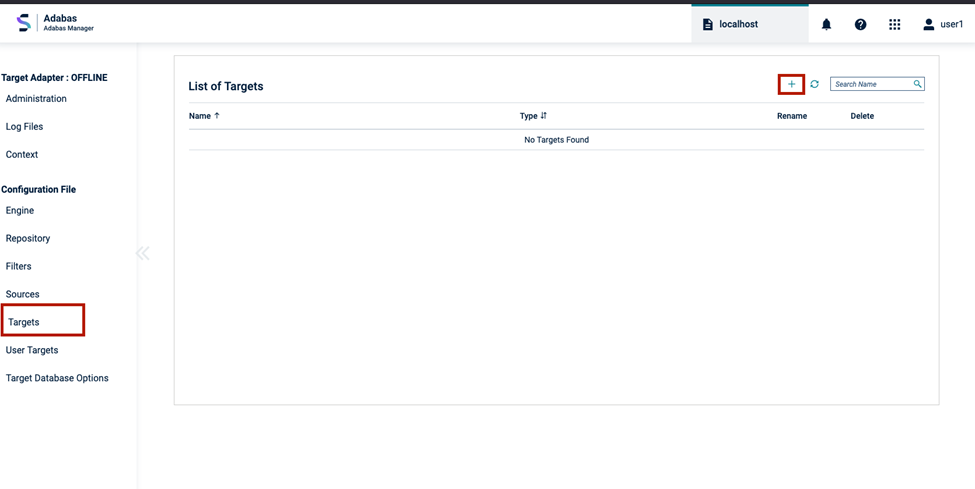
To create a JMS target:
Navigate to Targets and create a new target.
Select "UserDefinedJms" as the target type.

Specify the required values, including the name, description, and JMS communication properties file path.
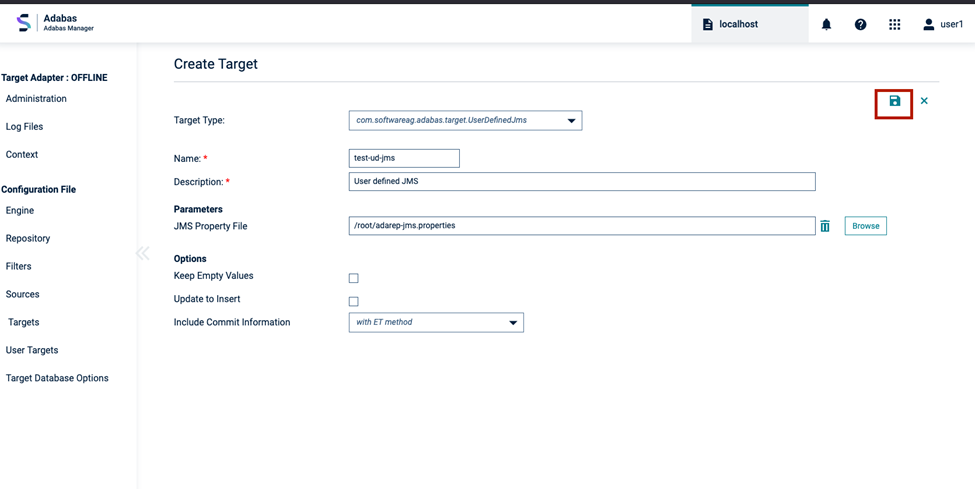
The JMS connection is defined through a properties file. The properties file specifies the connection details, authentication settings, and JMS resources used by the JMS provider.
java.naming.factory.initial specifies the fully qualified class name of
the JNDI Initial Context Factory.
java.naming.provider.url defines the network endpoint of the JMS
broker.
java.naming.security.principal specifies the user name used to
authenticate with the JMS provider.
java.naming.security.credentials specifies the password used for
authentication.
connectionFactory defines the JNDI name of the connection factory.
queue.queue/<queueName> defines a JMS queue and binds it to a JNDI
name.
	             java.naming.factory.initial=org.apache.activemq.artemis.jndi.ActiveMQInitialContextFactory
	             java.naming.provider.url=tcp://172.17.0.3:61616
	             java.naming.security.principal=artemis
	             java.naming.security.credentials=artemis
	             connectionFactory=ConnectionFactory
	             queue.queue/ordersQueue=ordersQueue
When the JMS User Target is active, the following processing sequence occurs:
Initialize the JNDI context.
Authenticate with the JMS provider.
Look up the connection factory and queue.
Establish the connection and session.
Publish replication messages to the configured queue.
Connection Failure - Verify that the provider URL is correct and that the broker is accessible.
Class Not Found - Ensure that the JMS client JAR is placed in the correct directory.
Authentication Error - Verify that the user name and password match the broker configuration.
Queue Not Found - Verify that the JNDI name mapping in the properties file is correct.
Silent Message Loss - Verify that the queue name matches the broker configuration exactly.
Use consistent and descriptive queue naming conventions.
Externalize credentials using environment variables or a secrets manager - avoid plaintext in production.
Validate broker connectivity before deployment.
Enable ART logging to assist with troubleshooting connection or delivery issues.
Version-control all configuration files for auditability.
Ensure version compatibility between the JMS client library and your broker.
| Option | Description |
|---|---|
| Keep Empty Values |
Select this option to indicate that all values of periodic (PE) fields or multiple-value (MU) fields within PE fields are replicated, even if they are empty. If this option is not selected, only non-empty values of PE fields or MU fields within PE fields are replicated. This option is available only for JMS targets when the Event Replicator runs with OPTIONS=32 on the mainframe. |
| Update to Insert |
Select this option to convert update commands to insert commands. When enabled, the Event Replicator Target Adapter first deletes the existing row, if present, and then inserts a new row containing the changed information instead of issuing an update command. To use this feature, set the mainframe replication OPTIONS parameter specified in the destination class parameter data (DCLASSPARM parameter) to 32 (OPTIONS=32). Warning Default: Leave this option unselected. Note |
| Include Commit Information |
Select an option from the drop-down menu to control whether and how Adabas commit time information is included in the replicated data for all processed transactions. with ET method - Produces output with a separate ET document. yes - Provides commit information inline with the record document. no - No commit information is provided. Default: no. |
The following examples show how commit information is included when different options are selected.
This option produces output with a separate ET document.
	               <?xml version="1.0" encoding="UTF-8"?>
	               <artdocument version="1" committed="2018/10/04-12:46:41.284060">
	               <method>update</method>
	               <tableName>EMPLOYEES</tableName>
	               <fields>
	               <field name="ISN" value="1130" />
	               <field name="CITY" value="Auckland2" />
	               </fields>
	               </artdocument>

	               <?xml version="1.0" encoding="UTF-8"?>
	               <artdocument version="1" committed="2018/10/04-12:46:41.284060">
	               <method>ET</method>
	               </artdocument>
This option provides commit information inline with the record document.
	               <?xml version="1.0" encoding="UTF-8"?>
	               <artdocument version="1" committed="2018/10/04-12:44:42.834695">
	               <method>update</method>
	               <tableName>EMPLOYEES</tableName>
	               <fields>
	               <field name="ISN" value="1130" />
	               <field name="CITY" value="Auckland" />
	               </fields>
	               </artdocument>
Click Save to persist the target configuration.
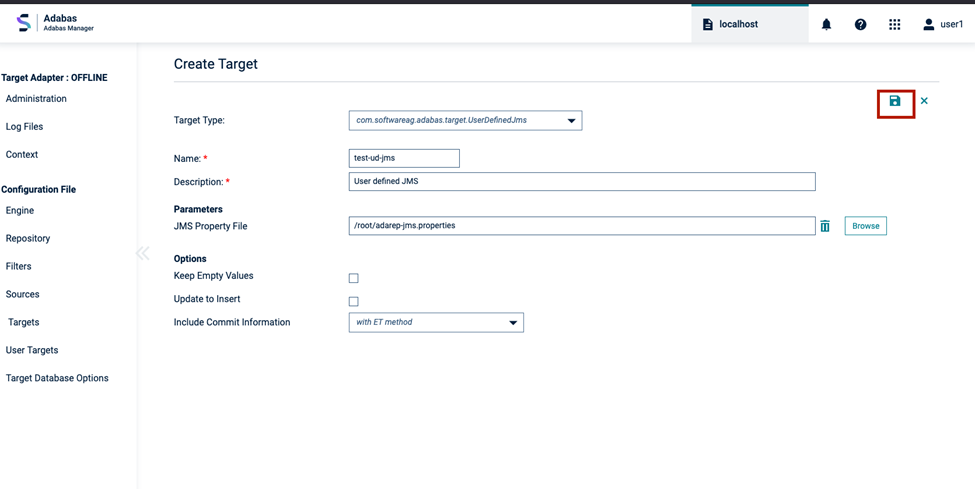
The JMS target is now available for selection in replication source definitions.
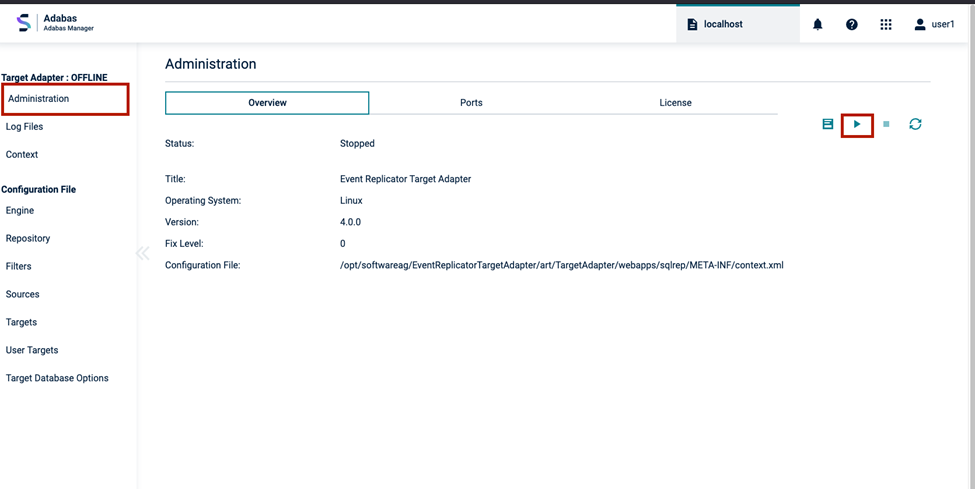
Start the Event Replicator Target Adapter to activate data replication.
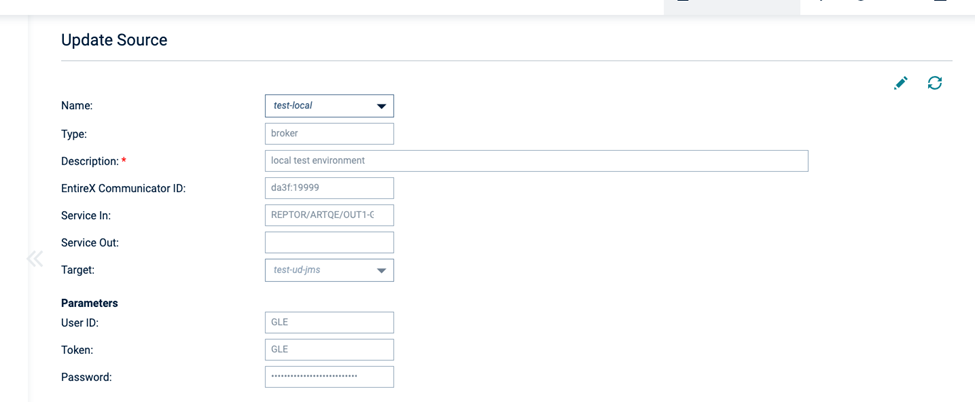
Once configured, the JMS User Target can be assigned to a replication source within the Event Replicator setup, enabling real-time data propagation to JMS infrastructure.
Replicated Adabas database changes are published automatically to the configured JMS queue as transactions are committed.
Ensure version compatibility between the JMS client library and the JMS broker.
Verify network connectivity between the ART host and the JMS endpoint before going live.
Secure credentials appropriately and avoid plaintext credentials in production environments where possible.
Monitor ART logs regularly for connection errors or message delivery issues.
If you have migrated a context.xml file from a previous version of the Event Replicator Target Adapter and are now using Adabas Manager to manage adapter configuration, re-register the User Target in the Adabas Manager interface.