Configuring connections
When you first add the correlator-integrated JMS messaging bundle to an Apama Studio project, the list of connections is initially empty. You can add one or more connection to JMS providers.
To establish a connection to a JMS broker:
1. In the Project Explorer expand the project's Adapters node and then expand the Correlator-Integrated JMS node.
2. Double-click the adapter instance. This opens the instance's configuration in the JMS Correlator-Integrated adapter editor.
3. In the adapter editor's Settings tab, click the Add Connection button ( ). This displays the JMS Configuration wizard.
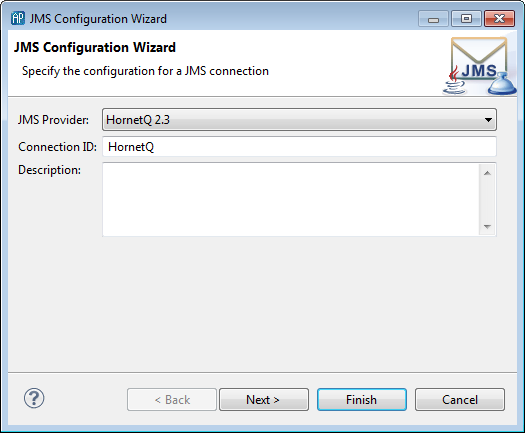
4. On the first page of the JMS Configuration wizard specify the following.
a. JMS Provider, select from the drop-down list.
b. Connection ID, this needs to be unique, and will be used throughout the configuration files and Apama application to identify this broker connection (but the Apama connection identifier is not exposed to the JMS provider in any way). The Connection ID is used when sending JMS messages from the Apama application. The value for the Connection ID should not contain any spaces.
c. Description, this is optional and currently unused.
5. Click Next.
This displays the second page of the JMS Configuration wizard.
6. The second page of the JMS Configuration wizard displays the default Classpath details for the JMS Provider you selected in the previous step. If necessary, add or modify the values as appropriate for your environment.
7. Click Next.
This displays the third page of the
JMS Configuration wizard.
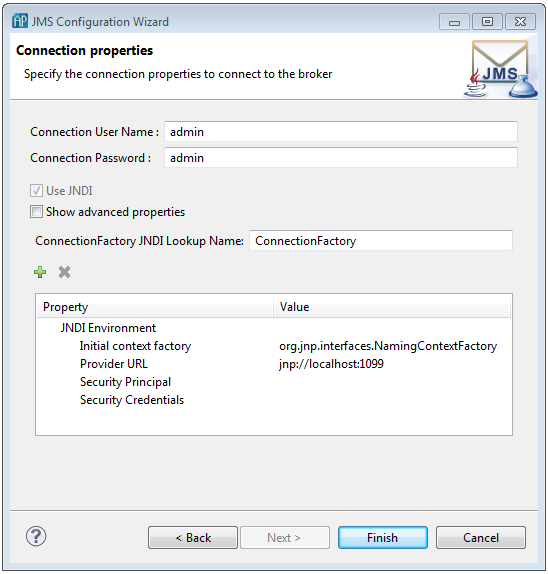
8. The third page of the JMS Configuration wizard displays the default Connection properties for the JMS Provider you selected. If necessary, add or modify the values as appropriate.
a. By default, the JMS Connection uses JNDI (which is the recommended option); remove the check in the Use JNDI check box if your application will not use JNDI and your JMS provider supports non-JNDI instantiation of the ConnectionFactory class (note that many providers do not).
b. By default, the JMS Configuration wizard lists a subset of standard connection properties. If Use JNDI is enabled, the Connection details field shows JNDI Environment properties. If Use JNDI is not enabled, the Connection details field shows ConnectionFactory properties. To show the complete list of properties add a check to the Show advanced properties check box.
c. You can add and remove properties and you can modify the properties' values. To modify a value, click in the Value column and enter the required information.
9. Click Finish.
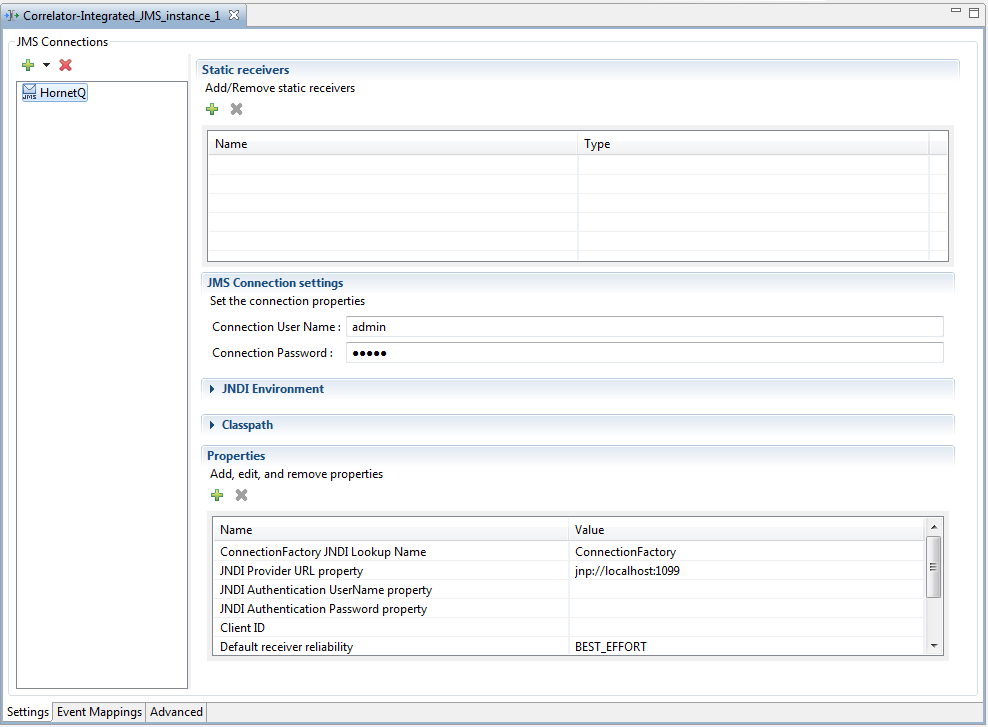
Apama Studio updates the adapter editor to display the new connection in the JMS Connections section.
After you establish a connection to a JMS broker, you need to add JMS receivers and specify mapping configurations for receivers and senders.
Copyright © 2013
Software AG, Darmstadt, Germany and/or Software AG USA Inc., Reston, VA, USA, and/or Terracotta Inc., San Francisco, CA, USA, and/or Software AG (Canada) Inc., Cambridge, Ontario, Canada, and/or, Software AG (UK) Ltd., Derby, United Kingdom, and/or Software A.G. (Israel) Ltd., Or-Yehuda, Israel and/or their licensors.