The Enterprise version of the OLEDB/ODBC Adapter Module can be used to access data from any existing third-party ODBC or OLE DB data source, including IDMS, Ingres, UniVerse, Unidata, or IMS data sources. Refer to the section on CONNX OLE DB/ODBC Adapter: Enterprise and Desktop Modules in the CONNX User Reference Guide, which can be found online, on the CD-ROM or within the CONNX product, for more information on the text boxes required for building sample tables.
The following procedure runs a script
designed to insert CONNX sample data into an OLE DB database provider
installed on the client machine. For information on how to install sample
data into an ODBC database, see To
Build Enterprise ODBC Sample Database Tables.
Sample database tables can be created either during installation or after
installation. During installation, a dialog box appears asking whether
you want to install sample database tables. Click Yes
to continue with sample table installation through CONNX sample database
logon dialog boxes. Click No to
continue with CONNX installation. You can install sample tables at any
time using the Build Sample Database icons available in your program group.
Important: The driver used to
import table information must support ADO and be fully ODBC Level 2 compliant.
During installation, click
Yes to install sample database
tables, or click the Start
button, and then point to All
Programs. Point to CONNX Sample Databases, and click
Build Enterprise OLEDB Sample Data.
The Enterprise OLEDB Sample Database
Logon dialog box appears. Select the OLEDB
Provider option under Logon
Information.

Click the Select Provider button.
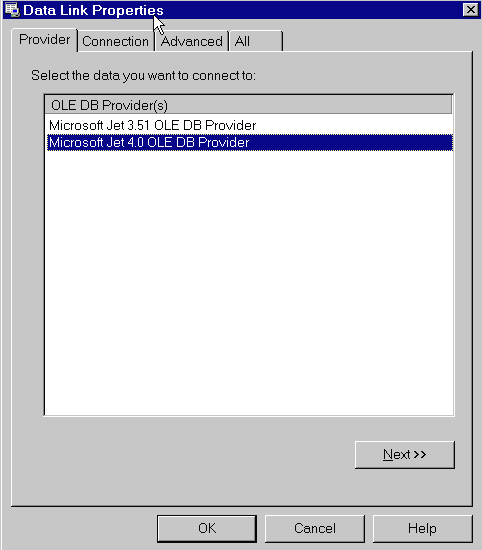
The Data
Link Properties dialog box appears. Select an OLE DB provider
from the list. In this example, Microsoft® Jet 4.0 is used.

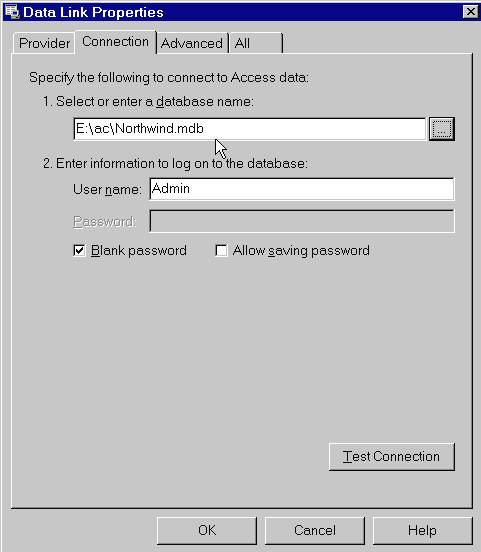
Select the Connection
tab. Each OLE DB provider may have a unique dialog on this tab. All
will require a data source or database name and possibly user and
password entries. Consult documentation for each provider for specific
access requirements.

Click the Test Connection button to verify that the data source is available. Click the OK button.
The Enterprise OLE DB Sample Database Logon dialog box appears. Type a user name and password for the OLE DB provider, and then click the OK button.
The samples are installed in the selected data source table. You can refer to the sample tables in the post-installation stage, or by opening the CONNX Data Dictionary Manager window.
Note: This script does not delete existing tables. However, it may not work well if the selected catalog already has tables named "customers_oledb," "orders_oledb," "products_oledb," and so on. Select a catalog that does not contain such tables or drop the tables using an appropriate enterprise manager tool before proceeding with sample database import.