
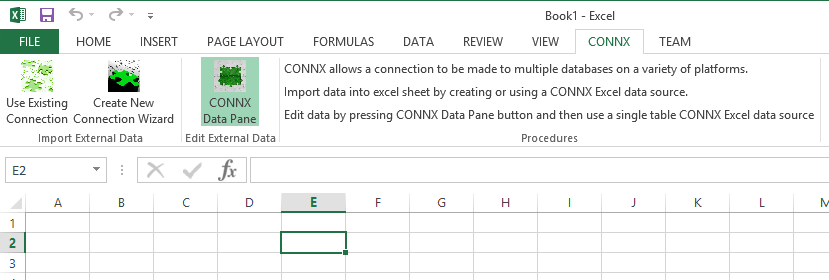
Installing the CONNX Excel Add In it will make a CONNX
tab appear in the top menu bar of Excel, press it to show the CONNX ribbon
functions. Data can be imported using the "Use
Existing Connection" and "Create
New Connection Wizard" buttons. These will import the
data into the excel spreadsheet, the data in the excel worksheet can be
edited and the excel sheet saved, however those changes do not affect
the database table.
To Edit data
in Excel and send those changes directly to the database a table connection
must be made through the data task pane. In the CONNX Ribbon, press
the "CONNX Data Pane"
button and the CONNX Data Task pane will show on the right side of the
worksheet.
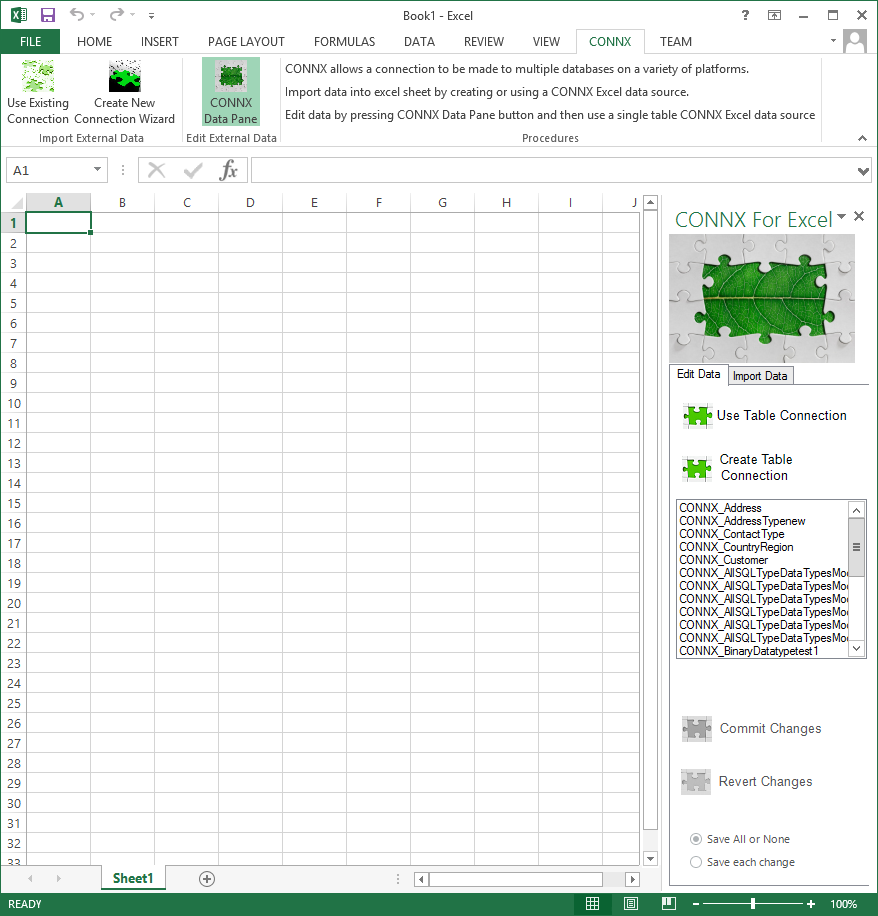
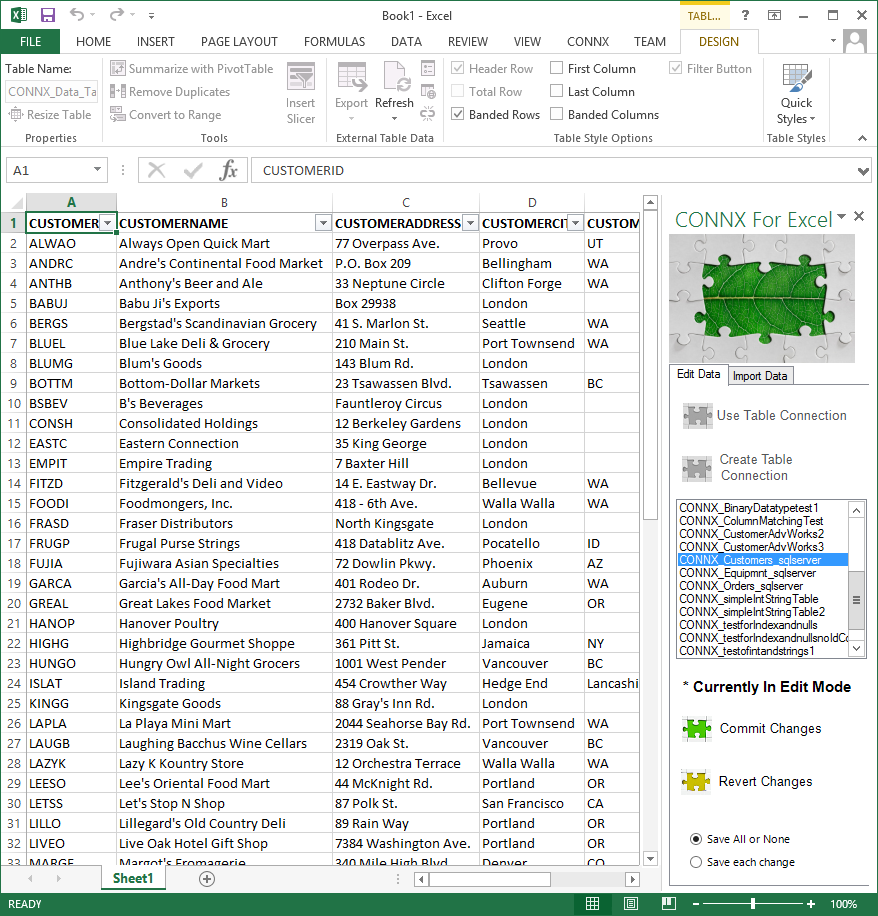
In the Data task pane there is an "Edit Data" tab, this is used to make a connection to a table in a database, import the data, then track and send the changes back to the database. In order to track and send the changes correctly, the connection here must be made to only one table. Joins and aggregates are not allowed in these connections. The dropdown list will show the friendly name of the existing connections that specify a single table only. If there are no existing connections a new table connection can be made by pressing the "Create Table Connection" button.
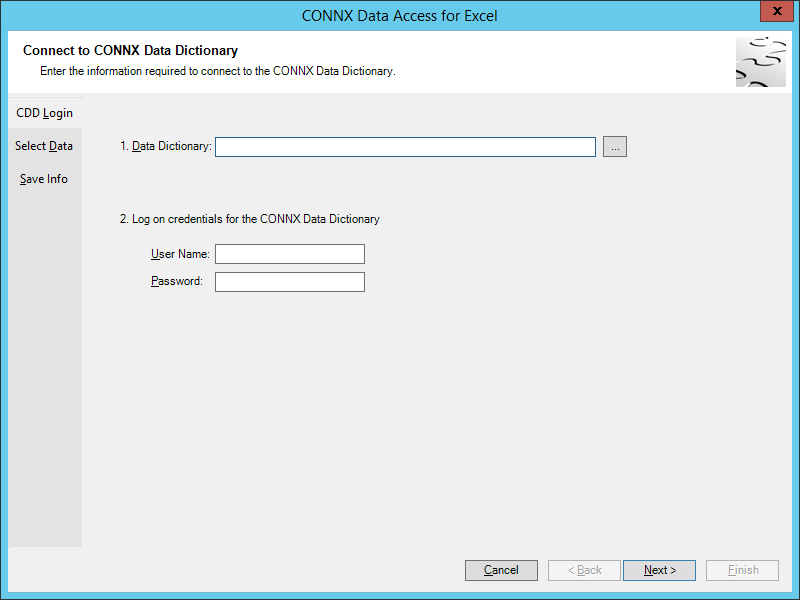
That brings up a form to walk through creating Excel
connection to a CONNX datasource. It is a three step process, select
the Data Dictionary with the data source in it and specify the user name
and password to log into the data dictionary.
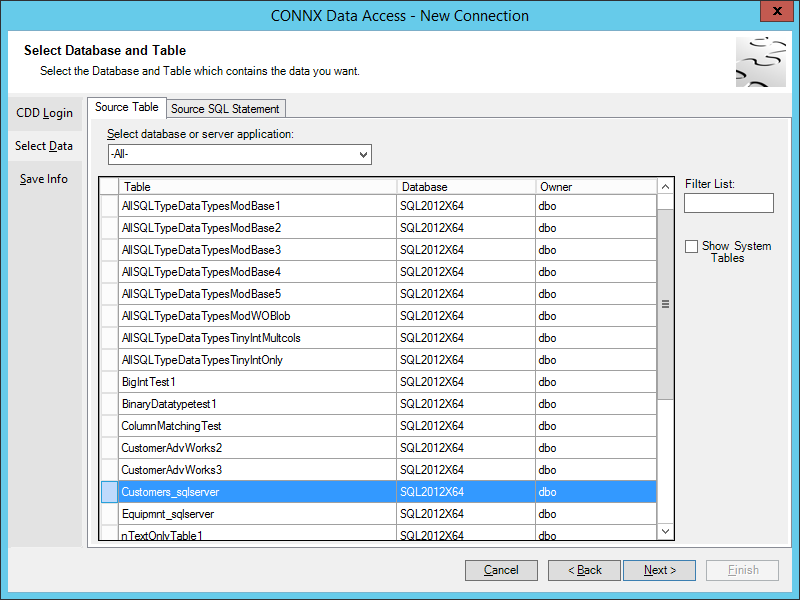
Then there will be a list of tables to select the
one to edit the data. Note when importing data only there is an
additional tab for using a SQL Statement as a source. A single table
must be selected in order to enable data editing and allow changes to
be sent to the database.
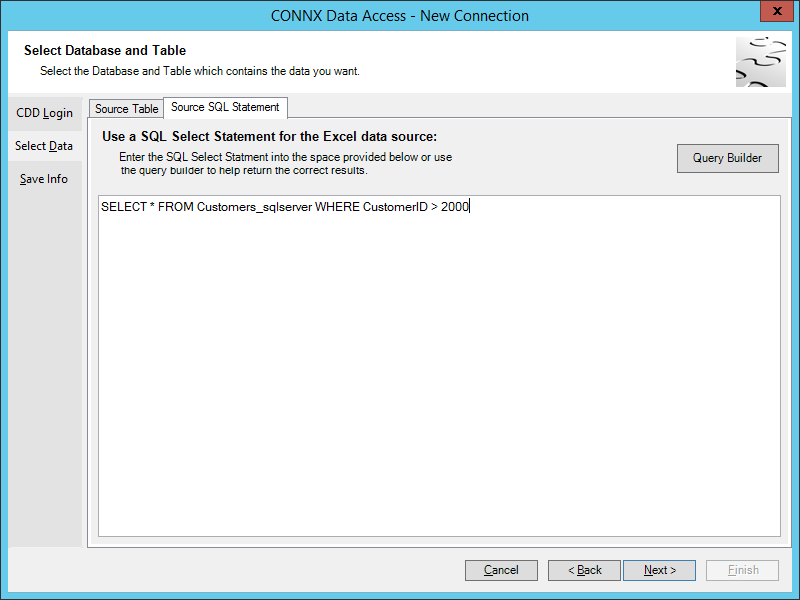
To use a select statement for the source, select the "Source SQL Statement" tab. This is useful for when the user wants to limit the amount of rows returned to Excel for edting.
* Caution: When using a SQL Statement as a source for editing data the following rules apply:
Select statements cannot contain table joins, aggregates, sql functions or column alias', or any other SQL grammer that will make it impossible for the correct row in the source table to be determined while moving changes to the database.
Select statements must contain enough columns to make the data being edited unique, if not, the changes will fail because the correct row in the table will not be found.
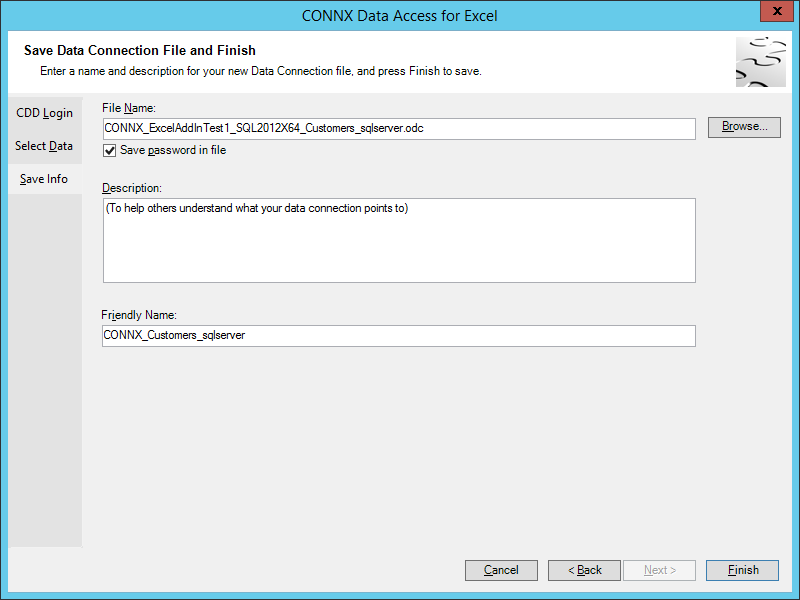
The final screen allows customizing how the new data connection information is saved. The odc connection files are usually saved in the user\My Data Sources folder however they can be saved elsewhere. An important part of this screen is the Friendly Name, this is what is shown in the CONNX data task pane list. Choosing a descriptive Friendly Name will help to pick it out from the list of available CONNX ODC connections. Uncheck "Save password in file" to not have the Data Dictionary password written to the odc file. A registry entry can be used to disable this checkbox all the time, so no passwords are saved and the user must log in every time they load or refresh data. The registry value can be added in the Configuration manager under the CONNX key, if "EXCELADDINNOSAVEPASSWORD" is added and set to 1 no passwords will be able to be saved. If set to 0 or not there, then users can save passwords to odc files.
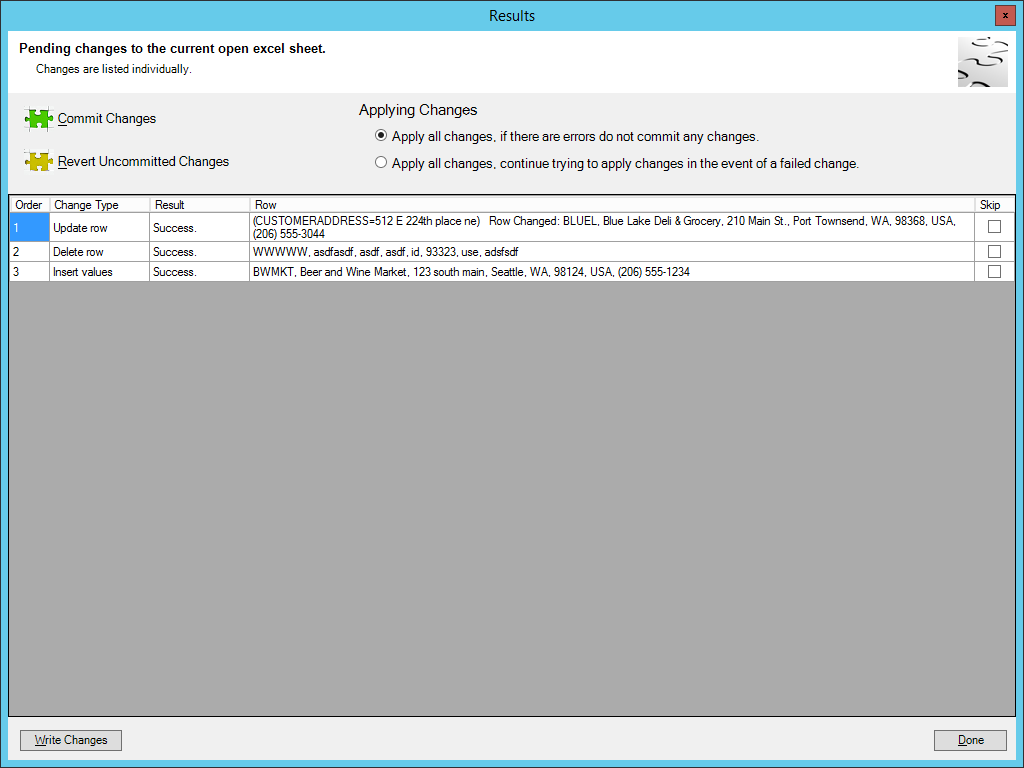
After pressing "Finish" on the Create Table Connection or Selecting a Table Connection for edit, the data is loaded into the Excel spreadsheet. Also this sheet is now enabled for editing and tracking changes to be sent to the database. Now that the sheet is in edit mode, the Commit and Revert changes buttons are now enabled. After changes have been made in the sheet, pressing the Commit changes button will bring up a screen with a list of all the changes in the order they happened. From there they can be sent to the database or skipped. The "Revert Changes" button will get rid of all changes made to the data in the sheet and reload the data from the database table, so not only does it undo changes it also gets the most recent data in the table.
To change data in a cell simply click in the cell change to edit the cell and change it's contents. When finished click off the cell to exit the cells edit mode.
To delete a row, select the entire row or all the cells in the row and either press the delete key or right click and press delete.
To insert a new row, there is a blank row at the end of the data that has been imported and it has lines above and below it. Start at the first cell and enter data in each cell, the data will not be prepared to be put in the table until a cell in a different row is clicked on. Then the blank insert row will appear below the row that was just added.
A few notes on inserting a new row, If only a few cells have had data entered in them and a different row is clicked, only the data in those cells will be inserted, even if the user goes back to the row and changes the rest of the blank cells. This is because the Data Task pane keeps track of the order of changes and will treat it as an insert and update. If this happens, the user can skip the inserted row that was not complete when sending the changes to the database.
After changes to the data in the sheet have been made,
pressing the "Commit Changes"
button will bring up a screen that lists the changes and the order in
which they happened. The changes can be reviewed and if correct,
pressing the Commit Changes button will send the changes to the database.
There are two options when sending the changes, all succeed or none,
or each individual succeeds or fails. Like the description, if all
the changes do not succeed, then none or committed to the database. This
can be useful if later changes are dependant on earlier changes going
into the table it stops if there is an error. If the changes are
independent of each other, then it can be set to continue on sending and
committing changes even if one fails. Since this is a disconnected
data editing tool there is no locks or holds put on the table being edited.
It is possible that data is changed in the table from another source
and that could cause an error when trying to change data in that row.
Also, a quick check is performed to make sure the data going into
the table is the correct type of data for that column in the table.
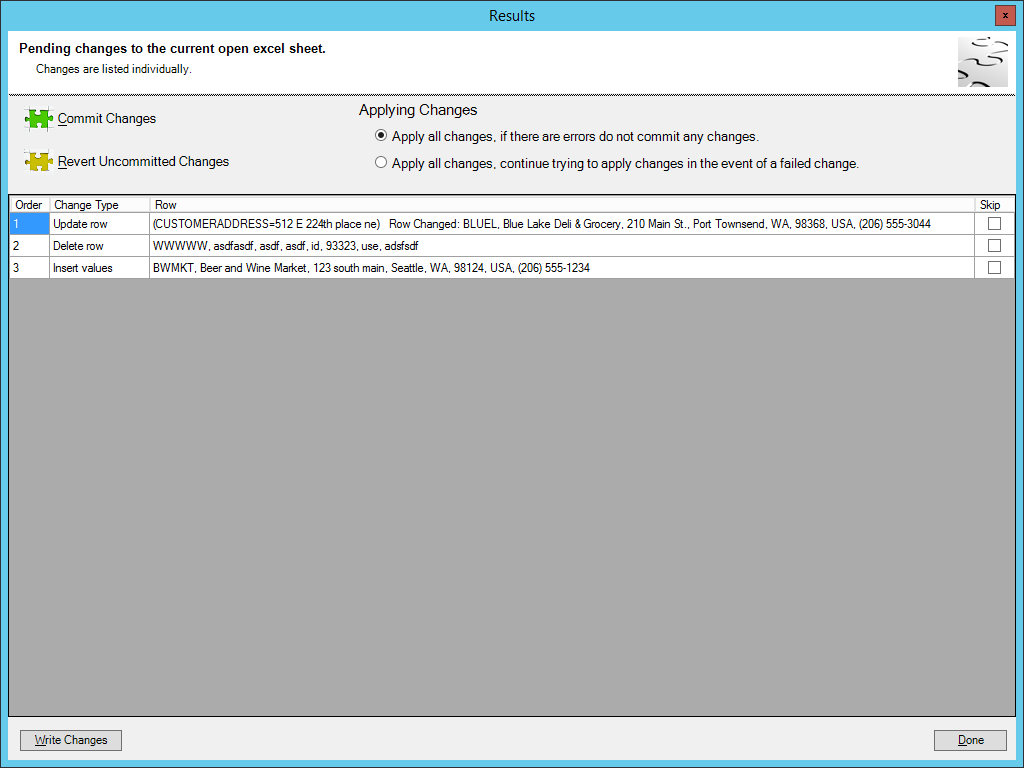
After pressing the "Commit Changes" button the grid will show the results of sending the changes to the database. If they succeed it will show Success in the result column, if they fail it will show the error message of why it failed. All the changes that succeeded will be removed from the list of changes after this form is closed.
If there are errors with certain changes and it is desired that all the other changes go to the database without those, they can be skipped by checking the "Skip" checkbox on the right. Pressing the "Revert Uncommitted Changes" button will get rid of any changes that had errors or were not successfully sent to the database. This is a good step if some of the changes have errors, but all the changes that could succeed did, then it will reset everything and be ready for more changes.
To write the changes to a file at any point before or after sending them to the database, press the "Write Changes" button. That will write each row in the display to either a tab delimited or comma separated file. This can be done for auditing purposes or saving an error to be looked into later.
.