
Click the Import button in the CONNX Data Dictionary Manager window.
The Import CDD dialog box appears. Select Redshift database from the Import Type list box. This is the name CONNX uses for imports of Redshift data.
Type the database that you created
for your cluster in the Enter the
database name text box.
Select the Include System Tables check box to import table definitions into the CDD.
Select the Get Statistics check box to identify the table sizes.
Type a server location, user name, and password under Logon Information.
Server: The endpoint of the Amazon Redshift cluster. This will be the url to the location of the cluster created with AWS it will likely end with ".redshift.amazonaws.com".
UserName: The user name of a user account that has permission to connect to the database. This value is a database permission, not an Amazon Redshift permission, although you can use the master user account that you set up when you launched the cluster.
Password: The password for the user account to connect to the database.
TCP/IP Port: Port 5439 is listed in the TCP/IP Port text box by default. This is the port number that you specified when you launched the cluster. If you have a firewall, ensure that this port is open for you to use.
Authentication Mode: These are the SSL methods for authentication that can be used with the Redshift connection.
disable: SSL is disabled and the connection is not encrypted.
allow: SSL is used if the server requires it.
prefer: SSL is used if the server supports it. Amazon Redshift supports SSL, so SSL is used when you set to prefer.
require: SSL is required.
verify-ca: SSL must be used and the server certificate must be verified.
verify-full: SSL must be used. The server certificate must be verified and the server hostname must match the hostname attribute on the certificate.
Custom SSL Certificate: Specify the Amazon Redshift certificate to used with server authentication here. The certificate must be in the root of the CONNX Installation directory. Or it the folder with the SSL Certificate can be specified using the registry key "CERTPATH" in the "CONNX" registry key.
Click the OK
button. The CONNX Import Table Selection
dialog box appears with a list of available table names. Click the
Add or Add
All button to move the tables to the Select
Tables for Import pane.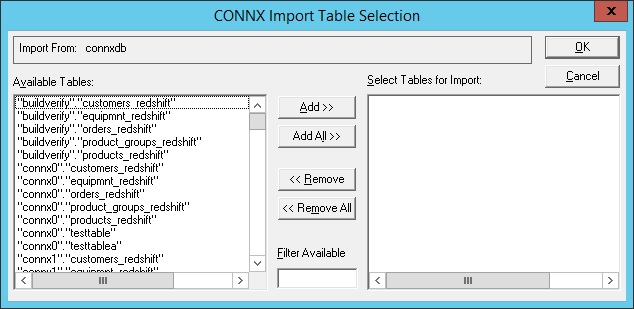
Click the OK button to import the selected tables into CONNX. The Redshift database tables are added to the list of accessible objects in the CONNX Data Dictionary Manager window.