
Click the Import button in the CONNX Data Dictionary Manager window.
The Import
CDD dialog box appears. Select DB2
Database from the Import Type
list box.

Type the location in the Enter the DB2 RDBNAME text box.
If you require access
to DB2 system metadata, select the optional Include
System Tables check box to import system table metadata into
the CDD.
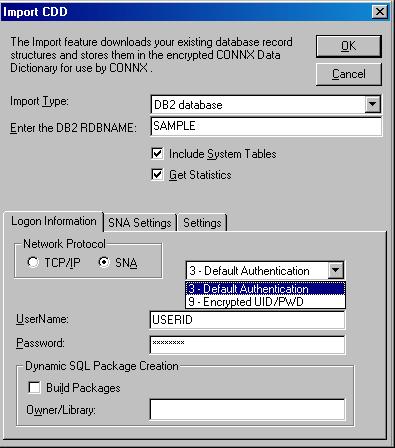
Select the Get Statistics check box to import keys, indexes, and rows per table.
Select the SNA option on the Logon Information tab.
From the drop-down box, select either the Default Authentication or the Encrypted UID/PWD authentication.
Type a server location, user name, and password.
UserName: User name used for logging on to the target host.
Password: Password used when logging on to the target host.
Click the Build
Packages button under Dynamic
SQL Package Creation to define dynamic SQL packages used by
CONNX. This function is a one-time operation, which can be performed
by the DB2 administrator on the initial import. All subsequent connect
attempts use the pre-built packages, unless the AS/400 Plug-n-Play
flag is selected. You must have DB2 administrator authority to build
dynamic SQL packages.
If you are connecting to a DB2/400 target, you do not have to click
the Build Packages check box,
since the AS/400 Plug-n-Play check box on the Settings tab is enabled
by default. If you decide to require all users to use the same set
of packages, you can do so by clicking the Build
Packages check box on the initial import.
Type the owner, library, or collection name in the Owner/Library text box. The option only needs to be selected during the first import session. The default value is NULLID.
Select the SNA
Settings tab. The SNA option enables the configuration of an
APPC LU 6.2 connection.

Select a vendor stack from the list box in the Vendor Stack text box and then type the Mode Name.
Vendor Stack: Several vendors implement SNA software, including Attachmate, IBM, Microsoft® , SNA Server, Novell, and NetManage.
Transaction Program: The host DB2 DRDA "catcher" program. Leave this field blank.
Mode Name: An Advanced Program-to-Program Conversation (APPC) mode name defines the transmission characteristics of the conversation. IBM has defined a default mode name = IBMRDB, optimized for DRDA traffic. A mode name specifies parameters such as frame size and number of send/receive windows. The mode name must be defined in the selected vendor stack configuration. Maximum length of this field is 8 characters. If a default mode name is defined in the SNA vendor configuration, this field can be left blank.
Type the Local LU (logical unit) name, the Remote LU name, and the Remote Net ID name (or leave it blank). The Net ID entry fields are for 1- to 8-character network names, such as APPN or IBMIN. These entries must match the names defined in the SNA vendor configuration.
Local LU Alias: A local LU alias identifies the client PC to the SNA network. This term is used interchangeably with PC system name in AS/400 installations. Local LU has a maximum length of 8 characters. Depending on the SNA vendor-supported feature set, this entry field may be blank if pooled LUs are supported or if a default LU is defined.
Remote Net ID: If Remote Net ID is left blank, the Remote LU entry field is treated as a Remote LU Alias; a corresponding entry must exist in the SNA vendor configuration. If both a Remote Net ID and a Remote LU Name are entered, a fully qualified netid.luname must be defined in the SNA vendor configuration.
Remote LU: The Remote LU identifies the target machine for the APPC connection. For AS/400 installations, this term is synonymous with System Name. For DB2 mainframe installations, a Remote LU uniquely identifies an instance of DDF (Distributed Data Facility), an address space which supports the DRDA AS (Application Server) program. One or more instances of DDF can be active within an SNA network.
Security: Select the APPC security level from the list box. Choose from UserID & Password, UserID, or None, which correspond to APPC allocate options AP_PGM, AP_SAME, and AP_NONE, respectively. The default is UserID & Password (AP_PGM).
Click the Settings
tab. If you are connecting to a mainframe DB2 target system on which
secondary authorization IDs are defined, you can use this entry field
to issue a Set Current SQLID command at connect time.

Type a schema list in the Owner List text box on the Settings tab. This list is used to restrict the tables, views, and stored procedures appearing in the initial import list box. The space-delimited list entries can be full library, owner, collection, or schema names, for example, QGPL, QIWS, SYSIBM, QSYS2, SYSCAT, or pattern match entries. The pattern match characters are % and _ for multiple- and single-character pattern matches. Examples are as follows:
QSYS2 A% QGPL: Lists all tables, views, and stored procedures in QSYS2 and QGPL, and all tables and views for any library/collection/schema/owner beginning with the letter "A."
QSYS2 A_C QGPL: Lists all tables, views, and stored procedures in QSYS2 and QGPL, and all tables and views for any library/collection/schema/owner that begins with the letter "A" and has the letter "C" as its third and final character.
% or blank: Lists all tables and views for all libraries/collections/schemas/owners.
For DB2 installations which make periodic copies of the SYSIBM.* metadata, enter the copied schema name in the Shadow Catalog Prefix text box under Mainframe DB2 Options. This directs CONNX to run its import queries against the copied system catalog instead of the SYSIBM.* system metadata.
Under Cursor Behavior, select the radio button for either Close on Commit or Preserve on Commit. If you select Close on Commit, all dynamic SQL SELECT statements are mapped by CONNX to cursors which close after a commit is issued. If you select Preserve on Commit, all dynamic SQL SELECT statements are opened with "sticky" cursors that hold their positions across commits. Preserve on Commit is the preferred setting for Microsoft Access and Visual Basic dynaset processing, but the option may require increased system resources.
Under AS/400 DB2 Options, the AS/400 Plug-n-Play Mode and Convert Binary to Character options are checked by default. The AS/400 Plug-n-Play Mode option enables each connection to create dynamic SQL packages as needed in the per-connection QTEMP scratch pad. The Convert Binary to Character option translates SQL BINARY/VARBINARY, or LONGVARBINARY column data from the host code page to the PC character code page.
Under Job Priority, select Default to run your SQL requests at the default system job priority. You can also select an alternate job run priority, which will cause CONNX to issue an OS/400 CHGJOB remote command to alter the job run priority, where 1=highest job run priority.
Select the Tracing
check box to diagnose potential communications problems. If the box
is checked, CONNX writes a binary trace of all sent/received messages
via either TCP/IP or APPC/SNA LU 6.2 to the cnxdb2.trc file in the
CONNX32 directory. Simultaneously, CONNX writes a text file (cnxdb2.sql)
of all executed SQL statements.
The SQL text trace is also written to the same directory/file name,
with a file extension of .sql.
Turn the feature off by clearing the check box after successfully tracing
problem scenarios and submitting the binary trace file and/or ODBC
API trace to CONNX Technical Support.
Click the OK
button. The CONNX Import Table Selection
dialog box appears with a list of available table names. Click the
Add or Add
All button to move the tables to the Select
Tables for Import pane.

Click the OK
button to import the selected tables into CONNX. The DB2 database
tables, views, and stored procedures are added to the list of accessible
objects in the CONNX Data Dictionary Manager window.
Note: The Preserve on Commit
cursor behavior option is not implemented for DB2/OS390 and DB2/MVS.