
Note: For DB2 UDB platforms, the RDBNAME = the database name, for example, SAMPLE.
For OS/400 platforms, the RDBNAME can be displayed via the DSPRDBDIRE command. The network administrator can define the RDBNAME through the ADDRDBDIRE command.
For DB2/MVS or OS/390 platforms, the RDBNAME is the location name. Ask your DB2 administrator for the location name.
Note: For DRDA target systems supporting TCP/IP, the client must specify a target address. This is an entry field conforming to the four-part TCP/IP address syntax, for example, 102.54.94.97, or a symbolic nickname such as CONNXDB2.
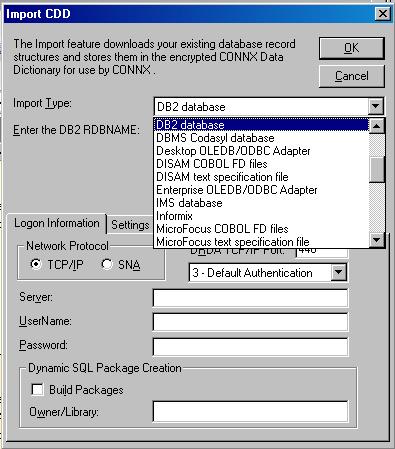
Click the Import button in the CONNX Data Dictionary Manager window.
The Import
CDD dialog box appears. Select DB2
database in the Import Type
list box.
Type the RDBNAME (location)
in the Enter the DB2 RDBNAME
text box.
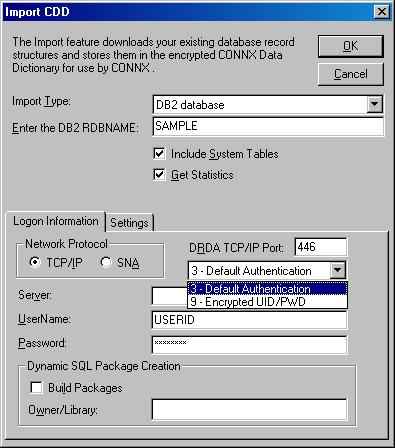
If you require access to system metadata, select the Include System Tables check box to import system table metadata into the CDD.
Select the Get Statistics check box to retrieve index and key information and the number of rows per table.
Select the TCP/IP option on the Logon Information tab.
From the drop-down box, select either the Default Authentication or the Encrypted UID/PWD authentication.
Type a server location, user name, and password:
Server: Symbolic or dotted numeric TCP/IP address of DB2 system.
DRDA TCP/IP Port Number: The DRDA TCP/IP port on which the DB2 target system listens. For mainframe and OS/400 systems, this text box is pre-set to 446. For DB2 UDB systems, enter the port number defined in the host system services file.
UserName: User name used for logging on to the target host.
Password: Password used when logging on to the target host.
Click the Build
Packages button under Dynamic
SQL Package Creation to define dynamic SQL packages used by
CONNX. This function is a one-time operation, which can be performed
by the DB2 administrator on the initial import. All subsequent connect
attempts use the pre-built packages, unless the AS/400 Plug-n-Play
flag is selected. You must have DB2 administrator authority to build
dynamic SQL packages.
If you are connecting to a DB2/400 target, you do not have to click
the Build Packages check box,
since the AS/400 Plug-n-Play check box on the Settings tab is enabled
by default. If you decide to require all users to use the same set
of packages, you can do so by clicking the Build
Packages check box on the initial import.
Type the owner, library, or collection name in the Owner/Library text box. The option only needs to be selected during the first import session. The default value is NULLID.
Select the Settings
tab in the Import CDD dialog
box to specify further options.

Refer to the table below for a description of actions to take depending
on the selections made on the Logon
Information and Settings
tabs.
To filter the imported tables, views, and stored procedures by owner/schema/collection name, refer to the discussion of the Owner List entry field on the Settings tab.
Select the Tracing
check box to diagnose potential communications problems. If the box
is checked, CONNX writes a binary trace of all sent/received messages
via either TCP/IP or APPC/SNA LU 6.2 to the cnxdb2.trc file in the
CONNX32 directory. Simultaneously, CONNX writes a text file (cnxdb2.sql)
of all executed SQL statements.
The SQL text trace is also written to the same directory/file name,
with a file extension of .sql.
Turn the feature off by clearing the check box after successfully tracing
problem scenarios and submitting the binary trace file and/or ODBC
API trace to CONNX Technical Support.
Click the OK
button. The CONNX Import Table Selection
dialog box appears with a list of available table names. Click the
Add or Add
All button to move the tables to the Select
Tables for Import pane.

Click the OK
button to import the selected tables into CONNX. The DB2 database
tables, views, and stored procedures are added to the list of accessible
objects in the CONNX Data Dictionary Manager window.
Note:For DB2 UDB AIX, and
Linux, ask your DB2 administrator for the correct port number. To
find the correct port number, open a DB2 Command Line Processor window
on the target server and type Get DBM CFG. Find the following entry
in the output, which is by default: TCP/IP
service name (SVCENAME) db2cDB2. Look
for the services file in the AIX, Windows, or Linux system directory
and find the following entry: db2cDB2
50000/tcp #connection port for the DB2 instance DB2. In this example, the correct port number
is 50000.
AS/400 DB2 Options Settings
|
QTEMP = AS/400 temporary scratch pad (per user logon) |
|||||||
|
Connected to AS/400 |
AS/400 Plug-n-Play ON |
AS/400 Plug-n-Play OFF |
Build Packages Option ON |
Build Packages Option OFF |
Owner Specified |
Owner Not Specified |
Action |
|
X |
X |
|
|
|
|
|
Always build one package during connect in QTEMP, and build others on demand, as needed, also in QTEMP. |
|
|
|
|
X |
|
|
X |
Build five packages multiplied by two kinds of cursor behavior multiplied by 1 per set = 10 packages in owner = NULLID. Grant EXECUTE on the packages to PUBLIC. |
|
|
|
|
X |
|
X |
|
As with Owner Not Specified, but with different owner/library/collection. |
|
X |
|
X |
|
X |
|
|
Look for prebuilt packages in library/collection NULLID (or other specified library/collection). Error out if packages are not found. |
|
|
|
|
|
X |
|
|
Look for prebuilt packages in library/owner/collection NULLID (or other specified library/owner/schema/collection). Error out if packages are not found. |