
|
The Open Systems Event Replicator supports replicating to the JMS Queues and Topics. The process of replicating to a JMS Queue or Topic is the same as replicating to a relational target such as SQL Server or Oracle except that the data placed on the JMS Queue or Topic is in xml format rather than being put directly into a physical database.
Start the CONNX JMS Server component
Configure a JMS Queue or Topic
Creating a CONNX JMS CDD Entry This includes:
|
The CONNX JMS server must be installed on the same platform in which the JMS Que/Topic provider resides. The CONNX JMS Server is a java program that communicates between CONNX and the JMS Queues/Topics. If the JMS provider resides on an UNIX Machine, additional installation steps must be done which are described below.
The CONNX JMS Server uses the Open Source Apache Logging Services for logging output. This means that the Apache log4j.jar file must be present on the machine where the CONNX JMS Server and the JMS Messaging Server are installed. The log4j.jar file can be downloaded from the Apache web site.
The JMS Server is automatically installed on Windows when JMS is selected during the Install. To start the JMS Server, select "Start JMS Server" from the Start|Programs|CONNX JMS Server menu. The first time the JMS Server is run, you will be prompted for the classpath to the log4j.jar file as well as the location of the JMS provider you wish to connect to. The classpath information will be validated and once the information if found to be correct, the CONNX JMS Server will be started.
Note: The JMS Server listens on port 7600 by default. This can be changed on Windows by running "Configure JMS Server" from the CONNX JMS Server menu and on UNIX/Linux run the shell script jmsserver with the configure option (./jmsserver configure).
Note: The JMS Server Component must be started on the same platform in which the WebMethods Message Service Provider resides.
To create the CONNX JMS CDD entry, bring up the "CONNX - CONNX Data Dictionary Manger and perform the following:
Select the "Import" button
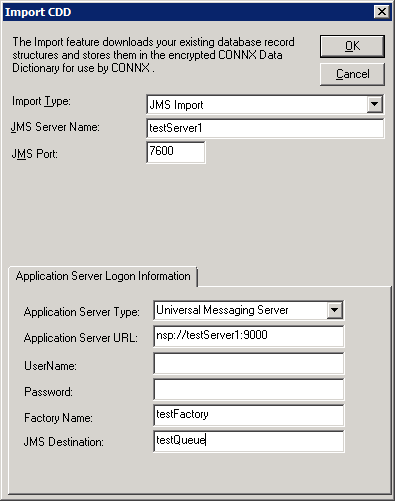
In the "Import CDD" dialog, for "Import Type:", select "JMS Import"
In the "JMS Server Name:" item, enter the machine name where the JMS server is running. (for this example, it is assumed that the JMS server will be running on the local machine, so "localhost" is used).
Leave the "JMS Port:" as is (port 7600). If you changed the "listening port" when starting up the cnxJMSserver.jar, then this value must match the value you specified at that time.
Under the "Application Server Logon Information" tab, the "Application Server Type:" select the Application Server Type you wish to connect to. Universal Messaging Server is selected by default. Note, if JNDI Properties File is selected, the JNDI Properties file needs to be located in the same location as the CONNX JMS Server. There is a sample JNDI.properties file called JNDI.properties.sample in this location. You can copy it and name the copy JNDI.properties and then modify that file.
If Universal Messaging Server, Glassfish or webMethods is selected, "Application Server URL:" will be set to the defaults for the selected type. The name of the server will be auto filled from the JMS Server Name. While the JMS Server Name can be "localhost" or 127.0.0.1, the server name specified in the Application Server URL CANNOT be "localhost" or 127.0.0.1. A valid DNS host name or IP address (other than local loopback) must be used. It is recommended that the JMS Server Name also be the DNS name or IP address of the server.
If JNDI Properties File is selected, the values will be read from jndi.properties which should be located in the same location as the JMS Server. A sample file named jndi.properties.sample is provided and is located in \connx32\connxjms on Windows and in the connx directory on UNIX/Linux. This file can be modified and saved as jndi.properties.
Leave "UserName:" and "Password:" entries blank unless a user name and password has been associated with the JMS queue. In that case, use the appropriate values.
In the "Factory Name:" item, enter the Factory Name you wish to use.
In the "JMS Destination:"
item, enter the Queue Name or Topic Name you wish to connect to.
Enter "OK".
An attempt will be made to connect
to the webMethods Message Service Provider. If everything
went ok, you should see an entry added to the CONNX Data Dictionary.
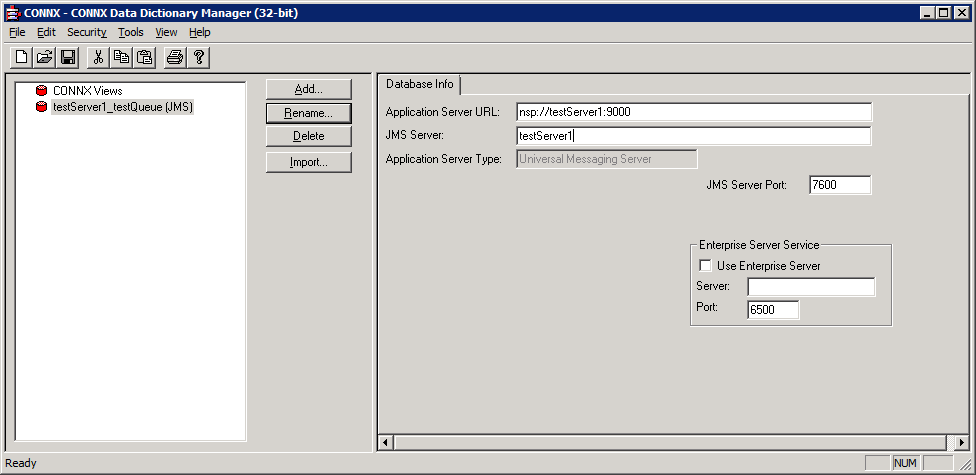
Select File from the menu and then Save.