
On Windows, the JMS Server is automatically installed when JMS is selected on the Database Module screen during the Windows installation process.
 .
.
For UNIX/Linux, the JMS Server must be installed by the UNIX JMS Installer. During the Windows installation process, select JMS (see screen above). In addition to installing the JMS components to Windows, it will also install the Unix JMS Installer.
The CONNX JMS Server must be installed on the same machine as the JMS Messaging Server.
The CONNX JMS Server uses the Open Source Apache Logging Services for logging output. This means that the Apache log4j.jar file must be present on the machine where the CONNX JMS Server and the JMS Messaging Server are installed. The log4j.jar file can be downloaded from the Apache web site.
UNIX/Linux Installation
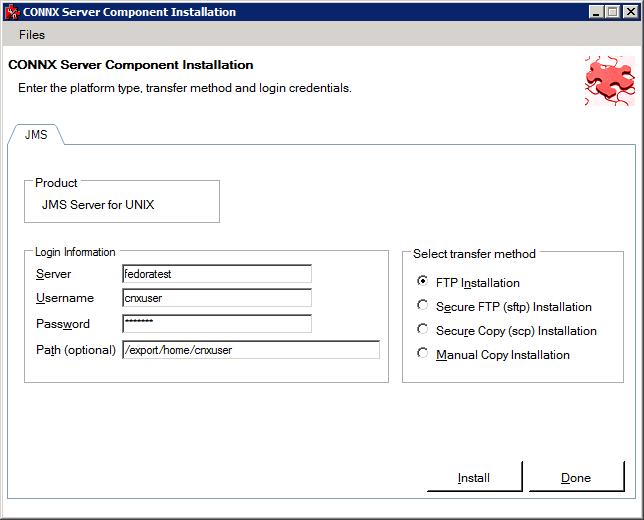
After
the Windows installation has completed, go to the Start|All Programs
menu and select Unix Installer from the "CONNX JMS Server" menu.
This will run the Unix JMS installer which uses FTP, SFTP or SCP to transfer
the contents to the selected UNIX/Linux machine. Please consult your system
administrator for the transfer method appropriate for your environment.
After the files have been transferred, you will be prompted to complete
the installation by invoking "installjms" on the Unix system.
This Unix shell script will set up the JMS Server in a directory named
connx which will be under the base install library that is specified when
running the installjms script.
Note: If you leave the Install Location blank, the installer will copy the files to the home directory of the user specified in the User ID field.
After the installation has completed, the CONNX JMS Server is started on Unix/Linux by running the jmsserver shell script with the START option and on Windows by selecting "Start JMS Server" from the Start|Programs|CONNX JMS Server menu. ("Start JMS Server" is a Windows short cut to jmsserver.bat which is located in the \connx32\CONNXJMS folder) The first time this script is run, you will be prompted for the classpath to the log4j.jar file as well as the location of the JMS provider you wish to connect to. The classpath information will be validated and once the information if found to be correct, the CONNX JMS Server will be started. You will also be prompted for the port the JMS Server will listen on. The default is port 7600.
Changing JMS Server Configuration:
If any of the classpath information or the port number needs to be changed after the initial setup, the JMS Server can be re-configured on Windows by selecting "Configure JMS Server" from the Start|Programs|CONNX JMS Server menu or by running the jmsserver shell script with the configure option (./jmsserver configure) on UNIX/Linux.
Note for Universal Messaging Server installations:
For the Universal Messaging Server, the default location for the jms jars is \softwareag\UniversalMessaging\lib on Windows and /opt/softwareag/UniversalMessaging/lib on UNIX/Linux. The default location for log4j.jar is \softwareag\common\lib\ext on Windows and /opt/softwareag/common/lib/ext on UNIX/Linux.
Note for webMethods installations:
webMethods does not use the javax.jms interface. When the configuration program prompts for the location of javax, the location of webMethods should be specified. The default location is /opt/softwareag/common on UNIX/Linux and c:\softwareag\common on Windows.
Note: The CONNX JMS Server requires Java JRE version 1.7 or higher.
Details about the CONNX JMS Server are covered more fully in Chapter 4, in the topic, "JMS Queues/Topics as a Replication Target".