
CONNX Event Replicator Installation Procedure - Docker
CONNX provides Docker scripts that facilitate the creation of Docker images for the CONNX components on the Linux operating system.
Docker scripts are provided for the Replicator Event Producer and the Replicator Event Server.
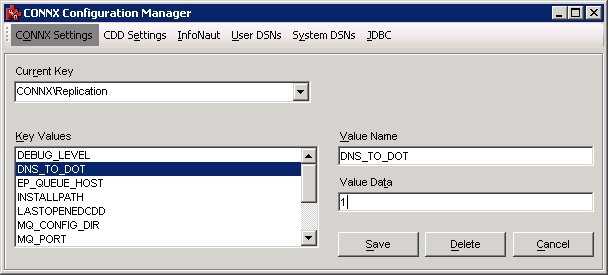
Note: When using the Event Replicator in a Docker environment, the Replication Administrator must have the configuration setting DNS_TO_DOT set to a value of 1. To set this value, open the CONNX Configuration Manager on the Windows machine where the Replication Administrator is running. Select the key CONNX\Replication and a Key Value of DNS_TO_DOT. Set the Value Data to 1 and click Save.
The docker containers used for replication will use the User ID and Group name sagadmin. This User ID and Group is also used by the Adabas container. Before starting the installation into a docker environment, please create a sagadmin user and group with the ID number 1724.
i.e. groupadd -g 1724 sagadmin && useradd -r -u 1724 sagadmin -g sagadmin
When installing the Event Server, the Linux CONNX Client must also be present in the directory where the replication components are installed. To install the CONNX Client, please download the Linux Intel Client from Empower.
After downloading the Linux Client, run the Windows based installer, fill in the Server name, user credentials and the optional path. Select the Docker check box and press install to transfer to client component files to the Linux system. Note, a separate readme file and Dockerfile will be transferred. These files will not be used during the creation of the Event Server docker container. The location the client components are transferred to must be the same as the location specified below for the replication components.
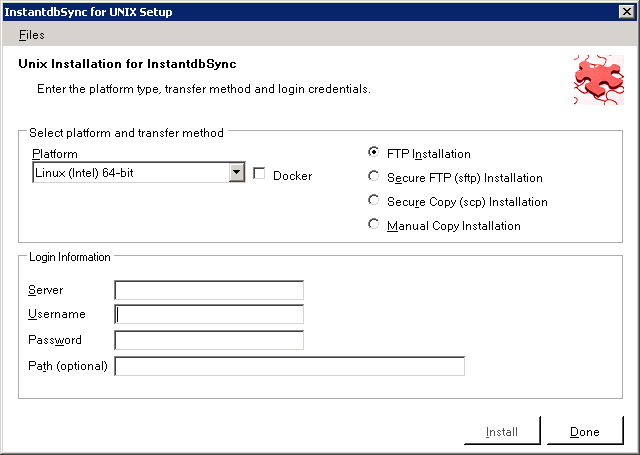
the appropriate user name and password.
Navigate to the Adabas directory for Docker at /opt/softwareag/Adabas/docker/Adabas. This directory will contain several files, including the Docker script file.
To build a docker image for Adabas, use the following command:
```docker build --build-arg sag_user_id=1234 --build-arg group_id=1234 --tag <Name of your image>:<Tag of your image> . -f./Dockerfile```
Example:
```docker build --build-arg sag_user_id=1234 --build-arg group_id=1234 --tag adabasreplication:6.7 . -f./Dockerfile```
The final output should read: Successfully tagged adabasreplication:6.7.
### Extending the Adabas image
The Adabas image must be built first before it can be extended to work with replication.
Once the Adabas image is properly built and configured, navigate to the directory you specified in the windows file transfer GUI for the CONNX Event Replicator. This directory will contain several files, including the Docker script file as well as this readme file.
To extend upon the docker image for Adabas to include the CONNX Event Replicator, use the following command:
```docker build --build-arg IMAGE_NAME=<Name of your image from the previous step>:<Tag of your image from the previous step> --tag <Name of your image from the previous step>:<Tag of your image from the previous step> . -f./Dockerfile.eventproducer```
Please note that the value of the build argument "IMAGE_NAME" must match the image name and tag name of the image built in the previous step.
Example:
```docker build --build-arg IMAGE_NAME=adabasreplication:6.7 --tag adabasreplication:6.7 . -f./Dockerfile.eventproducer```
The final output should read: Successfully
tagged adabasreplication:6.7.
To build the CONNX Event Server Docker image, start a terminal emulator on the Linux server and type
the appropriate user name and password.
Navigate to the directory you specified in the windows file transfer GUI. This directory
will contain several files, including the Docker script file.
To build a docker image for the CONNX Event Server, use the following command:
```docker build --tag <Name of your image> . -f./Dockerfile.eventserver```
Example:
```docker build --tag eventserverimage . -f./Dockerfile.eventserver```
The final output should read: Successfully tagged eventserverimage:latest.
Note:
In order to build the Event Server image, the Linux CONNX client files
must be present. Please see the top of this page for more information.
To run the CONNX Adabas Replication Docker image, use the following command:
```docker run -d -e "ACCEPT_EULA=Y" -e "CONNX_EP_QUEUE_HOST=<IP address of the event server host machine>" -e "ADA_DB_CREATION=demodb" -e ADADBID=<Database ID of your choice> --name <Name of your container> -v <Adabas license location>:/opt/softwareag/common/conf:z -v <Producer data files location>:/opt/softwareag/connx/replicator/producer/data:z -v <Log location>:/opt/softwareag/connx/replicator/log:z -p <External port>:60001 <Name of your image>:<Name of your tag>```
For the <Producer data files location> and <Log location> directories, it is recommended to create a single "replicator" directory on the host machine. Under this "replicator" directory, create a "producer" and "log" directory. Under the "producer" directory, create a "data" directory. Please ensure that the "producer/data" and "log" directories have an owner and group of sagadmin with an id of 1724.
The <External port> should be the port number for connecting to the Adabas database via TCP/IP.
Please note that the above command will create a demo database. If you already have a database configured within your image, omit the "ADA_DB_CREATION" and "ADADBID" environment variables.
Example:
```docker run -d -e "ACCEPT_EULA=Y" -e "CONNX_EP_QUEUE_HOST=127.0.0.1" -e "ADA_DB_CREATION=demodb" -e ADADBID=1 --name adabasreplicationcontainer -v /home/cnxuser/adabaslicenses:/opt/softwareag/common/conf:z -v /home/cnxuser/replicator/producer/data:/opt/softwareag/connx/replicator/producer/data:z -v /home/cnxuser/replicator/log:/opt/softwareag/connx/replicator/log:z -p 20005:60001 adabasreplication:6.7```
Note: Specifying
the environment variable ACCEPT_EULA and setting it to 'Y' acknowledges
that you have read and accepted the Software AG End User License Agreement.
The software will not run if this value is not set.
### Running the CONNX Event Server image
To run the CONNX Event Server Docker image, use the following command:
```docker run -d -e "ACCEPT_EULA=Y" --name <Name of your container> -v <Config file location>:/config:z -v <Common data files location>:/opt/softwareag/connx/replicator/common/data:z -v <Consumer data files location>:/opt/softwareag/connx/replicator/consumer/data:z -v <Log location>:/opt/softwareag/connx/replicator/log:z -p <External port for the message queue>:9200 -p <External port for the controller>:9205 <Name of your image>:<Tag of your image>```
For the <Config file location>, <Common data files location>, <Consumer data files location>, and <Log location> directories, it is recommended to create a single "replicator" directory on the host machine. Under this "replicator" directory, create a "config", "common", "consumer", and "log" directory. Under both of the "common" and "consumer" directories, create a "data" directory. Please ensure that each of the "config", "common/data", "consumer/data", and "log" directories have an owner and group of sagadmin with an id of 1724.
Example:
```docker run -d -e "ACCEPT_EULA=Y"
--name eventservercontainer -v /home/cnxuser/replicator/config:/config:z
-v /home/cnxuser/replicator/common/data:/opt/softwareag/connx/replicator/common/data:z
-v /home/cnxuser/replicator/consumer/data:/opt/softwareag/connx/replicator/consumer/data:z
-v /home/cnxuser/replicator/log:/opt/softwareag/connx/replicator/log:z
-p 9200:9200 -p 9205:9205 eventserverimage:latest```
Note: Specifying the environment
variable ACCEPT_EULA and setting it to 'Y' acknowledges that you have
read and accepted the Software AG End User License Agreement. The
software will not run if this value is not set.
Verifying the Build:
Please refer to the following docker command reference to manage and verify the image and container.
Show the available docker images:
docker images
Start the docker image - for example:
Event Server:
docker run -d -e "ACCEPT_EULA=Y" --name eventservercontainer -v /home/cnxuser/replicator/config:/config:z -v /home/cnxuser/replicator/common/data:/opt/softwareag/connx/replicator/common/data:z -v /home/cnxuser/replicator/consumer/data:/opt/softwareag/connx/replicator/consumer/data:z -p 9300:9200 -p 9305:9205 eventserverimage:latest
Adabas with Event Producer:
docker run
-d -e "ACCEPT_EULA=Y" -e "CONNX_EP_QUEUE_HOST=127.0.0.1"
-e "ADA_DB_CREATION=demodb" -e ADADBID=1 --name adabasreplicationcontainer
-v /home/cnxuser/adabaslicenses:/opt/softwareag/common/conf:z -v /home/cnxuser/replicator/producer/data:/opt/softwareag/connx/replicator/producer/data:z
-p 20005:60001 adabasreplication:6.7
Show the log:
docker logs <container name>
Show the containers:
docker ps -a
Stop the container:
docker stop <container name>
Delete the container:
docker rm <container name>
Remove the image:
docker image rm <image name>
Note: If the replication target is SQL Server, the connection to the target database in the CDD must use the Enterprise Server Service. Please see Chapter 4 "Creating a CDD for Event Replication using the ConnX SQL Engine" for more information.