
The installation instructions for your UNIX system can be found on the Empower web site.
Download the appropriate
UNIX installation package from Empower to your computer.
Double-click
on the installation package icon to launch the Install Shield Wizard
for CONNX Client.
If the target system
has an FTP, SFTP or SCP server enabled, skip to step 5.
If the target system
does not have an FTP, SFTP or SCP server enabled, select the Manual
Copy Installation option and click the Begin Client Installation button.
This option will create the necessary install files in the UNIXCLIENT\TEMPINST
subdirectory of the CONNX installation directory. Move these
files via an alternate copy method to the Unix server and then proceed
to step 11 below.
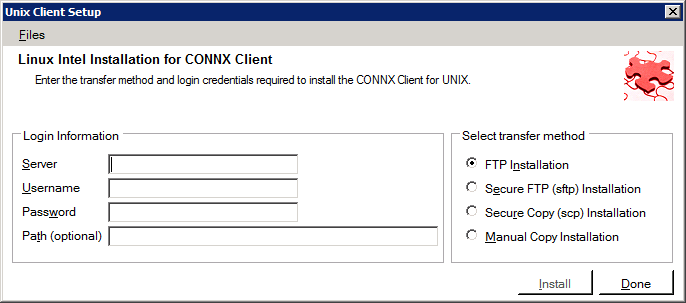
Select the desired
transfer method (FTP, SFTP or SCP)
In the Server
text box, enter the TCP/IP host name
or address for your system platform.
In the User
ID text box, enter a privileged user account name.
In the Password
text box, enter a user account password. (The password appears as
********).
Note: Server,
User ID and Password
are required fields.
By default, the CONNX
client data is sent to your home directory. If you wish to send it
to another location, enter the name of the alternate directory in
the UNIX Directory text box.
If the specified directory does not exist, it will be created.
Click the Install
button. This action starts an FTP, SFTP or SCP session and
copies the selected components to the target server. The progress
of the copy will be displayed in the status pane on the installer..
An ftp window appears
saying the files were successfully copied to the system.
If the CONNX client
is not installed, an error box appears. Select Files
from the menu. The sub menu has options to view the FTP log
as well as the FTP script. The FTP logs have a timestamp appended
to the name. Select the appropriate log file and check for errors.
If the resolution to the problem requires a call to technical
support, please provide the log file as well as the script file to
the support representative.
Note: If the files fail to
copy via the Client Installation's FTP, SFTP or SCP session, please
use the Manual Copy Installation as outlined in step 4 above.
Once the files are
copied, a dialog box appears asking you to log on to your system and
run the installclient shell script.
To run the installclient
shell script, start a terminal emulator on the UNIX server and type
the appropriate user name and password.
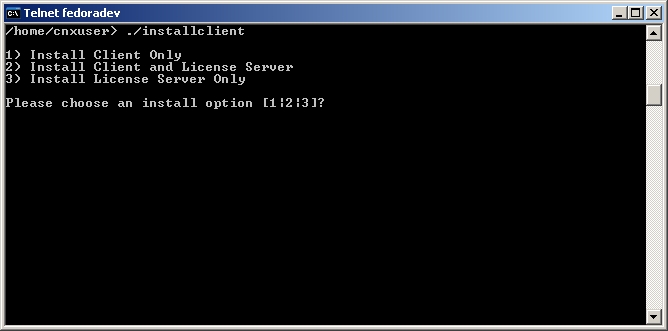
Type ./installclient
and then press <Enter>.
You will see a screen that gives three options. With SQL Gateway a
License server is required in order to use the product. In many circumstances
when a Unix Client is desired, it might be desirable to have the license
server on the same machine. If this is the case, you would select
option 2. If you wish to use an existing License Server, that might
be running on a different machine, then select option 1. If you wish
to install the License Server only, then select option 3.and then
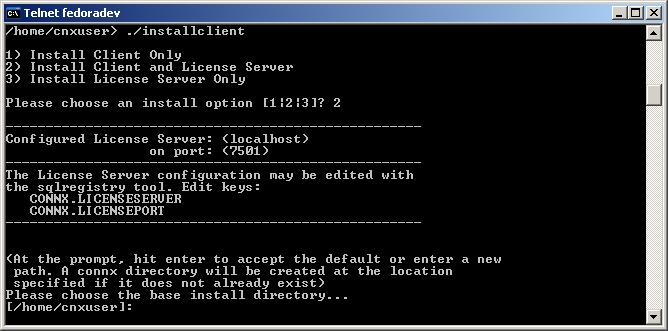
press <Enter>. Press
<Enter> to install to
current directory or enter a new install path at the prompt. The contents
of the compressed files are unzipped to a CONNX directory in the install
directory.
If option 2 is selected, you will notice that it will try to install
the License Server on your UNIX Machine as localhost with an address
of 7501. After this installation script has been run, the License
Server will be automatically invoked. In the future, you can start/stop
or check the status of the License Server by invoking the script,
licenseserver. This script is in the CONNX folder. The parameters
to this script are [start|stop|status]. So to start the license server,
you would type, ./licenseserver start. You might consider adding this
to your startup script in order to have the license server running
when the UNIX machine is running. The screen below shows the case
where option 2 is selected.
The final output should read:
CONNX UNIX Client Installation Complete.
To run the CONNX client, add the correct location of the registry files (64 and 32 bit) and the environment variables (CONNXREGISTRY and CONNXREGISTRY64) pointing to the correct location of the registry files to the env list. For example, add the entries:
export CONNXREGISTRY=<LocationOfRegistry>/connxreg.db
export CONNXREGISTRY64=<LocationOfRegistry>/connxreg64.db
to the startup profile of any user that runs the CONNX client application. The location of the registry is specified during the client installation or by default is the same folder in which the CONNX client is installed.
Close the telnet server
session.
Click the Done button.
Important: All UNIX instructions must be entered as lowercase characters.
If you installing a Unix system with a ODBC driver manager, follow the instructions in Completing CONNX Installation for UNIX ODBC Drivers.
If you are installing a Unix system with a JDBC server, follow the instructions in Completing CONNX Installation for JDBC Servers.
The first part of the UNIX CONNX installation process is complete. Refer to the appropriate Post-Installation Checklist to complete any additional requirements for each database you install.