
CONNX provides Docker scripts that facilitate the creation of Docker images for the CONNX components on the Linux operating system.
Docker scripts are provided for the CONNX Data Server, the CONNX License server, and the CONNX JDBC server. The follow section will over the JDBC server and the License server.
The installation instructions for your Linux system can be found on the Empower web site.
Download the appropriate
Linux installation package from Empower to your computer.
Double-click
on the installation package icon to launch the Install Shield Wizard
for CONNX Client.
If the target system
has an FTP, SFTP or SCP server enabled, skip to step 5.
If the target system
does not have an FTP, SFTP or SCP server enabled, select the Manual
Copy Installation option and click the Begin Client Installation button.
This option will create the necessary install files in the UNIXCLIENT\TEMPINST
subdirectory of the CONNX installation directory. Move these
files via an alternate copy method to the Unix server and then proceed
to step 11 below.
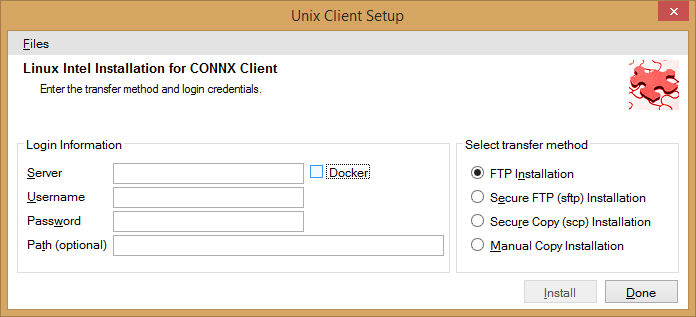
Select the Docker
checkbox.
Select the desired
transfer method (FTP, SFTP or SCP)
In the Server
text box, enter the TCP/IP host name
or address for your system platform.
In the User
ID text box, enter a privileged user account name.
In the Password
text box, enter a user account password. (The password appears as
********).
Note: Server,
User ID and Password
are required fields.
By default, the CONNX
client data is sent to your home directory. If you wish to send it
to another location, enter the name of the alternate directory in
the UNIX Directory text box.
If the specified directory does not exist, it will be created.
Click the Install
button. This action starts an FTP, SFTP or SCP session and
copies the selected components to the target server. The progress
of the copy will be displayed in the status pane on the installer..
An ftp window appears
saying the files were successfully copied to the system.
If the CONNX client
is not installed, an error box appears. Select Files
from the menu. The sub menu has options to view the FTP log
as well as the FTP script. The FTP logs have a timestamp appended
to the name. Select the appropriate log file and check for errors.
If the resolution to the problem requires a call to technical
support, please provide the log file as well as the script file to
the support representative.
Note: If the files fail to
copy via the Client Installation's FTP, SFTP or SCP session, please
use the Manual Copy Installation as outlined in step 4 above.
Once the files are
copied, a dialog box appears asking you to log on to your system and
run the installclient shell script.
To build the Docker
image, start a terminal emulator on the Linux server and type the
appropriate user name and password.
Navigate to the directory
you specified in the windows file transfer GUI. This directory
will contain several files, including two template Docker files.
Dockerfile.jdbcserver is the template for building a Docker image for
the JDBC Server.
This script should be modified to include your custom configuration
settings and DSN entries.
The CDDs used by the docker image are externalized, and should be placed
in the host docker system.
Please refer to Completing CONNX Installation for JDBC Servers for the specific commands
to add to the docker script for creating DSNs.
Examples are also provided directly in the docker script.
After the Dockerfile.jdbcserver
has been updated to include DSN and other configuration settings,
build a docker image for the CONNX license server, use the following
command:
(replace XXX with the current CONNX version number - 138 for example
for 13.8)
docker build -t connxXXXjdbcserver . -f./Dockerfile.jdbcserver
Example:
docker build -t connx138jdbcserver
. -f./Dockerfile.jdbcserver
The final output should read:
Successfully
tagged connxXXXjdbcserver:latest.
The next step is to build a docker image for
the CONNX license server. No modification of the supplied docker
script should be required.
Run the following command:
(replace XXX with the current CONNX version number - 138 for example
for 13.8)
docker build -t connxXXXlicenseserver . -f./Dockerfile.licenseserver
Example:
docker build -t connx138licenseserver
. -f./Dockerfile.licenseserver
The final output should
read:
Successfully
tagged connxXXXlicenseserver:latest.
To
run the CONNX JDBC docker image, use the following command:
(replace XXX with the current CONNX version number - 138 for example
for 13.8)
docker run -d -e "ACCEPT_EULA=Y" --name cnxclient -v
<Config file location>:/config:z -p <external port>:7502
connxXXXjdbcserver
Example:
docker run -d -e "ACCEPT_EULA=Y"
--name cnxclient -v /home/cnxuser/config:/config:z -p 20002:7502
connx138jdbcserver
The <Config file location> should contain the CONNXREG64.db file
which holds the CONNX configuration information for the JDBC server.
This directory should also contain your
CONNX CDD files.
Ensure that the directory on the host
system has an owner and group of sagadmin with an id of 1724.
The <external port> should be the port number for connecting
to the JDBC server.
To
run the CONNX license server docker image, use the following command:
(replace XXX with the current CONNX version number - 138 for example
for 13.8)
docker run -d -e "ACCEPT_EULA=Y" --name cnxlicense
-v <license file location>:/license:z -p <external port>:7501
connxXXXlicenseserver
Example:
docker run -d -e "ACCEPT_EULA=Y"
--name cnxclient -v /home/cnxuser/license:/license:z -p 20001:7501
connx138licenseserver
The <license file location> should contain your CONNX license
database - it will be created and maintained by the license server,
and it is external from the docker image.
Ensure that the directory on the host
system has an owner and group of sagadmin with an id of 1724.
The <external port> should be the port number for connecting
to the license server.
The first part of the
Docker CONNX installation process is complete. Refer
to the appropriate Post-Installation Checklist to complete any
additional requirements for each database you install.
Verifying
the Build:
Please refer to the following docker command reference to manage and
verify the image and container.
Show the available docker images:
docker images
Start the docker image - for example:
docker
run -d -e "ACCEPT_EULA=Y" --name cnxclient -v /home/cnxuser/config:/config:z
-p 20002:7502 connx138jdbcserver
Show the log:
docker logs cnxclient
Show the containers:
docker ps -a
Stop the container:
docker stop cnxclient
Delete the container:
docker rm cnxclient
Remove the image:
docker
image rm connx138jdbcserver