
This document covers the following topics:
The Menu System is the interactive component of ASF, and allows you to
Generate Evaluation Reports, based on data stored by the Store Program.
Define groups of files and databases which are to be monitored by the Store Program, and to store these definitions as Store Profiles.
Define groups of fields, files and databases for which the stored ASF data is to be evaluated, and to store these definitions as Evaluation Profiles.
Run the Store Program on an ad hoc basis to collect current database statistics.
Define additional Store Types.
List or delete records stored by the Store Program.
Run predefined evaluations.
Administer the user access to ASF.
Call ASF utilities.
Perform ASF services.
To start ASF, log on to the Natural library SYSASF and enter the command "MENU". The ASF Logo screen is displayed first.
10:25:44          *** A D A B A S  Statistics Facility ***          2008-01-22
USERID                    V e r s i o n   8.1.1                     MLOGO001


                   AAAAAAAAAAAA         SSSSSSSSSS          FFFFFFFFFFFFF
                 AAAAAAAAAAAAAA       SSSSSSSSSSSSS        FFFFFFFFFFFFF
                AAAA      AAAA       SSSS      SSSS       FFFF
               AAAA      AAAA       SSSS                 FFFF
              AAAA      AAAA         SSSSS              FFFF
             AAAAAAAAAAAAAA           SSSSS            FFFFFFFFFF
            AAAAAAAAAAAAAA              SSSS          FFFFFFFFFF
           AAAA      AAAA      SSSS    SSSSS         FFFF
          AAAA      AAAA       SSSSSSSSSSSS         FFFF
         AAAA      AAAA          SSSSSSSSS         FFFF

               ADABAS              STATISTICS            FACILITY

               A   P R O D U C T    OF      S O F T W A R E    AG

                          ASF Data :      1424 / 14
                          ASF Profiles :  1424 / 15
|
Figure 3-1: ASF Logo Screen
The ASF Logo screen shows the ASF version and the file numbers of the
ASF system files. You can display the ASF Logo screen from any ASF screen by
typing the command ASFLOGO in the ASF Direct Command
Line. The ASF Logo screen is not displayed when you start ASF from the Adabas
Online Services (AOS).
Note:
If the ASF systems files are not correctly shown in the ASF Logo
screen, verify the Natural LFILE settings (NTFILE parameter). As a temporary
solution, you can set the logical file numbers of the ASF system files with the
ASF direct command "LFILE".
The Menu System provides you with two kinds of help, namely passive help and active help.
You activate the passive help feature by pressing PF1. If the cursor is positioned on an input field when you press PF1, a text appears on the screen giving a short description of the purpose of the field and of related information such as the required format of input data for this field. Another way of selecting passive help for a field is to place a question mark in the first position of the input field, then press ENTER.
If the cursor is not positioned on an input field, then pressing PF1 will display a general text which describes the purpose and usage of the currently selected screen.
At the bottom of each passive help screen, ASF informs you which part of the help text is currently displayed on the screen. The two numbers show the line number of the first line of the screen and the total number of lines of the help text.
If you enter an asterisk ("*") in an input field of the main menu or of any other menu, the ASF program will display on the screen a list of the allowable input values for that field. If you then select an item in the list, ASF deselects the help display and enters the marked item automatically into the menu from which the help feature was activated. If, however, there is no active help defined for a particular input field, the passive text for the screen is displayed.
If you mark a field in the profile selection list or in the active help list with a valid code of the calling mask, the corresponding function is performed. E.g. if you select the function "S" in the "Store profile administration", the "Select store profile from list" screen is displayed. If you mark a profile in this list with an "M", the corresponding profile is edited for modification.
For fields whose expected input is a Store Profile, Evaluation Profile or Store Type, you can precede the asterisk by one or more alphanumeric characters. In this case, the display of allowable values for the field starts at the value which matches the given characters. If no value matches the characters exactly, then the display will start at the next available value in alphabetical order.
When the asterisk is preceded by one or more characters in this way, the active help display is not restricted to just those values matching the given pattern. This feature merely specifies a starting point in the active help display. You can still use the scroll keys PF7 and PF8 to move to the start or the end of the entire list.
Assume that the cursor is on an input field where you are required to input the name of a Store Profile. If you want to use the active help facility to get a display of the available Store Profiles starting at the letter "K", then input "K*" in the input field and press ENTER. If there are any Store Profiles whose names start with this letter, they will be displayed, otherwise the display with start with the next Store Profile name in alphabetical order.
Note:
If you input characters after the asterisk, ASF ignores them.
The following PF-keys are defined throughout:
| PF-key | Function |
|---|---|
| PF1 | Display passive help text. |
| PF3 | Return to the calling screen (without saving data). |
| PF7 | Scroll backwards by one screen. |
| PF8 | Scroll forwards by one screen. |
| PF12 | Return to main menu. |
The Direct Command Line, which appears at the bottom of every ASF menu, allows you to type commands which
Modify your current working environment.
Start certain ASF functions directly even if the associated menu is not currently selected.
Select options from the Main Menu directly, regardless of which menu is currently displayed.
Such commands are called Direct Commands. The Main Menu options can be selected by typing the appropriate one-character code in the Direct Command Line. See the section Main Menu later in this section for a list of the one-character codes which can be used as Direct Commands.
In addition to the Main Menu options, the following Direct Commands are available:
| Direct Command | Purpose |
|---|---|
| ASFLOGO | Display the ASF initial Logo screen. |
| ASFUEX | Display the ASF User Exit Maintenance Menu. The various options available for the ASFUEX direct command are described in the section User Fuctions. |
| ASFvrsnn | Start a program related to correction ASFvrsnn. Whether there is such a program and how to use it, is described in the information delivered with the corresponding correction. |
| DELETE HELP | Delete the old ASF help texts while performing an upgrade installation. |
| FETCH progname | Call the external program progname via FETCH. Same as “TRIG PROG progname”. |
| FETCH RETURN progname | Call the external program progname via FETCH RETURN. Same as “USE PROG progname”. |
| FIN | Exit from the NATURAL environment. |
| FSTORE profilename storetype dbid | Run the Store Program but store only database records; any file specified in the Store Profile is ignored. The Store Program is using the named Store Profile and Store Type. The third parameter (dbid) is optional. If it is specified, ASF data will be stored for this database only. The database must be one of the databases specified in the Store Profile. |
| INFO | Display the ASF long error message corresponding to the most recently displayed ASF short error message. |
| INFO nnn | Display the long error message corresponding to the ASF error number nnn. |
| KEEP | Retain the current environment parameters for use when initializing the next ASF session. |
| LFILE | Maintain the ASF DATA and PROFILES file numbers. See the section ASF System File Maintenance for more details. |
| LINK FILE filenumber | Link the specified file number to all databases in the current (or last used) Evaluation Profile of type 5-10. This means that, for each database specified in the profile, any existing file numbers are deleted and an entry is made for the specified file number. Each time you use the LINK FILE command, the effect of the previous LINK FILE command is superseded. |
| LOGOFF | (same as FIN). |
| LOGON xxxxx | Log on to the NATURAL library xxxxx. |
| MENU | Select the ASF Main Menu. |
| MOD ON | Put ASF into Modify mode (for Predefined Evaluations). The last used Predefined Evaluation is activated. |
| MOD OFF | Return ASF to Capture mode. |
| PROFILE | Select the screen "Define User Profile", which is used to modify your working environment for the current session. |
| PROFILE xxxxx | Select the screen "Define User Profile", and display the profile for user xxxxx. If the profile for this user does not already exist, it will be created, and the values will be set to those for PROFILE STANDARD. |
| PROFILE STANDARD | Select the screen "Define User Profile" in a special mode which defines the initial working environment for new users. |
| RETURN | Exit from the NATURAL environment and pass a return code. |
| RETURN RESET | Reset the return code (no exit). |
| RETURN STATE | Write out the current return code (no exit). |
| RDC | Display the SYSRDC Main Menu. |
| SELECT | Select the Workplan (Screen "Predefined Evaluations and Reports", main menu option "P"). Note that you can also use the direct command "P" to select the Workplan. |
| SELECT nn | Select the predefined evaluation nn from the list of predefined evaluations in the Workplan. |
| STORE profilename storetype dbid | Run the Store Program, using the named Store Profile and Store Type. The third parameter (dbid) is optional. If it is specified, ASF data will be stored for this database only. The database must be one of the databases specified in the Store Profile. |
| TRACE | Display the Trace Maintenance Menu. The various options available for the TRACE direct command are described in the section Tracing ASF. |
| TRIG PROG progname | Call the external program progname via FETCH. |
| USE PROG progname | Call the external program progname via FETCH RETURN. |
| VERSION | Display the ASF version and the number of the correction last applied. |
| * comment | Input is ignored by ASF. When a direct command starts with an '*' (asterisk), it is treated as comment. This is helpful when writing batch input streams. When the SYSRDC trace is active, the comment line is written to the trace. |
Note:
Whenever a direct command is entered, ASF writes a user entry
into the SYSRDC trace containing the direct command.
The Menu System can be activated in Batch Mode. This is especially important for running the Store Program at Nucleus startup and termination, before the nucleus statistical values are refreshed and also for storing data cyclically. Data which is input to the Menu System in batch mode has exactly the same order and format as the data which is input online. The method for running the Store Program in batch mode uses the Direct Command Line feature of ASF to execute a STORE command. The format of the STORE command as used in the Direct Command Line is shown below. The following sample shows an extract from a JCL job to run the Store Program in batch mode:
,STORE PROFILNAME STORETYP DBID
,FIN
Note that the STORE command is preceded by a comma (the standard delimiter is the comma, provided that the default settings "IM=D" and "ID=," in the Natural parameter module have not been modified). This is because the ASF Main Menu has two input fields, of which the Direct Command Line is the second. Therefore, when running ASF in batch mode, the (blank) data for the first input field is terminated by the comma, and the remainder of the line is input to the Direct Command line. To terminate ASF (and exit the Natural environment) in batch mode, the command FIN is included in the JCL job.
The direct command RETURN terminates the ASF session (like "FIN" or "LOGOFF") and sets a return code. The return code is set to the following values:
| Return Code | Reason |
|---|---|
| 0 | OK |
| 2 | A Critical Report has found critical values. |
| 4 | A STORE has stored some but not all DB’s/files requested. |
| 8 | A STORE has stored no DB/file or the STORE failed with any ASF error (like "Profile not found"). |
| 12 | A Natural error occurred. |
The following sample shows an extract from a JCL job to run the Store Program in batch mode and to set a return code:
,STORE PROFILNAME STORETYP DBID
,RETURN
In the menus, you can specify dates in either absolute format or relative format.
In absolute format, you specify a date in the form YYYY-MM-DD or DD.MM.YYYY, depending on the current default format for absolute dates, as defined in the User Profile. For example, you would specify Nov 23, 2007 as one of the following
2007-11-23	  (US format)
23.11.2007   (European format)
depending on the current default format for absolute dates. In general, ASF is generous when interpreting dates. If it finds a date which does not have the standard format, it translates it into the standard as soon as you press ENTER.
You can specifiy the year with two digits only. In this case, ASF assumes that the resulting year is in the range from (current year - 50) to (current year + 49). If, for example, the current year is 2007, the values from 00 to 56 are interpreted as 2000 to 2056 and the values from 57 to 99 are interpreted as 1957 to 1999.
07-11-23	   (US format)
23.11.07    (European format)
The separators can be omitted if the year is specified with 4 or 2 digits and the day and month with 2 digits each:
20071123          (US format, 4-digit year)
231107             (European format, 2-digit year)
A date can always be specified as "DD.MM.YYYY" or as "YYYY-MM-DD" regardless of the current selected default date format if all digits are specified and the corresponding separator character is used. A 2-digit year is also possible. ASF translates the date into the current selected default date format. E.g. a predefined evaluation was saved with the date
23.11.93 (European format, 2 digit year)
If the current date format is YYYY-MM-DD (US), ASF translates the date as soon as you press ENTER into
1993-11-23 (standard US format, 4 digit year)
In relative format, you specify the date as a number of days, weeks or months relative to the current date. A relative count from first or last record is also possible. The valid formats are described in the following table:
| Format | Decription |
|---|---|
| ±nnnD |
The day is ±nnn days relative to today. The valid range for nnn is 0-999. Example: -1D means: Yesterday. |
| ±nnn |
The same as ±nnnD, but ASF sets the corresponding input time field in the menu automatically to the current time of day. Example: +1 means: Tomorrow, at the current time. |
| ±nnnWd |
The week is ±nnn weeks relative to the current week. The valid range for nnn is 0-160. The day of the week is given by d, whereby Monday=1, Tuesday=2, etc. If d is not specified, the value 1 (the first day of the week, namely Monday) is assumed. Example: +0W2 means: Tuesday of the current week. |
| ±nnMdd |
The month is ±nn months relative to the current month. The valid range for nn is 0-36. The day relative to the start of the month is given by dd. If dd is not specified, the value 1 (the first day of the month) is assumed. Examples: +1M15 means: the 15th day of next month. -1M3 means: the 3rd day of the previous month. |
| ±nnnnR | The date of the nnnn-th record (time-stamps)
counted from the first record for ‘+’, or from the last record for ‘-‘. ‘±0’ is
interpreted as ‘±1’, i.e. first or last record, respectively. The valid range
for nnnn is 0-9999.
Example: -1R means: last record. +3R means: 3rd record. |
Note:
If you use the format ±nnn as listed above, ASF
sets the corresponding input time field automatically to the current time of
day. If you use any of the other formats listed above, the corresponding input
time field is not set automatically, so you must either enter the time
explicitly or use the appropriate default value for the input time
field.
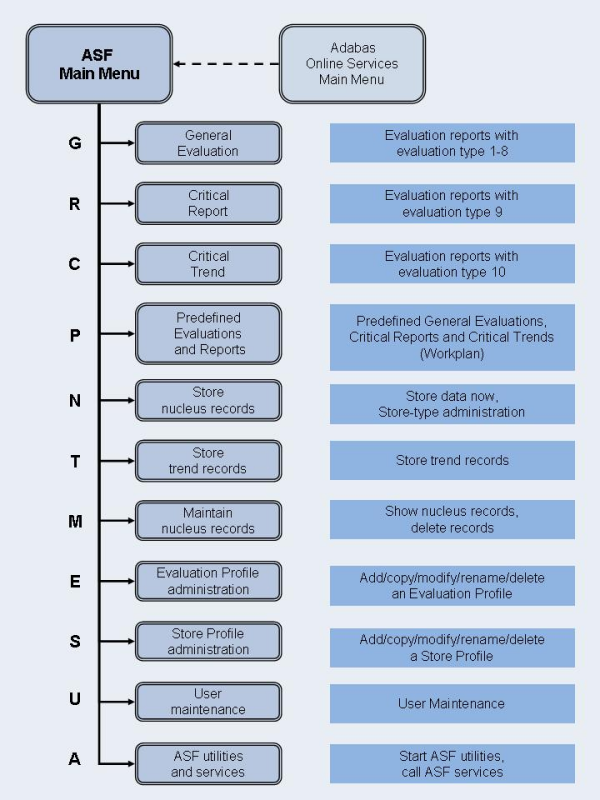
Figure 3-2: ASF Main Menu Functions
10:42:29          *** A D A B A S  Statistics Facility ***          2008-01-22
USERID                        - Main Menu -                         MOS00001

                 Code                 Service
               -------  -------------------------------------
                  G     General evaluation
                  R     Critical report
                  C     Critical trend report
                  P     Predefined evaluations and reports
                  N     Store nucleus records
                  T     Store trend records
                  M     Maintain nucleus records
                  E     Evaluation-profile administration
                  S     Store-profile administration
                  U     User maintenance
                  A     ASF utilities and services
                 ./?    Terminate / Help
               -------  -------------------------------------
           Code:  _

     Direct command ==> _______________________________________________________
Enter-PF1---PF2---PF3---PF4---PF5---PF6---PF7---PF8---PF9---PF10--PF11--PF12---
Help More Term Menu |
Figure 3-3: Adabas Statistics Facility Main Menu
The menu lists the services which are available. You can select one of the listed services by typing the one-letter code for the service in the "Enter code" field. When you have entered the input data, press to activate the service which you selected.
This option selects the screen for generating an Evaluation Report with an Evaluation Type of 1-8. These reports show the past and current status of databases and files, and do not include information concerning critical values.
This selects the screen for running a Critical Report. A Critical Report lists the data fields which, according to the most recently stored data, have reached or exceeded their critical values.
This selects the screen for running a Critical Trend Report. A Critical Trend Report lists the data fields which, based on their past and current values, will reach or exceed their critical values within a certain period of time, e.g. three months.
This selects the service for executing a predefined general evaluation, critical report or critical trend report. The list of predefined evaluations and reports is called the Workplan.
This selects the screen for either starting the Store Program, or for modifying the list of available Store Types.
This option selects the screen for storing a set of trend records. The stored trend records can then be evaluated by running the General Evaluation service (code G in the Main Menu).
This option selects the screen for displaying or deleting ASF records.
This option selects the screen for the administration of Evaluation Profiles. You can define new profiles, and copy, modify, rename or delete existing profiles.
This option selects the screen for the administration of Store Profiles. You can define new profiles, and copy, modify, rename or delete existing profiles.
Note:
Additional Store Types can be defined with the "Store nucleus
records" service.
This option selects the screen for User Administration. You can grant or deny permission to users to modify Store Profiles and Evaluation Profiles, to store data and run evaluations.
Note:
This option is only available when Natural Security is being
used. Furthermore, you must be registered in Natural Security as Administrator
to select this option. See the section
Step 5: Setting up User
Security in the ASF Installation
documentation for details.
This option selects the screen for the ASF Utilities and Services.
Enter the code of the service you wish to activate.
10:55:38          *** A D A B A S  Statistics Facility ***          2008-01-22
USERID                    - General evaluation -                    MSA00001

                   Code                 Service
                 -------  -------------------------------------
                    S     Start general evaluation
                    ?     Help
                    .     Terminate
                 -------  -------------------------------------
       Enter code : _

    Eval. profile : ________________
  Evaluation type : __
  Time frame from : __________ , _____  to  __________ , _____

    Store profile : ________________
       Store type : __
           Origin : ___ Nucleus records
           Screen : _  Printer : _  PC-File : _

     Direct command ==> _______________________________________________________
Enter-PF1---PF2---PF3---PF4---PF5---PF6---PF7---PF8---PF9---PF10--PF11--PF12---
Help More Term Capt Menu> |
Figure 3-4: Menu for General Evaluation
Note:
For Evaluation Types 2 and 6, the text "Time frame from" appears
as shown here. For Evaluation Types 1,3,4,5,7 and 8, this text is replaced by
the text "Points of time".
This screen is used to start the Evaluation Reports with Evaluation Type 1-8. These reports show the past and current status of databases and files, generated future trend values and the results of statistical operations. They do not include information concerning critical values.
This menu is reached when you select the service code "G" in the main menu. In this case, the PF6 key is labeled "Capt".
The menu is also reached when you use the "modify" option in the list of predefined evaluations (main menu option "P"). In this case, the PF6 key is labeled "MODnn", where nn is the number of the predefined evaluation. See the section Workplan: Predefined Evaluations and Reports for more information.
Select this service to start the evaluation. You supply information concerning the period of time which is to be analyzed, the name of the Store Profile which was used when storing the data, the Store Type, the Evaluation Profile to be used, and the output medium for the evaluation (screen, printer or PC). The output is formatted according to the Evaluation Type (1-8).
Enter "S" to start the evaluation.
The name of the Evaluation Profile which ASF will use when evaluating the stored data. Type "*" to get an active help list of the Evaluation Profiles for the specified Evaluation Type.
The type (1-8) of report which ASF will generate.
Enter here the starting date/time and the end date/time of the period to be evaluated. Defaults: the "to" date is today, the "to" time is 23:59.
You can specify the date in either absolute or relative format. For further details, refer to the section Absolute and Relative Date Format.
Note:
Relative dates are especially useful when used in the Workplan
or in a batch environment (see Option P in the Main Menu).
Type here the starting date/time and the end date/time of the period to be evaluated. Defaults: the "from" date is today, the "from" time is 00:00, the "to" date is today, the "to" time is 23:59.
You can specify the date in either absolute or relative format. For further details, refer to the section Absolute and Relative Date Format.
The name of the Store Profile which was used by the Store Program while the data was being collected. Type "*" to get an active help list.
The Store Type used by the Store Program while the data was being collected. (Note: to check which Store Type was used with which Store Profile, use the service "Maintain ASF records", which is available in the ASF main menu). Type "*" to get an active help list.
The Evaluation can be based on nucleus data stored by the Store Program or trend data created by running the service "Store Trend Records" (code T in the Main Menu). The choices are: ALL (both nucleus and trend data), NU (nucleus data only) and TR (trend data only). Type "*" to get an active help list.
Note:
When TR is selected, certain ASF fields may not be included in
the report. This is because ASF considers certain data fields to be unimportant
for trend records.
The medium to which the output is sent. Mark one of the choices accordingly.
You can mark PC-File with an "X" for standard, "Y" for standard without header lines, "C" for CSV or "F" for a full download. See the section Download Format for more details.
11:20:11          *** A D A B A S  Statistics Facility ***          2008-01-22
USERID                      - Critical report -                     MCR00001


                   Code                 Service
                 -------  -------------------------------------
                    S     Start critical report
                    ?     Help
                    .     Terminate
                 -------  -------------------------------------

       Enter code : _

    Eval. profile : ________________

    Store profile : ________________
       Store type : __
           Screen : _  Printer : _  PC-File : _

     Direct command ==> _______________________________________________________
Enter-PF1---PF2---PF3---PF4---PF5---PF6---PF7---PF8---PF9---PF10--PF11--PF12---
Help More Term Capt Menu |
Figure 3-5: Menu for Critical Report
This screen is used to start a Critical Report. A Critical Report lists the data fields which, according to the most recently stored data, have reached or exceeded their critical values.
This screen is reached by selecting the service code "R" in the main menu. In this case, the PF6 key is labeled "Capt".
The menu is also reached when you use the "modify" option in the list of predefined evaluations (main menu option "P"). In this case, the PF6 key is labeled "MODnn" instead of "Capt", where nn is the number of the predefined evaluation. See the section Workplan: Predefined Evaluations and Reports for more information.
Enter "S" to start the Critical Report.
The name of the Evaluation Profile which ASF will use when evaluating the stored data. Type "*" to get an active help list.
The name of the Store Profile which was used by the Store Program while the data was being collected. Type "*" to get an active help list.
The Store Type used by the Store Program while the data was being collected. Type "*" to get an active help list.
The medium to which the output is sent. Mark one of the choices accordingly.
If you mark Printer, and you have specified one or more Con-nect cabinets in your User Profile (refer to the screen "Define User Profile"), the output of the Critical Report will be sent as a memo to the named Con-nect cabinets as well as being sent to the default printer.
If you mark PC-File with an "X", the report is downloaded in standard format to the PC-File. If you mark PC-File with "C", the report is downloaded as comma-separated-values (CSV). If you mark PC-File with "E", the output is written in SMTP format to Workfile 1 which can be used for sending e-mails.
Note:
A Critical Report shows data which was recorded during the last
run of the Store Program (using the given Store Profile and Store Type). This
does not necessarily represent the current database status, if the data was
stored some time ago (for example one or two days ago). If you take corrective
action to the database according to the contents of a Critical Report, you must
subsequently run the Store Program with the same Store Profile and Store Type,
so that the changes will be reflected in a subsequent Critical Report.
13:33:08           ***  A D A B A S  STATISTICS FACILITY ***        2008-01-22
USERID             Critical report based on: 1992-04-13 23:12       MACR0001
    Evaluation profile: PROD-LIMIT-YELL Store profile: TEST-DB-ALL Type: WE
                                                                        < ALL >
    DB !  File ! Field            !       Value !Unit!Parm!       Limit !Unit
 ------+-------+------------------+-------------+----+----+-------------+----
    16 !       ! DATA USED        !        92.8 ! PC ! GE !          85 ! PC
       !   122 ! NI EXTENTS       !           3 !    ! GE !           3 !
    17 !       ! DATA USED        !        99.7 ! PC ! GE !          85 ! PC
       !    39 ! DS EXTENTS       !           3 !    ! GE !           3 !
       !    71 ! DS EXTENTS       !           3 !    ! GE !           3 !
    26 !       ! DATA USED        !        97.3 ! PC ! GE !          85 ! PC
       !    44 ! AC EXTENTS       !           3 !    ! GE !           3 !
       !   185 ! NI EXTENTS       !           5 !    ! GE !           3 !
       !       ! DS EXTENTS       !           4 !    ! GE !           3 !
       !       ! AC EXTENTS       !           3 !    ! GE !           3 !
    37 !       ! DATA USED        !        86.4 ! PC ! GE !          85 ! PC
       !       !                  !             !    !    !             !
       !       !                  !             !    !    !             !
       !       !                  !             !    !    !             !
     Direct command ==> _______________________________________________________
Enter-PF1---PF2---PF3---PF4---PF5---PF6---PF7---PF8---PF9---PF10--PF11--PF12---
Help Term Time - + Menu |
Figure 3-6: Sample output for Critical Report
Figure 3-6 shows an example of the information contained in a Critical Report. The output was generated by running Predefined Evaluation 2 - see the section on Predefined Evaluations for further details.
If you press PF4, an active help list is displayed of all of the stored data sets which were stored with the same Store Profile and Store Type. If you mark one of the data sets, then the Critical Report for that data set will be displayed. Alternatively, you can use the PF5 and PF6 keys to page backwards and forwards through the list of data sets stored with the current Store Profile and Store Type.
To send a Critical Report to Con-nect cabinets, perform the following steps:
Verify that the Con-nect environment and the ASF interface to Con-nect are set up correctly. See the section Step 8: Setting up Con-nect in the ASF Installation documentation for details.
Define a Con-nect profile (code "P" in the ASF Utilities and Services Menu). Specify at least one Cabinet as receiver. See the section Define User Profile for details.
Define the Critical Report and write it to the screen as a test.
Unselect the Output Medium "Screen" and select "Printer" instead but do not submit it.
Capture the report as Predefined Report by pressing PF6. Specify the description of the new Predefined Report and save it. Remember the number of the Predefined Report.
Set up a batch job calling the Predefined Report with the input statement
,SELECT nn
where nn is the number of the new Predefined Report. Take care that the job runs under the same user Id as the Con-nect profile.
The report is send to the in-basket of the cabinets specified in the Con-nect profile. A copy is in the out-basket of the SYSASF cabinet and in the Natural print file of the job.
You can send a Critical report also online to Con-nect cabinets. In this case the copy is routed to the printer.
To send a Critical Report as e-mail, perform the following steps:
Define an e-Mail profile (code "P" in the ASF Utilities and Services Menu). Specify the domain name, the e-mail addresses of the receiver(s) and sender and a standard text. See the section User Profile Maintenance for details.
Define a Critical Report and write it to the screen as a test.
Unselect the Output Medium "Screen" and mark "PC-File" with an "E" instead but do not submit it.
Capture the report as Predefined Report by pressing PF6. Specify the description of the new Predefined Report and save it. Remember the number of the Predefined Report.
Set up a batch job calling the Predefined Report with the input statement
,SELECT nn
where nn is the number of the new Predefined Report. Take care that the job runs under the same user Id as the e-Mail profile.
Define Workfile 1 (CMWKF01) in the job. ASF writes the report into this work file in SMTP format.
Add an SMPT step to the job. Use as input the Workfile 1 defined in the ASF step. The SMPT JCL for z/OS looks like (similar for other operating systems):
//MESSAGE EXEC PGM=IEBGENER
//SYSIN     DD DUMMY
//SYSPRINT  DD SYSOUT=X
//SYSUT2    DD SYSOUT=(B,SMTP),DEST=(domain)
//SYSUT1    DD DSN=ASF.WORK1,DISP=SHR
The SMTP server sends the Critical Report as e-mail to all receivers specified in the e-Mail profile. Errors found by SMTP are reported to the ‘From’-address which is also used as sender address of the e-mail.
15:35:19          *** A D A B A S  Statistics Facility ***          2008-01-22
USERID                   - Critical trend report -                  MCT00001


                   Code                 Service
                 -------  -------------------------------------
                    S     Start critical trend report
                    ?     Help
                    .     Terminate
                 -------  -------------------------------------
       Enter code : _

   Trend based on : __________ , _____  to  __________ , _____
       limited to : __________ , _____

    Eval. profile : ________________
    Store profile : ________________
       Store type : __
           Screen : _  Printer : _  PC-File : _

     Direct command ==> _______________________________________________________
Enter-PF1---PF2---PF3---PF4---PF5---PF6---PF7---PF8---PF9---PF10--PF11--PF12---
Help More Term Capt Menu |
Figure 3-7: Menu for Critical Trend Report
This screen is used to start a Critical Trend Report. A Critical Trend Report lists ASF data fields which are either already critical, or which will reach their critical limit within a specified time.
This screen is reached by selecting the service code "C" in the main menu. In this case, the PF6 key is labeled "Capt".
The menu is also reached when you use the "modify" option in the list of predefined evaluations (main menu option "P"). In this case, the PF6 key is labeled "MODnn", where nn is the number of the predefined evaluation. See the section Workplan: Predefined Evaluations and Reports for more information.
Enter "S" to start the Critical Trend Report.
The start and end date and time of the period in which the original ASF Nucleus records were stored. The default time for the "from" field is 00:00. The default time for the "to" field is 23:59.
You can specify the date in either absolute or relative format. For further details, refer to the section Absolute and Relative Date Format.
Note:
Relative dates are especially useful when used in the Workplan
(see Option P in the Main Menu).
The end date and time to be considered for the critical trend. The default time is 23:59. The format of the date field is the same as for "Trend based on".
The name of the Evaluation Profile which contains the definitions of the databases, files and ASF data fields for which the Critical Trend Report is to be generated. Type "*" to get an active help list.
The name of the Store Profile which was used by the Store Program to collect the original ASF Nucleus data. Type "*" to get an active help list.
The Store Type used by the Store Program while the data was being collected. Type "*" to get an active help list.
The medium to which the output is sent. Mark one of the choices accordingly.
If you mark PC-File with an "X", the report is downloaded in standard format to the PC-File. If you mark PC-File with "C", the report is downloaded as comma-separated-values (CSV).
15:59:14           ***  A D A B A S  STATISTICS FACILITY ***        2008-01-22
USERID   Crit-trend-base: 1992-03-01 - 1992-04-15 limit: 1992-09-30 MACT0001
   Evaluation profil: PROD-LIMIT-TREND Store profil: TEST-DB-ALL Type: WE wee
                                                                        < ALL >
    DB !  File ! Field            !       Limit !Unit!Parm! Date       ! Accur.
 ------+-------+------------------+-------------+----+----+------------+-------
    16 !   122 ! NI EXTENTS       !           5 !    ! GE ! 1992-04-14 ! n/a
       !       ! AC EXTENTS       !           5 !    ! GE ! 1992-04-15 ! n/a
    17 !       ! DATA USED        !          99 ! PC ! GE ! 1992-04-13 ! reache
    26 !       ! ASSO USED        !          99 ! PC ! GE ! 1992-04-29 ! 91
       !       ! DATA USED        !          99 ! PC ! GE ! 1992-04-12 ! 87
    27 !       ! DATA USED        !          99 ! PC ! GE ! 1992-09-16 ! 43
       !       !                  !             !    !    !            !
       !       !                  !             !    !    !            !
       !       !                  !             !    !    !            !
       !       !                  !             !    !    !            !
       !       !                  !             !    !    !            !
       !       !                  !             !    !    !            !
       !       !                  !             !    !    !            !
       !       !                  !             !    !    !            !
     Direct command ==> _______________________________________________________
Enter-PF1---PF2---PF3---PF4---PF5---PF6---PF7---PF8---PF9---PF10--PF11--PF12---
Help Term - + Graph Menu |
Figure 3-8: Sample output for Critical Trend Report.
Figure 3-8 shows an example of the type of information shown in a Critical Trend Report (the output was generated by running Predefined Evaluation 5 - see the section on Predefined Evaluations for further details). The example shows that the report was run on January 22nd, is based on data stored between March 1st and April 15th, and that the trend was extrapolated to September 30th (the original delivered sample data is from 1992). ASF calculated that the fields shown would reach their critical limits within this time, on the dates shown in the "Date" column. The value in the column "Accuracy" for each critical field is the coefficient of determination (expressed as a percentage), which is a standard statistical quantity for measuring the linearity of a data sample. Used in the context of the Critical Trend Report, it gives a measure of confidence in the prediction. Values above 90% indicate a very reliable prediction.
For the file-extent related fields, the critical date is calculated in a special procedure using the Adabas formula for calculating the standard size of further extents. For these fields the accuracy cannot be calculated and is listed as "n/a".
Fields which have already reached the critical value with the last record of the base period are indicated in the "Accuracy" column as "reached".
When you download the report to the PC, an additional column "Last Base" lists the value of the last record of the base period.
You can select the Graph feature of the Critical Trend Report by pressing the PF11 key, as indicated in Figure 3-8. When you do this, a graph is displayed on the screen, indicating the development of the first of the ASF data fields during the period in question. The graph also indicates the date at which the ASF data field will reach or exceed the critical limit. The keys PF7 and PF8 can be used in this graph mode to scroll backwards and forwards respectively within the list of ASF data fields.
The graph for a particular ASF data field can be selected directly from the Critical Trend Report output screen by moving the cursor to the name of the field and pressing PF11.
Figure 3-9 shows the graph for the ASF data field "ASSO USED", which is the 4th ASF data field listed in Figure 3-8.
  16:16:46           ***  A D A B A S  STATISTICS FACILITY ***        2008-01-22
  USERID   Crit-trend-base: 1992-03-01 - 1992-04-15 limit: 1992-09-30 MACTG001
           Database: 26 File: 0 Field: ASSO USED Unit: PC
        123 +                :
            !                :
            !                :
         99 ! ...............:............................................ GE
            !                :
            !                :
            !          * *   :
            !                :
            !        *       :
            !                :
            !      *         :
            !  * *           :
            !                :
            !                :
            !                :
            +BBBBBBBBBBBBLLLLLLLLLLLLLLLLLLLLLLLLLLLLLLLLLLLLLLLLLLLLLLLL+
        1992-03-01                                                  1992-09-30

 Enter-PF1---PF2---PF3---PF4---PF5---PF6---PF7---PF8---PF9---PF10--PF11--PF12---
Help Term - + Menu |
Figure 3-9: Sample graphical output for Critical Trend Report
The graph shows values for the field ASSO USED for database 26. The critical limit of 99% for this field is shown as a horizontal line of dots. The horizontal axis is the time axis. It is labeled "B" for the period of time for which stored ASF data exists, and "L" for the period of time for which a prediction is being made. The asterisks show the ASF data which is stored for the field ASSO USED. One asterisk on the graph might represent several stored data values which cannot be displayed separately due to the limited resolution of the graph. The vertical line of dots which meets the horizontal axis shows the predicted date when the value of ASSO USED will reach the critical limit.
If you want to generate a similar graph on the PC, perform the following steps:
Store trend records. Use the same times as in the critical trend reports as base period. The generate time should include the critical time reported by the Critical Trend.
Run a General Evaluation. Use the same fields as in the Critical Trend. The time should include the base period as well as the generated future times. Origin must be set to "ALL".
Download the General Evaluation to the PC and process the data with a spreadsheet tool like Excel.
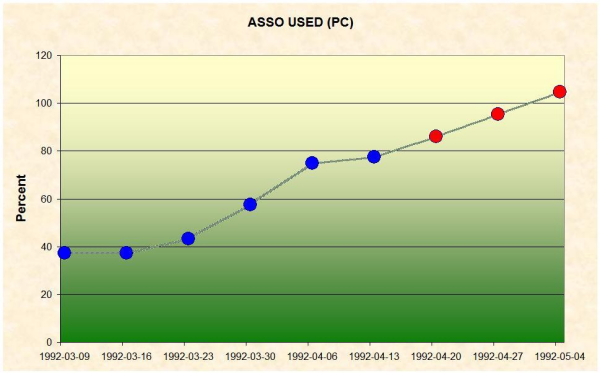
Figure 3-9a: Sample graphical output for Trend Data
In this graph the original nucleus values are indicated as blue points, the calculated trend values are red points. The critical 99 % will be reached in the last week of the diagram. A percentage above 100 indicates that more space for the Associator (used) will be required than currently available (Associator defined).
ASF330 'S'tart for evaluation or 'I'nfo,'M'odify,'D'elete,'*','.'
 16:25:54          *** A D A B A S  Statistics Facility ***          2008-01-22
 USERID                   - Evaluation selection -                   MEVSE001


   01 __ Limit-report 'RED'   : Used storage >= 95 %, extents >= 4
   02 __ Limit-report 'YELLOW': Used storage >= 85 %, extents >= 3
   03 __ Limit-report 'YELLOW': HWM's,S2,format overwr.,throwbacks,restarts...
   04 __ Limit-report 'BLUE'  : Waste of resources disk/main storage, pools...

   05 __ Limit-report TREND   : Development of ASSO/DATA storage, 5th. extents
   06 __ Disk-storage    : Historical development of a database (time frame)
   07 __ Disk-storage    : Multiple databases at one glance (point in time)
   08 __ File-overview   : Historical development of a file (time frame)

   09 __ File-overview   : Multiple files at one glance (point in time)
   10 __ IO-behaviour    : Historical development of a database (time frame)
   11 __ IO-behaviour    : Multiple databases at one glance (point in time)
   12 __ Resources       : Historical development of a database (time frame)


     Direct command ==> _______________________________________________________
Enter-PF1---PF2---PF3---PF4---PF5---PF6---PF7---PF8---PF9---PF10--PF11--PF12---
Help More Term - + Menu |
Figure 3-10: Screen for Predefined Evaluations and Reports
This screen displays the Workplan, which is a list of predefined evaluations and reports. Associated with each item in the Workplan is a set of parameters which can be used to start a General Evaluation, Critical Report or Critical Trend Report. Using this feature, the input data required to run frequently used evaluations can be defined once in the Workplan, then activated as often as required.
Using the Workplan, it is possible to store the parameters which are required for running a General Evaluation, Critical Report or Critical Trend Report. When you press PF6 ("Capture") in any of the screens General Evaluation, Critical Report or Critical Trend Report, the values currently displayed in the input fields of the screen are added as a new item to the Workplan. The evaluations can be started directly from the Workplan by entering "S" in the input field beside the appropriate item or with the direct command
SELECT nn
where nn is the number of the predefined evaluation. The numbers of the predefined evaluations are listed in the first column of the Workplan.
After you install ASF for the first time, 30 of the first 35 slots in the Workplan are preset to run examples of predefined evaluations supplied by Software AG. These examples access test ASF data records, so you can activate any of them immediately after installing ASF in order to view some sample ASF reports. Corresponding to each of these examples is an Evaluation Profile, also supplied by Software AG, which ASF requires to run the example. The sample Predefined Evaluations are listed in the section Supplied Predefined Evaluations in the ASF Examples documentation, the corresponding Evaluation Profiles are in the section Supplied Evaluation Profiles in the same documentation.
You can add your own predefined evaluations to this list (up to 96 predefined evaluations are allowed). You can also modify or delete one or more of the examples supplied by Software AG and use the vacant slots for your own predefined evaluations. See the Workplan Functions below for details.
A predefined evaluation can only be modified or deleted if the user is authorized to modify evaluation profiles.
This screen is reached by selecting the service code "P" in the main menu.
The Workplan functions are activated by typing the appropriate letter in the input field corresponding to the item, then pressing ENTER. These functions are:
The function "S" causes the evaluation or report to run.
Associated with each item in the Workplan are several lines of descriptive text. The first line of each Workplan item is shown in the Workplan screen. The function "I" causes the additional lines of text to be displayed.
If you wish to change any of the data values of a predefined evaluation or report, select the function "M" (Modify). This causes the corresponding screen for General Evaluation, Critical Report or Critical Trend Report to be displayed, with all of the input fields filled with the data which was stored in the Workplan.
Note that when you select General Evaluation, Critical Report or Critical Trend Report from the Workplan, the PF6 key is labeled "MODnn", where nn is the number of the Workplan item.
You can now make your modifications. When you have completed the modifications, press PF6. The descriptive text for this Workplan item is displayed on the screen, and you can modify it if you wish. To exit from the text window, press ENTER. If you have changed the text, you will be asked to confirm the change by pressing ENTER again.
Subsequently, the Workplan is redisplayed.
The function "D" deletes an item from the Workplan. You must confirm the deletion in a pop-up window.
Type "*" to get an active help list of the Workplan functions.
ASF provides editor functions for the administration of the Workplan. Using these functions, items in the list can be copied, moved to another position or deleted.
The following editor functions can be applied to an item in the list by inserting the two character code in the item's input field:
| Function | Description |
|---|---|
| .X | Mark an item with "X" |
| .Y | Mark an item with "Y" |
| .C | Make a copy of the current item and insert it directly after the current item. All of the following items are moved down one position. |
| .D | Delete the item. All of the following items are moved up one position. |
| .A | Activate an item. This defines a "destination" position for the Copy and Move functions listed below. The activated item is highlighted on the screen. |
The following editor functions must be entered on the Direct Command Line:
| Function | Description |
|---|---|
| CX-Y | All of the items between the items marked "X" (function ".X") and "Y" (function ".Y") are copied and inserted directly after the activated item (function ".A"). The following items are moved down the appropriate number of positions. |
| MX-Y | All of the items between the items marked "X" (function ".X") and "Y" (function ".Y") are moved from their current position to directly after the activated item (function ".A"). |
| DX-Y | All of the items between the items marked "X" (function ".X") and "Y" (function ".Y") are deleted. The following items are moved up the appropriate number of positions. |
To move a single item from one position in the list to another, it must be marked firstly with ".X", then with ".Y", and then moved with "MX-Y".
14:03:40          *** A D A B A S  Statistics Facility ***          2008-01-23
USERID               - Store nucleus data environment -             MSN00001


                   Code                 Service
                 -------  -------------------------------------
                    S     Store data now
                    F     Store data without file information
                    A     Store type administration
                    ?     Help
                    .     Terminate
                 -------  -------------------------------------

       Enter code : _

    Store profile : ________________
       Store type : __

 Reduced on DB-ID : _____

     Direct command ==> _______________________________________________________
Enter-PF1---PF2---PF3---PF4---PF5---PF6---PF7---PF8---PF9---PF10--PF11--PF12---
Help More Term Msg Menu |
Figure 3-11: Menu for Store Nucleus Records
This screen is used to run the Store Program once for a particular Store Profile and Store Type, or to modify the list of user-defined Store Types.
This menu is reached by selecting the service code "N" in the main menu.
Select this option to run the Store Program on an ad-hoc basis. The program runs once, collecting current data for the databases and files defined in the Store Profile, and then it terminates.
This option is similar to Store Data Now, but stores only database records; any files specified in the Store Profile are ignored. As a result, this option executes faster than Store Data Now, so it is useful in cases where speed is required, for example when storing End Nucleus (Store Type=EN) records.
Select this option to obtain the menu for the administration of the user-defined Store Types. With this service you can define new Store Types, or modify or delete existing user-defined Store Types. It is, however, not possible to modify or delete the predefined Store Types.
The screen for "Store type administration" shows a list of the currently defined Store Types. You define a new user-defined Store Type by appending it to the end of the list. You delete an existing user-defined Store Type by overwriting the name of the Store Type with blanks then pressing the ENTER key.
The code of the service you wish to activate.
The name of the Store Profile which is to be used by the Store Program to collect the data.
The Store Type to be used by the Store Program to collect the data. Type "*" to get an active help list.
A summary of the Store Types follows the description of the input fields.
If you enter a database ID in this optional input field, then data will be stored only for the database specified. The database ID must be one of those defined in the Store Profile.
The following Store Types are predefined for use with Store Nucleus Records. An overview of all predefined Store Types is provided in the section Supplied Store Types.
This Store Type is used when the Store Program is run directly after the Nucleus startup.
This Store Type is used when the Store Program is run immediately before ending the nucleus session.
This Store Type can be used when the Store Program is run immediately before the nucleus statistical values are refreshed by the ADADBS `REFRESHSTATS' function. You can use this Store Type in a 24-hour environment (Adabas nucleus runs continuously). If, however, the nucleus is shut down from time to time, you should use the "EN" (end nucleus) Store Type before you refresh the nucleus statistical values.
This Store Type is used when the Store Program is run on a cyclic basis, for example once every 24 hours. If you use the Job Scheduler to run the Store Program cyclically, you must develop a JCL procedure which runs in Batch Natural and executes ASF direct commands.
This Store Type is used when the Store Program is run on a daily basis.
This Store Type is used when the Store Program is run on a weekly basis.
This Store Type is used when the Store Program is run on a one-off basis, in either online or batch mode.
This Store Type is used when the Store Program runs immediately after the TP monitor is started.
This Store Type is used when the Store Program is run immediately before the TP monitor is terminated.
This Store Type is used when the Store Program is run for test purpose.
Several Store type are predefine for the ASF Condense Nucleus Records utility. These Store types start with "+", "&" or "#". They are described in detail in the sections Condense Records to Average Records and Condense Records to Delta Records.
In addition to the built-in Store Types, you can define new Store Types. The names can consist of any two characters, provided that none of the existing Store Type names is used. Also, care should be taken not to use any characters which have a special significance for the TP monitor being used (for example, the "suspend" character should be avoided).
You could, for example, use a new Store Type when monitoring the effect of an ADARUN parameter change over a period of several hours, making one run of the Store Program every 30 minutes. After the resulting ASF records have been analyzed in an Evaluation Report, the records can be deleted. Records stored by the Store Program with one of the standard Store Types are not affected by this procedure.
Another example of the use of additional Store Types is to store records at monthly intervals. A suitable name for such a Store Type would be "MO". Evaluation Reports could then be generated, based only on the data stored in these records. .
While the Store Program runs, an informational message for each database and file processed is listed on the screen indicating whether the store was successful or not. After the run you can press PF9 ("Msg") to list the error messages in more details. In batch, the error messages are listed always by default. The error message list looks like:
DB File AOS-Pgm Response ---------------------------------------------------------- 177 4 AB8FCB Rsp 017 - File not found 50151 61 AB8FCB Rsp 017 - File not found 50151 62 AB8FCB Rsp 017 - File not found 111 ABSOPN2 Rsp 148 - DB not active |
14:38:16          **** A D A B A S Statistics Facility ****         2008-01-23
USERID                      - Store trend data -                    MGTS0001


                   Code                 Service
                 -------  ----------------------------------
                    S     Store trend data now
                    ?     Help
                    .     Terminate
                 -------  ----------------------------------
        Enter Code: _

  Trends based on : from: __________ , 00:00   to: __________ , 23:59
   Generate trend : from: __________ , 00:00   to: __________ , 23:59
    Steps of days : 7__
 DBs and FIs from : ________________

    Store profile : ________________
       Store type : __

      Direct Command ==> __________________________________________________
Enter-PF1---PF2---PF3---PF4---PF5---PF6---PF7---PF8---PF9---PF10--PF11--PF12---
Help More Term Menu |
Figure 3-12: Menu for Store Trend Records
This screen is used to generate a set of trend records. Trend records contain predictions of future database behavior based on trends indicated in existing ASF Nucleus records. Records generated in this way can be evaluated using the General Evaluation service (code G in the Main Menu).
Note:
Each trend record contains data which is predicted for a
particular date and time. No two trend records in a set contain data predicted
for the same day. Before new trend records are generated, all previously stored
trend records with the same store profile and store type are deleted
automatically. For a specific store profile and store type you will therefore
find only the trend records generated last.
This menu is reached by selecting the service code "T" in the main menu.
The code of the service you wish to activate.
The start and end date and time of the period in which the original ASF Nucleus records were stored. The default time for the "from" field is 00:00. The default time for the "to" field is 23:59.
You can specify the date in either absolute or relative format. For further details, refer to the section Absolute and Relative Date Format.
The start and end date and time of the period for which the trend records are to be generated. The default time for the "from" field is 00:00. The default time for the "to" field is 23:59. The format for the date field is the same as for "Trends based on".
The required interval, in days, between adjacent trend records in the set. The default value is 7.
Enter the name of a Store Profile or an Evaluation Profile which specifies the databases and files for which you wish to generate trend records. This will typically be the Evaluation Profile which will be used to output a report based on the generated trend records. If the Evaluation Profile does not contain databases, the corresponding Store Profile should be used.
Note:
Trend records are based on data which was stored using a
particular Store Profile with a particular Store Type. The set of databases and
files specified in that Store Profile might be considerably larger than the set
of databases and files for which trend records are required.
The name of the Store Profile which the Store Program used when creating the original ASF Nucleus data. Type "*" to get an active help list.
The Store Type which the Store Program used when creating the original ASF Nucleus data. Type "*" to get an active help list.
A summary of the Store Types follows the description of the input fields in the section Store Nucleus Records.
15:15:44          *** A D A B A S  Statistics Facility ***          2008-01-23
USERID                 - Maintain nucleus records -                 MDR00001

                   Code                 Service
                 -------  -------------------------------------
                    S     Show nucleus records
                    D     Delete nucleus records
                    E     Export nucleus records to workfile
                    I     Import nucleus records from workfile
                    ?     Help
                    .     Terminate
                 -------  -------------------------------------
       Enter code : _

     Records from : __________ , 00:00  to  __________ , 23:59
    Store profile : ________________
       Store type : __
           Origin : ___
      Database ID : _____

     Direct command ==>  _______________________________________________________
 Enter-PF1---PF2---PF3---PF4---PF5---PF6---PF7---PF8---PF9---PF10--PF11--PF12---
HELP Term Menu |
Figure 3-13: Menu for Maintain Nucleus Records
This screen is used to display a summary of records which have been stored by the Store Program, or to delete records stored by the Store Program.
This menu is reached by selecting the service code "M" in the main menu.
This lists records which have been stored by the Store Program, according to the selection criteria which you enter in the input data fields of the menu. If you enter data for more than one input data field, then records will be listed only if they meet all of the selection criteria. The listed records are sorted according to Store Profile and Store Type, and show: database and file names, date, time and number of records.
Selecting this option causes records which were stored by the Store Program to be deleted. You specify the records to be deleted by entering data in one or more of the input data fields. If you enter data for more than one input data field, then records will be selected for deletion only if they meet all of the selection criteria.
Before the records are deleted, a warning is displayed on the screen, stating how many records would be deleted. You can confirm the delete operation by typing the word "delete", then pressing ENTER. You will then be prompted to press ENTER again to confirm the deletion. You can cancel the delete operation by pressing PF3.
The Export option copies nucleus records to the external work file 1, as specified in the JCL for the job, according to the selection criteria which you enter in the input data fields of the menu. The original nucleus records are not deleted. If you enter data for more than one input data field, then records will be copied only if they meet all of the selection criteria.
This function runs only in batch mode with most TP monitors, since output data is written to a work file.
Records which have been exported can be subsequently imported (copied back into the set of ASF nucleus records) using the IMPORT option in the same menu.
| Warning: If a Store Profile is used to create ASF nucleus or trend records, and these records are subsequently exported, the Store Profile must not be deleted, otherwise you cannot reload the records with the Import option. The reason is that the ASF records contain the ID (in numerical form) of the Store Profile which created them, so the Store Profile must still exist when records are imported, otherwise an invalid reference occurs. You can, however, use the Transfer option in the ASF Utilities Menu to reload the records. |
The Import option copies nucleus records from the external work file 1 into the set of ASF nucleus records, according to the selection criteria which you enter in the input data fields of the menu. If you enter data for more than one input data field, then records will be copied only if they meet all of the selection criteria.
If an imported record already exists as a nucleus record, an error message is generated and the imported record is rejected. After this the import continues.
The external work file must be in the format which is created by the EXPORT option in the same menu. The external work file is specified in the JCL in the same way as for the EXPORT option (see above).
The external work file must be defined with the following Natural parameter:
WORK=((1),OPEN=ACC)
This function runs only in batch mode with most TP monitors, since input data is read from a work file.
The code of the service you wish to activate.
The starting date/time and the end date/time of the time frame to be used for the selected service.
You can specify the date in either absolute or relative format. For further details, refer to the section Absolute and Relative Date Format.
The name of the Store Profile which was used by the Store Program while the data was being collected. Type "*" to get an active help list.
The Store Type used by the Store Program while the data was being collected. Type "*" to get an active help list.
The Evaluation can be based on nucleus data stored by the Store Program or trend data created by running the service "Store Trend Records" (code T in the Main Menu). The choices are: ALL (both nucleus and trend data), NU (nucleus data only) and TR (trend data only). Normally, NU should be used. Type "*" to get an active help list.
The ID of the database for which the selected service applies.
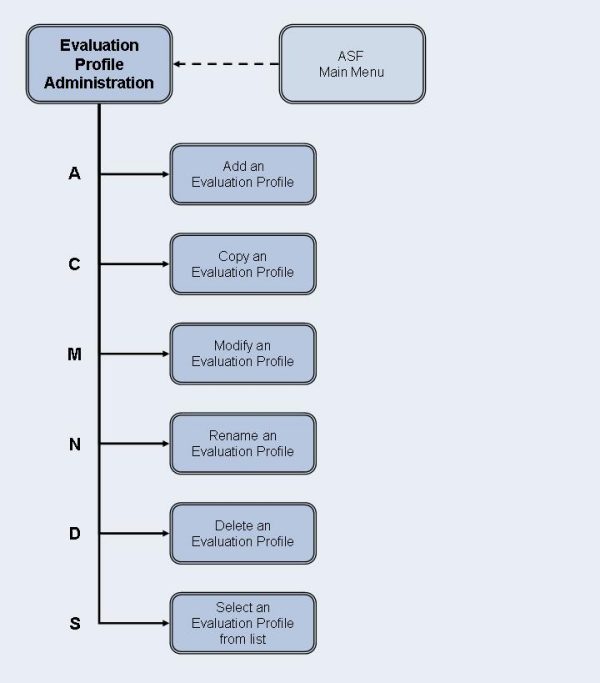
Figure 3-14: Evaluation Profile Administration Menu
15:43:45          *** A D A B A S  Statistics Facility ***          2008-01-23
USERID             - Evaluation profile administration -            MPE00001


                   Code                 Service
                 -------  -------------------------------------
                    A     Add an evaluation profile
                    C     Copy an evaluation profile
                    M     Modify an evaluation profile
                    N     Rename an evaluation profile
                    D     Delete an evaluation profile
                    S     Select evaluation profile from list
                    ?     Help
                    .     Terminate
                 -------  -------------------------------------

       Enter code : _
          Profile : ________________
  Evaluation type : __

     Direct command ==> _______________________________________________________
Enter-PF1---PF2---PF3---PF4---PF5---PF6---PF7---PF8---PF9---PF10--PF11--PF12---
Help More Term Menu |
Figure 3-15: Menu for Evaluation-Profile Administration
This screen is used for the administration of Evaluation Profiles. By selecting the appropriate code, services to add new profiles, or to modify, rename, copy or delete existing profiles can be selected.
This menu is reached by selecting the service code "E" in the main menu.
You use several screens when adding or modifying an Evaluation Profile, depending on the Evaluation Type. The screens are:
Evaluation Profile administration
Profile Element: Accumulation (types 1-8)
Profile Element: Limits (types 9-10)
Profile Element: Units
Link databases to profile
Link files to database (types 5-10)
The screens are accessed as shown in the following diagram.
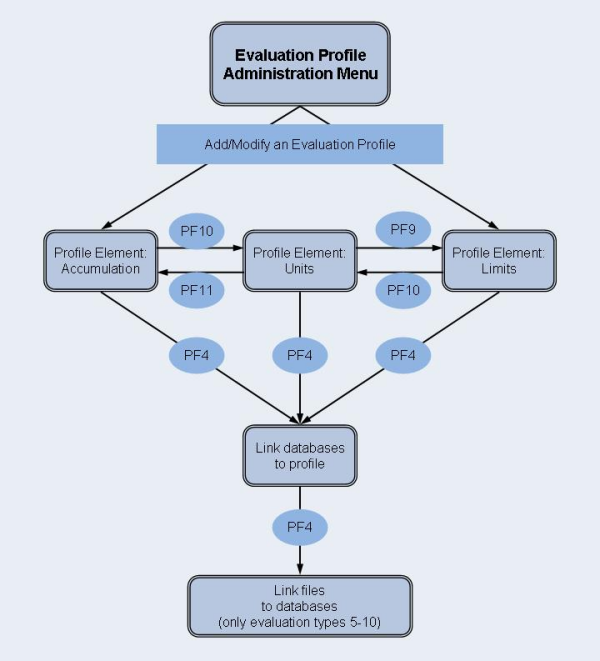
Figure 3-16: Adding/Modifying an Evaluation Profile
Select this service to add a new Evaluation Profile to the list of evaluation profiles. When you type the name of the new profile at the "Profile:" prompt and press ENTER, a screen appears in which you can optionally supply an alias name for the new profile.
An alias name can be up to 3 characters long. If you type an alias name, it can be used subsequently instead of the profile name in any input field which requires a profile name. If you do not wish to provide an alias name for the profile, simply press ENTER.
If you specify an Evaluation Type 1-8, the service "Profile Element: Accumulation" will be started. If you specify an Evaluation Type 9 or 10, the service "Profile Element: Limits" will be started.
Select this service to copy an existing Evaluation Profile to a new Evaluation Profile. Type the name of the existing profile in the "Profile" input field. When you press ENTER, a screen appears in which you specify the name and alias of the new profile, and also the Evaluation Type of the new profile.
Select this service to modify an existing Evaluation Profile. If you specify an Evaluation Type 1-8, the service "Profile Element: Accumulation" will be started. If you specify an Evaluation Type 9 or 10, the service "Profile Element: Limits" will be started.
Select this service to change the name of an Evaluation Profile or the alias or both. A screen appears in which you can overwrite the existing names with new names.
Select this service to delete an existing Evaluation Profile. Type the name of the profile to be deleted in the "Profile" input field. A screen appears in which you must type the name (again!) and alias of the profile. After you press ENTER, you will be prompted to press ENTER again to confirm the deletion.
Select this service to start the active help function for the "Profile" input field.
Enter the code of the service you wish to activate.
The name of the Evaluation Profile (or the alias name, if it exists) which ASF will use for the selected service. Type "*" to get an active help list.
The type (1-10) of report which ASF will generate. Type "*" to get an active help list.
16:28:04           **** A D A B A S Statistics Facility ****        2008-01-23
USERID                - Profile element : Accumulation -            MPXK0001


  Prof.: EVAL-01          1  One DB in point in time (DB) V:Fields H:Times

  Field Name       ! Seq ! Min ! Max ! Sum ! Avr ! Val ! Disp ! Det
  -----------------+-----+-----+-----+-----+-----+-----+------+---------< ALL >
  ________________ ! ___ !  __ !  __ !  __ !  __ !  __ !  __  !  __
  ________________ ! ___ !  __ !  __ !  __ !  __ !  __ !  __  !  __
  ________________ ! ___ !  __ !  __ !  __ !  __ !  __ !  __  !  __
  ________________ ! ___ !  __ !  __ !  __ !  __ !  __ !  __  !  __
  ________________ ! ___ !  __ !  __ !  __ !  __ !  __ !  __  !  __
  ________________ ! ___ !  __ !  __ !  __ !  __ !  __ !  __  !  __
  ________________ ! ___ !  __ !  __ !  __ !  __ !  __ !  __  !  __
  ________________ ! ___ !  __ !  __ !  __ !  __ !  __ !  __  !  __
  ________________ ! ___ !  __ !  __ !  __ !  __ !  __ !  __  !  __
  ________________ ! ___ !  __ !  __ !  __ !  __ !  __ !  __  !  __


     Direct command ==> _______________________________________________________
Enter-PF1---PF2---PF3---PF4---PF5---PF6---PF7---PF8---PF9---PF10--PF11--PF12---
Help More Term DBs Add Save - + Units Menu |
Figure 3-17: Menu for Profile Element: Accumulation.
This screen is used to define the types of accumulation to be displayed when the Evaluation Profile is used in an Evaluation Report.
This screen can be selected in several ways:
By choosing option "A" (add an evaluation-profile) or "M" (modify an evaluation-profile) in the "Evaluation-profile administration" screen, if the Evaluation Type is 1-8.
By pressing PF11 in the "Profile Element: Units" screen.
At most 10 ASF data field names can be displayed on one screen. If you have defined an Evaluation Profile which specifies more than 10 fields, then pressing the PF8 key will scroll forwards through the list. Similarly, pressing the PF7 key will scroll backwards through the list.
To add a new field to the list, you can do any one of the following:
If there is an unused position in the "Field Name" column, you can type the name of the data field directly at that position. If the current screen is full, you can scroll forward page by page to the end of the list by typing the PF8 key repeatedly, until an unused position is displayed.
You can type the two characters ". I" over the first two characters of an existing field name. This causes a new empty line to be inserted between two existing lines. You can then use the new empty line for typing in the name of a new data field.
Instead of the field name, you can also type the internal field number as short cut for the field. The internal field numbers are listed in the "Nr." column in the Select Fields screen. Note that internal field numbers can change with new ASF releases.
You can select the active help by typing an asterisk ("*") in any field in the "Field Name" column, even if the field is not blank, or by pressing the PF5 key ("Add"). The active help is described below in more detail. The fields which you select in the active help will be inserted after the line with the "*" or, if you have pressed the PF5 key, at the end of the list.
If you wish to change the order of field names in the "Field Name" column, the simplest method is to overwrite the sequence number in the "Seq" column. If, for example, you originally defined a particular data field at the position with sequence number 4, and you want to move it to position number 1, then overwrite the "4" in the "Seq" column with "1", then press ENTER. The list of data fields will be reordered so that the data field which was previously at position 4 is now at position 1.
You can select the active help at the field selection by typing an asterisk ("*") in the first position of any field in the "Field Name" column or by pressing the PF5 key ("Add"). The screen "Active help: Select groups" is displayed.
16:44:59           **** A D A B A S Statistics Facility ****        2008-01-23
                        - Profile element : Accumulation -            MPXK0001

   +---------------------< Select groups    page  1 >---------------< ALL >--+
   !                                                                         !
   !  Mk Nr. Group Name         Sel Max ! Mk Nr. Group name         Sel Max  !
   !  ----------------------------------+----------------------------------  !
   !  __   1 ADARUN-Parameter     0  25 ! __  11 High water marks     0   8  ! >
   !  __   2 Session Informatio   0  16 ! __  13 Tech. ASF fields     0  17  !
   !  __   3 Physical DB-Layout   0   9 ! __  14 User defined field   0  20  !
   !  __   4 IO-Data              0   9 !                                    !
   !  __   5 Cmd distr. source    0   4 !                                    !
   !  __   6 Cmd distr. thread    0 251 !                                    !
   !  __   7 Cmd distr. type      0  22 !                                    !
   !  __   8 User calls           0   6 !                                    !
   !  __   9 Run time info        0   7 !                                    !
   !  __  10 Call duration (mil   0  21 !                                    !
   !                                             Total ............     415  !
   +-------------------------------------------------------------------------+

      Direct command ==> _______________________________________________________
 Enter-PF1---PF2---PF3---PF4---PF5---PF6---PF7---PF8---PF9---PF10--PF11--PF12---
Help More Term All Selct Menu |
Figure 3-18: Active help: Select groups.
This screen shows how many data fields for each group are available for the given Evaluation Type (column "Max") and how many of them are currently selected (column "Sel"). The total number of the selected and available fields is also displayed.
You can mark a group with the following line commands:
| A | Select all fields of the group. |
| D | Delete all selections of the group. |
| X | Display the data fields of the group for further selection. |
Pressing the PF5 key ("All") is like marking all groups with "X". If you have marked any group with "X" or you have pressed the PF5 key, the "Active help: Select fields" screen is displayed.
16:44:59           **** A D A B A S Statistics Facility ****        2008-01-23
                       - Profile element : Accumulation -            MPXK0001

  +---< Select fields of group 2: 'Session Information' page  1 >--< ALL >--+
  !                                                                         !
  !  Mk Nr. Field name          State  ! Mk Nr.Field name           State   !
  !  ----------------------------------+----------------------------------  !
  !  __  29 DBID                       ! __  39 DURATION                    ! >
  !  __  30 DB-NAME                    ! __  40 WAIT-TIME                   !
  !  __  31 SVC                        ! __  41 CPU-TIME                    !
  !  __  32 NUCID                      ! __  42 DATE NUC-START              !
  !  __  33 VERSION                    ! __  43 TIME NUC-START              !
  !  __  34 DATE LOADED                ! __  44 NUC-RUN-TIME                !
  !  __  35 TIME LOADED                !                                    !
  !  __  36 MAXNR OF FILES             !                                    !
  !  __  37 NR FILES LOADED            !                                    !
  !  __  38 CURR. LOG TAPE             !                                    !
  !                                                                         !
  +-------------------------------------------------------------------------+

     Direct command ==> _______________________________________________________
Enter-PF1---PF2---PF3---PF4---PF5---PF6---PF7---PF8---PF9---PF10--PF11--PF12---
Help More Term Selct - + Prev Next Menu |
Figure 3-19: Active help: Select fields.
In this screen, the relevant data fields for the given Evaluation Type of the selected group are displayed. The "State" column indicates whether the field is already selected. You can select the fields by marking them with "X" or reverse the selection with "D". You can scroll through the list by using the PF7 and PF8 keys as usual. With the PF10 and PF11 keys you can go to the previous or next group when you have marked more than one group in the group menu.
When you have finished marking your selections, you must press PF6 to store them. Then the next selected group is displayed. After the last group, the group selection screen is displayed again. If you press here PF6 again, the active help screen is deselected. If you press PF3 while the active help screen is displayed, then the active help screen is deselected and all of the marked data fields are ignored.
The number "Nr." indicates the internal field number which can be used as abbreviation when selecting fields in the "Profile element : Accumulation" screen.
You can enter an "x" in one or more of the columns Min, Max, Sum, Avr, Val, Disp and Det for each of the specified field names. Each such mark means that the appropriate statistical function will be activated for that field when the Evaluation Profile is used to create an Evaluation Report. The statistical functions are:
| Statistical Function | Meaning |
|---|---|
| Min | The minimum value recorded for the field in question is required. |
| Max | The maximum value recorded for the field in question is required. |
| Sum | The total of all recorded data for the field is required. |
| Avr | The average of the recorded data for the field is required. |
| Val | The most recent value recorded of the field. For evaluations of type 2 or 6 an additional line lists this value. For the other evaluation types, the recorded data is listed anyway. Therefore no additional column is displayed. |
| Disp | This is the coefficient of dispersion, also known as the coefficient of variation. It is calculated by dividing the standard deviation by the mean, and normally results in a value between 0 and 100. The coefficient of dispersion is a measure of the deviation of the set of data from the average value. A value close to 0 indicates that the data points lie near to the average value. |
| Det | This is the coefficient of determination, which is the square of the coefficient of correlation. The coefficient of determination is a measure of the linearity of the data sample. This value is expressed as a percentage, whereby a value close to 100 indicates a very linear relation, and a value less than 50 indicates a non-linear relation. (This value is indicated by the term "Accuracy" in the output of a Critical Trend Report). |
The usual meanings apply for the PF-keys PF1 (help), PF3 (terminate screen, return to calling screen), PF12 (exit to main menu).
| PF-key | Screen selected |
|---|---|
| PF4 | Link Databases to profile. |
| PF5 | Active help: Select groups/fields. |
| PF10 | Profile element: Units. |
17:14:49           **** A D A B A S Statistics Facility ****        2008-01-23
USERID                  - Profile element : Limits -                MPXL0001


  Prof.: EVAL-09          9  Critical report : List of fields, databases and f

  Field Name       ! Seq ! Rel.!  Limit     Unit! Join! Rel.!  Limit
  -----------------+-----+-----+-----------+----+-----+-----+-----------< ALL >
  ________________ ! ___ !  __ ! _________ ! __ !     !  __ ! _________
  ________________ ! ___ !  __ ! _________ ! __ !     !  __ ! _________
  ________________ ! ___ !  __ ! _________ ! __ !     !  __ ! _________
  ________________ ! ___ !  __ ! _________ ! __ !     !  __ ! _________
  ________________ ! ___ !  __ ! _________ ! __ !     !  __ ! _________
  ________________ ! ___ !  __ ! _________ ! __ !     !  __ ! _________
  ________________ ! ___ !  __ ! _________ ! __ !     !  __ ! _________
  ________________ ! ___ !  __ ! _________ ! __ !     !  __ ! _________
  ________________ ! ___ !  __ ! _________ ! __ !     !  __ ! _________
  ________________ ! ___ !  __ ! _________ ! __ !     !  __ ! _________


     Direct command ==> _______________________________________________________
Enter-PF1---PF2---PF3---PF4---PF5---PF6---PF7---PF8---PF9---PF10--PF11--PF12---
Help More Term DBs Add Save - + Units Menu |
Figure 3-20: Menu for Profile Element: Limits.
In this screen, the user specifies "critical" limits for the ASF fields. These critical limits are the basis of the evaluations for Critical Reports and Critical Trend Reports.
This screen can be selected in several ways:
By choosing option "A" (Add an evaluation-profile) or "M" (Modify an evaluation-profile) in the "Evaluation-profile administration" menu if the Evaluation Type is 9 or 10.
By pressing PF9 in the "Profile Element: Units" screen if the Evaluation Type is 9 or 10.
For each data field, you can define either one or two critical values. The data you specify for the critical values determines the conditions under which the data field will be included in a Critical Report or Critical Trend Report. Each critical value is defined by:
A numerical value, which you type in the "Limits" column.
A unit of measurement, which you type in the "Unit" column.
A mathematical relation, which you type in the column "Rel", which ASF uses when comparing the data field's current value to the limit value.
See the following sections Units of measurement and Mathematical relations for further details.
If you define two critical limits for a given data field, the limit values are joined with an "OR". See the following section Combining critical values for details.
For each data field, you can define either one or two critical values. The Limit field is numeric.
The allowable units of measurement are:
| Symbol | Meaning |
|---|---|
| BL | Blocks |
| CY | Cylinders |
| MB | Megabytes |
| BY | Bytes |
| SE | Seconds |
| PM | per minute |
| PC | percent |
Note:
For dimensionless data fields such as READ ASSO, the unit field
is left blank. In general, you can only specify a unit which results in a
numeric value, e.g. you can not use the units "hours" or "days".
The allowable relations are shown in the following table. Relations are expressed by two-letter abbreviations as shown in the following table. The usual mathematical relational operators can be used as well.
| Abbreviation | Meaning | |
|---|---|---|
| EQ | = | equals |
| NE | <> | is not equal to |
| GE | >= | is greater than or equal to |
| LE | <= | is less than or equal to |
| GT | > | is greater than |
| LT | < | is less than |
You can define two critical limits for a data field. If you define two critical limits, the data field is critical if at least one of the conditions is true.
The following example shows critical values defined for the data field "ASSO USED" in the Evaluation Profile "TEST-EVAL". The data shown here means: the value of the data field will be critical when it is greater than or equal to 90 %, or when it is less than or equal to 5 %. The word "OR" is displayed automatically in the Join column when you define the second critical value for a data field.
14:23:59           **** A D A B A S Statistics Facility ****        23.11.2007
USERID                  - Profile element : Limits -                MPXL0001


   Prof.: TEST-EVAL        9  Critical report : List of fields, databases and f

   Field Name       ! Seq ! Rel.!  Limit     Unit! Join! Rel.!  Limit
   -----------------+-----+-----+-----------+----+-----+-----+-----------< ALL >
ASSO USED ! 1 ! GE ! 90 ! PC ! OR ! LE ! 5 |
Figure 3-21: Specifying critical values
The "Seq" column can be used to change the order of the fields listed. See the description of the screen "Profile Element: Accumulation" for details.
17:50:57           **** A D A B A S Statistics Facility ****        2008-01-23
USERID                  - Profile element : Units -                 MPXU0001

  Prof.: EVAL-09          9  Critical report : List of fields, databases and f

                   !     !         !    ! Da ! Hr ! Se !    !     ! 1/call
  Field Name       ! Seq ! Default ! Bl ! Cy ! MB ! BY !  % ! Nom ! 1/min
  -----------------+-----+---------+----+----+----+----+----+-----+-----< ALL >
  ________________ ! ___ !         ! __ ! __ ! __ ! __ ! __ ! __  ! __
  ________________ ! ___ !         ! __ ! __ ! __ ! __ ! __ ! __  ! __
  ________________ ! ___ !         ! __ ! __ ! __ ! __ ! __ ! __  ! __
  ________________ ! ___ !         ! __ ! __ ! __ ! __ ! __ ! __  ! __
  ________________ ! ___ !         ! __ ! __ ! __ ! __ ! __ ! __  ! __
  ________________ ! ___ !         ! __ ! __ ! __ ! __ ! __ ! __  ! __
  ________________ ! ___ !         ! __ ! __ ! __ ! __ ! __ ! __  ! __
  ________________ ! ___ !         ! __ ! __ ! __ ! __ ! __ ! __  ! __
  ________________ ! ___ !         ! __ ! __ ! __ ! __ ! __ ! __  ! __
  ________________ ! ___ !         ! __ ! __ ! __ ! __ ! __ ! __  ! __


     Direct command ==> _______________________________________________________
Enter-PF1---PF2---PF3---PF4---PF5---PF6---PF7---PF8---PF9---PF10--PF11--PF12---
Help More Term DBs Add Save - + Limit Menu |
Figure 3-22: Menu for Profile Element: Units.
In this screen, the units of the data fields to be used in the output report are specified.
This screen can be selected in several ways:
by pressing PF10 in the "Profile Element: Accumulation" screen
by pressing PF10 in the "Profile Element Limits" screen
The selectable units are listed in the following table. Some columns are used for two different units. It depends on the field specified which of them is used.
| Unit | Meaning | Description |
|---|---|---|
| Bl | Blocks | The size value is displayed in units of blocks. |
| Cy | Cylinders | The size value is displayed in units of cylinders. |
| MB | Megabytes | The size value is displayed in units of megabytes (millions of bytes). |
| BY | Bytes | The size value is displayed in units of bytes. |
| Se | Seconds | Some data fields represent a time as for example the field "CPU-TIME". These fields have in the "Default" column the entry "SE" (seconds). If the column "Se" (seconds) or no column is marked for such a field, the output report will show the total number of seconds. |
| Hr | Hours | The time value is displayed as "hours:minutes:seconds". |
| Da | Days | The time value is displayed as "days:hours:minutes". |
| % | Percent | The value is displayed as percentage. The basic value used for the percentage calculation can be found in the section ASF Fields in the ASF Examples documentation. |
| Nom | Actual Value | The actual value of the field. This is also the default if no column is selected. |
| 1/min | Per Minute | Some data fields represent the number of times a particular event occurred since the Adabas nucleus was started. An example is the data field "READ ASSO", whose value is incremented by 1 every time a READ operation occurs on ASSO. If the column "1/min" is marked, the output report will express this value as an average number of occurrences per minute. |
| 1/call | Per Call | Call duration fields (e.g. DUR-L9) represent the time in milliseconds the nucleus spent to perform a specific type of call (e.g. all L9 calls) since nucleus start. If the column "1/call" is marked, the output report will express this value as an average time spent per call. |
For each data field, you can choose one or more units of measurement to be output in any Evaluation Report which uses this Evaluation Profile. ASF indicates the default unit of measurement for each field in the column "Default".
If any of the unit columns is marked with an "x", then the corresponding ASF field will appear in the output report in the appropriate format.
If you press ENTER before selecting at least one unit of measurement for a given field, then ASF automatically places a mark in the column representing the default unit of measurement for that field.
Not all units are applicable for all fields. If you select a unit which is not allowed for the given field, ASF displays an error message. The units available for each field are listed in the section ASF Fields in the ASF Examples documentation.
For evaluations of type 9 or 10, only one unit can be selected per field.
When you press PF6, all of the marked data is saved in the Evaluation Profile. Furthermore, if you have specified "N" in the "Stay after SAVE" field in the User Profile (see the section User Profile Maintenance), the screen will be automatically deselected.
The "Seq" column can be used to change the order of the fields listed. See the description of the screen "Profile Element: Accumulation" for details.
18:51:14           **** A D A B A S Statistics Facility ****        2008-01-23
USERID                  - Profile administration -                  MPXXD001

     +-------------------< link databases to profile >-------------< ALL >-+
     !                  Profile :  EVAL-05                                 !
     !                                                                     !
     ! DB-ID   DB-Name           dyn     DB-ID   DB-Name           dyn     !
     ! -----   ----------------  ---    ------   ----------------  ---     !
     ! _____                     __      _____                     __      !
     ! _____                     __      _____                     __      !
     ! _____                     __      _____                     __      !
     ! _____                     __      _____                     __      !
     ! _____                     __      _____                     __      !
     ! _____                     __      _____                     __      !
     ! _____                     __      _____                     __      !
     ! _____                     __      _____                     __      !
     ! _____                     __      _____                     __      !
     ! _____                     __      _____                     __      !
     +---------------------------------------------------------------------+

      Direct command ==> _______________________________________________________
 Enter-PF1---PF2---PF3---PF4---PF5---PF6---PF7---PF8---PF9---PF10--PF11--PF12---
Help More Term Files Save - + Menu |
Figure 3-23: Menu for Link Databases to Profile.
Note:
The columns marked "dyn" appear when defining a Store Profile, or
when defining an Evaluation Profile with an Evaluation Type of
5-10.
This screen is used to define databases in Evaluation Profiles and Store Profiles.
For Evaluation Profiles, the definition of databases is optional. Specifying databases restricts the evaluation to the given values. If you do not specify any database, the databases and files are linked dynamically to the profile when the evaluation is performed. In this case, all databases and files found in the data are used.
For Store Profiles, the definition of databases is mandatory.
This screen can be selected as follows:
When the "Add a store profile" or "Modify a store profile" services in the "Store-profile administration" screen are selected.
By pressing the PF4 key in any of the screens "Profile Element: Accumulation", "Profile Element: Limits" or "Profile Element: Units".
The screen contains 20 input fields (two columns of 10 input fields each) which you can use for typing in database IDs. The database IDs must be numeric. When a new profile is being defined, these fields are originally empty. When you modify an existing profile, the values which you previously entered for these fields are redisplayed. New database IDs can be typed in any blank input field. If there is no blank input field available, you can press PF8 to scroll forward to the next 20 input fields. You can also type the two characters ". I" in any input field, even if that field is not blank, then press ENTER. This causes a blank input field to be created, which you can then use to type in the new database ID. You can remove a database ID from the list by overwriting it with blanks and then pressing ENTER.
You can specify at most 256 different database IDs in one profile. Each database ID must be in the range from 1 to 65535.
For a Store Profile or an Evaluation Profile of type 5-10, you can select files by positioning the cursor to the corresponding database entry and pressing PF4. You can also type ".F" in the DB-ID field or "F" in the "dyn" field. The "Link Files to Database" screen is displayed.
When defining a Store Profile, or when defining an Evaluation Profile with an Evaluation Type of 5-10, the extra columns marked "dyn" are displayed. If you mark the dyn-field corresponding to a DBID, then the list of files corresponding to the database (accessed by pressing PF4) will not be evaluated when the Store Program or an Evaluation is running. Instead, ASF will dynamically include all currently active files for the database in its processing, if the profile is a Store Profile, or, in the case of an Evaluation Profile, all possible files for the database. In this case, the number of files is not restricted to 256, as it is when you specify the file IDs explicitly. If you later remove the "dyn"-mark from the DBID, the Store Program and the Evaluations revert to using the explicit list of files which you have specified for the database.
The "dyn" column is not displayed for Evaluation Profiles with an Evaluation type of 1-4 since these profiles contain no file-related ASF data fields.
When you have finished typing the database IDs, you must press PF6 before pressing PF3, otherwise ASF ignores your changes and returns to the calling screen.
When you press PF6, all of the marked data is saved in the Evaluation or Store Profile. Furthermore, if you have specified "N" in the "Stay after SAVE" field in the User Profile (see the section "User Profile Maintenance"), the screen will be automatically deselected.
18:52:25           **** A D A B A S Statistics Facility ****        2008-01-23
USERID                  - Profile administration -                  MPXXDF01

    +-------------------< link databases to profile >-------------< ALL >-+
    !  +---------------------< link files to database >--------------< ALL >-+
    !  !    DB :   1424  Database 01424       Profile :  EVAL-05             !
    !  !                                                                     !
    !  ! File     Name                     File     Name                     !
    !  ! -----    ----------------         -----    ----------------         !
    !  ! _____                             _____                             !
    !  ! _____                             _____                             !
    !  ! _____                             _____                             !
    !  ! _____                             _____                             !
    !  ! _____                             _____                             !
    !  ! _____                             _____                             !
    !  ! _____                             _____                             !
    !  ! _____                             _____                             !
    !  ! _____                             _____                             !
    +- ! _____                             _____                             !
       +---------------------------------------------------------------------+
     Direct command ==> _______________________________________________________
Enter-PF1---PF2---PF3---PF4---PF5---PF6---PF7---PF8---PF9---PF10--PF11--PF12---
Help More Term Add Save - + Prev Next Menu |
Figure 3-24: Menu for Link Files to Profile
This screen is used to specify which files in a particular database should be included in Store Profile or an Evaluation Profile.
Note:
For Evaluation Profiles, this screen can only be selected if the
Evaluation Type is 5-10.
This screen is selected by positioning the cursor on a database entry in the screen "Link databases to profile" and pressing PF4 or by typing ".F" in the DB-ID field or "F" in the "dyn" field.
The screen contains 20 input fields (two columns of 10 input fields each) which you can use for typing in file IDs. The input fields are directly under the heading "File". The file IDs must be numeric. When a new profile is being defined, these fields are originally empty. When you modify an existing profile, the values which you previously entered for these fields are redisplayed. New file IDs can be typed in any blank input field. If there is no blank input field available, you can press PF8 to scroll forward to the next 20 input fields. You can also type the two characters ". I" in any input field, even if that field is not blank, then press ENTER. This causes a blank input field to be created, which you can then use to type in the new file ID. You can remove a file ID from the list by overtyping it with blanks and then pressing ENTER. You can specify at most 256 different file IDs for each database ID. Each file ID must be in the range from 1 to 5000.
When you have finished typing the file IDs, you must press PF6 before pressing PF3, otherwise ASF ignores your changes and returns to the calling screen.
When you press PF6, all of the marked data is saved in the Evaluation Profile. Furthermore, if you have specified "N" in the "Stay after SAVE" field in the User Profile (see the screen "Define User Profile"), then the screen will be automatically deselected.
When you press PF10 or PF11, the files of the previous or next DBID listed in the "Link Databases to Profile" function are displayed. Before the next/previous database is displayed, ASF saves the changes of the current database automatically.
You can select the active help at the file selection by pressing the PF5 key or typing "*" in the first position of any file ID. The file IDs that you select in the active help will be inserted after the line with the "*" or, if you have pressed the PF5 key, at the end of the list.
18:52:25           **** A D A B A S Statistics Facility ****        2008-01-23
USERID                  - Profile administration -                  MPXXDF01

    +-------------------< link databases to profile >-------------< ALL >-+
    !  +--< Select Files of DB 1424  ==> Row     1 of    10 >-< ALL >-+ LL >-+
    !  !                                                              !      !
    !  ! Mk  File  Name                   Mk  File  Name              !      !
    !  ! -------------------------        --------------------------  !      !
    !  !  __     1 Checkpoint-file                                    !      !
    !  !  __     5 NAT-FNAT                                           !      !
    !  !  X_     6 NAT-USER                                           !      !
    !  !  __     7 NDV-SYSF                                           !      !
    !  !  __     8 NAT-SECU                                           !      !
    !  !  __    14 ASF-DATA                                           !      !
    !  !  __    15 ASF-PROFILE                                        !      !
    !  !  X_   101 Employees                                          !      !
    !  !  X_   102 Miscellaneous                                      !      !
    !  !  X_   103 Vehicles                                           !      !
    +- ! Start file:     1                                            !      !
       +--------------------------------------------------------------+ -----+
     Direct command ==> _______________________________________________________
Enter-PF1---PF2---PF3---PF4---PF5---PF6---PF7---PF8---PF9---PF10--PF11--PF12---
Help More Term Selct - + Menu |
Figure 3-25: Active help: Select files
This screen shows you the list of currently active files of the selected database. Files already selected are marked with "X". You can select new file IDs by marking them with "X". You can deselect a file ID by overtyping the "X" with blanks.
The "Start file" field displays the first file ID of the current page. If you overwrite this field, the list will start from the specified file ID. If the corresponding file is not active, the list will start with the next smaller file ID or with the first page. If the value is higher than the highest possible file ID, the last page will be displayed.
When you have finished marking you selections, you must press PF6 to store them. If you press PF3 while the active help screen is displayed, then the active help screen is deselected and all your changes are ignored.
Note:
In the active help screen of the file selection, you can only
select file IDs of currently active files. In the screen "Link Files to
Database" you can even specify file IDs of inactive files.
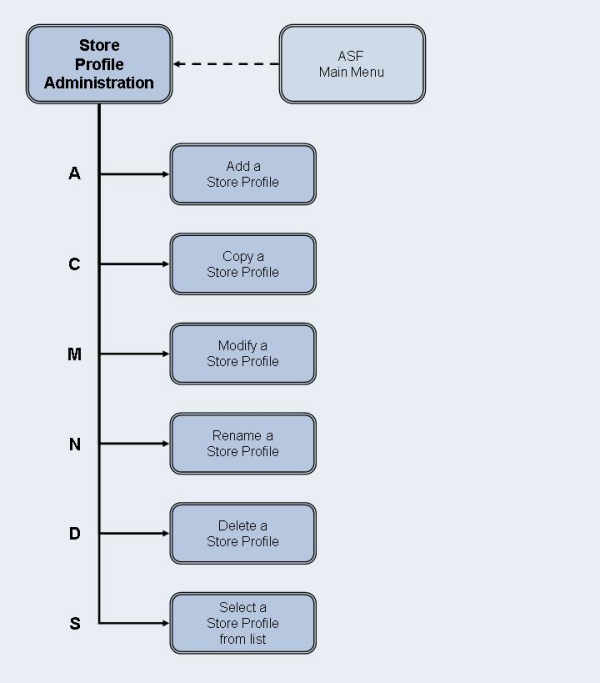
Figure 3-26: Store Profile Administration Menu
18:55:02          *** A D A B A S  Statistics Facility ***          2008-01-23
USERID                - Store profile administration -              MPS00001


                   Code                 Service
                 -------  -------------------------------------
                    A     Add a store profile
                    C     Copy a store profile
                    M     Modify a store profile
                    N     Rename a store profile
                    D     Delete a store profile
                    S     Select store profile from list
                    ?     Help
                    .     Terminate
                 -------  -------------------------------------

       Enter code : _

          Profile : ________________

     Direct command ==> _______________________________________________________
Enter-PF1---PF2---PF3---PF4---PF5---PF6---PF7---PF8---PF9---PF10--PF11--PF12---
Help More Term Menu |
Figure 3-27: Menu for Store-Profile Administration
This screen is used for the administration of Store Profiles. By selecting the appropriate code, services to add new profiles, or to modify, rename, copy or delete existing profiles can be selected.
This menu is reached by selecting the service code "S" in the main menu.
You use several screens when adding or modifying a Store Profile. The screens are:
Store-Profile administration.
Link databases to profile.
Link files to database.
The screens are accessed as follows:
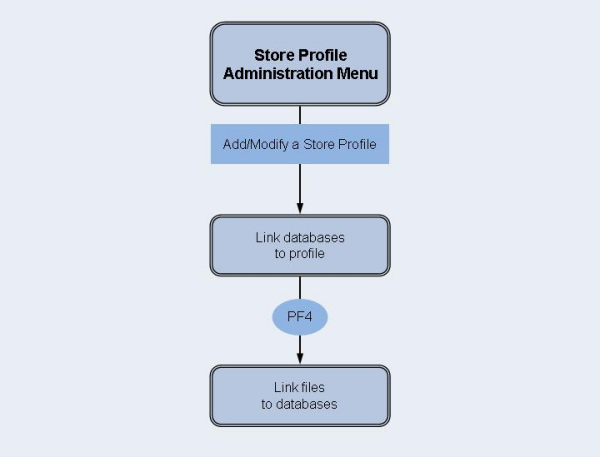
Figure 3-28: Adding/modifying a Store Profile
The "Link databases to profile" and "Link files to database" screens are described in the section Evaluation Profile Administration.
Select this service to add a new Store Profile to the list of Store Profiles. When you type the name of the new profile at the "Profile:" prompt and press ENTER, a screen appears in which you can optionally supply an alias name for the new profile.
An alias name can be up to 3 characters long. If you type an alias name, it can be used subsequently instead of the profile name in any input field which requires a profile name. If you do not wish to provide an alias name for the profile, simply press ENTER.
Subsequently, the screen "Link databases to profile" appears.
Select this service to copy an existing Store Profile to a new Store Profile. Type the name of the existing Store Profile in the "Profile" input field. When you press ENTER, a screen appears in which you specify the name and alias of the new profile. You do not have to specify an Evaluation Type, since this only applies to Evaluation Profiles.
Select this service to modify an existing Store Profile. Type the name or the alias of the Store Profile you wish to modify in the "Profile" input field. Subsequently the screen "Link databases to profile" appears. You can then add new databases and files to the Store Profile, or remove databases and files from the profile.
Select this service to change the name of a Store Profile or the alias or both. A screen appears in which you can overwrite the existing names with new names.
Select this service to delete an existing Store Profile. Type the name of the Store Profile to be deleted in the "Profile" input field. A screen appears in which you must type the name (again!) and alias of the Store Profile. After you press ENTER, you will be prompted to press ENTER again to confirm the deletion.
| Warning: If a Store Profile is used to create ASF nucleus or trend records, and these records are subsequently exported, the Store Profile must not be deleted, otherwise you cannot reload the records with the Import option. The reason is that the ASF records contain the ID (in numerical form) of the Store Profile which created them, so the Store Profile must still exist when records are imported, otherwise an invalid reference occurs. You can, however, use the Transfer option in the ASF Utilities Menu to reload the records. |
Select this service to start the active help function for the "Profile" input field.
Enter the code of the service you wish to activate.
The name of the Store Profile which ASF will use for the selected service. Type "*" to get an active help list.
Note:
This option is only available when Natural Security is being used.
Furthermore, you must be registered in Natural Security as Administrator to
select this option. To add a user to the list, you must modify the Natural
Security group ASFGROUP. See the section
Step 5: Setting up User
Security in the ASF Installation documentation
for details.
18:56:41           **** A D A B A S Statistics Facility ****        2008-01-23
USERID                    - Security maintenance -                  MPA00001


                                                   !mod. !mod. !     !
                                                   !store!eval.!     !
 No  ! User-ID  ! Name                             !prof.!prof.!store!evaluate
 ----+----------+----------------------------------+-----+-----+-----+-<  ALL >
 1   ! ASFADMIN ! ASF Administrator                !  X  !  X  !  X  !   X
 2   ! BATCH    ! Batch ASF                        !  X  !  X  !  X  !   X
 2   !          !                                  !  _  !  _  !  _  !   _
 3   !          !                                  !  _  !  _  !  _  !   _
 4   !          !                                  !  _  !  _  !  _  !   _
 5   !          !                                  !  _  !  _  !  _  !   _
 6   !          !                                  !  _  !  _  !  _  !   _
 7   !          !                                  !  _  !  _  !  _  !   _
 8   !          !                                  !  _  !  _  !  _  !   _
 9   !          !                                  !  _  !  _  !  _  !   _
 10  !          !                                  !  _  !  _  !  _  !   _


     Direct command ==> _______________________________________________________
Enter-PF1---PF2---PF3---PF4---PF5---PF6---PF7---PF8---PF9---PF10--PF11--PF12---
Help Term Save - + Menu |
Figure 3-29: Menu for User Maintenance
This screen is used for the administration of user access to ASF. You use the User Maintenance service to authorize users to perform one or more of the following actions: run Evaluations, modify Store Profiles, store data or modify Evaluation Profiles.
This menu is reached by selecting the service code "U" in the main menu (if Natural Security has been installed).
You can authorize users to modify Store Profiles, modify Evaluation Profiles, store data or to run Evaluations by placing a mark in the appropriate column(s). The names of the users who are registered in the Natural Security group ASFGROUP are displayed automatically. The "Modify Evaluation Profiles" authorization includes also the authorization to modify Predefined Evaluations. When you have finished, press PF6 to save the changes.
18:59:42          *** A D A B A S  Statistics Facility ***          2008-01-23
USERID              - ASF Utilities and Services Menu  -            MUM00001

                 Code                 Service
               -------  ---------------------------------------
                  A     Condense records to average records
                  D     Condense records to delta records
                  S     Synchronize / regenerate store times
                  T     Transfer from foreign ASF system
                  V     ASF Version Information
                  F     ASF System File Maintenance
                  P     Profile Maintenance
                  X     Userexit Maintenance
                  I     ASF Application Program Interface
                 1/2    API Example 1/2
                 R/M    SYSRDC Debugger / ASF Trace Maintenance
                 ./?    Terminate / Help
               -------  ---------------------------------------
     Enter code:  _

     Direct command ==> _______________________________________________________
Enter-PF1---PF2---PF3---PF4---PF5---PF6---PF7---PF8---PF9---PF10--PF11--PF12---
Help More Term Menu |
Figure 3-33: Menu for ASF Utilities and Services
The menu lists the available ASF Utilities and Services. You can select one of the listed utilities or services by typing the corresponding one-letter code in the "Enter code" field. When you have entered the input data, press ENTER to activate the corresponding utility or service.
This menu is reached by selecting the service code "A" in the Main Menu.
The ASF Utilities and Services are described in detail in the section ASF Utilities and Services.