
This document describes the administrative tasks that you can perform with the Data Archiving for Adabas graphical user interface.
Data Archiving for Adabas services is maintained and monitored using Software AG's cross-product and cross-platform product management framework System Management Hub (SMH). If you are not familiar with using SMH, please refer to the SMH documentation for further information.
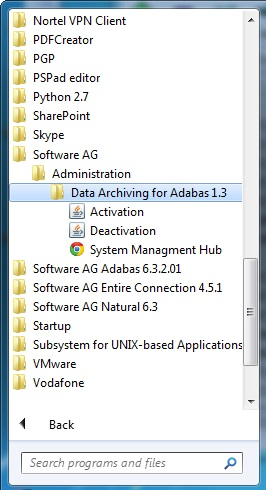
If System Management Hub is available on your local machine, the install process creates a Start Menu entry; an example screen shot follows:
If no Start Menu entry is available, go to your browser and use http://localhost:10010/smh (assuming defaults have been used for the System Management Hub install) or use your normal entry to the System Management Hub.
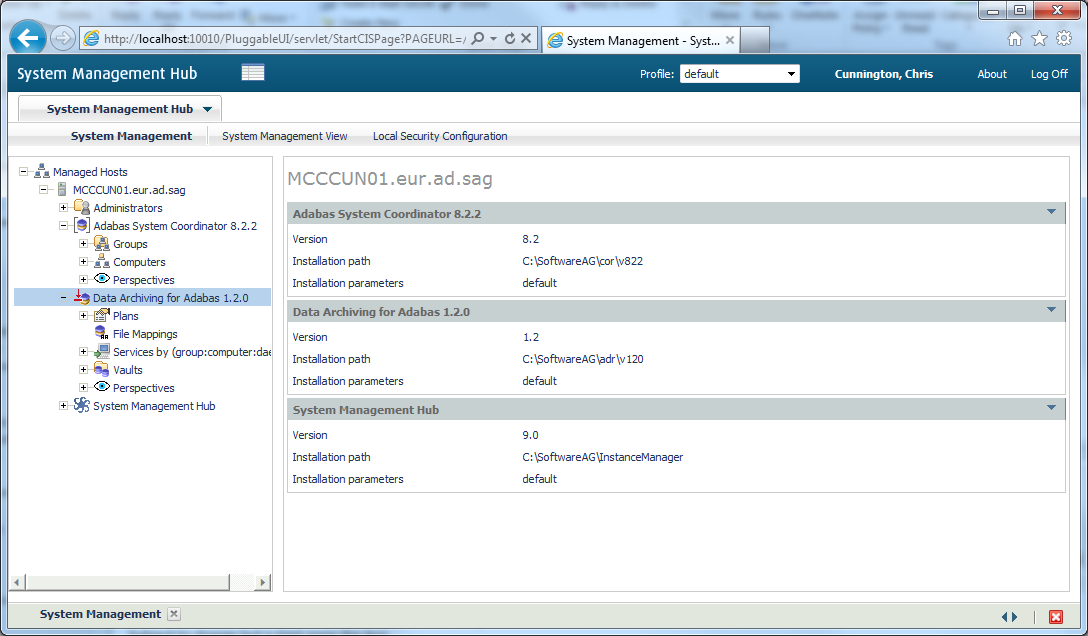
The SMH screen is divided into two frames: the navigation frame on the left; and the content frame on the right. You can navigate within the navigation tree using expand (+) and minimize (-), selecting an object and then left clicking or right clicking on the object depending on the type of operation you wish to perform.
The following is a typical SMH screen:
Vaults are flat-file stores which are used to hold archived data and any relevant metadata such as Adabas FDTs.
A Vault must be associated with every Action and contains Archives written as a result of such Actions being run.
Vaults are maintained by selecting the Vaults node within the Data Archiving for Adabas navigation tree. Selecting this node results in the following sub-nodes:
Vault Browse enables Vault content browsing and Archive recall capability.
A Vault contains Archives written as a result of Actions being run. Vault Browse lists these Archives and enables selected Archives to be recalled as required.
For efficiency, a Vault browse cache is maintained which can be refreshed on demand, and filtering enables the browse list content to be applicable to only those Archives of particular interest.
![]() To browse Archives in a Vault
To browse Archives in a Vault
Select the Vaults node within the Data Archiving for Adabas navigation tree
Select the Browse sub-node.
Select the Vault to be browsed.
The Vault Browse window lists all Archives in the selected Vault (subject to any current filter).
On selection of the Vault, sub-nodes of ‘year’ and ‘month number’ may be displayed in the navigation tree depending on the list content. Selection of these sub-nodes will automatically filter the list content in the Vault Browse window to only those Archives which match the particular year and month number of the sub-node selected.
Explicit filtering may also be performed, refer to Setting a Browse Filter for more information.
![]() To display Archive details
To display Archive details
Refer to Browsing Archives in a Vault to list the particular Archive(s) for which details are required.
To display the details for an individual Archive, click directly on its Archive–ID link. Alternatively, to display the details for multiple Archives, use the checkboxes for selection and then choose ‘Detail’ from the drop-down Operations box (this method can also be used for an individual Archive).
![]() To set a browse filter
To set a browse filter
A browse filter can be set at the Browse sub-node and also any sub-node below Browse (e.g. Vault name, year number, month number) by simply right clicking on the sub-node and selecting Set Browse Filter.
The filter applies at the user level and only a single filter can be active at any one time. To remove the filter refer to Clearing a Browse Filter.
The keyword ‘Filter:’ in the Vault Browse window indicates whether or not a browse filter is active.
![]() To clear a browse filter
To clear a browse filter
A browse filter can be cleared at the Browse sub-node and also any sub-node below Browse (e.g. Vault name, year number, month number) by simply right clicking on the sub-node and selecting Clear Browse Filter.
For efficiency, a browse cache is maintained at the Vault level. This cache is established the first time a Vault name under the Browse sub-node is selected, and then regularly refreshed automatically when the Vault content changes. The keyword ‘Vault Contents Cached At:’ in the Vault Browse window indicates when the browse cache for the current Vault was last refreshed.
If a more immediate refresh is required, this can be done manually as follows:
![]() To refresh the browse cache
To refresh the browse cache
Select the Vaults node within the Data Archiving for Adabas navigation tree.
Select the Browse sub-node.
Select and right click the Vault whose browse cache is to be refreshed, then select Refresh Browse Cache.
![]() To recall an Archive
To recall an Archive
Refer to Browsing Archives in a Vault to find the particular Archive(s) for which a recall is required.
To recall an individual Archive, use the checkbox for selection and then choose ‘Recall’ from the drop-down Operations box.
Refer to Recall Archived Data for additional information regarding the recall process.
Vault Validation is a configurable option and is intended to enable the periodic validation of the Vault contents in order to provide an early detection system in the event that the Vault contents become compromised in some way.
The validation process operates asynchronously to normal archiving operations and can be configured according to a defined schedule or simply run on demand.
Log files are created by the validation process and are listed under the corresponding Vault within the Validation sub-node.
Note:
Only Vaults with validation enabled are displayed under the
Validation sub-node.
![]() To define Vault Validation
To define Vault Validation
Vault Validation settings can only be modified when Adding a Vault or Modifying a Vault.
Refer to Vault Validation Settings for the configurable options available.
![]() To run Vault Validation on demand
To run Vault Validation on demand
Select the Vaults node within the Data Archiving for Adabas navigation tree.
Select the Validation sub-node.
Select and right click the Vault to be validated, then select Run Validation Now.
The corresponding validation log will appear in the Logs section of the Vault Validation window
Note:
Vault Validation on demand can only be run against Vaults with
validation enabled.
![]() To display Vault Validation logs
To display Vault Validation logs
Select the Vaults node within the Data Archiving for Adabas navigation tree.
Select the Validation sub-node.
Select the Vault whose validation logs are to be displayed. The Vault Validation window will appear.
The Logs section displays the validation logs (subject to any defined retention period).
![]() To delete Vault Validation logs
To delete Vault Validation logs
Select the Vaults node within the Data Archiving for Adabas navigation tree.
Select the Validation sub-node.
Select the Vault whose validation logs are to be deleted. The Vault Validation window will appear.
To delete individual logs or all logs on the current page use the checkboxes for selection and then choose ‘Delete’ from the drop-down Operations box. Alternatively, to delete all logs, right click the Vault, then select Delete All Logs.
At least one Vault must be configured to enable the storing of archive data, however, multiple Vaults can also be configured allowing the possibility of different business areas using dedicated Vaults.
Vaults are written to by archive processes called Accumulators, which are launched automatically on demand by the Data Archiving Service. An Accumulator which is launched on a particular computer must be able to identify the physical location of the Vault where the archive data is to be stored. It does this by referring to the Vault Path defined for that particular computer in the Vault configuration.
Note:
We recommend that your archived data should be maintained in Vaults
outside of the installation
directory.
![]() To add a Vault
To add a Vault
Select the Vaults node within the Data Archiving for Adabas navigation tree.
Select and right click the Configuration sub-node, then select Add Vault. The Add Vault window will appear.
Enter the following information for the new Vault:
| Field | Description |
|---|---|
| Short Name |
1-32 characters to be used as the name for the Vault. This is the name that will appear under the Vaults node within the Data Archiving for Adabas navigation tree Names are case-sensitive, the first character must be alphabetic, all other characters can be either alphabetic or numeric. The only special character permitted is underscore. |
| Description |
A textual description of the Vault. |
| Granularity |
Select the level of granularity with respect to the physical directory structure of a Vault.
Refer to Vault Granularity for more information. |
| Access path to the vault content |
The Vault Path is the physical location of the Vault, it can be HFS, a UNC path or a Windows directory. Note: |
| Computer |
Select the Computer from the drop-down box whose Vault Path is being defined. |
| Path |
For the selected Computer, specify the path to be used by the Accumulator process to access the Vault. |
If the default Vault validation settings are to be modified, refer to Vault Validation Settings.
Click the Add Vault button to add the new Vault.
![]() To modify a Vault
To modify a Vault
Select the Vaults node within the Data Archiving for Adabas navigation tree.
Select the Configuration sub-node.
Select and right click the Vault to be modified, then select Modify Vault. The Modify Vault window will appear.
Refer to Adding a Vault for an explanation of the modifiable fields
If the current Vault Validation settings are to be modified, refer to Vault Validation Settings.
Click the Save Changes button to save the changes.
Note:
When deleting a Vault, only the Vault configuration information is
deleted – the physical vault containing the archived data is not deleted. It is
the responsibility of the user to delete the physical vault if the archive data
within it is no longer required.
![]() To delete a Vault
To delete a Vault
Select the Vaults node within the Data Archiving for Adabas navigation tree.
Select the Configuration sub-node.
Select and right click the Vault to be deleted, then select Delete Vault.
A Vault cannot be deleted if it is currently the active Vault for one or more Plans/Actions. If it is not an active Vault, a confirmation window will appear.
Click the Yes button on the confirmation window to delete the Vault.
![]() To add a Vault Path
To add a Vault Path
Select the Vaults node within the Data Archiving for Adabas navigation tree.
Select the Configuration sub-node.
Select and right click the Vault to be modified, then select Add Vault Path. The Add Vault Path window will appear.
Enter the following information for the new Vault Path:
| Field | Description |
|---|---|
| Computer |
Select the Computer from the drop-down box whose Vault Path is being defined. |
| Path |
For the selected Computer, specify the path to be used by the Accumulator process to access the Vault. |
Click the Add Vault Path button to add the new Vault Path.
![]() To modify a Vault Path
To modify a Vault Path
Select the Vaults node within the Data Archiving for Adabas navigation tree.
Select the Configuration sub-node.
Select the Vault to be modified. The Vault Configuration window will appear.
In the Physical Path(s) to the Vault section, identify the computer whose Vault Path is to be modified and click on the corresponding modify icon. The Modify Vault Path window will appear.
Refer to Adding a Vault Path for an explanation of the modifiable fields.
Click the Save Changes button to save the changes.
![]() To delete a Vault Path
To delete a Vault Path
Select the Vaults node within the Data Archiving for Adabas navigation tree.
Select the Configuration sub-node.
Select the Vault to be modified. The Vault Configuration window will appear.
In the Physical Path(s) to the Vault section, identify the computer whose Vault Path is to be deleted and click on the corresponding delete icon. A confirmation window will appear.
Click the Yes button on the confirmation window to delete the Vault Path.
![]() To modify Vault Validation Settings
To modify Vault Validation Settings
Vault Validation Settings may only be modified when Adding a Vault or Modifying a Vault.
Enter the following information as required:
| Field | Description |
|---|---|
| Validation |
Enable or Disable Vault Validation. The default is Disabled. |
| If Enabled... | |
| Level |
Select one of:
|
| Next run |
The time of day the validation process will run. |
| Frequency |
The repeating time period that the validation will run. For example, run every 1 day or 1 week etc. |
| Computer |
The computer where the validation process will run. |
| Retain logs for |
The retention period for log files created by the validation process. Log files are useful to Software AG in cases where a validation alert occurs. |
Vault Granularity enables you to define levels of granularity with respect to the physical directory structure of a Vault thereby influencing the placement of Archive files within it.
For example, specifying a granularity of ‘Year’ will automatically cause the current year to be suffixed to the Vault path. All Archive files created in the current year will then be written to that suffixed directory. When the current year rolls over to a new year, the new year will be suffixed to the Vault path and all subsequent Archive files will then be written to this new suffixed directory.
The result of this is that all Archive files for a particular year are located in a particular directory providing the ability to annually migrate archive data to another medium (for example, tape).
In the same way, specifying a granularity of ‘Month’ will automatically cause the current month within the current year to be suffixed to the Vault path. This results in all Archive files for a particular month in a particular year being located in a particular directory - providing the ability to monthly migrate archive data to another medium.
Archiving requirements are implemented by defining Plans and Actions.
A Plan identifies a collection of one or more related Actions, for example all the Actions required for a particular business application, division, or department.
![]() To add a Plan:
To add a Plan:
Select and right click the Plans node within the Data Archiving for Adabas navigation tree, then select Add Plan. The Add Plan window will appear.
Enter the following information for the new Plan:
| Field | Description |
|---|---|
| Short Name |
1-32 characters to be used as the name for the Plan. This is the name that will appear under the Plans node within the Data Archiving for Adabas navigation tree. Names are case-sensitive, the first character must be alphabetic, all other characters can be either alphabetic or numeric. The only special character permitted is underscore. |
| Group |
The Adabas System Coordinator Group for the Plan. An Adabas System Coordinator Group defines a logical network of computers where Data Archiving Services are available. |
| Description |
A textual description of the Plan. |
| Vault |
The default Vault for use by Actions within this Plan. Individual Actions within this Plan may override this default Vault if required. Refer to Vault Configuration if the Vault has not yet been defined. |
Click the Add Plan button to add the new Plan.
![]() To modify a Plan
To modify a Plan
Select the Plan node within the Data Archiving for Adabas navigation tree.
Select and right click the Plan to be modified, then select Modify Plan. The Modify Plan window will appear.
The following information can be modified:
| Field | Description |
|---|---|
| Description |
A textual description of the Plan. |
| Vault |
The default Vault for use by Actions in this Plan. Individual Actions within this Plan may override this default Vault if required. Notes:
|
Click the Save Changes button to save the changes.
![]() To delete a Plan
To delete a Plan
Select the Plan node within the Data Archiving for Adabas navigation tree.
Select and right click the Plan to be deleted, then select Delete Plan. A confirmation window will appear.
Click the Yes button on the confirmation window to delete the Plan and all associated Actions.
Note:
Deleting a Plan will also delete all Actions within the Plan.
An Action belongs to a Plan and defines where data is to be extracted from (the Source Files(s)), where it is to go (Vault or Target File(s)), and the computers on which the respective Extractor and Accumulator processes will run.
![]() To add an Action:
To add an Action:
Select the Plans node within the Data Archiving for Adabas navigation tree.
Select the Plan within which the Action is to be added.
Select and right click the Actions sub-node, then select Add Action. The Add Action window will appear.
Enter the following information for the Action:
| Field | Description |
|---|---|
| Action Name |
1-32 characters to be used as the name for the Action. This is the name that will appear under the Actions sub-node for the selected Plan. This Action name must be unique within the selected Plan. Names are case-sensitive, the first character must be alphabetic, all other characters can be either alphabetic or numeric. The only special character permitted is underscore. |
| Description |
A textual description of the Action. |
Extractor Settings defines the Computer where the Extractor process will run and the data selection mode to be used.
Enter the following information:
| Field | Description |
|---|---|
| Computer |
Select the computer where the Extractor is to run and where the Source File(s) reside. The selectable list of Computers is determined by the Group name defined to the Plan. |
| Mode |
Identify the Data Selection Mode:
Refer to the sections Data Selection Methods and Data Selection Mode for information regarding these different types of selection methods. |
Accumulator Settings defines the Computer where the Accumulator process will run, the Vault to use, and any required Search indexes.
Enter the following information:
| Field | Description |
|---|---|
| Computer |
Select the Computer where the Accumulator is to run (for a TRANSFER operation, this is where the Target File(s) reside). The selectable list of Computers is determined by the Group name defined to the Plan. Note: |
| Vault |
Select the Vault to be used by the Accumulator. The default selection is the Vault defined to the Plan but a different Vault can be selected if required. |
| Search Indexes |
Select the number of search strings that will be supplied with the data to be archived. The default is 0, and the maximum is 4. Refer to Search Archived Data for more information. |
Scheduling Settings defines the scheduling requirements.
Enter the following information:
| Field | Description |
|---|---|
| Schedule Type |
|
Runtime Control Settings defines the runtime characteristics of the Action relating to processing limits and pacing.
Enter the following information:
| Field | Description |
|---|---|
| Limit Action to a maximum of nnnn records |
Each run of this Action will stop when the specified number of records has been processed. The default value of 0 means no limit. |
| Limit Action to a maximum of nnnn seconds |
Each run of this Action will stop when the specified number of seconds has elapsed. The default value of 0 means no limit. |
| Pacing |
When set to On, this control regulates the activity level (throughput) of each run of this Action so that a pre-determined level of service can be maintained. This is achieved by defining minimum and maximum settings for the numbers of records to be processed per second (approximately). The default is Off. |
Click the Add Action button to add the new action.
When a new Action is added, the sub-nodes Source Files and Target Files will appear in the navigation tree under the Action. All Adabas files referenced by the Action must be defined in these sub-nodes.
Refer to Adding Source Files and Adding Target Files for information on how to define these files.
![]() To modify an Action
To modify an Action
Select the Plans node within the Data Archiving for Adabas navigation tree.
Select the Plan within which the Action to be modified is located.
Select the Actions sub-node.
Select and right click the Action to be modified, then select Modify Action. The Modify Action window will appear.
Refer to Adding an Action for an explanation of the modifiable fields.
Click the Save Changes button to save any changes.
![]() To delete an Action
To delete an Action
Select the Plans node within the Data Archiving for Adabas navigation tree.
Select the Plan within which the Action to be deleted is located.
Select the Actions sub-node.
Select and right click the Action to be deleted, then select Delete Action. A confirmation window will appear.
Click the Yes button on the confirmation window to delete the Action.
![]() To copy an existing Action
To copy an existing Action
Select the Plans node within the Data Archiving for Adabas navigation tree.
Select the Plan within which the Action to be copied is located.
Select the Actions sub-node.
Select and right click the Action to be copied, then select Copy Action. The Copy Action window will appear.
Enter the following information:
| Field | Description |
|---|---|
| Group |
Select the Adabas System Coordinator group. |
| Plan |
Select the Plan where the current Action will be copied to. |
| Action |
1-32 characters to be used as the name for the copied Action. This is the name that will appear under the Actions sub-node for the selected Plan. This Action name must be unique within the selected Plan. Names are case-sensitive, the first character must be alphabetic, all other characters can be either alphabetic or numeric. The only special character permitted is underscore. |
| Description |
A textual description of the copied Action. |
Click the Copy Action button to copy the Action.
An Action can be run manually at any time.
![]() To run an Action manually
To run an Action manually
Select the Plans node within the Data Archiving for Adabas navigation tree.
Select the Plan within which the Action to be run is located.
Select the Actions sub-node.
Select and right click the Action to be run, then select Run Action ‘name’ Now. A confirmation window will appear.
Click the Yes button on the confirmation window to run the Action.
In order to define an automatic schedule, the Action must first be configured with a Schedule Type of Automatic. Refer to Adding an Action for an explanation of the parameter Schedule Type. Once configured with this setting, a Schedule sub-node will be present in the navigation tree under the Action.
![]() To define an automatic schedule
To define an automatic schedule
Select the Plans node within the Data Archiving for Adabas navigation tree.
Select the Plan within which the Action to be scheduled is located.
Select the Actions sub-node.
Select the Action to be scheduled.
Select and right click the Schedule sub-node, then select Modify Schedule. The Modify Schedule window will appear.
Enter the following information:
| Field | Description |
|---|---|
| Run At |
Define the time of day when the Action is to be run. |
| Occurring:... Daily... Weekly on... Monthly on day... Quarterly on day... Half Yearly on day... Annually on day... Repeat every... |
Define the schedule. |
Click the Save Changes button to save any changes.
In order to define an ad hoc schedule, the Action must first be configured with a Schedule Type of Ad hoc. Refer to Adding an Action for an explanation of the parameter Schedule Type. Once configured with this setting, a Schedule sub-node will be present in the navigation tree under the Action.
![]() To define an ad hoc schedule
To define an ad hoc schedule
Select the Plans node within the Data Archiving for Adabas navigation tree.
Select the Plan within which the Action to be scheduled is located.
Select the Actions sub-node.
Select the Action to be scheduled.
Select the Schedule sub-node. The Schedule window will appear.
Click the Add Schedule Entry button. The Add Schedule Entry window will appear.
Enter the following information:
| Field | Description |
|---|---|
| Time |
Define the time of day when the Action is to be run. |
| Date |
Define the date when the Action is to be run. |
Click the Add Schedule Entry button to add the entry.
Repeat as necessary to define as many Schedule Entries as required.
Individual schedule entries can be modified and deleted by clicking on the respective icon in the Schedule window.
When creating an Action you need to choose the mode of data selection. There are three modes available; Extraction Syntax, To-do List (User-generated archive/transfer lists), and User Library (Record selection plug-in).
![]() To use Extraction Syntax
To use Extraction Syntax
Ensure the Action is defined with a mode of Extraction Syntax. This will create the node Extraction Syntax below the Action.
Select the node Extraction Syntax and the Modify Extraction Syntax window will appear.
Define the required extraction syntax. Refer to Extraction Syntax for more information and examples on using the extraction syntax.
Click the Check Syntax button to validate and check for compilation errors in the syntax. If the validation fails, an indication of the error is provided.
Click the Save button to store the syntax.
Click the Help button for a quick reference guide on the extraction syntax.
![]() To use To-Do List (User-generated archive/transfer list)
To use To-Do List (User-generated archive/transfer list)
Ensure the Action is defined with a mode of To-Do List. This will create the node To-Do List below the Action.
Select the location that will be used to store the To-Do List for the Action. By default this is the Repository but an alternative Adabas file may be specified instead. The file will be created automatically if it does not already exist.
Create the To-Do List content by referencing the supplied Data Archiving for Adabas Application Programming Interface. Refer to Application Programming Interface for more information on using this interface.
Select the node To-Do List from within the Action to display the status of any To-Do List.
![]() To use User Library (Record selection plug-in)
To use User Library (Record selection plug-in)
Ensure the Action is defined with (a) a mode of User Library and (b) the library path for the plug-in. This will create the node Real-Time API Parameters below the Action.
The node Real-Time API Parameters is used to define the parameters which are passed to the plug-in.
Create the Plug-in by referencing the supplied Data Archiving for Adabas Application Programming Interface. Refer to API for the C Programming Language and the section titled User-Lib Interface.
An Action requires all the files that make up the business object be defined under the Source Files node.
![]() To add Source Files for an Action
To add Source Files for an Action
Select and right click on Source File node below the Action, then select Add Source File. The Add Source File window will appear:.
Enter the following information:
| Field | Description |
|---|---|
| File Name |
1-32 characters to be used as the name for the Source File. This is the name that will appear within the Source Files sub-node under the selected Action. This file name must be unique within the Action. Names are case-sensitive, the first character must be alphabetic, all other characters can be either alphabetic or numeric. The only special character permitted is underscore. |
| Adabas |
This identifies the data source. For Adabas data this is the database and file number. |
| File Mapping |
File Mappings can be used in association with a Source File. This allows Adabas Long Field names to be used when the Action’s Data Selection Mode is set to ‘Extraction Syntax’. |
| Description |
A textual description of the Source File. |
| Codepage |
Defines the codepage to be associated with Alphanumeric format field values in the Source File. Select one of: |
Click the Add Source File button to add the new source file.
Note:
Target files are only required if the Action will be using the
TRANSFER feature of Data Archiving for Adabas.
You must define all the Target Files that are involved in making up the business objects to be transferred.
![]() To add Target Files for an Action
To add Target Files for an Action
Select and right click on the Target File node below the Action, then select Add Target File. The Add Target File window will appear.
Enter the following information:
| Field | Description |
|---|---|
| File Name |
1-32 characters to be used as the name for the Target File. This is the name that will appear within the Target Files sub-node under the selected Action. This file name must be unique within the Action. Names are case-sensitive, the first character must be alphabetic, all other characters can be either alphabetic or numeric. The only special character permitted is underscore. |
| Adabas |
This identifies the data target. For Adabas data this is the database and file number. If appropriate, a target LOB file must also be defined. |
| Codepage |
Defines the codepage to be applied to Alphanumeric format field values when transferring data into the Target File. Select one of: |
| Duplicate ISN Handling |
Specifies what action to take when inserting a Transfer record into the Target File and the ISN of this record already exists. Select one of: |
| Duplicate Unique Descriptors |
Specifies what action to take when inserting a Transfer record into the Target File when a duplicate unique descriptor value already exists. Select one of: |
| File Creation Parameters |
If ‘Create File If It Does Not Exist’ is selected then define the appropriate Adabas file parameters. Refer to the Adabas documentation relating to file creation for further information on these parameters. The default parameter settings supplied are for example only. |
Click the Add Target File button to add the new target file.
The Data Archiving Service (also simply referred to as the Archiving Service) manages all archive operations. It runs unattended and, according to any defined Plans and Actions, launches Extractor and Accumulator processes to perform the necessary archiving requirements.
For more information on the Archiving Service, Extractor, and Accumulator components please refer to Components of Data Archiving for Adabas.
Each Data Archiving Service runs within an Adabas System Coordinator Daemon on a Computer which is defined to an Adabas System Coordinator Group. Archiving Services running within the same Group can communicate collaboratively to provide a fully distributed archiving service where the Extractor can run on one computer and the Accumulator can run on another. An individual Archiving Service is referred to by Group:Computer:Daemon.
![]() To monitor Archiving Services
To monitor Archiving Services
Select the Services by (group:computer:daemon) node within the Data Archiving for Adabas navigation tree.
Select the group:computer:daemon for the Archiving Service you wish to monitor. The Archiving Service window will appear.
The following information is displayed:
| Field | Description |
|---|---|
| Group Computer Daemon |
The name of the Group, Computer and Daemon corresponding to the selected Archiving Service. |
| Service Status Information | |
| Status |
The run status of the selected Archiving Service. |
| Install Path |
The installed location of the selected Archiving Service. |
| Version |
The version of the selected Archiving Service. |
| Repository |
The location information for the Repository used by the selected Archiving Service. |
| License Information | |
| File |
The location of the selected Archiving Service’s license file. |
| Status |
The status of the selected Archiving Service’s license. |
| Expires |
The expiry date of the selected Archiving Service’s license. |
Archiving requirements are implemented by defining Plans and Actions. A Plan identifies a collection of one or more related Actions, and an Action defines where data is to be extracted from, where it is to go, and the computers on which the respective Extractor and Accumulator processes will run.
Each run of an Action is called an Activity and the Archiving Service manages and records all pending, current and completed Activities in order to assist the administrator in monitoring and controlling archive operations.
Pending Activities are Activities relating to those Actions that have been scheduled to run in the future. Refer to Running an Action using a Schedule for more information on how to define a schedule for an Action.
![]() To monitor Pending Activities
To monitor Pending Activities
Select the Services by (group:computer:daemon) node within the Data Archiving for Adabas navigation tree.
Select the group:computer:daemon for the Archiving Service you wish to monitor. The Archiving Service window will appear.
Select the Pending Activities sub-node. The Pending Activities window will appear.
If pending Activities are present, the following information is displayed:
| Column | Description |
|---|---|
| Type |
The type of operation to be performed by the Activity; for example, Archive or Transfer. |
| Schedule |
The type of schedule defined to the Action for which this Activity has been scheduled; for example, Automatic or Ad Hoc. |
| Due |
The date and time when this Activity is scheduled to run. |
| Plan |
The name of the Plan corresponding to the Action for which this Activity has been scheduled. |
| Action |
The name of the Action for which this Activity has been scheduled. |
| Added At |
The date and time when the Action schedule was created. |
| Added By |
The user identity of the person who created the Action schedule. |
| Cancel |
To cancel the scheduled Activity, click the icon on the appropriate entry. |
Current Activities are Activities relating to those Actions that are currently in progress having been submitted to run manually or automatically via a defined schedule. Refer to Running an Action for more information on the options available for running an Action.
![]() To monitor current Activities
To monitor current Activities
Select the Services by (group:computer:daemon) node within the Data Archiving for Adabas navigation tree.
Select the group:computer:daemon for the Archiving Service you wish to monitor. The Archiving Service window will appear.
Select the Current Activities sub-node. The Current Activities window will appear.
If current Activities are present, the following information is displayed:
| Column | Description |
|---|---|
| Started |
The start time of the Activity. |
| Activity-ID |
The internal identity by which this Activity is known. |
| Plan |
The name of the Plan corresponding to the Action for which this Activity has been started. |
| Action |
The name of the Action for which this Activity has been started. |
| Type |
The type of operations being performed by the Activity; for example, Archive, Remove, Transfer or Recall. Remove indicates that records have been deleted from the Source Files by use of the Extraction Syntax statements ‘ARCHIVE MOVE’ or ‘REMOVE’ (or by the equivalent functions in the Natural and C APIs). |
| Overall |
The highest progress count from either the Accumulator process or the Extractor process. |
| Status |
The overall status of the Activity, a combination of the Accumulator and Extractor statuses. |
| Extractor |
The progress count for the Extractor process. |
| Status |
The status of the Extractor. |
| Accumulator |
The progress count for the Accumulator process. |
| Status |
The status of the Accumulator. |
![]() To display details of current Activities
To display details of current Activities
Select the Services by (group:computer:daemon) node within the Data Archiving for Adabas navigation tree.
Select the group:computer:daemon for the Archiving Service you wish to monitor. The Archiving Service window will appear.
Select the Current Activities sub-node. The Current Activities window will appear.
To display the details for an individual Activity, click directly on its Activity-ID link. Alternatively, to display the details for multiple Activities, use the checkboxes for selection and then choose ‘Detail’ from the drop-down Operations box (this method can also be used for an individual Activity).
The Activity Detail window appears which provides additional details about the selected Activity.
Current Activities may be stopped to enable unplanned maintenance to be performed on Activity-involved databases or files by allowing the resources used by such Activities to be released. Refer to Adabas Database and File Maintenance for additional information when considering this operation.
![]() To stop current Activities
To stop current Activities
Select the Services by (group:computer:daemon) node within the Data Archiving for Adabas navigation tree.
Select the group:computer:daemon for the Archiving Service you wish to monitor. The Archiving Service window will appear.
Select the Current Activities sub-node. The Current Activities window will appear.
To stop one or more Activities, use the checkboxes for selection and then choose ‘Stop’ from the drop-down Operations box.
Click the Yes button on the confirmation window to stop the selected Activities.
Current Activities may be paused and resumed to enable unplanned maintenance to be performed on Activity-involved databases or files by allowing the resources used by such Activities to be released. Refer to Adabas Database and File Maintenance for additional information when considering this operation.
![]() To pause and resume current Activities
To pause and resume current Activities
Select the Services by (group:computer:daemon) node within the Data Archiving for Adabas navigation tree.
Select the group:computer:daemon for the Archiving Service you wish to monitor. The Archiving Service window will appear.
Select the Current Activities sub-node. The Current Activities window will appear.
To stop one or more Activities, use the checkboxes for selection and then choose ‘Pause’ from the drop-down Operations box.
Click the Yes button on the confirmation window to pause the selected Activities.
To resume one or more paused Activities, use the checkboxes for selection and then choose ‘Resume’ from the drop-down Operations box.
Click the Yes button on the confirmation window to resume the selected Activities.
Completed Activities are Activities relating to those Actions that have previously been run either successfully or unsuccessfully.
![]() To view completed Activities
To view completed Activities
Select the Services by (group:computer:daemon) node within the Data Archiving for Adabas navigation tree.
Select the group:computer:daemon for the Archiving Service you wish to monitor. The Archiving Service window will appear.
Select the Completed Activities sub-node. The Completed Activities window will appear.
If complete activities are present, the following information is displayed:
| Column | Description |
|---|---|
| Started |
The start time of the Activity. |
| Activity-ID |
The internal identity by which this Activity is known. |
| Plan |
The name of the Plan corresponding to the Action for which this Activity was run. |
| Action |
The name of the Action for which this Activity was run. |
| Type |
The type of operations performed by the Activity; for example, Archive, Remove, Transfer or Recall. Remove indicates that records have been deleted from the Source Files by use of the Extraction Syntax statements ‘ARCHIVE MOVE’ or ‘REMOVE’ (or by the equivalent functions in the Natural and C APIs). |
| Overall |
The highest completed progress count from either the Accumulator process or the Extractor process. |
| Status |
The overall completion status of the Activity, a combination of the Accumulator and Extractor completion statuses. |
| Extractor |
The completed progress count for the Extractor process. |
| Status |
The completion status of the Extractor. |
| Accumulator |
The completed progress count for the Accumulator process. |
| Status |
The completion status of the Accumulator. |
| Ended |
The end time of the Activity. |
![]() To display details of completed Activities
To display details of completed Activities
Select the Services by (group:computer:daemon) node within the Data Archiving for Adabas navigation tree.
Select the group:computer:daemon for the Archiving Service you wish to monitor. The Archiving Service window will appear.
Select the Completed Activities sub-node. The Completed Activities window will appear.
To display the details for an individual Activity, click directly on its Activity-ID link. Alternatively, to display the details for multiple Activities, use the checkboxes for selection and then choose ‘Detail’ from the drop-down Operations box (this method can also be used for an individual Activity).
The Activity Detail window appears which provides additional details about the selected Activity.
![]() To delete completed Activities
To delete completed Activities
Select the Services by (group:computer:daemon) node within the Data Archiving for Adabas navigation tree.
Select the group:computer:daemon for the Archiving Service you wish to monitor. The Archiving Service window will appear.
Select the Completed Activities sub-node. The Completed Activities window will appear.
To delete one or more completed Activities, use the checkboxes for selection and then choose ‘Delete’ from the drop-down Operations box.
To delete all completed Activities, right-click on the Completed Activities sub-node and select 'Delete All' from the pop-up menu.
Click the Yes button on the confirmation window to delete the Activities.
An Activity may fail for many reasons; from a database or file not being available, to an unexpected processing error. The restart operation is designed to provide recovery from such failures by checking (and if necessary repairing) the integrity of the current archive files before continuing with the Activity. Log messages are written to provide information relating to the restart operation.
![]() To restart failed Activities
To restart failed Activities
Select the Services by (group:computer:daemon) node within the Data Archiving for Adabas navigation tree.
Select the group:computer:daemon for the Archiving Service you wish to monitor. The Archiving Service window will appear.
Select the Completed Activities sub-node. The Completed Activities window will appear.
To restart one or more completed Activities, use the checkboxes for selection and then choose ‘Restart’ from the drop-down Operations box.
Click the Yes button on the confirmation window to restart the selected Activities.
The configuration data for Data Archiving for Adabas is stored in a Repository. A Perspective defines an access path to a particular Repository. Multiple Perspectives can be defined, enabling configuration data in different Repositories to be maintained from a single Administration machine.
Adding a Perspective allows the Administration machine to maintain different Repositories.
![]() To add a Perspective
To add a Perspective
Select and right click the Perspectives node within the Data Archiving for Adabas navigation tree, then select Add Perspective. The Add Perspective window will appear.
Enter the following information for the new Perspective:
| Field | Description |
|---|---|
| Communication Type |
|
| Hostname |
When using a Daemon as the access point, this is the hostname of the computer where the Adabas System Coordinator Daemon is running. |
| Port |
When using a Daemon as the access point, this is the Group Services port number for the Adabas System Coordinator Daemon running on the computer defined in the “Hostname” field above. |
| Database/File |
When explicitly specifying a Repository, this is the database and file number of the Repository. |
Click the Add button to add the new Perspective.
You can alter your current Perspective by selecting another one. This allows you to administer multiple Repositories from the Administration machine.
![]() To select a Perspective
To select a Perspective
Select the Perspectives node within the Data Archiving for Adabas navigation tree.
Select and right click the Perspective to be selected, then select Select Perspective.
Select and right click the Data Archiving for Adabas node, then select Refresh. This will perform a refresh on the navigation tree to ensure the change in Perspective is correctly registered.
You can discover which computers are using the same Repository for a particular Perspective. This enables you to select alternative access paths to the Repository.
![]() To discover a Perspective
To discover a Perspective
Select the Perspectives node within the Data Archiving for Adabas navigation tree.
Select and right click the Perspective to be discovered, then select Discover Perspectives.
![]() To delete a Perspective
To delete a Perspective
Select the Perspectives node within the Data Archiving for Adabas navigation tree.
Select and right click the Perspective to be deleted, then select Delete Perspective.
Click the Yes button on the confirmation window to delete the Perspective.
File Mappings allow the use of Adabas long field names in the Extraction Syntax by providing a means to map Adabas short field names to long field names. A File Mapping is the equivalent of a Natural DDM (a view of a file). The File Mapping node provides support for the maintenance and creation of File Mappings, including importing from FDTs, Predict or Natural DDMs.
![]() To add a new File Mapping
To add a new File Mapping
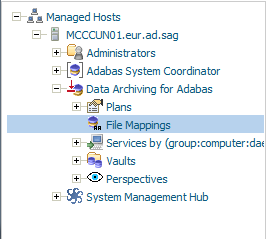
Select the File Mappings node within Data Archiving for Adabas:
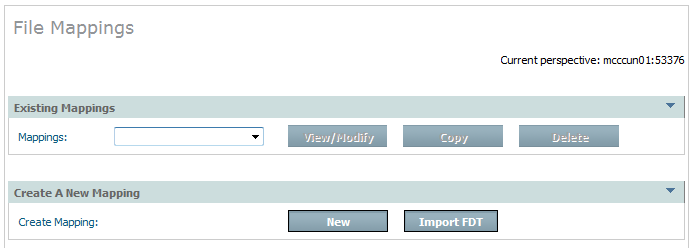
Click the New button, the Add A New File Mapping window will appear:
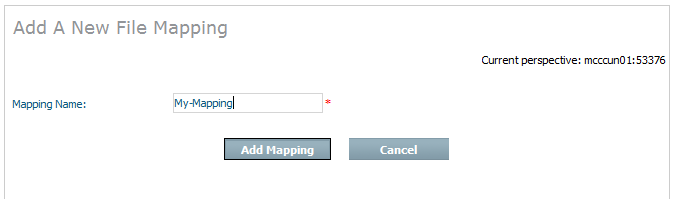
Enter the following information:
| Field | Description |
|---|---|
| Mapping Name | 1-32 characters to be used as the name for the file mapping. This is the name that is used by the Source Files in an action. |
Click the Add Mapping button to create the new file mapping.
Once the new mapping file is created it is then possible to edit, add and delete the fields.
Field descriptions:
| Field | Description |
|---|---|
| Select | Select rows to mark them for deletion. |
| Full Name | Full long field name (32 characters max., cannot start with a number and must not contain symbols used in Extraction Syntax or space characters). |
| Short Name | Short field name (2 characters, 1st character must be alpha, 2nd character must be alphanumeric. The range E0 to E9 is not allowed.). |
| Move Up | Move the selected field up the File Mapping list order. |
| Move Down | Move the selected field down the File Mapping list order. |
Click the Save button to store the new File Mapping.
![]() To import a new File Mapping
To import a new File Mapping
Select File Mappings node within Data Archiving for Adabas
Click the Import FDT button, the Import A New File Mapping From FDT window will appear:
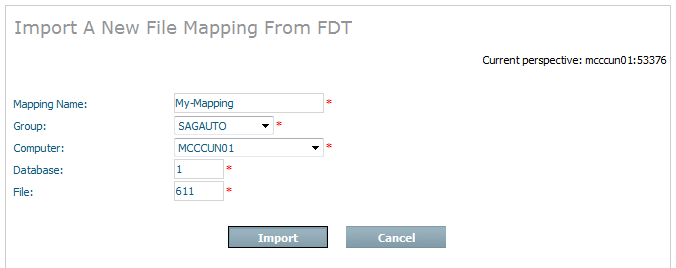
Enter the following information:
| Field | Description |
|---|---|
| Mapping Name | 1-32 characters to be used as the name for the File Mapping. This is the name that is used by the Source Files in an action. |
| Group | The Adabas System Coordinator Group for the plan |
| Computer | Choose a computer from the list where the FDT will be read from. The list of computers comes from the Adabas System Coordinator Group that the archive Plan uses. |
| Database | The Adabas database number where the FDT is to be imported from. |
| File | The Adabas file number where the FDT is to be imported from. |
Click the Import button to create the new File Mapping.
Once the new mapping file is created it is then possible to edit, add and delete the fields.
Note:
The initial long field names will be a duplicate of
the short names when import is used.
Field descriptions:
| Field | Description |
|---|---|
| Select | Select rows to mark them for deletion. |
| Full Name | Full long field name (32 characters max., cannot start with a number and must not contain symbols used in Extraction Syntax or space characters). |
| Short Name | Short field name (2 characters, 1st character must be alpha, 2nd character must be alphanumeric. The range E0 to E9 is not allowed.). |
| Move Up | Move the selected field up the File Mapping list order. |
| Move Down | Move the selected field down the File Mapping list order. |
Click the Save button to store the new File Mapping.
![]() To copy an existing File Mapping
To copy an existing File Mapping
Select the File Mappings node within Data Archiving for Adabas:
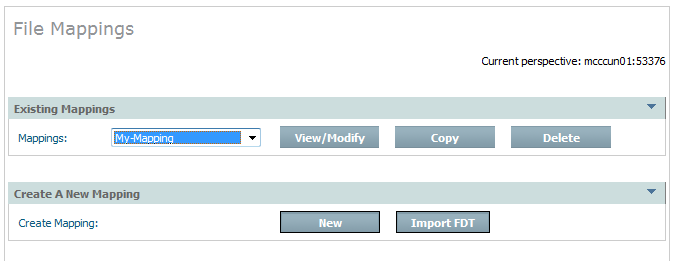
Click the Copy button, the Copy File Mapping window will appear:
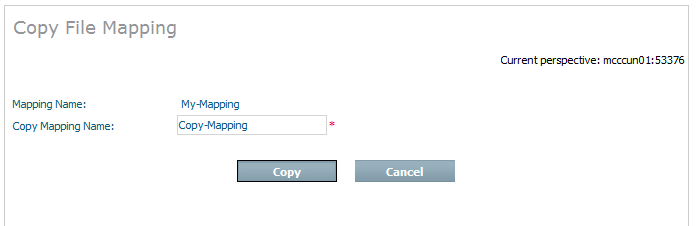
Enter the following information:
| Field | Description |
|---|---|
| Mapping Name | The File Mapping being used as the base for the copy. |
| Copy Mapping Name | 1-32 characters to be used as the name of the new File Mapping. |
Click the Copy button to create the new File Mapping.
![]() To modify an existing File Mapping
To modify an existing File Mapping
Select the File Mappings node within Data Archiving for Adabas:
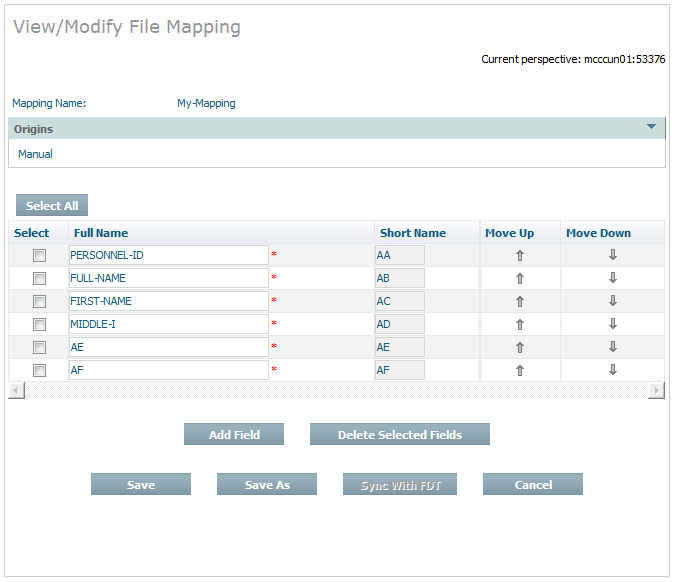
Click the View/Modify button, the View/Modify File Mapping window will appear:
Edit, add and delete fields as required:
To edit the name of a field, over-type the existing names in the Full Name column.
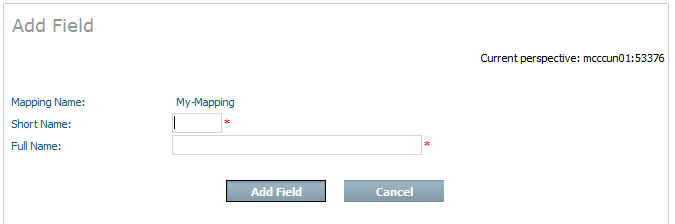
To add a field,click the Add Field button, the Add Field dialog will appear:
Enter the Short Name and Full Name for the new field and then click the Add Field button.
Enter the Short Name and Full Name for the new field and then press the Add Field button.
To delete a field, click on the corresponding checkbox in the Select column and click the Delete Selected Fields button.
When the modifications have been completed, click the Save button to save the changes.
![]() To synchronise a File Mapping with an FDT
To synchronise a File Mapping with an FDT
Select the File Mappings node within Data Archiving for Adabas:.
Click the View/Modify button, the View/Modify File Mapping window will appear:
Click the Sync With FDT button, the Sync Fields With FDT window will appear:
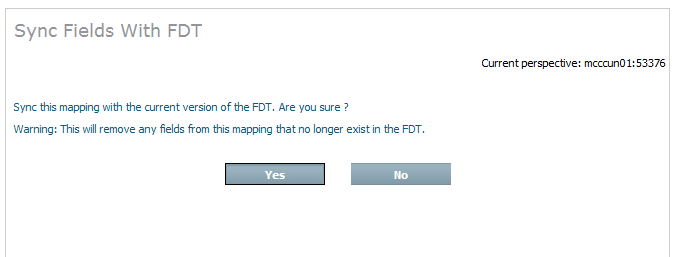
Confirm the operation by clicking the Yes button.
The File Mapping will be synchronised with the FDT and the View/Modify File Mapping will display the refreshed field mappings.
Click the Save button to save the changes.
When an Action uses the Vault as a destination it is possible to search the Vault for information. It is also possible to recall specific search results, rather than the whole of a previous Archive Action.
Over time there are vast amounts of data stored in archives, usually because the data is no longer productive in a full function database because there is no need to keep massive database indexes to such data. Therefore searching full archives over long periods is a very intensive process. Consequently it is very important to make sure the search fields are carefully planned, and limited to only the most critical of fields, otherwise overheads of archive searches (and other processing) will be too expensive.
![]() To search one (or more) complete archiving runs for an Action:
To search one (or more) complete archiving runs for an Action:
When defining the Action you must carefully choose how many search indexes will be supplied with the data (now and in the future) making sure this is absolutely minimized. Please note that once a minimal search is done through the archive, the results can be recalled back to Adabas for further detailed processing. The following image shows the number of search indexes being selected in the Action node (as described earlier):

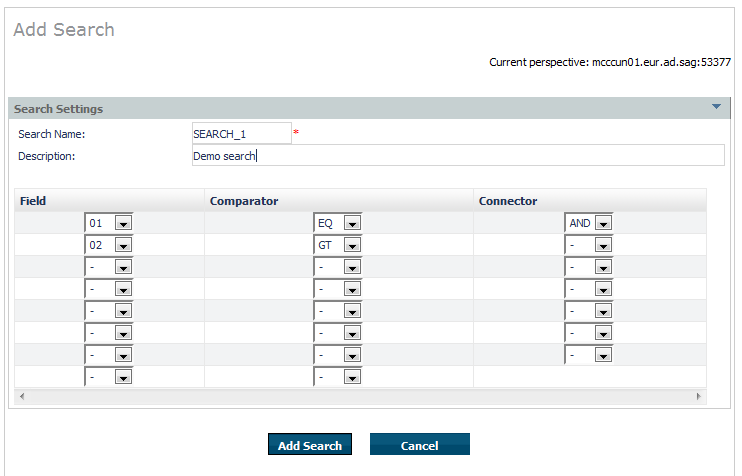
A search can be defined via the right click Add Search command on the search node. The example below shows a search for field number 1 that is to be for an equal comparison:
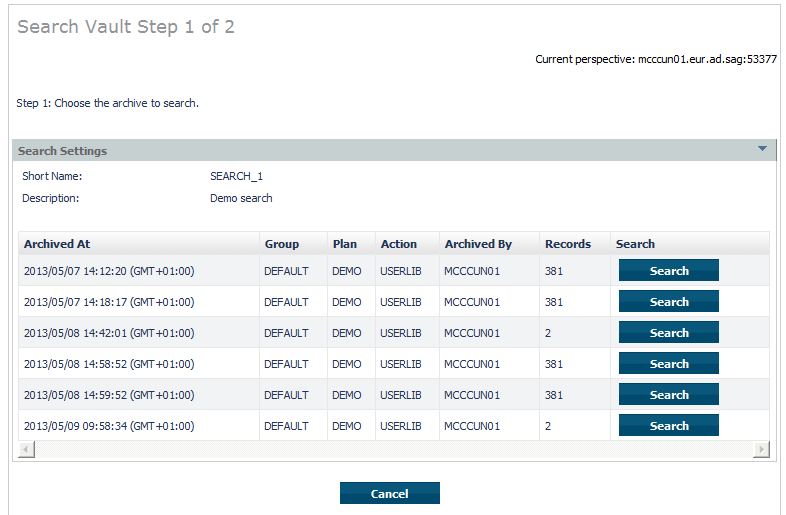
Once the Action is set up and it has been run at least once to generate an Archive, then you can right click on a search to run it. You will see a list of all the Archives in the Vault for the Action as stage 1 of 2. Select the one that you wish to search, see below:
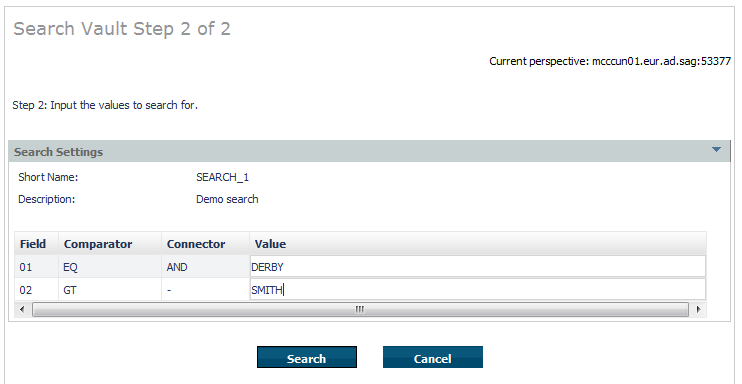
Having chosen which Archive you wish to search, you must now enter the values you wish to search for, and then click search to submit the search. See below:
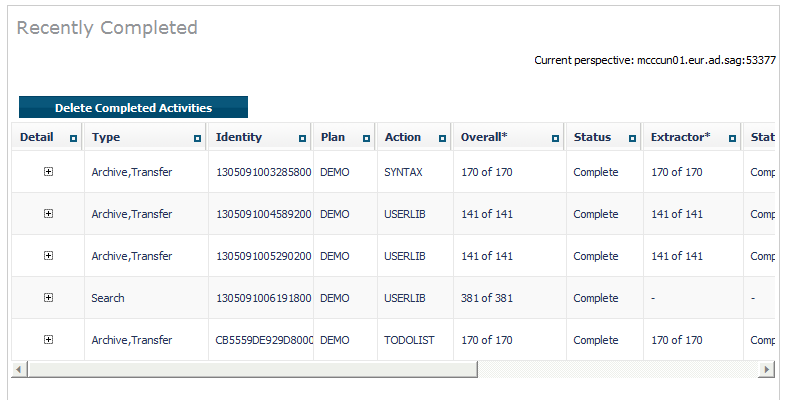
When you confirm the search is to run you can then watch the search running on the activity monitor screens. Below you can see the activity monitor showing a completed search:
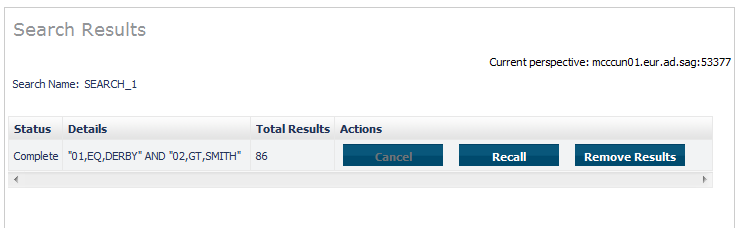
You can look back at completed searches, and either remove them or choose to recall them back to Adabas. Here is an example:
You can recall one or more Archives back to an Adabas file at any time.
![]() To recall archived data:
To recall archived data:
Refer to Browsing Archives in a Vault to find the particular Archive(s) for which a recall is required.
To recall an individual Archive, use the checkbox for selection and then choose ‘Recall’ from the drop-down Operations box. The Recall window to define the Source and Destination computers and to select the Source Files for recall will appear.
Enter the following information:
| Field | Description |
|---|---|
| Source Computer |
Specifies the computer to be used to recall the data from the Vault. A Vault Path to the Vault must be defined for the specified computer. |
| Destination Computer |
Specifies the computer to be used to write the recalled data back into Adabas. This must be the computer where the target Adabas database(s) are running. |
| Select |
Specify which Archive Source Files are to be recalled. |
| Destination DB |
Specify the target database number for the selected Archive Source File. |
| Destination File |
Specify the target file number for the selected Archive Source File. |
| Destination LOB File |
If relevant, specify the associated target LOB file number for the selected Archive Source File. |
Click the Next button. The Recall File Parameter settings window for the first selected Archive Source File will appear.
Enter the following information:
| Field | Description |
|---|---|
| Mode |
Select one of:
|
| Codepage |
Defines the codepage to be applied to Alphanumeric format field values when recalling the Archive data into a target file specified by the Destination DB/File. |
| File Creation Parameters |
If the Mode selected is such that an Adabas file may be created, define the appropriate Adabas file parameters. Refer to the Adabas documentation relating to file creation for further information on these parameters. The default parameter settings supplied are for example only. |
| Duplicate ISN Handling |
Specifies what action to take when inserting an Archive record into the target file and the ISN of this record already exists. Select one of: |
| Duplicate Unique Descriptors |
Specifies what action to take when inserting an Archive record into the target file when a duplicate unique descriptor value already exists. |
Click the Next button to repeat the file parameter settings for each selected Archive Source File.
Once parameter settings have been specified for all selected Archive Source Files, a window appears in which it is possible to define runtime pacing characteristics for the recall operation.
| Field | Description |
|---|---|
| Pacing |
When set to On, this control regulates the activity level (throughput) of the recall operation so that a pre-determined level of service can be maintained. This is achieved by defining minimum and maximum settings for the numbers of records to be processed per second (approximately). The default is Off. |
Click the Recall button to schedule the recall.
Each Archiving Service is associated with a license file. Refer to Monitoring Archiving Services for information on how to select an Archiving Service and check the associated license details.