The Software AG Installer (download center) has limited support for z/OS at present. However, the installation (and activation) of the z/OS software is downloaded along with all other platforms. Here are some useful points to help you understand the process overall:
The install image must be downloaded to one of the other supported platforms (Windows or Solaris for example).
There is a special z/OS activation step that has to run in the download platform (off-host).
This step guides you through the FTP process to load the z/OS software into the z/OS system.
Once the off-host FTP activation is completed then you must perform the full z/OS activation from within z/OS (USS).
Data Archiving for Adabas is a fully portable technology. It runs in all primary Unix systems, Windows and also in z/OS. There is only one code-base rather than one code-base for open systems and another for mainframe. Data Archiving for Adabas uses the openness of z/OS by running within a USS process within z/OS.
Note:
This is not the same as running in a z/Linux partition.
IBM’s z/OS has embedded Unix System Services (USS) within it. This is part of the ongoing modernization that has been happening to the operating system in recent years. This means z/OS is able to embrace modern technologies that in the past were considered only for off-host (outside the mainframe).
When running in z/OS, Data Archiving for Adabas uses normal z/OS Adabas databases, not a special “Unix like” Adabas. This is because systems running with USS can also interact with normal z/OS resources at the same time.
During the install you must identify the configuration file. Please refer to the section Installation Planning and Preparation for information on how to manage that part of the installation.
Before the installation you must:
The ADR install requires that you construct a load library with the following specific attributes:
DCB=(BLKSIZE=23200,RECFM=U)
The default name for the dataset is prefix.SAG.ADR110.LOAD where prefix is the RACF (or equivalent) userid of the person doing the installation. The prefix must remain as part of the dataset name (this will be reviewed later), the rest can be changed if you wish.
Make a site-based ADALNKR with the appropriate SVC number for your site. Make it available in the z/OS dataset mentioned above. LNKGBLS must be linked in with your ADALNKR in this library.
Make sure ADALNKR is fully maintained.
Here is some example JCL…
//LNKRGBLS JOB CLASS=G,MSGCLASS=X
//* ----------------------------------------------------------------- *
//* Assemble LNKGBLS - reentrant                                    - *
//* ----------------------------------------------------------------- *
//GBLSWLS EXEC ASMACL,
//      PARM.C='ASA,NODECK,OBJECT,XREF(SHORT),TERM',
//      PARM.L='XREF,LIST(ALL),LET,MAP,NCAL'
//C.SYSLIB     DD DISP=SHR,DSN=SAG.ADA814.SRCE
//             DD DSN=SYS1.MACLIB,DISP=SHR
//             DD DSN=SYS1.MODGEN,DISP=SHR
//C.SYSPRINT   DD SYSOUT=*
//C.SYSTERM    DD SYSOUT=*
//C.SYSIN      DD *
*
*        Global definitions for the Adabas link routine
*        for Batch/TSO.
*        Modify this sample for your site.
*        Then assemble and link it and include the
*        resulting module with ADALNK8 to create the ADALNKR
*        for use with ADR in z/OS.
*
         LGBLSET LOGID=1,         DEFAULT ADABAS DBID                  X
               SVCNO=252,         DEFAULT ADABAS SVC NUMBER            X
               OPSYS=ZOS,         Operating system                     X
               COR=NO,            Activate System Coordinator          X
               TPMON=BAT,         Batch/TSO                            X
               RENT=YES,          Non-reentrant for Batch/TSO          X
               GEN=CSECT,         Generate CSECT for load module       X
               GBLNAME=LNKGBLS,   DEFAULT GLOBALS MODULE NAME          X
               USERX1=NO,         Link user exit 1 YES/NO              X
               LX1NAME=UEXITB,    User exit 1 module name              X
               USERX2=NO,         Link user exit 2 YES/NO              X
               LX2NAME=UEXITA,    User exit 2 module name              X
               UES=YES            Enable UES
*
         END
//L.SYSPRINT   DD SYSOUT=*
//L.SYSLMOD    DD DISP=SHR,DSN=SAG.ADR110.LOAD
//L.SYSIN   DD  *
 MODE AMODE(31),RMODE(ANY)
 ENTRY LNKGBLS                 Default entry name
 NAME LNKGBLS(R)               DEFAULT TABLE NAME
//*
//* ----------------------------------------------------------------- *
//* LINK ADALNKR with LNKGBLS                                       - *
//* ----------------------------------------------------------------- *
//LINKA8Y EXEC PGM=IEWL,
//      PARM='LET,LIST(ALL),MAP,XREF,REUS=RENT',REGION=4M
//SYSPRINT     DD  SYSOUT=*
//SYSUT1       DD  DSN=&&SYSUT1,SPACE=(1024,(120,120),,,ROUND),UNIT=VIO
//ADALIB       DD  DISP=SHR,DSN=SAG.ADA814.LOAD
//SYSLMOD      DD  DISP=SHR,DSN=SAG.ADR110.LOAD
//SYSLIN       DD  *
  MODE AMODE(31),RMODE(ANY)
  INCLUDE ADALIB(ADALNKR8)              /* V8 LINK ROUTINE */
  INCLUDE SYSLMOD(LNKGBLS)
  INCLUDE ADALIB(LNKUES)
  INCLUDE ADALIB(ASC2EBC)
  INCLUDE ADALIB(EBC2ASC)
  ENTRY ADABAS
  NAME ADALNKR(R)
/*
//
Data Archiving for Adabas uses the UI provided by System Management Hub. The UI cannot be installed in z/OS. It must therefore be installed in another platform and be available for use before the ADR runtime installation can be started.
The user interface to Data Archiving for Adabas is the same for all operating systems. You use the UI to operate, configure and monitor your archiving environment throughout your network. The most common approach is to install and use the UI on a Windows platform.
OMVS is usually available within z/OS by default because many other software components from other vendors (including IBM) use it. If it is not available, you can use the following information to make it available:
When z/OS is first installed and configured a RACF (or equivalent) basic user called IBMUSER is defined. The IBMUSER is automatically defined with an OMVS segment. It is an OMVS segment that enables a user to use OMVS (USS).
Therefore, your RACF or equivalent systems such as ACF2, TOP SECRET etc. (please consult the appropriate documentation of these other systems for similar information) administrator needs to add an OMVS segment to all users who are to use OMVS, including the person who will be doing the ADR install.
An OMVS segment contains the following:
UID.
A numeric UID like in any other Unix system. This UID represents one sharable Unix that one or more userids may be able to use. There may be many more OMVS systems (UID) defined for your system.
Home directory.
Something like /u/nat/xyz
A shell program.
This is essentially Unix (the korn shell), often called “ksh” in the Unix community. An example of this may be: /bin/sh
Maximum size.
This is akin to address-space size. It may be allowed to default. It is not unusual for a Unix OMVS to be 128-512 meg.
In RACF the command to add such a segment would be…
ALU <userid> OMVS (UID(1234) HOME ('/u/nat/xyz') PROGRAM ('/bin/sh')
This command needs to be entered using a tool that supports mixed case (such as TSO ISPF/PDF/Option 6).
Next, a Unix group should be assigned to the <userid>. Again, this is a numeric and is referred to as "GID". A normal RACF "connect" command can be used to do this.
A GID can be assigned to a RACF group with…
ALG <group> OMVS(GID(nn))
The home directory needs to be created in the filesystem (HFS, ZFS etc).
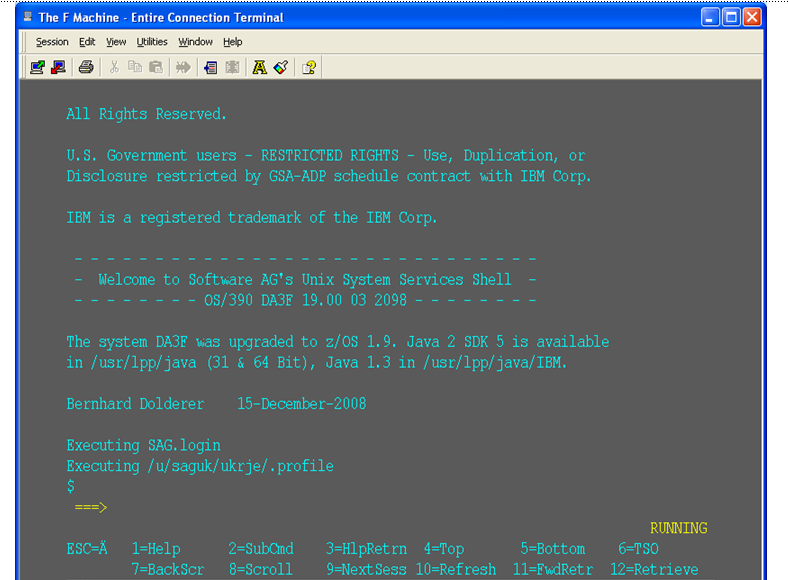
Once the permissions, home directory etc. are acquired, there are two typical ways to get into OMVS. One is through TSO. Get into TSO and issue the OMVS command and press Enter.
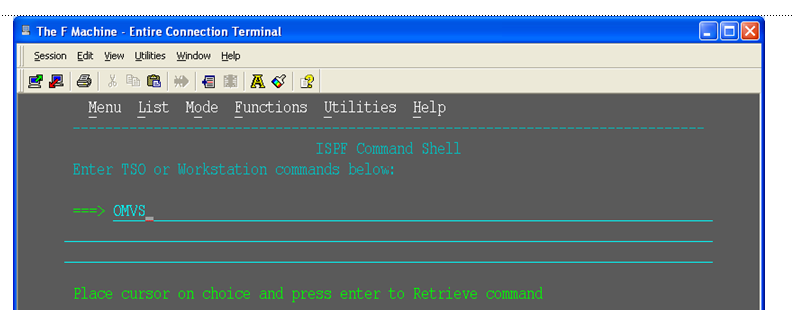
You can get to OMVS like any other Unix system from outside z/OS using telnet. Enter the following at your workstation:
telnet <computer> <port>
This will enable access into the OMVS Unix at the same point as entering “OMVS” in TSO.
Once in OMVS, you will be able to use all the usual Unix directives:
| Directive | Description |
|---|---|
| cd | Change directory |
| mkdir | Make directory |
| chmod | Set protection |
| chown | Set owner |
| chgrp | Change group |
| ls -la | Display directory contents |
This section describes the steps required to install Data Archiving for Adabas for z/OS.
Important:
Please read the Installation Preparation Checklist (below)
before starting with the
installation.
There are a number of things that need to be done prior to installing. These have been covered in the preceding sections and are summarized here as a checklist to help you ensure the installation is successful:
| Step | Description | Notes |
|---|---|---|
| 1 |
Check the system name and hostname of the z/OS machine where the software is being installed:
|
Use the da3f:saguser> uname –a OS/390 DA3F 20.00 03 2098 Use the da3f:saguser> onslookup DA3F Defaulting to nslookup version 4 Starting nslookup version 4 Server: daedns.ad.sag Address: 10.20.xxx.xxx Name: DA3F.hq.sag Address: 10.20.xxx.xxx |
| 2 |
Check the amount of free disk space available in the directory in the USS filesystem where the software is being installed. Minimum disk space: 300 MB |
Use the da3f:saguser> df –k /opt/softwareag |
| 3 |
Check the amount of memory (region size) available to a process running in the USS environment. Note: Minimum memory: 64 MB |
Minimum memory: 64 MB |
| 4 |
User ID and password for the USS account that will be used to install and run the software. Make sure that the account has read/write and execute permissions to the installation directory in the USS filesystem (from Step 2 above). |
User ID: saguser Password: ******** Permissions: |
| 5 |
Check that the USS account (from Step 4 above) has the correct z/OS security permissions for the dataset where the ADALNKR/LNKGBLS were prepared earlier. |
Dataset: SAG.ADR110.LOAD Permissions: |
| 6 |
Adabas database and file number for the Configuration File. This can be a file that will be created or replaced as part of the installation, or it can be an existing file shared by another computer already running Data Archiving for Adabas. If the file is being shared by another computer, the hostname of the computer and its Group Services port number will be required (default 53376). |
Database: 10
File number: 120
Choose one of:
When choosing share you will be prompted for: Hostname: sunpcc10.hq.sag Portnumber: 53376 |
| 7 |
Download location. This is the non-z/OS computer where you either download directly or placed the software distribution image. Note: |
Example: C:\SoftwareAG\Temp |
| 8 |
Details for the FTP upload of the z/OS software because the software must be uploaded to z/OS. The following information is needed:
Software AG recommends the target directory for the upload is different to the location where the software will finally be installed, since the FTP is only a temporary step. Typically, this is a temporary directory in the user’s home directory. Check the amount of free disk space available in the target directory. Minimum upload disk space: 30MB |
Hostname: da3f.hq.sag
User ID: saguser
Password: ********
Directory: /u/saguser/tmp
The da3f:saguser> df –k /u/saguser/tmp |
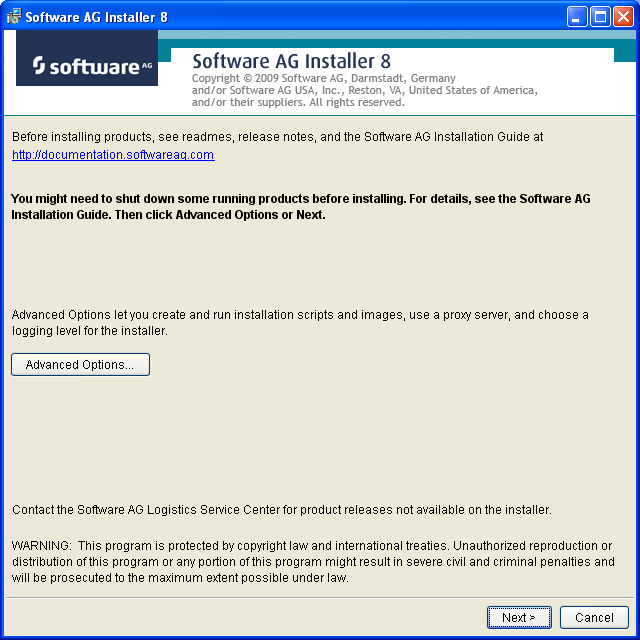
On the Software AG Installer Welcome Screen, click Next to start the installation.
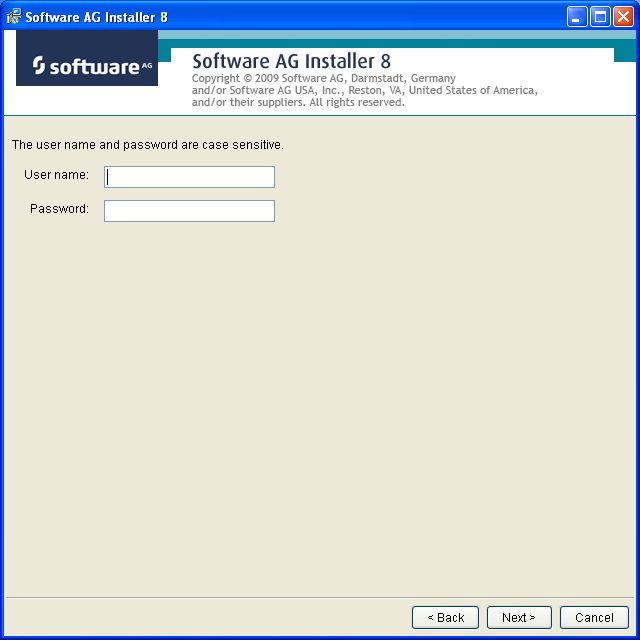
Identify yourself to the Installer by logging in with your credentials as shown below. Click Next to proceed to the next step:
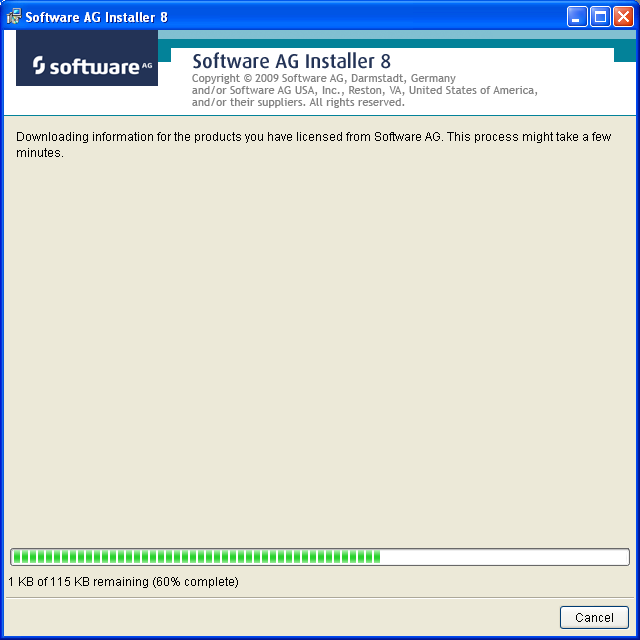
The Installer acquires information about a) all the products for which you are licensed and b) are able to be installed using the Installer. You can see this happening (below). It may take a few minutes:
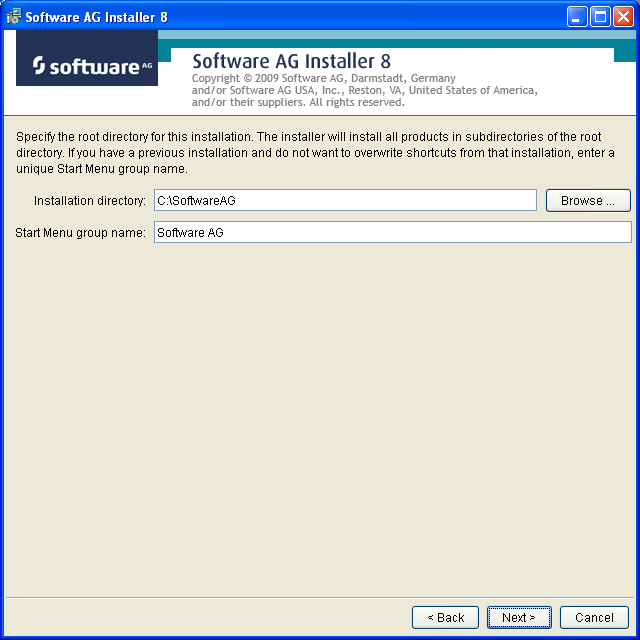
Once the Installer has acquired all licensing information for your site, it shows the default install location. You can alter this if you wish but make sure you understand the implications of changing it for all the products being installed. Click Next to proceed further:
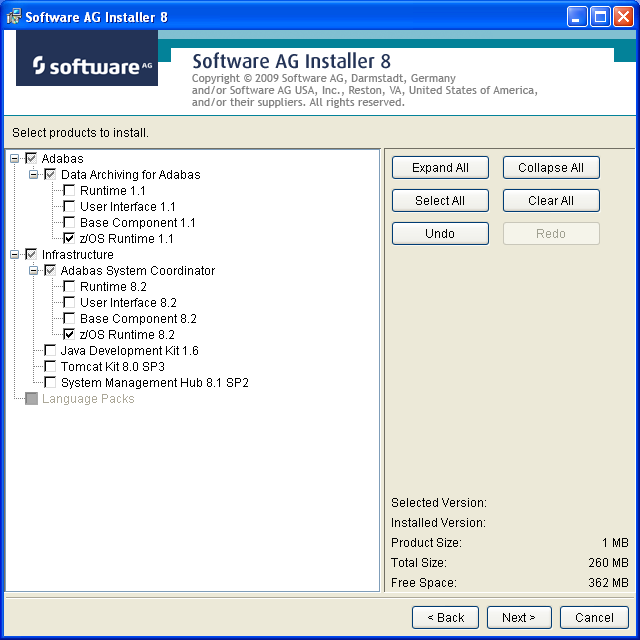
You can now choose the products that you wish to install:

You can see below which products have been selected. In making these choices, other implied choices of sibling and prerequisite products are also made automatically. Once your selections are made, click Next to proceed:
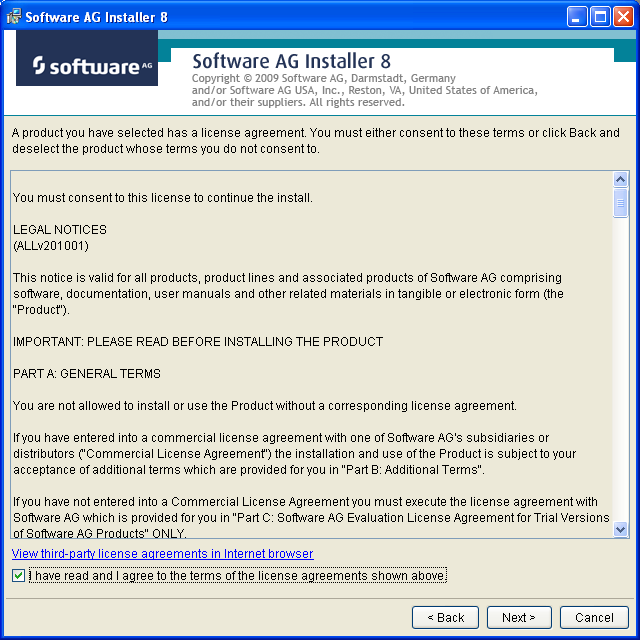
Rread the terms and conditions. When you have finished confirm you have done so by checking the box. Click Next to continue:
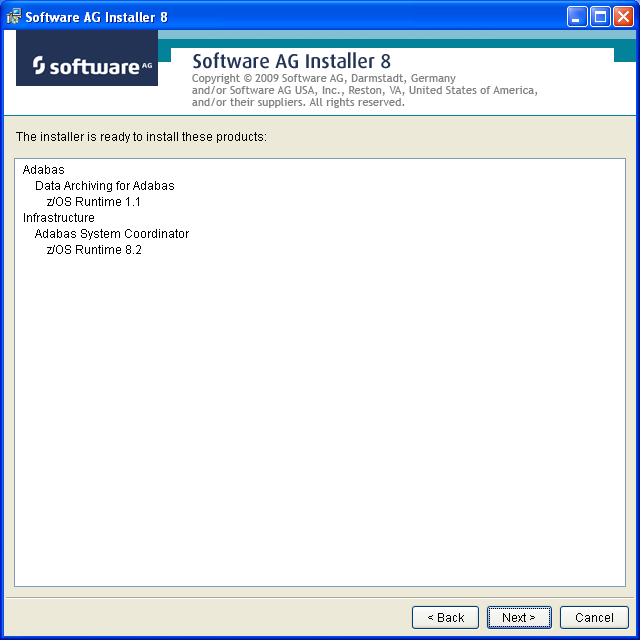
A list of the products selected for install is provided. Click Next to perform the installation:
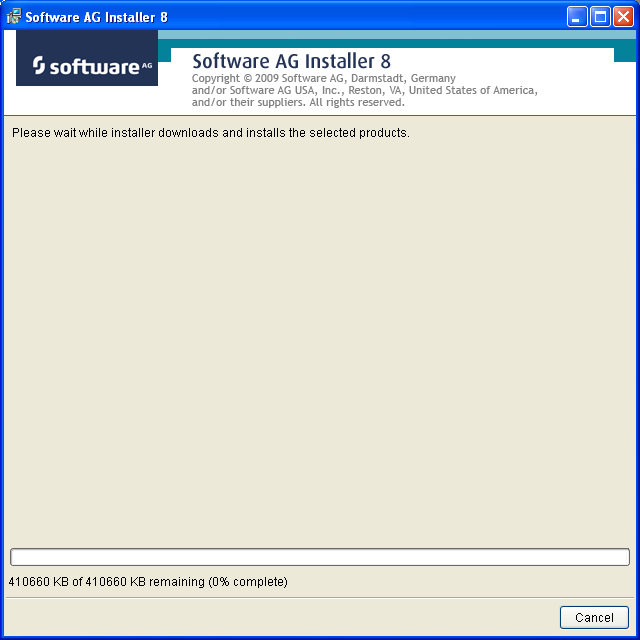
The installation may take some time.
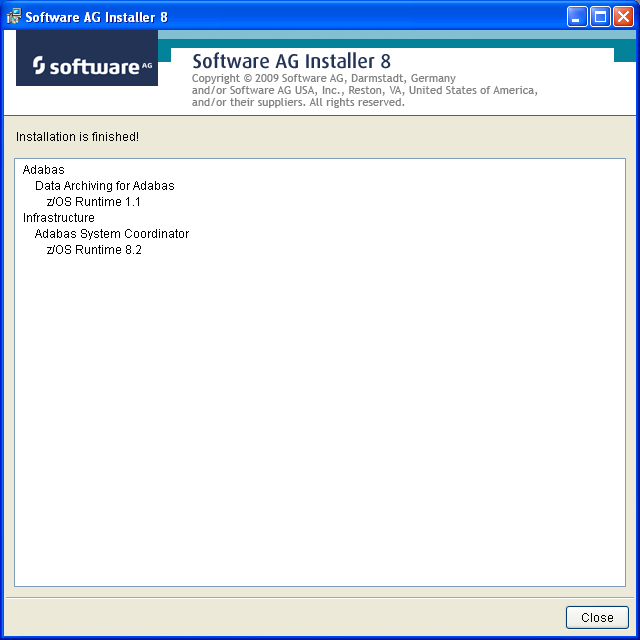
Once the installation of all the products is completed you will see the following confirmation screen:
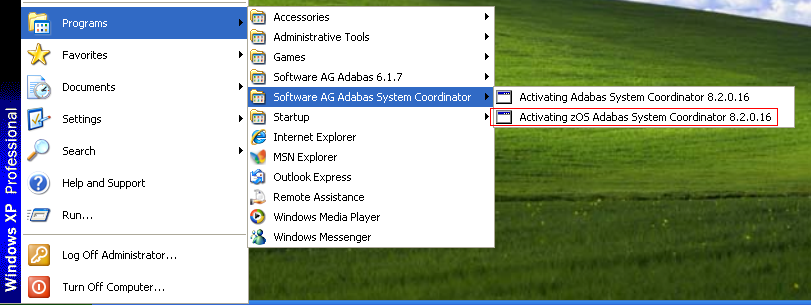
Once the installation of the off-host UI portion is completed you can then start the (off-host) z/OS specific activation in that platform too. In Windows it is another start menu option (with z/OS in the name).
The following screen shows the start menu option for the z/OS part (marked in red) accompanied by Windows part too. Select z/OS as shown below:
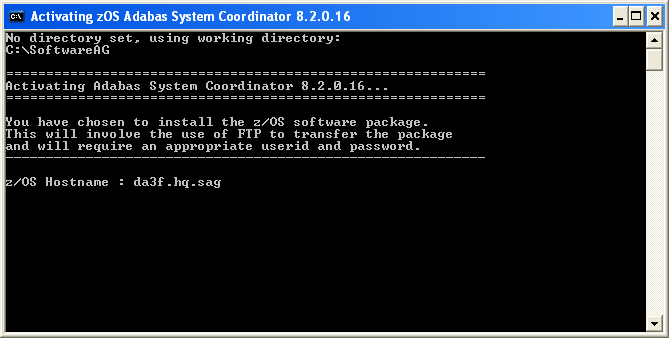
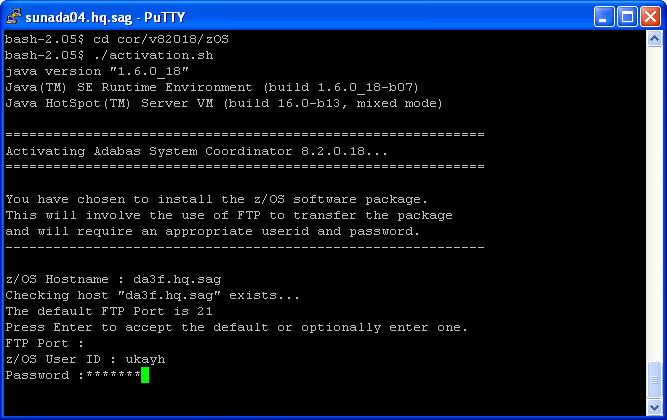
Now you see the opening screen explaining that (z/OS) FTP information is needed. The first thing you must supply is the fully qualified hostname for z/OS FTP for your site. In the screen (below) you see a hostname has been supplied. Press Enter to continue once the hostname is correctly entered:
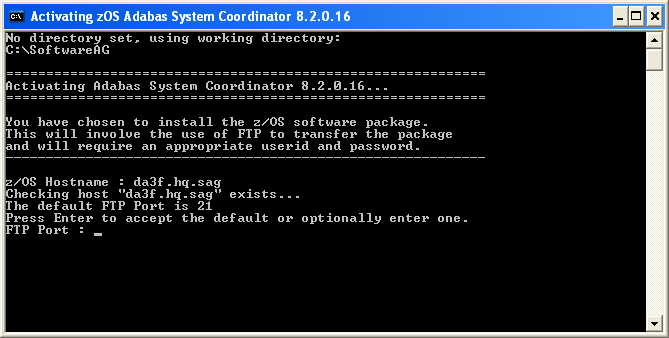
In the screen (below) you see the supplied hostname is checked to see if it can be reached. If it cannot be reached the hostname may be wrong, or perhaps firewall issues are preventing it being found. Once the hostname is validated you must identify the FTP port for your z/OS system. This is usually port 21, in which case you can just press Enter to use 21 as the default. If your FTP port is different then provide the port number here (see below):
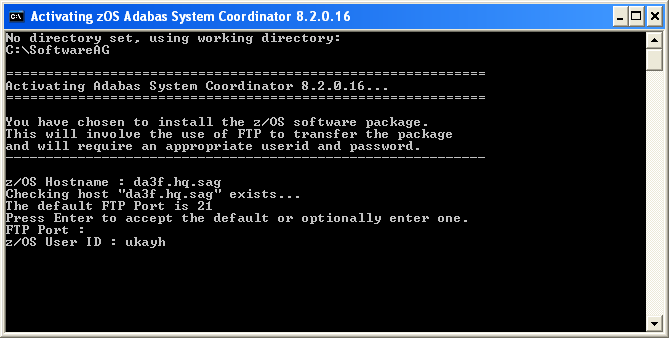
A valid z/OS userid is needed to carry out an FTP operation too. Below you see one supplied:
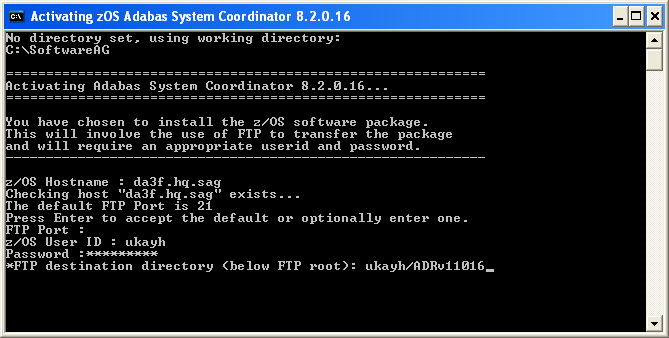
And (below) a valid z/OS password is needed too:

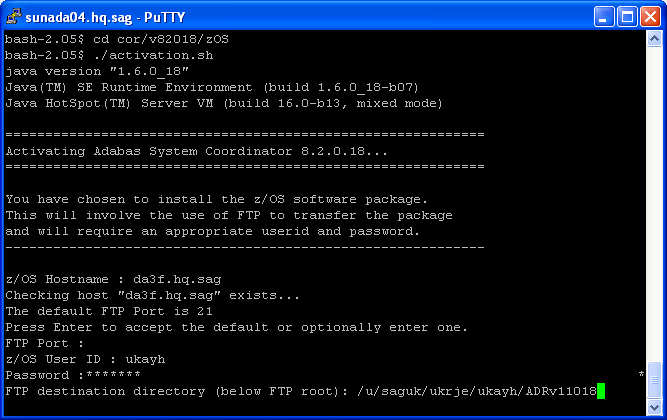
You also need to identify a new directory (to be automatically created within the FTP root directory in z/OS) to where the software will be copied, as you see below:
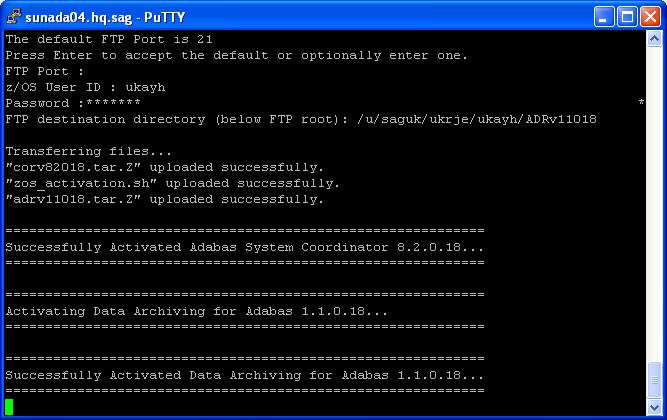
Finally, when all the information is gathered, the FTP executes, and you get final confirmation messages as you see below:
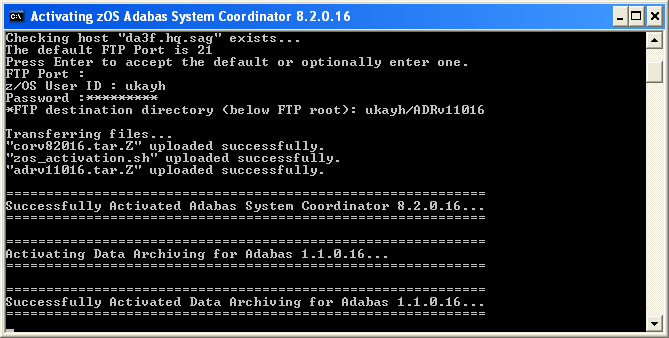
You are now ready to go into z/OS to take the final step to activate the software. Go to step 3.
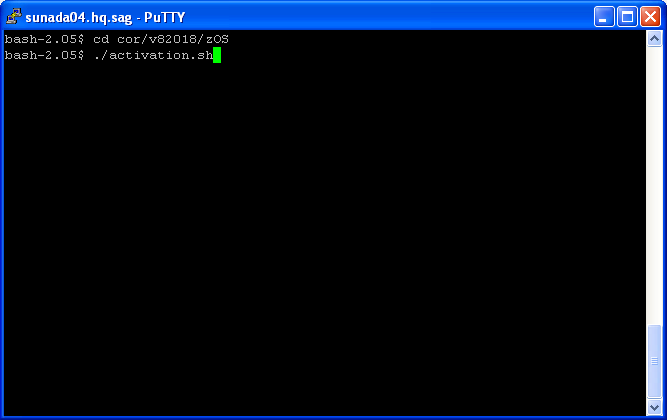
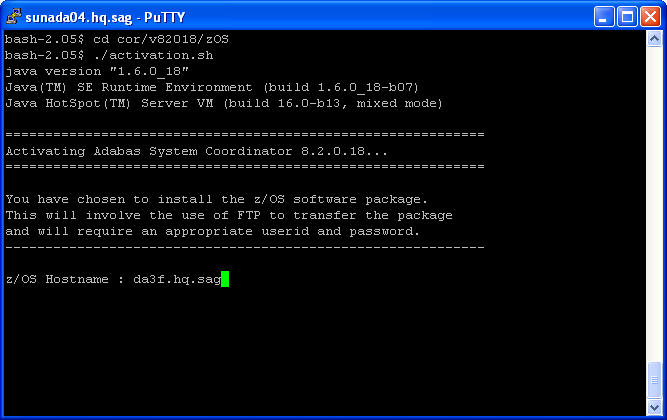
Once the installation of the off-host UI portion is completed you can then start the (off-host) z/OS specific activation in that platform too.
In Solaris navigate to the subdirectory cor/v82018/zOS and run the command ./activation.sh.
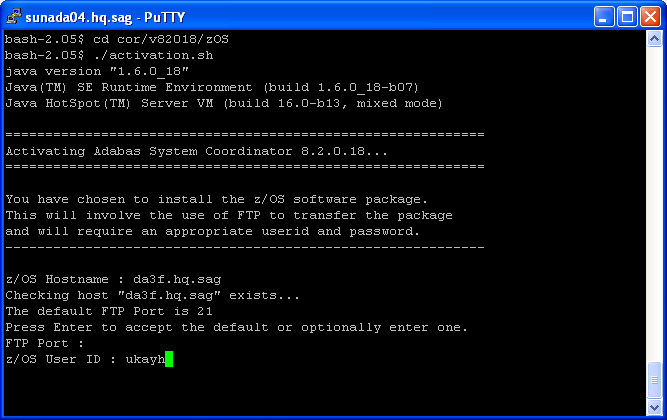
Now you see the opening screen explaining that (z/OS) FTP information is needed. The first thing you must supply is the fully qualified hostname for z/OS FTP for your site. In the screen (below) you see a hostname has been supplied. Press Enter to continue once the hostname is correctly entered:
In the screen (below) you see the supplied hostname is checked to see if it can be reached. If it cannot be reached the hostname may be wrong, or perhaps firewall issues are preventing it being found. Once the hostname is validated you must identify the FTP port for your z/OS system. This is usually port 21, in which case you can just press Enter to use 21 as the default. If your FTP port is different then provide the port number here (see below):

A valid z/OS userid is needed to carry out an FTP operation too. Below you see one supplied:
And (below) a valid z/OS password is needed too:
You also need to identify a new directory (to be automatically created within the FTP root directory in z/OS) to where the software will be copied, as you see below:
Finally, when all the information is gathered, the FTP executes, and you get final confirmation messages as you see below:
Get into your USS (OMVS) system by TSO OMVS
command or telnet <computer> <port> .
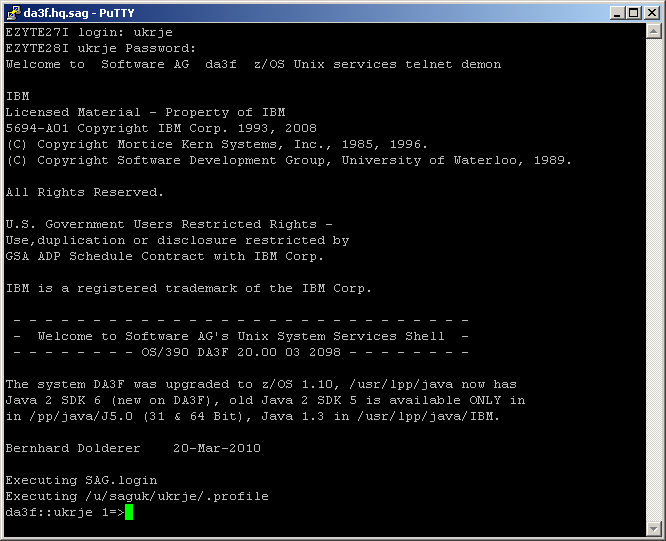
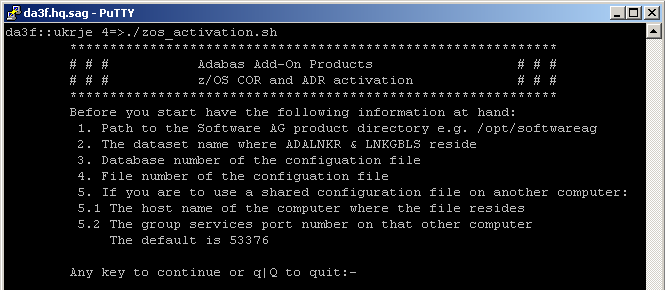
Change directory to the new one created by the FTP step above. Once you are in that directory enter ./zos_activation.sh at the command prompt to execute the final z/OS runtime activation. The first display lists all the information that you will need to supply in order to complete the activation, as seen below:
Having pressed Enter (or any key) to continue at the preceding screen you now need to identify the path to the general Software AG software directory (it usually ends in /opt/softwareag or similar), as below:

Now identify the normal z/OS dataset where ADALNKR and LNKGBLS have been prepared (as in the preparation steps above), as below:

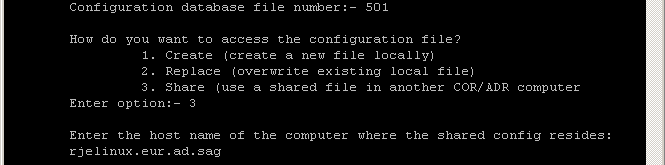
Now identify the database number where the configuration file is to reside (or perhaps already resides). Then provide the file number for the configuration file too. Both prompts can be seen filled in below:

Having identified the database and file number of the configuration file, you now need to indicate if the file was previously installed in another computer or if it is to be created new or if an existing one is to be overlaid. This time we choose to share a file that already exists by choosing option 3 below (we do this because this involves more steps to show you here as a useful example):

To use a file from a previous install in another computer you must first identify the fully qualified hostname, as you can see below:
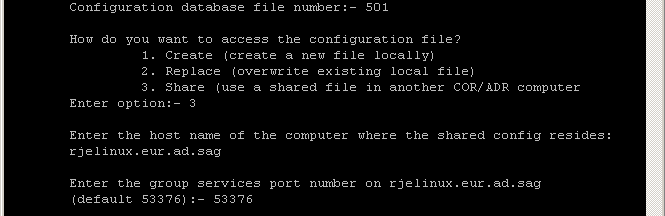
And you also need to identify the group services port used in that other computer by the previous install. The default is 53376 which is used below:
Once all the settings are known they are displayed back to you for confirmation. If you see any that are incorrect then enter the number for any option in order to re-enter it. Once you are happy all is well then press C to continue or <Ctrl C> (you can re-run the activation) to quit, any other key will be ignored…
Now the main part of the activation executes. Below you see the install files copied, uncompressed, etc. and finally you are asked if you want the software to be started up…
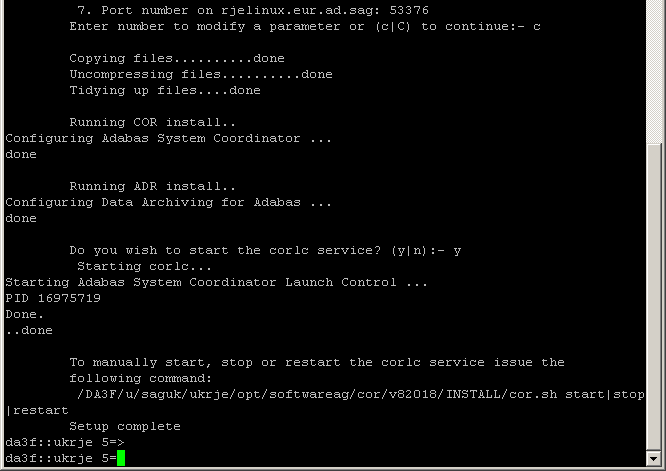
Now that the software (runtime) is started you are ready to use it through the browser from a non-z/OS platform that will reach out to the runtime in z/OS.
After installing the ADR runtime for the first time you must activate the ADR runtime within the UI browser. The browser (and prerequisite System Management Hub) must have been previously installed.
![]() to use the Runtime from the Browser UI:
to use the Runtime from the Browser UI:
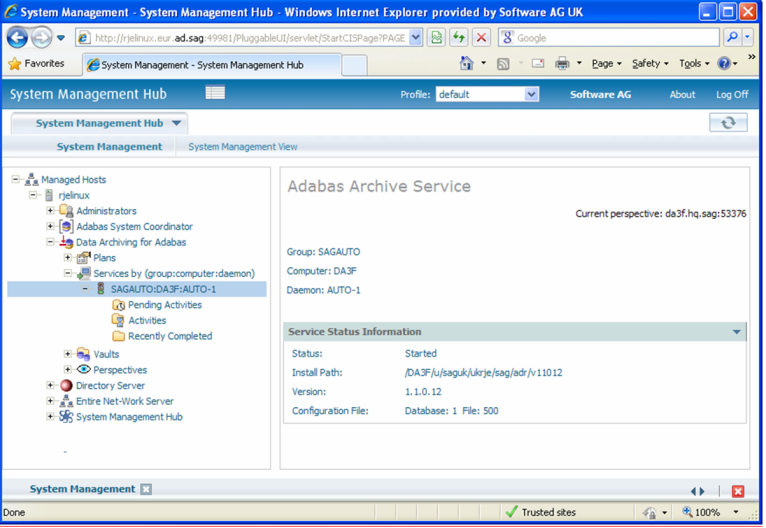
Log on to SMH on a computer where the UI has been installed and expand the tree node for the UI computer.

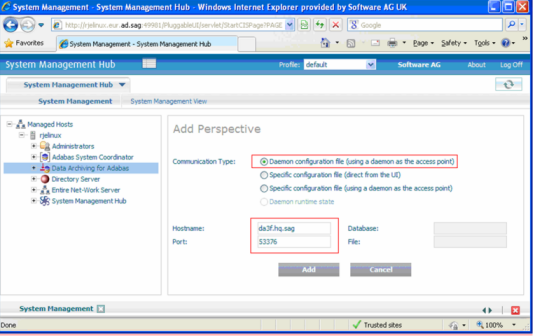
Select the main node. If the UI computer does not also have the runtime installed there, the first time you enter it you will be asked to identify the location of the configuration file that has just been created in z/OS (or elsewhere if it was created during the install of the runtime in a different computer altogether)…then click Add.
Right-click on the main node in the tree and select Refresh so that the selected perspective comes into force.
Within the tree select the node. You should see the archive service for the runtime in the computer you have just installed. This should show a green traffic light which indicates that the service is active.
The installation is now complete. You can begin using Data Archiving for Adabas. See the section Getting Started for further information.