This section provides information about installing and running Entire Net-Work in the z/VM operating system environment. It covers the following topics:
Note:
Software AG licensing software is not provided for VM/GCS
environments.
Each virtual machine running under z/VM has its own operating environment. This may be:
a batch operating system such as z/VSE, MVS, or VM/GCS; or
an interactive system such as CMS.
Batch operating systems running in virtual machines are called "guest" operating systems. Entire Net-Work can run in guest operating systems the same way it runs on actual physical machines, except that communication between virtual machines does not require a physical communication medium. All virtual machines on a physical machine are viewed by the network as one logical node.
Within the z/VM environment, on any one physical machine, each virtual machine supporting an Entire Net-Work Communicator is considered a separate node.
For efficient communication, however, all CMS virtual machines on a physical machine are viewed by the network as one logical node.
Two Entire Net-Work configurations are available for the VM/CMS environment. Either the ITM (ID Table Manager) configuration or the full Entire Net-Work configuration or both can be installed. A brief description is provided below. For detailed information, see the section Installing the ITM in VM/CMS and the section Installing Entire Net-Work in VM/CMS.
The ITM controls Adabas routing information.
The ITM (ID Table Manager) configuration is sufficient in most cases where communication is required only between virtual machines in the VM/CMS environment.
On z/VM systems where the full Entire Net-Work configuration is installed under CMS or GCS, the ITM is required if CMS clients access a local or remote Adabas or if Adabas is run in CMS on the same z/VM system.
The full Entire Net-Work configuration includes the Entire Net-Work control program. It allows communication, using TCPX, with all supported Entire Net-Work environments and platforms outside the VM/CMS environment.
Before installing the ITM configuration or the full Entire Net-Work or both, at least one virtual machine(s) must be defined:
Entire Net-Work virtual machine. Entire Net-Work runs in its own virtual machine, which normally runs disconnected. The virtual storage required is 2MB, but at least 8MB is recommended.
The ITM virtual machine. If Entire Net-Work is implemented in a z/VM environment in conjunction with Adabas or CMS clients (such as Natural clients), the ITM Virtual Machine is required. For details, see the section The ITM Virtual Machine.
In addition, Software AG recommends at least one other virtual machine:
Entire Net-Work Administrator. For details, see the section The Administrator Virtual Machine.
Entire Net-Work User. For details, see the section The User Virtual Machine.
If the ITM is used, the Database Administrator virtual machine should be used as the Entire Net-Work Administrator machine.
Each virtual machine operates as a task within its own CMS environment and comprises system resources that emulate virtual storage, virtual DASD (minidisk) space, and I/O capabilities such as an operator console and printer. The actual system resources allocated to each Entire Net-Work virtual machine are either
predefined in a CP directory; or
dynamically defined in the PROFILE EXEC that is invoked when each Entire Net-Work virtual machine begins operating.
If an Adabas ID Table Manager machine currently exists, it should be used as the ITM virtual machine for Entire Net-Work. If not, then the ITM must be installed on a separate virtual machine. See the section Installing the ITM in VM/CMS.
The virtual storage size required for the ITM virtual machine is 2M.
The "A" disk must be at least 100 4KB blocks at address 19
If an Entire Net-Work Administrator virtual machine is being used, a read-only link to the Entire Net-Work library disk is necessary.
If no Entire Net-Work Administrator virtual machine is being used, the Entire Net-Work library disk must be defined for the Entire Net-Work virtual machine and/or the ITM virtual machine. The library disk must be at least 300 4KB blocks (or equivalent).
The Entire Net-Work virtual machine and/or the ITM virtual machine must be authorized for IUCV communication.
The following entries should be placed in the CP directory of the Entire Net-Work virtual machine and/or the ITM virtual machine if Entire Net-Work will be accepting IUCV connections from other Entire Net-Work nodes:
IUCV ALLOW (PRIORITY)
IUCV ANY (PRIORITY)
where PRIORITY is optional, but recommended.
Also in the CP directory, the OPTION statement's MAXCONN parameter must be set high enough to accommodate an IUCV path to each user virtual machine, either CMS or a "guest" operating system:
two paths to each Adabas nucleus machine under CMS; and
one path to each "guest" operating system where another Entire Net-Work resides.
The PROFILE EXEC of the Entire Net-Work or ITM virtual machine should contain the required CMS commands (see the section Running the ITM in VM/CMS).
Software AG recommends starting the Entire Net-Work or ITM virtual machine automatically at system startup time using the AUTOLOG command in the PROFILE EXEC of the AUTOLOG1 virtual machine. If set up to do so, the ID Table Manager virtual machine's PROFILE EXEC can execute AUTOLOG to start the Adabas virtual machines.
The Entire Net-Work or ITM virtual machine should be included in the SMART service virtual machine list. This can be done by including the following command in the SMINIT EXEC:
VMC smartvmid SET UL idtmvmid
where smartvmid and idtmvmid are the virtual machine IDs of the SMART and ID Table Manager virtual machines.
The Administrator virtual machine can be defined to z/VM as a secondary console for the Entire Net-Work machine. This allows the administrator to control the nucleus machine and issue Entire Net-Work operator commands using the SEND command from the terminal.
The secondary console support is defined by specifying the CONSOLE statement in the CP directory of the Entire Net-Work machine as follows:
CONSOLE 009 devtype T nwavmid
where:
| devtype | is the administrator console device type |
| nwavmid | is the administrator virtual machine ID |
The following is an example of the entries in the CP directory for the ITM virtual machine named DBIDSERV. The virtual machine ADMNVMID is used as the alternate console.
USER DBIDSERV DBIDSERV 2M 8M G
ACCOUNT xxxxxxxx
OPTION MAXCONN 100
IUCV ALLOW PRIORITY
IUCV ANY PRIORITY
IPL CMS PARM AUTOCR
CONSOLE 009 3215 T ADMNVMID
SPOOL 00C 2540 READER *
SPOOL 00D 2540 PUNCH A
SPOOL 00E 1403 A
LINK MAINT 190 190 RR
LINK MAINT 19E 19E RR
MDISK 191 3390 274 1 vvvvvv MR rpassword
where:
| rpassword | is the multiread password for the library minidisk |
| vvvvvv | is the volume serial number of a physical disk |
Allocating a separate Administrator virtual machine gives the Entire Net-Work administrator maximum control of the Entire Net-Work environment. The Entire Net-Work administrator can then
maintain a single Entire Net-Work library disk, WCPVvrs TXTLIB; and
issue operator commands for nuclei running in disconnected machines (when the Entire Net-Work Administrator virtual machine is defined as a secondary console for the Communicator machine).
If Entire Net-Work is to be implemented in a VM/CMS environment in conjunction with Adabas in the z/VM environment (VM/CMS or VM/GCS), or in conjunction with Entire Net-Work under VM/GCS, it is strongly recommended that one central Administrator virtual machine be used for all Software AG products in the z/VM environment.
The Administrator virtual machine requires a minimum of 2M virtual storage.
The "A" disk must be at least 100 4KB blocks (or the equivalent).
If this virtual machine is being used, the Entire Net-Work library disk
must be defined in the CP directory for the Administrator virtual machine; and
must be at least 300 4KB blocks (or the equivalent); and
must not be placed on the "A" disk.
The Administrator virtual machine does not require communications unless user programs are to be executed in the virtual machine. For more information, see the section The User Virtual Machine.
The following is an example of the entries in the CP directory for an Administrator virtual machine named ADMNVMID:
USER ADMNVMID ADMNVMID 2M 8M G
ACCOUNT xxxxxxx
IPL CMS PARM AUTOCR
CONSOLE 009 3215
SPOOL 00C 2540 READER *
SPOOL 00D 2540 PUNCH A
SPOOL 00E 1403 A
LINK MAINT 190 190 RR
LINK MAINT 19E 19E RR
MDISK 191 3390 364 002 vvvvvv MR rpassword
MDISK 193 3390 371 005 vvvvvv MR rpassword
where:
| rpassword | is the multiread password for the library minidisk |
| vvvvvv | is the volume serial number of a physical disk |
User programs should execute from their own virtual machine. Each user virtual machine should meet the requirements defined in this section.
Each User virtual machine requires a minimum of 2M virtual storage.
Each User virtual machine must LINK to and ACCESS the Entire Net-Work library disk; that is, where WCPVvrs TXTLIB resides.
The User virtual machine does not need to be authorized to use IUCV. If Entire Net-Work will accept incoming IUCV connections from other Entire Net-Work nodes, the Entire Net-Work virtual machine and/or the ITM virtual machine has an IUCV ALLOW statement in its CP directory entry for IUCV communication.
To execute an Adabas user program, the User virtual machine must have the following statements in its PROFILE EXEC:
ACCESS cuu fm/A
GLOBAL TXTLIB libname
where:
| cuu | is the virtual unit address of the library minidisk |
| fm | is the file mode of the library minidisk |
| libname | is the TXTLIB filename |
The SETTXTLB supplied on the installation tape can be used to insure that the current version of the TXTLIB is being used.
A User virtual machine requires four nucleus extensions with the following attributes:
ADARUN SYSTEM SERVICE
DATADEF SYSTEM
DISPDD SYSTEM
RELDD SYSTEM
The NUCXTNTS EXEC must be issued with the parameter 'USER' to load the four nucleus extensions.
The following is an example of the entries in the CP directory for the User virtual machine:
USER ADAUSER1 ADAUSER1 1536K 8M G
ACCOUNT xxxxxxx
OPTION MAXCONN 10
IPL CMS PARM AUTOCR
CONSOLE 009 3215
SPOOL 00C 2540 READER *
SPOOL 00D 2540 PUNCH A
SPOOL 00E 1403 A
LINK MAINT 190 190 RR
LINK MAINT 19E 19E RR
LINK ADMNVMID 193 193 RR
MDISK 191 3390 381 007 vvvvvv RR rpassword
where:
| rpassword | is the multi-read password for the library minidisk |
| vvvvvv | is the volume serial number of a physical disk |
Any file assignments necessary to run an Adabas user program under VM/CMS must be issued using the DATADEF command.
For example, the following DATADEF statements are specified if control statements for ADARUN are located in a CMS file named USERPROG DDCARD A, and the output from ADARUN is to be placed in a file USERPROG DDPRINT A:
DATADEF DDCARD,DSN=USERPROG.DDCARD,MODE=A
DATADEF DDPRINT,DSN=USERPROG.DDPRINT,MODE=A
If a user program runs in multiuser mode and accesses one standard database ID, no ADARUN control statements are required.
For more detailed information about DATADEF, refer to the Adabas Installation Manual.
The Entire Net-Work library minidisk must be at least 300 4KB blocks (or the equivalent).
The library minidisk must be defined with a multiread or "ALL" password in either
the Entire Net-Work Administrator machine's CP directory; or
the Entire Net-Work Communicator virtual machine's CP directory if no Administrator machine has been defined.
All virtual machines using Entire Net-Work must have read-only LINKs to the library minidisk.
The SETTXTLB EXEC can be invoked by User machines to insure a GLOBAL TXTLIB command with the current version issued.
To install the ITM on a VM/CMS system:
Ensure that the required virtual machines have been defined. See the section Defining the Virtual Machines.
Define minidisk space for the ITM library.
Software AG recommends four cylinders of 3390 DASD. If an Administrator virtual machine has been defined, the library minidisk should be defined by an MDISK statement in the CP directory for that virtual machine; otherwise, it should be defined in the CP directory of the Entire Net-Work virtual machine.
Load the ITM installation tape.
Define the ITM environment.
LOGON to the ITM virtual machine. If an existing Adabas ID Table Manager virtual machine is to be used, terminate all active Adabas nuclei, and terminate the ID Table Manager with the SHUTDOWN command.
DISCONNECT from this virtual machine, and LOGON to the Entire Net-Work Administrator virtual machine, if one has been defined, or an existing Adabas DBA machine.
ATTACH a tape drive as unit 181. Then ACCESS the ITM library minidisk with a file mode other than A.
The ITM file WCPVvrs.TAPE is provided in TAPE DUMP format. Issue the following commands to position the tape to the correct file:
TAPE REW
TAPE FSF value
where value is the forward space file value.
This value can be calculated using the formula
3n - 2, where
n is the file sequence number for the
WCPVvrs.TAPE file (see the Report of Tape
Creation).
Issue the following command to load the ITM files:
TAPE LOAD * * fm
where fm is the file mode of the CMS minidisk where the installation tape will be installed.
These files include the WALVvrs TXTLIB.
You can perform the rest of the installation procedure manually by following Steps 6 through 10 below. Alternatively, you can perform the rest of the installation procedure automatically by executing the online installation procedure INSTWCP to perform these steps; then continue with Step 1. Software AG recommends the Online Procedure.
Create a PROFILE EXEC for the ITM virtual machine. Include the following functions:
If an Entire Net-Work Administrator virtual machine is being used, link the ITM library minidisk in MULTI READ mode.
ACCESS the library disk as a read-only extension of the "A" disk.
'ACC cuu fm/A'
Issue the SETTXTLB EXEC.
The SETTXTLB EXEC distributed on the installation tape includes the "GLOBAL TXTLIB" definition which contains the WCPVvrs TXTLIB and the Adabas (WALVvrs) TXTLIB. In this definition, the WCPVvrs TXTLIB is placed ahead of the Adabas TXTLIB. If you are using a SETTXTLB EXEC other than the one distributed with the current release of Entire Net-Work, be sure to place the WCPVvrs TXTLIB ahead of the Adabas TXTLIB. For example, the following is correct for Entire Net-Work 6.2.1:
GLOBAL TXTLIB WCPV6.2.1 WALV814
Clear the console stack DESBUF.
Load and invoke ADAITM.
'LOAD ADAITM (RESET ADAITM'
'START * ...'
If an Administrator virtual machine is defined, ensure that the PROFILE EXEC is located on the "A" disk of the ITM virtual machine and not on the Administrator machine.
If you are installing on an existing Adabas Administrator machine, the existing SETTXTLB EXEC must be modified to include the ITM TXTLIB (WCPVvrs) and the Adabas limited sublibrary (WALVvrs) in the GLOBAL TXTLIB statement.
Modify the ADALDI ZAP file to include the name of the ITM virtual machine. Apply the zap with the CMS ZAP command.
Modify the ADAITM ZAP file to include the node ID of the ITM virtual machine and the automatic restart parameter setting. Apply the zap with the CMS ZAP command.
Regenerate the required modules by executing the exec REFRESH.
Refer to the Report of Tape Creation to determine whether any ppppvrs.ZAPS files are included on the distribution tape.
If so, apply corrective maintenance. Unload each of these files from
the installation tape by issuing the TAPE FSF command to position the tape
correctly, and then issuing the TAPE LOAD * * fm command. Then
follow the procedure outlined in the member $READGCSDOC.
LOGON to the ITM virtual machine and enter PROFILE.
DISCONNECT from the ITM virtual machine.
The PROFILE EXEC created or modified by the Online Procedure will automatically start the ID Table Manager (ITM). If the Online Procedure was not used, or if ITM is to be started without the PROFILE EXEC, the following CMS commands must be entered:
'CP LINK ADMNVMID cuu cuu RR rpassword'
'ACC cuu fm/A'
'GLOBAL TXTLIB qqq WCPV621 WALV812'qqq
'LOAD ADAITM ( RESET ADAITM'
'START * DBAVMID dbavmid NODEID nodeid DOMAIN domain NODENAME nodename NETRESID netresid'
where:
| cuu | is the virtual unit address of the library minidisk. |
| fm | is the CMS filemode. |
| dbavmid | is the virtual machine ID for the Administrator virtual machine. |
| nodeid | target ID; is the target ID for the ID Table Manager virtual machine (service machine). |
| domain | is the domain name. |
| nodename | is the node name. |
| netresid | is the ID Table Manager resource ID. |
| rpassword | is the multi-read password for the library minidisk. |
The LINK statement is required only if an Administrator virtual machine is used.
Operator commands can be entered directly from the z/VM console, like the following example:
LISTTARG
or from a secondary console using the CP SEND command to prefix the command, like the following example:
CP SEND netvmid LISTTARG
where netvmid is the virtual machine ID of the ITM virtual machine.
The operator commands for the VM/CMS environment differ from the operator commands for other environments. For more information, see the section Operator Commands for the ITM in VM/CMS.
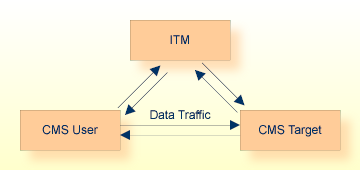
The ITM (ID Table Manager) handles routing information, ensuring that each local user virtual machine receives information only for the target it needs to access, regardless of whether that target is local or remote.
The ITM supports Adabas user programs and targets in the CMS environment. The following diagram shows the ITM role in a simple z/VM configuration.
The ITM
ensures unique target/user IDs;
maintains overall Entire Net-Work status (node, link, and service/database availability) throughout the network; and
selects targets and routing paths.
The ITM is required only in z/VM systems running one or more CMS virtual machines that need access to Adabas or other Entire Net-Work nodes. It maintains and provides routing information to users, targets, and to Entire Net-Work nodes running with guest operating systems. To do this, the ITM maintains up-to-date information about all targets, users, and other nodes in the network. It provides all information needed for communication between virtual machines, whether those machines are running CMS or a guest operating system.
Any Entire Net-Work node wishing to communicate on behalf of a non-CMS user with a CMS virtual machine target must first set up a communications path to the ITM virtual machine. CMS virtual machines establish a link to the ITM automatically.
Although it appears to other nodes as a normal network node, the ITM never receives payload messages. Instead, messages are queued to an Entire Net-Work line driver, which sends them on the group link for transmission to the proper target.
The ITM is vital to communications in the CMS environment. If the ITM virtual machine becomes unavailable, communications with all users, targets, and operating systems in the host processor are no longer possible. For this reason, the CP command FORCE should never be issued to this virtual machine.
If the link between the ITM and an Entire Net-Work node in a guest operating system becomes inactive, it must be restarted from the guest operating system end either by starting the Entire Net-Work Communicator or by issuing the CONNECT operator command. The ITM cannot automatically reconnect itself to the Entire Net-Work nodes. machine.
If the ITM is not able to transmit a message to an adjacent node due to an IUCV message limit overflow, the link to this node is disconnected by the ITM and an AITM28 message is written to the ADAITM MSGS file. (This file can be displayed using the LISTMSG command.)
If this occurs, the link must be manually reconnected from an Entire Net-Work node other than the CMS node by using the Entire Net-Work CONNECT operator command.
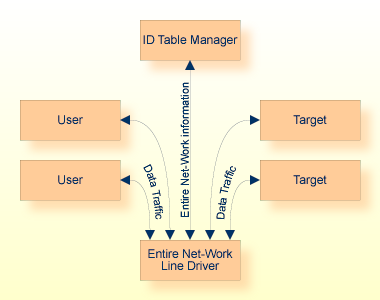
The connection between a guest operating system running in one virtual machine and users/targets in the CMS environment on the same host processor is called a "group link". The group link is, in fact, a number of links:
a major link from the Entire Net-Work Communicator in the guest operating system to the ITM; and
minor links to the various CMS virtual machines.
A group link is the only link possible between a guest operating system and CMS, and only one group link may exist for any one Communicator. The following figure shows the group link structure.
The functions of a line driver supporting a group link combine the normal line driver functions and the functions of Adabas ADALNK and ADAMPM. When a message is queued to a group link, the line driver determines the virtual machine to which the message is to be routed and sends the message directly to that machine without going through an intermediate CMS Communicator.
The IUCV line driver is the only line driver currently supported for the ID Table Manager (ITM) in the VM/CMS environment.
To install Entire Net-Work on a VM/CMS system:
Ensure that the required virtual machines have been defined. See the section Defining the Virtual Machines.
Define minidisk space or a Shared File System (SFS) directory for the Entire Net-Work library. It must be at least 300 4KB blocks (or the equivalent). If an Administrator virtual machine has been defined, the library minidisk should be defined by an MDISK statement in the CP directory for that virtual machine; otherwise, it should be defined in the CP directory of the Entire Net-Work virtual machine.
Load the Entire Net-Work installation tape.
Define the Entire Net-Work environment.
![]() To load the installation tape, complete the following steps:
To load the installation tape, complete the following steps:
LOGON to the Entire Net-Work virtual machine, or to the Entire Net-Work Administrator virtual machine, if it exists.
If an existing Adabas ID Table Manager virtual machine is to be used, terminate all active Adabas nuclei. Then terminate the ID Table Manager, using the SHUTDOWN command.
If an Entire Net-Work Administrator virtual machine has been defined, DISCONNECT from this virtual machine and LOGON to the Administrator virtual machine or an existing Adabas DBA machine.
ATTACH a tape drive as unit 181. Then ACCESS the Entire Net-Work library minidisk or SFS directory with a file mode other than A.
The Entire Net-Work file WCPVvrs.TAPE is provided in TAPE DUMP format. Issue the following commands to position the tape to the correct file:
TAPE REW
TAPE FSF value
where value is the forward space file value.
This value can be calculated using the formula
3n - 2, where
n is the file sequence number for the
WCPVvrs.TAPE file(see the Report of Tape
Creation).
Issue the following command to load the Entire Net-Work files:
TAPE LOAD * * fm
where fm is the file mode of the CMS minidisk or SFS directory where the installation tape will be installed.
The Entire Net-Work file WALVvrs.TAPE is provided in TAPE DUMP format. Issue the following commands to position the tape to the correct file:
TAPE REW
TAPE FSF value
where value is the forward space file value.
This value can be calculated using the formula
3n - 2, where
n is the file sequence number for the
WALVvrs.TAPE file (see the Report of Tape
Creation).
Issue the following command to load the Entire Net-Work files:
TAPE LOAD * * fm
where fm is the file mode of the CMS minidisk or SFS directory where the installation tape will be installed.
![]() To define the Entire Net-Work environment, complete the following
steps:
To define the Entire Net-Work environment, complete the following
steps:
Create a PROFILE EXEC for the Entire Net-Work virtual machine. Include the following functions:
If an Entire Net-Work Administrator virtual machine is being used and the Entire Net-Work library is on a minidisk, link to the minidisk in MULTI READ mode. ACCESS the library disk as a read-only extension of the "A" disk.
ACC cuu fm/A
If the Entire Net-Work library is on an SFS directory, access the SFS directory as a read-only extension of the "A" disk.
ACC dirid fm/A
If the output files (DDPRINT and NETPRNT) will be written to this SFS directory, the Entire Net-Work virtual machine must be granted write authority to this SFS directory, and it should be accessed as a file mode other that "A".
ACC dirid fm
Modify the NETWORK EXEC file. Change the DATADEF statements to point to the required files on the Entire Net-Work library minidisk or SFS directory. Software AG recommends placing the output files (DDPRINT and NETPRNT) in an SFS directory; this allows the Administrator machine to view the files while Entire Net-Work is running.
Examples for placing the files on a minidisk:
DATADEF DDPRINT,DSN=NETWRK.DDPRINT,MODE=A
DATADEF NETPRNT,DSN=NETWRK.NETPRNT,MODE=A
DATADEF DDCARD,DSN=ADARUN.DDCARD,MODE=A
DATADEF DDKARTE,DSN=NETWRK.DDCARD,MODE=A
Examples for placing the files in an SFS directory:
DATADEF DDPRINT,DSN=filepool:dirid,UNIT=SFS,FNAME=NETWRK,FTYPE=DDPRINT
DATADEF NETPRNT,DSN=filepool:dirid,UNIT=SFS,FNAME=NETWRK,FTYPE=NETPRNT
DATADEF DDCARD,DSN=filepool:dirid,UNIT=SFS,FNAME=ADARUN,FTYPE=DDCARD
DATADEF DDKARTE,DSN=filepool:dirid,UNIT=SFS,FNAME=NETWRK,FTYPE=DDCARD
Create the NETWRK DDCARD file, specifying the necessary NODE, DRIVER, and LINK statements. The NETWRK SAMPLE file can be used as an example. An IUCV link must be created for the ID Table Manager if it exists, plus any other required links. For more information, see the section Entire Net-Work Parameter Statements.
Create the ADARUN DDCARD file, specifying the necessary ADARUN parameters. The ADARUN SAMPLE file can be used as an example. For more information, see the section ADARUN Control Statements.
Refer to the Report of Tape Creation to
determine whether any ppppvrs.ZAPS files are
included on the distribution tape. If so, apply corrective maintenance. Unload
each of these files from the installation tape by issuing the TAPE FSF command
to position the tape correctly, and then issuing the TAPE LOAD * *
fm command.
Prepare and install the product license file.
The product license file is supplied on the individual customer installation tape or separately via an e-mail attachment. To install it you must:
Transfer the license file from tape or e-mail to your A disk as LICENSE DATA. Instructions for performing these transfers are provided in Transferring a License File to a z/VM Host. Be sure to specify a file name of "LICENSE" and a file type of "DATA" during the transfer.
Once the license file is transferred , you can install it. Instructions for installing the license are provided in this step.
To install the product license file, complete the following steps:
Verify that the license file is located on the A disk as LICENSE DATA (with RECFM=F and LRECL=80), taking care to preserve its format as ASCII.
Verify that the contents of the MLCvrs.TAPE library have been made available to the Entire Net-Work library disk.
Run the LICMAKE EXEC. This EXEC invokes the LICUTIL utility to generate file LICENSE ASSEMBLE A.
Run the ASMLICAM EXEC. This EXEC assembles LICENSE ASSEMBLE, creating NETLIC TEXT. This file must be available to Entire Net-Work.
Notes:
DMSSVT121S Unsupported SVC 98 (HEX 62) called from
nnnnnnnn
To start Entire Net-Work:
LOGON to the Entire Net-Work virtual machine and enter NETWORK.
DISCONNECT from the Entire Net-Work virtual machine.
Operator commands can be entered directly from the z/VM console, or from a secondary console using CP SEND to prefix the command. For example:
DISPLAY LINKS can be entered directly from the z/VM console.
CP SEND netvmid DISPLAY LINKS can be entered from a secondary console, where netvmid is the virtual machine ID of the Entire Net-Work virtual machine.
Software AG recommends that you disconnect from the running Entire Net-Work virtual machine, and that operator commands be issued from a secondary console. For details about the operator commands, see the section Entire Net-Work Operator Commands.
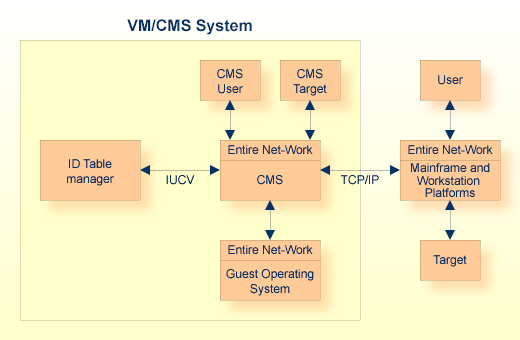
This section describes the Entire Net-Work requirements under VM/CMS.
As shown in the following diagram, Entire Net-Work in a VM/CMS system can connect to any other supported version of Entire Net-Work, allowing communication between CMS users and targets, and non-CMS users and targets.
Entire Net-Work runs in its own virtual machine, which normally runs disconnected. The virtual storage required is 2MB, but at least 8MB is recommended.
The Entire Net-Work library disk can be a minidisk or SFS directory. If you are using a minidisk, Software AG recommends the following:
Define the minidisk to the Administrator machine.
Link each Entire Net-Work virtual machine to the minidisk in its PROFILE EXEC.
The storage requirement is 300 4KB blocks or the equivalent.
The output files (DDPRINT and NETPRNT) can be written to an SFS directory, allowing the Administrator machine to view the files while Entire Net-Work is running. If tracing is used, these files can get very large. If the minidisk or SFS directory runs out of space, Entire Net-Work will terminate abnormally.
Entire Net-Work must be authorized for IUCV communication if the ID Table Manager exists, or if any other IUCV links will be created.
The following entries should be placed in the CP directory:
IUCV ALLOW (PRIORITY) IUCV ANY (PRIORITY)
where PRIORITY is optional, but recommended.
Also in the CP directory, the OPTION statement's MAXCONN parameter must be set high enough to accommodate an IUCV path to each link.
The Administrator virtual machine can be defined to z/VM as a secondary console for the Entire Net-Work machine. This allows the administrator to control the nucleus machine and issue Entire Net-Work operator commands using the SEND command from the terminal.
To define the secondary console support, specify the CONSOLE statement in the CP directory of the Entire Net-Work machine as follows:
CONSOLE 009 devtype T nwavmid
where:
| devtype | is the administrator console device type |
| nwavmid | is the administrator virtual machine ID |
Note:
Software AG licensing software is not provided at this time for
VM/GCS systems.
To install Entire Net-Work on a VM/GCS system:
Define virtual machines for the Entire Net-Work environment.
One virtual machine is required for operating Entire Net-Work:
Entire Net-Work Communicator (VM/GCS)
In addition, Software AG recommends at least one other virtual machine:
Entire Net-Work Administrator (VM/CMS)
The Entire Net-Work Communicator virtual machine runs under VM/GCS; while the Entire Net-Work Administrator machine runs under VM/CMS and provides a user interface for system maintenance.
If Entire Net-Work is running in conjunction with Adabas in the CMS environment, the Database Administrator virtual machine should also be used as the Entire Net-Work Administrator virtual machine.
For specific information about the CP directory requirements for each of these virtual machines, see the section GCS Communicator Machine and the section The Administrator Virtual Machine.
Define minidisk space for the Entire Net-Work library disk.
Software AG recommends that the library minidisk be defined by an MDISK statement in the CP directory for the Entire Net-Work Administrator virtual machine.
For detailed information about the Entire Net-Work library minidisk, see the section Entire Net-Work Library Minidisk Requirements .
Load the Entire Net-Work installation tape.
Define the Entire Net-Work environment.
LOGON to the Entire Net-Work Administrator virtual machine or an existing Adabas DBA machine and ATTACH a tape drive as unit 181.
ACCESS the Entire Net-Work library minidisk with a file mode other than "A".
The Entire Net-Work file, WCPVvrs.TAPE, is provided in TAPE DUMP format. Issue the following commands to position the tape to the correct file:
TAPE REW TAPE FSF value
where value is the forward space file value.
This value can be calculated using the formula
3n - 2, where
n is the file sequence number for the
WCPVvrs.TAPE file (see the Report of Tape
Creation).
Issue the following command to load the Entire Net-Work files:
TAPE LOAD * *
                  fm
where fm is the file mode of the appropriate CMS minidisk where the installation tape will be installed.
The Entire Net-Work file, WALVvrs.TAPE, is provided in TAPE DUMP format. Issue the following commands to position the tape to the correct file:
TAPE REW
TAPE FSF value
where value is the forward space file value.
This value can be calculated using the formula
3n - 2, where
n is the file sequence number for the
WALVvrs.TAPE file (see the Report of Tape
Creation).
Issue the following command to load the Entire Net-Work files:
TAPE LOAD * * fm
where fm is the file mode of the appropriate CMS minidisk where the installation tape will be installed.
Modify the ADARUN SAMPLE file for the Entire Net-Work Communicator virtual machine containing the ADARUN control statements for Entire Net-Work.
Modify the NETWRK SAMPLE file for the Entire Net-Work Communicator virtual machine containing the Entire Net-Work control statements for the control program and any line drivers being used.
For information about the IUCV, TCP/IP, and VTAM line drivers, read the documentation for those line drivers.
Modify the sample PROFILE GCS file for the Entire Net-Work Communicator virtual machine. Include the following functions:
MULTI READ LINK command to the Entire Net-Work library minidisk;
ACCESS for the library minidisk as a read-only extension of the "A" disk:
ACC cuu fm/A
Ensure that the PROFILE GCS is located on the "A" disk of the Entire Net-Work Communicator machine and not on the Administrator machine.
Refer to the Report of Tape Creation to determine whether any ppppvrs.ZAPS files are included on the distribution tape. If so, the files are provided in TAPE DUMP format. Issue the following commands to position the tape to the correct file:
TAPE REW
TAPE FSF value
where value is the forward space file value.
This value can be calculated using the formula
3n - 2, where
n is the file sequence number for the
ppppvrs.ZAPS file (see the Report of Tape
Creation).
Issue the following command to load the file:
TAPE LOAD * * fm
where fm is the file mode of the appropriate CMS minidisk where the file is to be installed.
Then follow the procedure outlined in the member $READppp DOC, where ppp is the product code.
LOGON to the Entire Net-Work virtual machine and IPL GCS to start Entire Net-Work.
DISCONNECT from the Entire Net-Work virtual machine.
The following CMS commands must be entered to start Entire Net-Work. These commands can be defined in the PROFILE GCS member or in a separate member that is used to start Entire Net-Work. A sample subset of these commands can be found in the file 'NETGCS GCS' distributed on the installation tape.
EXEC SETLODLB
LOADCMD DATADEF DATADEF
LOADCMD DISPDD DISPDD
LOADCMD RELDD RELDD
LOADCMD NETWRK NTWGCS
DATADEF DDCARD,DSN=ADARUN.SAMPLE,MODE=fm
DATADEF DDKARTE,DSN=NETWRK.SAMPLE,MODE=fm
DATADEF DDPRINT,UNIT=PRT
DATADEF DDDRUCK,UNIT=PRT
NETWRK START
where fm is the file mode for the library minidisk
Note:
The NETGCS GCS file has the DATADEF for DDPRINT and DDDRUCK
directed to a file instead of UNIT=PRT as shown above. If these files are
directed to a file on a minidisk, ensure that the minidisk is large enough to
support your needs. If the minidisk becomes filled to capacity, Entire Net-Work
terminates abnormally and issues a B37 abend.
Operator commands can be entered directly from the z/VM console; or from a secondary console using the CP SEND command.
Each Entire Net-Work command must be prefixed with the GCS command name NETWRK, for example:
NETWRK DISPLAY TARGETS
directly from the z/VM console or:
CP SEND netvmid NETWRK DISPLAY TARGETS
when entered from a secondary console.
Any file assignments necessary to run Entire Net-Work under VM/GCS must be issued using the DATADEF command.
For example, the following DATADEF statements are used if control statements for ADARUN are placed in the CMS file named ADARUN SAMPLE and control statements for Entire Net-Work are placed in the CMS file named NETWRK SAMPLE and the output from ADARUN and Entire Net-Work is directed to virtual printers:
DATADEF DDCARD,DSN=ADARUN.DDCARD,MODE=C
DATADEF DDKARTE,DSN=NETWRK.DDKARTE,MODE=C
DATADEF DDPRINT,UNIT=PRT
DATADEF DDDRUCK,UNIT=PRT
DATADEF NETPRNT,DSN=NETWRK.NETPRNT,MODE=A
The VM/GCS environment, unlike VM/CMS, is not an interactive environment; in its functionality and mode of operation, it is more like a batch guest operating system. GCS offers no online facilities for data manipulation or management and therefore is not a suitable environment for program maintenance and administration. VM/GCS is a production-oriented system.
This section describes VM/GCS characteristics including an overview of the virtual machine concept, and VM/GCS requirements including specific space requirements for both required and optional virtual machines.
In VM/GCS, the following entities are used to run Entire Net-Work:
Required: Entire Net-Work Communicator (GCS)
Recommended: Entire Net-Work Administrator (CMS)
Each of the above Entire Net-Work entities operates as a task within its own environment known as a "virtual machine". Each virtual machine comprises system resources that emulate virtual storage, virtual DASD (minidisk) space, and I/O capabilities such as an operator console and printer.
The actual system resources allocated to each virtual machine are either
predefined in a CP directory; or
dynamically defined in the PROFILE GCS that is invoked when each virtual machine begins operating.
The following sections describe each of the Entire Net-Work virtual machines and how its resources are initially defined when installing Entire Net-Work. Following this description is specific information about individual virtual machine requirements and operations in a VM/GCS environment.
The Entire Net-Work Communicator executes in its own virtual machine, which normally runs disconnected.
The virtual storage size required for Entire Net-Work is 2 MB, but a size of 8 MB is recommended.
The "A" disk (at address 191) must be at least 1 cylinder; 10 cylinders or more are recommended, especially if logging is required.
In addition, a read-only link is required to the Entire Net-Work library disk which is defined for the Entire Net-Work Administrator virtual machine. The library disk should be at least 300 4KB blocks.
The Administrator virtual machine can be defined to z/VM as a secondary console for the Entire Net-Work machine. This allows the administrator to control the Entire Net-Work machine and issue Entire Net-Work operator commands using the SEND command from his terminal.
The secondary console support is defined by specifying the CONSOLE statement in the CP directory of the Entire Net-Work machine as follows:
CONSOLE 009 devtype T nwavmid
where:
| devtype | is the administrator console device type |
| nwavmid | is the Administrator virtual machine ID |
The following is an example of the entries in the CP directory for the Entire Net-Work virtual machine:
USER NETGCS NETGCS 4MB 16M G
IPL GCS PARM AUTOLOG
OPTION MAXCONN 100
IUCV ALLOW PRIORITY
CONSOLE 009 3215 T ADMNVMID
SPOOL 00C 2540 READER *
SPOOL 00D 2540 PUNCH A
SPOOL 00E 1403 A
*

LINK MAINT 595 595 RR
LINK MAINT 59E 59E RR
LINK ADMNVMID 193 193 RR
*

MDISK 191 3390 067 010 vvvvvv MR rpassword
where:
| rpassword | is the multiread password for the library minidisk |
| vvvvvv | is the volume serial number of a physical disk |
Virtual machines that are to run VM/GCS must be a part of a GCS group.
The GCS group is defined by a "recovery" virtual machine whose 'vmid' is the name of the GCS group. The GCS group can be defined
manually by setting up a file named recvmid GROUP, where recvmid is the vmid of the recovery machine; or
automatically using the GROUP EXEC.
For more information about generating a GCS System, refer to the manual z/VM Installation and Service.
The Entire Net-Work virtual machine must be defined in the GCS group as an authorized user. This can be done either
on the appropriate panel in the GROUP EXEC; or
with the AUTHUSER macro in the GCS group file.
If Entire Net-Work is to be used in conjunction with the VTAM line driver, the Entire Net-Work machine must be defined in the same group as VTAM.
The following group file is an example of a manual group definition:
CONFIG SYSNAME=GCS,
     RECVM=GCS,
     DUMPVM=OPERATNS,
     SYSID='GCS ON z/VM',
     MAXVM=10
AUTHUSER START
AUTHUSER NAME=GCS
AUTHUSER NAME=MAINT
AUTHUSER NAME=VTAM
AUTHUSER NAME=NETMAINT
AUTHUSER NAME=RSCS
AUTHUSER NAME=NETGCS
AUTHUSER END
SEGMENT START
SEGMENT NAME=VTAM
SEGMENT END
END
To give the Entire Net-Work administrator maximum control of the Entire Net-Work environment, a separate virtual machine should be allocated. This allows the administrator to
perform maintenance operations on parameter files;
maintain a single Entire Net-Work library disk, WCPVvrs LOADLIB;
issue operator commands for Entire Net-Work running in a disconnected GCS machine (when the Administrator virtual machine is defined as a secondary console for the Entire Net-Work machine).
The Administrator virtual machine requires a minimum of 2M virtual storage.
The "A" disk must be at least 1 cylinder; Software AG recommends 10 cylinders or more, especially if logging is required.
The Entire Net-Work library disk must be defined in the CP directory for the Administrator virtual machine.
The following is an example of the entries in the CP directory for the Administrator virtual machine:
USER ADMNVMID ADMNVMID 2M 4M G
IPL CMS PARM AUTOCR
CONSOLE 009 3215
SPOOL 00C 2540 READER *
SPOOL 00D 2540 PUNCH A
SPOOL 00E 1403 A
LINK MAINT 190 190 RR
LINK MAINT 19E 19E RR
MDISK 191 3390 364 010 vvvvvv MR rpassword
MDISK 193 3390 371 004 vvvvvv MR rpassword
where:
| rpassword | is the multiread password for the library minidisk |
| vvvvvv | is the volume serial (NETnumber of a physical disk |