This section describes how to install and setup Natural Business Services on a Unix platform. The following topics are covered:
This section describes the product requirements for Natural Business Services V5.3 on Unix platforms. The following topics are covered:
The memory space required by Natural Business Services largely depends on the number of users.
The memory space per user is determined by the settings in the
NATPARM parameter module, especially by the values of
profile parameters such as USIZE and
SSIZE.
In addition to the user-specific memory, memory is required for the buffer pool, which is shared among all users.
Approximately 180 MB of hard-disk space is required for Natural Business Services.
Natural Business Services requires:
Natural V6.2.4 or higher or Natural V6.3.2 or higher
Note:
If you are using the Natural Construct
Browse* models, Natural version 6.3.4 PL2 or higher is required for the
generated code to work correctly.
Adabas V5 or higher
EntireX Communicator V7.2
Natural Development Server (NDV) V2.2 (conditional on whether Natural for Windows will be used)
Predict V4.5 (optional, but recommended for full Natural Business Services installation and Natural Construct development version)
This section describes the operating environments for Natural Business Services V5.3. The following topics are covered:
Natural Business Services functions in any Unix environment that supports Natural V6.2.4 or higher.
Natural Business Services generates applications that access the following data structures:
Adabas
SQL
You can also create your own models to access other data structures.
If Natural Security is installed, access to Natural Business Services is protected by the Natural Security facilities. Natural Business Services-generated modules operate in, and are controlled by, the Natural Security system.
Note:
If Natural Security is installed, you must perform several manual
installation steps. For information, see
Manual Installation
Steps.
The Natural Business Services distribution kit on CD-ROM contains the installation files for your Unix environment.
Note:
The license file is not contained on this CD. It must be obtained
from Software AG.
The naming conventions for the datasets identify the product, version number, release number, system maintenance level, dataset type, and work file type. For example, the installation CD-ROM for Natural Business Services includes the following:
NBSnnn.INPL.sag
where:
NBS is the product code
n is the version number
n is the release number
n is the system maintenance level
INPL is the dataset identifier
.sag is the workfile type
The Natural Business Services installation package includes the following datasets:
| Dataset | Description |
|---|---|
| NBSnnn.INPL.sag | INPL dataset containing all modules required to generate, catalog, and run Natural Business Services-generated modules. |
| NBSnnn.NCSR.sag | Dataset containing the Natural client service runtime modules. To create a runtime environment for generated Natural clients, install this dataset in a non-Natural Business Services environment. For instructions on installing this component, see Install the Natural Client Service Runtime Component. |
| NBSnnn.SYS1.FDU | Dataset containing control parameters for the ADAFDU utility. Used to create the container for the Natural Business Services system file 1 LFILE. |
| NBSnnn.SYS1.FDT | Dataset containing the FDT for the Natural Business Services system file 1 LFILE. Used as input to the ADAFDU utility. |
| NBSnnn.SYS2.FDU | Dataset containing control parameters for the ADAFDU utility. Used to create the container for the Natural Business Services system file 2 LFILE. |
| NBSnnn.SYS2.FDT | Dataset containing the FDT for the Natural Business Services system file 2 LFILE. Used as input to the ADAFDU utility. |
| CSTnnn.INPL.sag | INPL dataset containing all modules required to generate, catalog, and run Natural Construct-generated modules, as well as the SYSERR messages used by Natural Construct-generated applications. |
| CSTnnn.INPC.sag | INPL dataset containing the modules required to catalog and run generated modules. This dataset is a subset of CSTnnn.INPL.sag. |
| CSTnnn.INPE.sag | INPL dataset containing the modules required to run (but not catalog) generated modules. This dataset is a subset of CSTnnn.INPC.sag. |
| CSTnnn.FDU | Dataset containing control parameters for the ADAFDU utility. Used to create the container for the Natural Construct LFILE. |
| CSTnnn.FDT | Dataset containing the FDT for the Natural Construct LFILE. Used as input to the ADAFDU utility. |
| CSTnnn.ULD | Data file used as input to the ADAMUP utility. Used to load data to the Natural Construct LFILE. |
| CSTnnn.DA4 | Predict definitions for the Natural Business Services data file for users running Natural Business Services V5.3 with Predict V4. |
| CSTnnn.SINP.sag | INPL dataset containing the Natural Business Services demo programs to access SQL tables. |
| CSTnnn.SD4 | Dataset containing Predict definitions for the SQL tables accessed by the demo application for SQL users. |
| CSTnnn.CP45.sag | Dataset containing all Predict interface modules for users running Natural Business Services V5.3 with Predict V4.5. |
| CSTnnn.SYSH | Dataset containing help text. |
| CSTnnn.SYSM | Dataset containing program models. |
| CSTnnn.SYSR | Dataset containing code frames. |
This section contains information you should read before installing Natural Business Services. It contains general information on the prerequisites for installing and setting up Natural Business Services on a Unix platform. The information contained in this section is independent of hardware type and platform. The following topics are covered:
This section contains installation notes. Note the following before beginning the installation of Natural Business Services.
Read the readme.txt file delivered on your product CD. It contains important information which may not be contained in this documentation.
Complete the common steps for installing Software AG products under Unix before installing Natural Business Services. For a detailed description, see Installing and Setting Up Software AG Products under Unix.
Assign superuser status. As some installation steps require superuser
(root) permissions, the installation script offers a choice between the
su and sudo commands and
asks for the corresponding password required to become superuser.
Backup your current product version.
Ensure that the directory in which the Natural Business Services distribution files are installed on the disk is identified by the SAG environment variable (which can be set to an appropriate value in advance).
Ensure that you know the name and location of the Natural Business Services license file. To perform the installation procedure, you must provide a valid license file.
Ensure that all prerequisite software is installed.
This section contains important information you should read before installing this version of Natural Business Services. The following topics are covered:
If you have an existing NATPARM profile called NBSPARM, it will be overwritten during the installation procedure. To preserve your copy of the profile, either make a backup copy or rename the profile before installing Natural Business Services.
When using Natural Business Services,
ensure that BPSFI=OFF. If BPSFI=OFF, Search Sequence
2 is used (alternating search in buffer pool and database for each library). If
BPSFI=ON, Search Sequence 1 is used (search in buffer pool first
for all libraries and then search database).
To use Natural Business Services, Natural must be able to communicate with EntireX Broker. For information on how to set up access to EntireX Broker, see the Natural for Unix installation guide.
If you are installing Natural Construct over an existing version, you must delete all code frames supplied as fixes to previous versions of Natural Construct before upgrading (code frames with an “8” suffix). For example, COPA9 is an original code frame installed with the previous version, while COPA8 was delivered later as a fix.
Important:
If you used “8” as the suffix in the name of a customized code
frame, change the “8” to a “7” or less before deleting the code
frames.
To determine which code frames to delete, list the existing code frames in the SYSCST library ("MENU F L") and scan for suffixes of “8”.
This section contains the step-by-step procedure to install Natural Business Services on the Unix operating system. There are two methods of installing Natural Business Services: installing for the first time or updating from an existing version of Natural Business Services. The installation procedure is a combination of manual and script-driven steps. During the procedure, several steps are common for both methods and several steps are specific to either first-time or update installations. You will be guided accordingly during the installation process.
Note:
If you are migrating from an earlier Natural
Construct LFILE, ensure that the
Adabas SORT and TEMP files exist before beginning
the installation procedure. Some Adabas tools
require these files.
The installation can be performed in two installation modes, either graphical mode or character mode.
The installation steps are:
Step 15: Confirm DBID and FNR for FCST System File (First-Time Only)
Step 16: Confirm DBID and FNR for NBS System File 1 (First-Time Only)
Step 17: Confirm DBID and FNR for NBS System File 2 (First-Time Only)
If your CD-ROM drive has not yet been mounted, mount it now as described in the section Install the Contents of the CD-ROM to Disk of the steps common to all Software AG products.
When the installation is started, the setup procedure will check the hardware platform and operating system version and then start the appropriate INSTALL installation program.
The installation procedure examines the DISPLAY environment variable to determine whether to run in graphical or character mode. To use graphical mode, the DISPLAY environment variable must be set.
If it is not yet set in your environment and you want to use graphical mode, set it using the following command:
DISPLAY="your_machine_name:0" export DISPLAY
Character mode will be used automatically if the DISPLAY
environment variable is not set. If DISPLAY has been set in your environment
but you want to use character mode, you can disable it using the
-nw option when you start the installation.
At the end of an installation process, in either mode, a batch script is generated and written to the INSTALL directory in the installation path of the product (for example, $SAG/nbs/v531/NBSv531Inst.sh). It lists the parameters specified for that particular installation.
For example:
# ----------- <Start of generated batch script> ----------
# -- <Adapt the following lines until end of generated> --
# ------------ < batch script to your needs > ------------
#!/bin/sh
# You should replace SECRET by the actual password
# or (even better) call this script with superuser privileges.
#
SAG="/usr/SAG"; export SAG
/bin/sh /cdrom/setup.ux -batch \
  -sagenv /usr/SAG/sagenv.new \
  -installType customized \
  -user sag \
  -password SECRET \
  -authcmd sudo \
  -dbident 022 \
  -packages "
    Nucleus & utilities : off
    Adalnk : on
	Optimized Version of Adalnk : on
	Examples : on
	DBA Workbench : on"
# ----------- <End of generated batch script> ----------
You can use the -help option to display a
list of all supported parameters.
Note:
If you run the installation procedure in character mode, you must
type in the exact wording (for example: "accept" for
"accept", not just "y" or
the Enter key) at each command prompt.
To perform this step, you must be either the "sag" user or a member of the "sag" group to which the administrator and all users of Software AG products are assigned. Do not perform this step as the "root" user.
Start the installation procedure from a writable working directory.
We recommend $SAG/INSTALL. Enter the command:
sh /mount_dir/setup.ux
where mount_dir is the
starting directory on your product CD-ROM. Upper/lower case usage is possible
depending on your site settings.
The following panel is displayed:
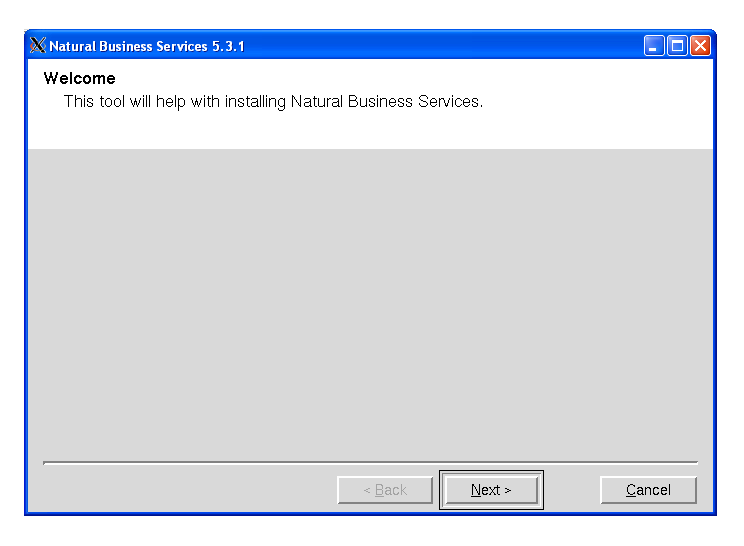
The setup program starts and guides you through the installation. The following conventions apply:
| Task | Procedure |
|---|---|
| Accept the default values and proceed (default values are displayed within square brackets) | Select . |
| Select a new value | Do one of the following:
|
| Cancel the installation script | Select (or type “Cancel” and press Enter in character mode). |
Notes:
Select to proceed.
Confirm the path of your CD-ROM drive.
The default path of the mounted CD-ROM drive is displayed. You can enter a different path or choose to change the path.
Select to proceed.
The license agreement is displayed. You must accept the agreement to proceed with the installation.
Select to proceed.
For example:
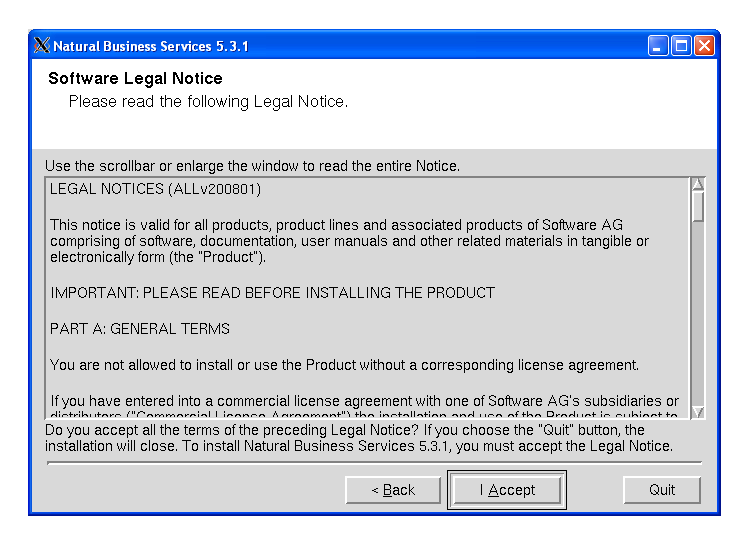
Note:
If you run the installation procedure in character mode, you must
type the exact wording at each command prompt (for example: you must type
"accept" for , not
just "y" or the Enter key).
You can change the value of the $SAG
environment variable on this panel. This variable indicates the path name of
the directory tree where all Software AG products are installed.
Confirm the path name of the directory tree where all Software AG products are installed.
For example:
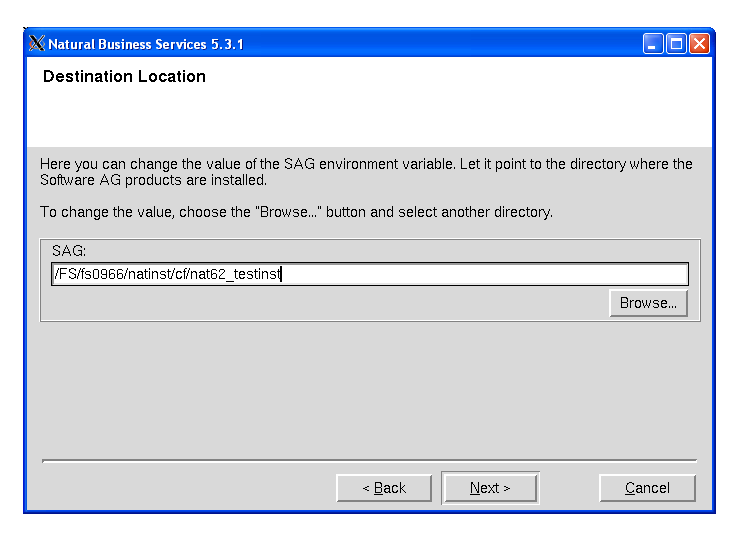
By default, the current $SAG variable is
displayed. You can enter a different path or choose
to select a path.
Select to proceed.
Specify the directory and name of your license file.
Enter the path where your license file is located (or choose to change the path).
For example:
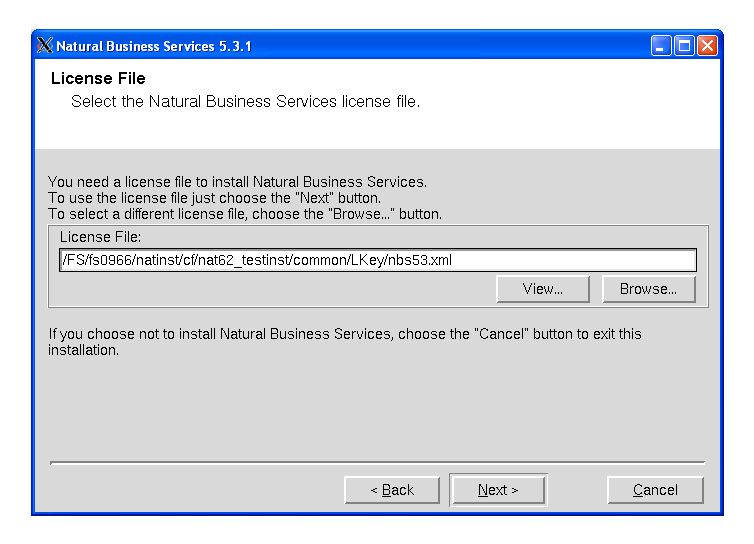
Select the <product_code>.xml file.
If no common Software AG environment exists, <your current directory>/<product_code>.xml is displayed.
Note:
To display the contents of your license file on a separate panel,
select . Select or
to return to the license file
panel.
Select to proceed.
The default installation package is pre-selected and displayed on this panel. The total number of bytes required to install that package and the number of bytes available are also displayed.
Note:
The packages displayed on this panel are based on the license file
selected on the previous panel. If the license file indicates there is only one
selection available, this panel and the following panel are not
displayed.
Review the installation information and select the package(s) you want to install.
For example:
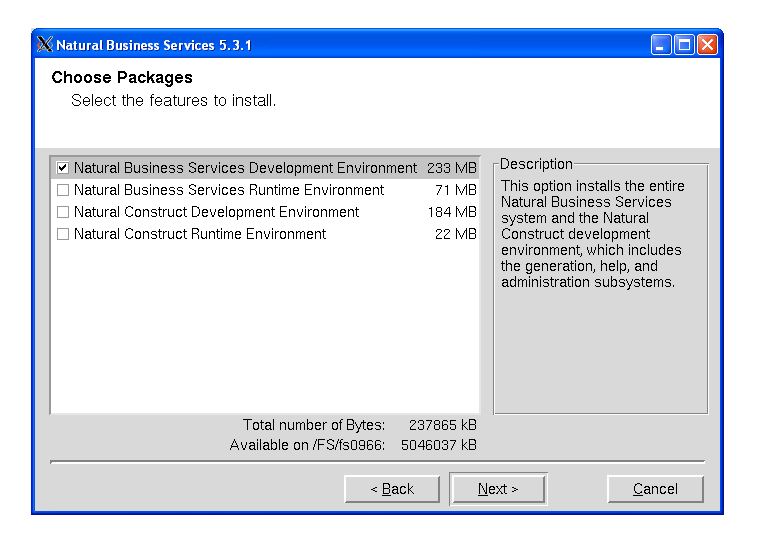
Select to proceed.
Your installation settings are displayed on this panel.
Review your configuration settings.
For example:
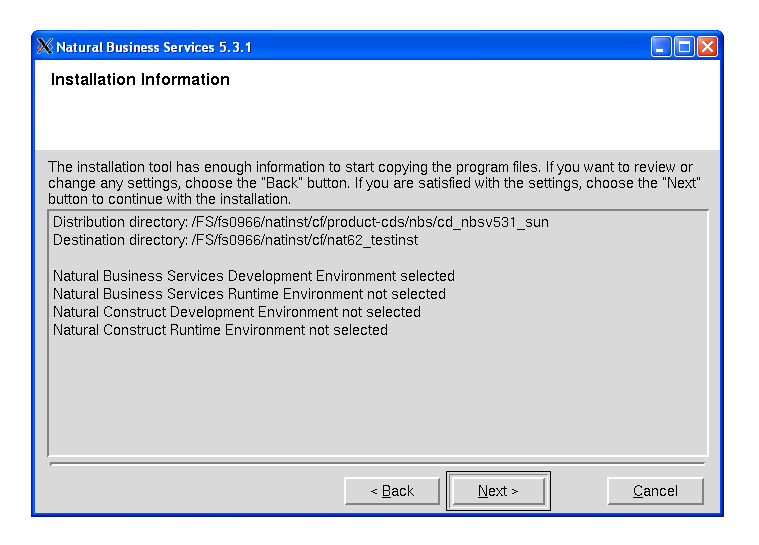
To change the settings, select .
Select to proceed.
The copy process begins.
Wait while the selected components are installed.
For example:
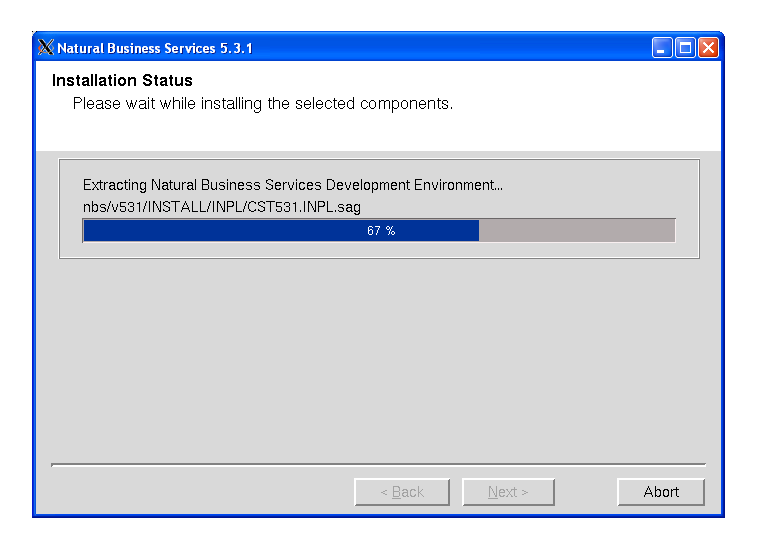
Progress is indicated by a bar displaying a percentage scale. When the process ends, the total number of bytes extracted is displayed.
Select to proceed.
The default version numbers for Natural and Adabas are displayed, as well as the location where Adabas is installed.
Verify the Natural and Adabas versions.
For example:

To change the default values:
| Product | Procedure |
|---|---|
| Natural | Select a different version of Natural. |
| Adabas | Choose and select a different location for Adabas. |
Select to proceed.
The default Natural parameter module used as a template for a new Natural Business Services parameter module is displayed. The installation script reads the system file settings from this parameter module.
Verify the Natural parameter module.
For example:
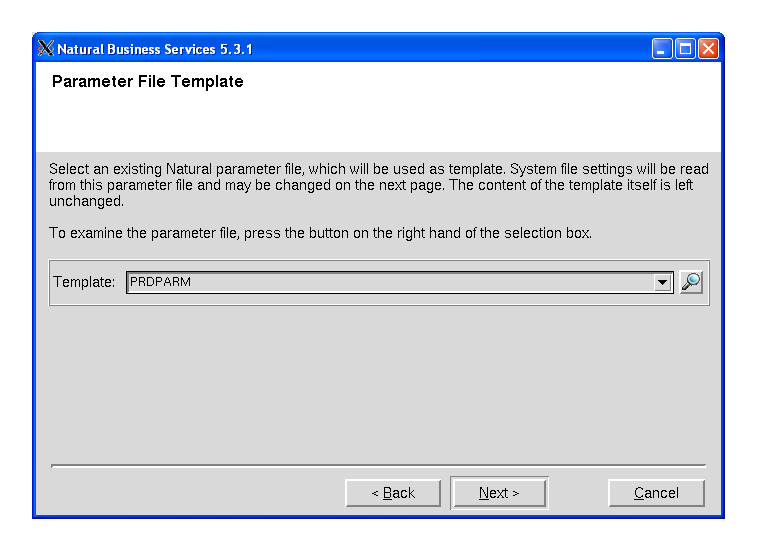
To change the Natural parameter module, select a different module in Template.
Note:
You can change the FNAT settings during the following step. This
will not change the contents of the module used as the template.
Select to proceed.
The default database ID (DBID) and file numbers (FNR) for the FNAT file should be displayed, as well as the path name for the FNAT directory. These settings are based on the Natural parameter module specified in Select the Natural Parameter Module.
Verify the FNAT settings.
For example:
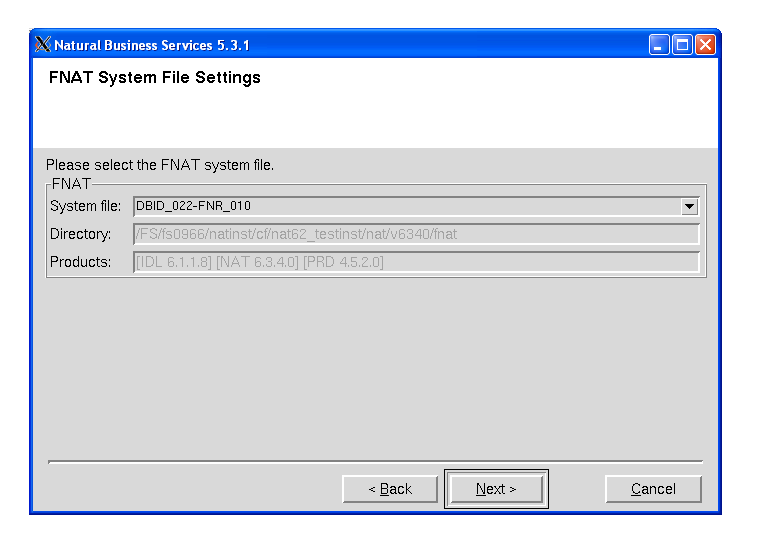
To change the default values, select a different file in System file.
Select to proceed.
By default, the steps performed during post installation are displayed.
Select the type of installation.
For example:
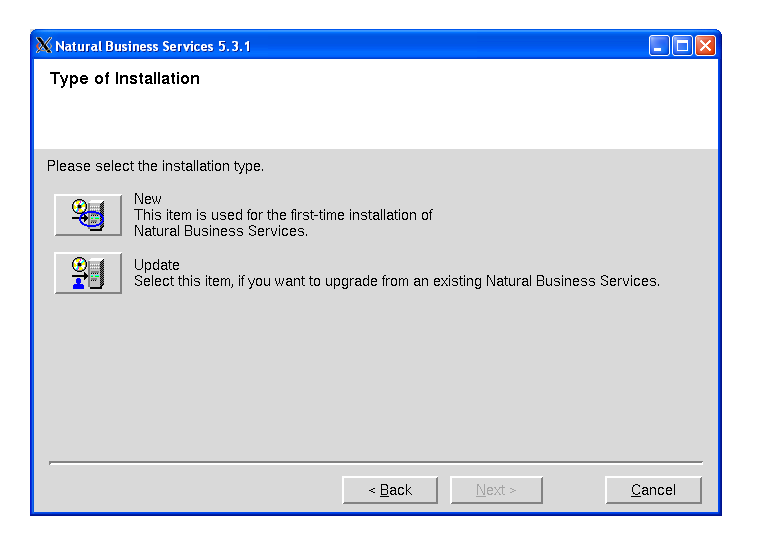
Select one of the following options:
| Option | Description |
|---|---|
| New | Install Natural Business Services for the first time. |
| Update | Upgrade from an earlier version of Natural Business Services. |
Select to proceed.
The default database ID (DBID) and file number (FNR) for the Natural Business Services FCST system file are displayed.
Verify the DBID and FNR for the FCST system file.
For example:
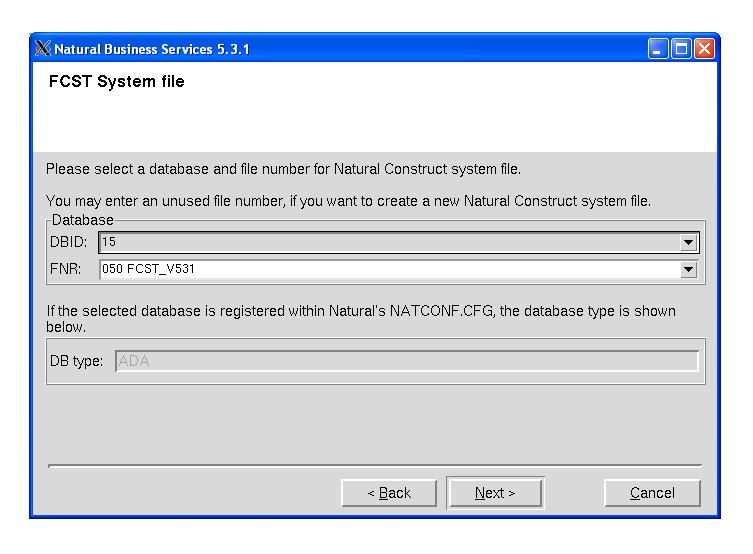
To create a new Natural Construct system file, select a file number in FNR (or enter an unused file number).
Select to proceed.
The default database ID (DBID) and file number (FNR) for the Natural Business Services system file 1 are displayed.
Verify the DBID and FNR for the NBS system file 1.
For example:
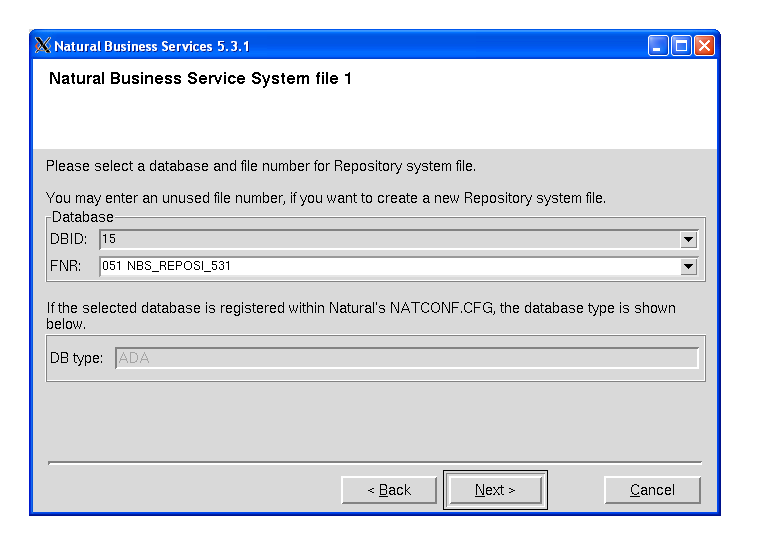
To create a new Repository system file, select a file number in FNR (or enter an unused file number).
Select to proceed.
The default database ID (DBID) and file number (FNR) for the Natural Business Services system file 2 are displayed.
Verify the DBID and FNR for the NBS system file 2.
For example:
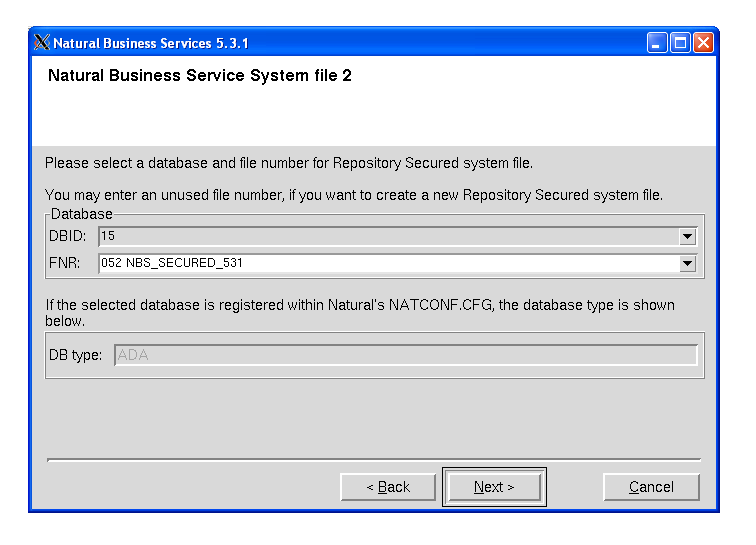
To create a new Repository Secured system file, select a file number in FNR (or enter an unused file number).
Select to proceed.
At this point, the INPL process begins and the libraries are loaded into Natural. Progress is indicated by a bar displaying a percentage scale.
Wait while the installation script loads the libraries.
For example:
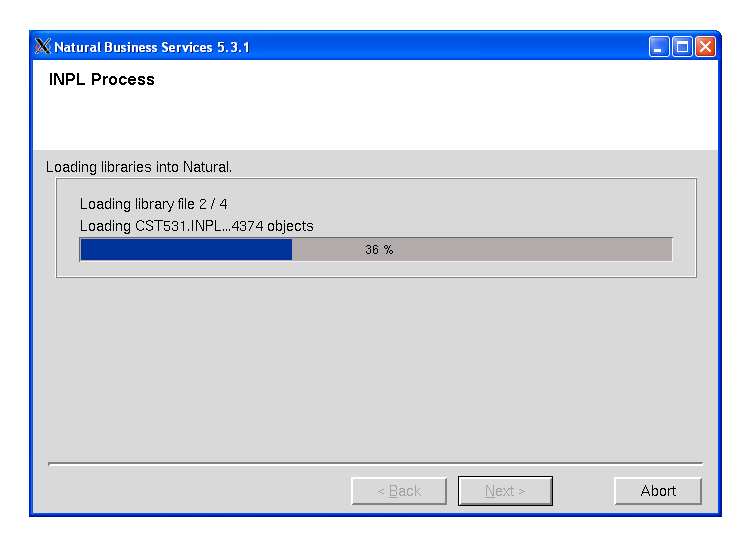
The INPL process does the following:
Creates the INPL parameter module
Checks the Natural buffer pool
Backs up the FNAT directory
Scans and/or loads the Natural Business Services libraries
Note:
If Natural Security is installed, some
datasets may not be loaded during the INPL process. For instructions on loading
these datasets, see Manual
Installation Steps.
Select to proceed.
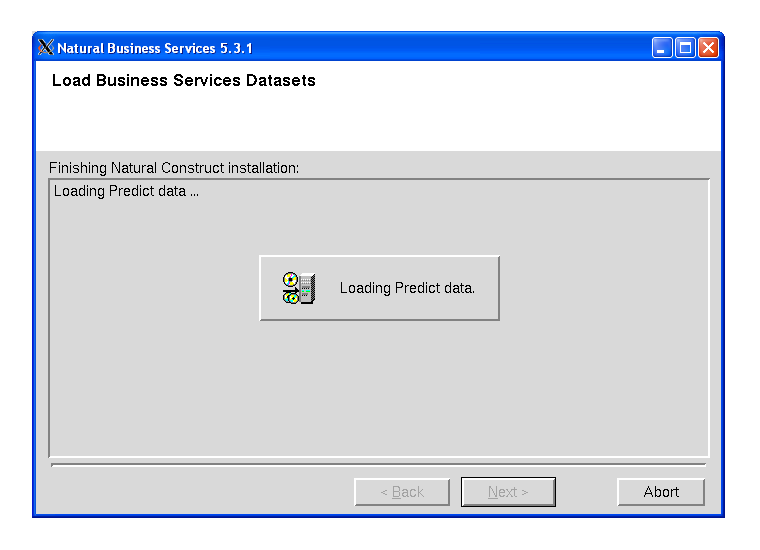
The installation procedure loads the following data from the Natural Business Services datasets:
Predict definitions of data used in the demo applications
Natural Business Services code frames, help text, and models
The installation script loads additional Natural Business Services datasets. Progress is indicated by messages on the panel.
Wait while the installation script loads the additional Natural Business Services datasets.
For example:
Select to proceed.
Perform this step after the successful installation of Natural Security.
Select the products and paths that will be written to the sagenv.new file.
Select to proceed.
The Installation Complete panel is displayed. For example:
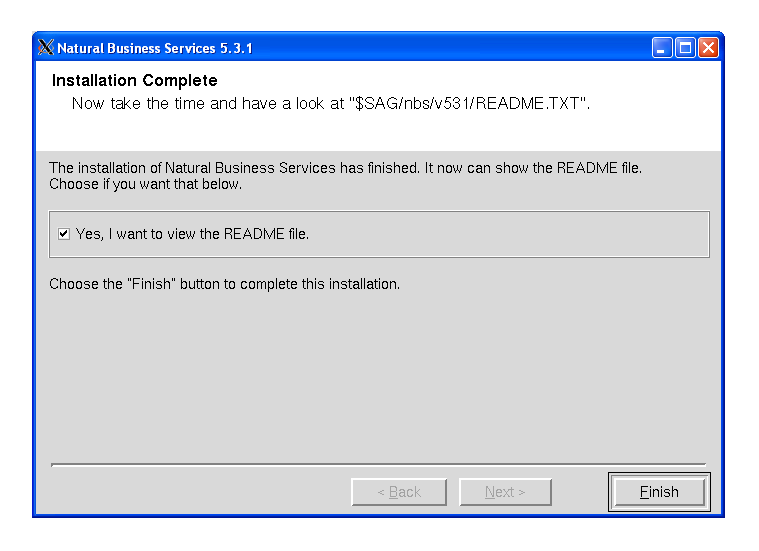
This panel informs you that the installation has finished successfully. You are advised to view the README file for further information.
Notes:
Select .
Remove the working directory and all of its contents (after the installation has been successfully completed).
You must perform the following steps manually; they are not part of the installation script:
To set the NATDIR,
NATVERS and PATH
environment variables, execute the sagenv.new file. The
environment file must be executed before using Natural Business
Services.
If Natural Security is installed, start
Natural with PARM=NBSPARM and define
the following libraries to Natural Security:
| Library | Contents |
|---|---|
| SYSBIZ | Natural Business Services administration data. |
| SYSBIZDE | Natural Business Services demo application. |
| SYSCST | Natural Construct administration data. |
| SYSCSTX | Natural Construct source code for user exits. |
| CSTAPPL | Natural Construct SYSERR message text. |
| SYSCSTDE | Natural Construct Adabas demo application. |
| SYSCSTDS | Natural Construct SQL demo application. |
To activate Natural Business Services, add the SYSLIBS library to your Natural steplib chain (if the library is not already in the steplib chain).
Note:
If you use the Natural Security Administration option to define all
Natural system libraries, ensure that the SYSLIBS
library is defined as public. (By default, SYSLIBS is protected.)
If Natural Security is installed, some datasets may not be loaded during the INPL process.
![]() To load datasets that were skipped during the INPL process:
To load datasets that were skipped during the INPL process:
Load the following datasets using the utilities listed:
| Dataset | Utility | Described In |
|---|---|---|
| CSTnnn.DA4 | SYSDICBE | Predict documentation (first-time only) |
| CSTnnn.SYSM | CSMLOAD | Natural Construct Generation |
| CSTnnn.SYSR | CSFLOAD | Multiple Code Frame Import Utility |
| CSTnnn.SYSH | CSHLOAD | CSHLOAD Load Utility |
This step updates the FCST file version.
![]() To update the FCST file version:
To update the FCST file version:
Log onto the SYSCST library.
Run the CVSETVER utility.
This step verifies that the profile was created correctly.
![]() To verify the system file assignments:
To verify the system file assignments:
Invoke Natural using the new NBSPARM profile.
Log onto the SYSBIZ library.
Issue the VERIFY command.
Enter "LF".
The following output is displayed:
Construct System File (LFILE 227) checked successfully
NBS Secured File (LFILE 136) checked successfully
NBS Unsecured File (LFILE 135) checked successfully
FNAT System File checked successfully
FUSER System File checked successfully
FDIC System File checked successfully
Note:
If you are installing Natural Business
Services without Natural Construct,
you do not require Predict. Therefore, you may
encounter an Adabas 3061 error while reading the
FDIC system file. If this happens, use the SYSPROF command to verify the system
file assignments and, if necessary, use the NATPARM utility to correct the
LFILE assignments in the NBSPARM profile.
If any file fails to verify:
Correct the NBSPARM profile.
Restart your Natural session.
Reissue the VERIFY command.
If Natural Security is installed, the following message may be displayed:
Since NSC is installed, some of the installation steps have to be performed manually.
If this message is displayed, run the CVUSRCOP utility from any library to copy the user exits.
Tip:
If the CVUSRCOP utility returns a NAT4889 error: SYSMAIN
4889 : Library is not defined to Natural Security, apply the latest
hot fixes for Natural Security.
This step verifies that all required USR modules are available from within the current steplib chain.
![]() To verify that all required USR modules are available:
To verify that all required USR modules are available:
Log onto the SYSBIZ library.
Issue the VERIFY command.
Enter "US".
The VERIFY program calls the USR routines to confirm their availability.
This step verifies the installation of the Software AG editor.
![]() To verify the installation of the Software AG editor:
To verify the installation of the Software AG editor:
Log onto the SYSBIZ library.
Invoke the VERIFY program.
Enter "SE".
The VERIFY program:
Opens a Software AG editor session.
Writes lines to the Software AG editor.
Reads the lines back from the Software AG editor.
Closes the Software AG editor session.
Writes out a success/fail message.
This step populates the Natural Business Services files with data for this version. The CSRLOAD program clears the source area, loads the current repository data, and generates entries required for the Broker attribute file. You must copy the entries manually.
![]() To load the repository data:
To load the repository data:
Log onto the SYSBIZ library.
Invoke the CSRLOAD program.
The following panel is displayed:
This process will load the current repository. Make sure your LFILES
are set correctly. This program also clears the source area and generates
entries required for the BROKER Attribute File. These must be copied manually.

Enter default values to be used to establish server records...
  Broker ID ........ BKRnnn__________________________
  Server qualifiers Prefix: __________ Suffix: __________
  Server Class ..... BUSINESS________________________ Unicode (Y/N): N
  Transaction ...... Natural_________________________
  Profile FNAT DBID  ____99
  Profile FNAT FNR . ___107
  Profile .......... NBSPARM_ Path to CMPRINT: $NATDIR$NATVERS________________

Natural Security Settings...
  Servers under NSC  _
  User id .......... ________________________________
  Password .........

Mark default records to be loaded...
  X Users             X Groups            X Domains            X Steplibs
  X Servers           X Business Services X Security Links
|
Note:
For upgrades, only the Business Services records must be loaded
(i.e., de-select all records except Business Services in Mark default
records to be loaded).
Tip:
If you create errors while specifying this data, you can manually
change the repository data in the Business Service Administration subsystem
(enter "MENU SA MM SE" in the command
box).
Specify the default settings for the records to be loaded.
You can use the default values for most settings. Specify the following fields:
| Field | Description |
|---|---|
| Broker ID | Name of the broker to use in this environment. |
| Server qualifiers | Prefix and suffix values added to the names of the server records being created. The combination of prefix and suffix characters must be less than or equal to 10. |
| Server class | Name of the server class under which the service will register with Broker. The default class name is BUSINESS, but you can change the name if desired. |
| Unicode | If you want NBS servers to invoke
Natural subprograms that contain Unicode parameters,
type "Y" in this field. For more information, see
Use
Unicode Parameters for Your Business Service.
Notes:
|
| Transaction | Name of the Natural nucleus under which the service will run. The default transaction name is Natural, but you can change the name if desired. |
| Profile FNAT DBID and FNR | Database ID and file number for the Natural FNAT system file in which the NBSPARM profile is located. |
| Profile | Name of the profile used. By default, NBSPARM is displayed. |
| Path to CMPRINT | Path to the batch output file for each server session. This path can be changed if desired, but it must reference an existing path before the server is started. For more information on CMPRINT, see DEBUG Command. |
| Natural Security Settings | If your servers run under Natural Security, mark Servers under NSC and specify a user ID and password; use the specified user ID and password to start all servers. |
Press Enter.
The CSRLOAD program displays all records that are being loaded.
Note:
If any records currently exist in your Natural
Business Services files, they will not be replaced. The output
report indicates which records were not replaced. Rename or delete the existing
records and rerun the CSRLOAD program, specifying only the objects you want to
load.
When using the CSRLOAD program, you can optionally load the servers only (Attach, Dispatch, Security, etc.). When loading servers, determine whether the servers will use Natural Security. Although the servers can use any setting for this option, problems may arise if you load a server that uses one option (for example, without assigning Natural Security) and then change the option (for example, specify Natural Security later). To eliminate this problem, you can load different sets of servers that have different options and specify a prefix or suffix to identify each set. For example, you can specify an "NSC-" prefix, select Servers under NSC, and enter a user ID and password to be used with NSC. You can also specify a different Broker (server) class for each set of servers to help with the Broker administration. This allows the same set of servers to start up with and without Natural Security.
Note:
To allow the secure and non-secure servers to run at the same time,
define the settings for both sets of servers in Broker.
![]() To load the servers only:
To load the servers only:
Log onto the SYSBIZ library.
Invoke the CSRLOAD program.
Select one or more server options.
De-select all options except Servers in the Default Records to be Loaded section.
For example:
This process will load the current repository. Make sure your LFILES
are set correctly. This program also clears the source area and generates
entries required for the BROKER Attribute File. These must be copied manually.
Enter default values to be used to establish server records...
Broker ID ........ BKRnnn__________________________
Server qualifiers Prefix: __________ Suffix: __________
Server Class ..... BUSINESS________________________ Unicode (Y/N): N
Transaction ...... Natural_________________________
Profile FNAT DBID ____99
Profile FNAT FNR . ___107
Profile .......... NBSPARM_ Path to CMPRINT: $NATDIR$NATVERS________________
Natural Security Settings...
Servers under NSC _
User id .......... ________________________________
Password .........
Mark default records to be loaded...
_ Users _ Groups _ Domains _ Steplibs
X Servers _ Business Services _ Security Links
|
Press Enter.
The selected servers are loaded.
You can also run the CSRLOAD utility again to create servers for other environments. To create servers for other environments, add a prefix or suffix as server qualifiers and specify an alternate server class.
When the CSRLOAD program ends, the Natural source area contains the definitions required for the Broker attribute file. Copy these definitions from the source area to your Broker attribute file and confirm the following global settings:
*-------------------------------------------------------------------*
* Broker specific Attributes / Definition of global resources       *
*-------------------------------------------------------------------*
 DEFAULTS = BROKER
   NUM-CLIENT        = 250
   NUM-CONVERSATION  = 1000
   NUM-SERVER        = 50
   NUM-SERVICE       = 500
   NUM-LONG-BUFFER   = 500
   NUM-SHORT-BUFFER  = 2000
This step verifies the additions to the Broker attribute file.
![]() To verify the Broker attribute file additions:
To verify the Broker attribute file additions:
Log onto the SYSBIZ library.
Issue the VERIFY command.
Enter "AF".
A confirmation message is displayed:
Business service                         Broker service
------------------------- -------------------------------------------------
ATTACH                    BKR057/BUSINESSSERVICES-QA/ATTACH/MAIN
                          MAIN and CMD services registered successfully
CFACTORY                  BKR057/BUSINESSSERVICES-QA/CFACTORY/MAIN
                          MAIN and CMD services registered successfully
DISPATCH                  BKR057/BUSINESSSERVICES-QA/DISPATCH/MAIN
                          MAIN and CMD services registered successfully
SECURITY                  BKR057/BUSINESSSERVICES-QA/Security/MAIN
                          MAIN and CMD services registered successfully
TIMESTAMP                 BKR057/BUSINESSSERVICES-QA/TIMESTAMP/MAIN
                          MAIN and CMD services registered successfully
If any errors appear in the output, correct either the records in your Natural Business Services file or the definitions in your Broker attribute file and rerun the test.
This step verifies the message queue API.
![]() To verify the message queue API:
To verify the message queue API:
Log onto the SYSBIZ library.
Invoke the VERIFY program.
Enter "MQ".
The VERIFY program:
Calls the message queue (conversation factory) APIs to pass data (as a multi-part message). This confirms that no limits are specified on Broker message lengths that will cause SQUSEND/SQURECV to fail.
Sends the binary values from H'00' to H'FF'. This confirms that no translation routine was added to the Broker attribute file.
Confirms that the data it receives matches the data it sent.
This step confirms that all verifications have been successful.
![]() To confirm all verifications:
To confirm all verifications:
Log onto the SYSBIZ library.
Invoke the VERIFY program.
Enter "*".
The program performs all verifications and confirms that:
the required Adabas files are available
the required class/server/service combinations for NBS have been defined in the Broker attribute file
the required Natural user exit routines are available
the program editor is available
the middleware connection is working
the steplib chain settings are correct
The Natural Business Services Natural client service runtime component is available on the CD structure in the top-level path client/. It contains several Java modules and the documentation set. The Java modules can be loaded on an OS platform (Windows, Unix, or Linux).
![]() To install the Natural client service runtime component:
To install the Natural client service runtime component:
Load the NBSnnn.NCSR.sag dataset as follows:
Invoke the Natural INPL utility.
Set work file 1 to the dataset name.
Enter the following:
INPL
B
Run the CVCLICOP utility.
This utility copies the USR and Natural routines required by the Natural client service runtime component. The following table describes which libraries the applicable routines are copied from and to:
| Routines | From | To |
|---|---|---|
| USR | SYSEXT library | SYSTEM library |
| NAT | SYSLIBS library | SYSTEM library |
By default, Natural Construct is installed in dynamic (multilingual) mode, which allows users to display Natural Construct in any available language. If you intend to run the system in one language only, you can install Natural Construct in static (one-language) mode to improve performance and reduce database calls. For information, see Static (One-Language) Mode.
Note:
Installing in static mode does not limit your ability to generate
multilingual applications; static mode applies to the Natural
Construct interface only.