Performing the Installation
The installation steps heavily depend on your chosen installer.
Win32
After downloading, double-click on install.exe. The installer will attempt to locate a suitable JRE/JDK installation on your machine but if you do not have one, be sure to download the package that includes one.
Linux/Solaris
After downloading open a shell and, cd to the directory where you downloaded the installer. At the prompt type:
sh ./install.bin
The installer will attempt to locate a suitable JRE/JDK installation on your machine but if you do not have one, be sure to download the package that includes one. Otherwise you may need to download one from your Java VM supplier's web site or contact your OS manufacturer. The installer can operate in GUI or console modes depending on your system configuration. The default mode of operation is console but you can perform a GUI installation by typing
sh ./install.bin -i gui .
Note: the VM based installations use a 32-bit version of the JVM. Users wishing to install a 64-bit version of the product are recommended to use the no-VM installers.
Mac OSX
After downloading, double-click on nirvana_osx_novm.zip to uncompress it. This produces a single installer executable called install.app. Double-click again to start the installation using the OSX java configured in your Mac.
Generic Unix
After downloading open a shell and, cd to the directory where you downloaded the installer. At the prompt type:
sh ./install.bin
The installer will attempt to locate a suitable JRE/JDK installation on your machine. You can download one from your Java VM supplier's web site or contact your OS manufacturer. The installer can operate in GUI or console modes depending on your system configuration. The default mode of operation is console but you can perform a GUI installation by typing
sh ./install.bin -i gui
Index
Introduction
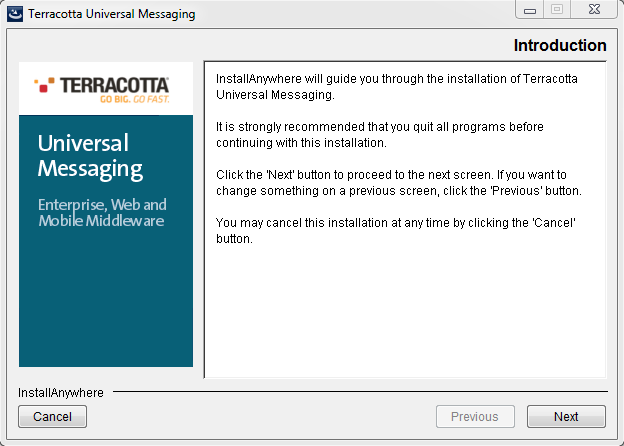
The first screen that is displayed when the installer is run is the introduction screen which describes the process that is about to start and advises to quit all other running programs before continuing. An example of how the screens look like is illustrated below for Win32 (GUI mode) and Unix (Console mode).
Preparing to install...
Extracting the installation resources from the installer archive...
Configuring the installer for this system's environment...
Launching installer...
===============================================================================
Choose Locale...
----------------
1- Deutsch
->2- English
3- Español
4- Français
5- Italiano
CHOOSE LOCALE BY NUMBER:
===============================================================================
Terracotta Universal Messaging (created with InstallAnywhere)
-------------------------------------------------------------------------------
Preparing CONSOLE Mode Installation...
===============================================================================
Introduction
------------
InstallAnywhere will guide you through the installation of Terracotta Universal
Messaging.
It is strongly recommended that you quit all programs before continuing with
this installation.
Respond to each prompt to proceed to the next step in the installation. If you
want to change something on a previous step, type 'back'.
You may cancel this installation at any time by typing 'quit'.
PRESS <ENTER> TO CONTINUE:
License Acceptance
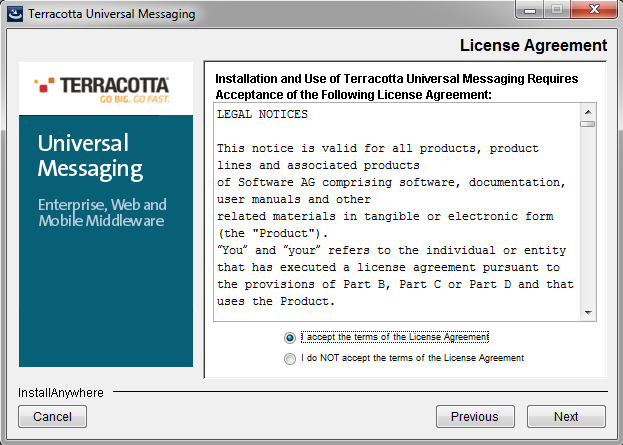
The second screen displayed by the installer asks you to accept the Software AG License agreement before continuing with the installation. Accepting the license agreement implies you agree with all terms of use and the installation can continue normally. Rejecting the license agreement will end the installation process. An example of the license agreement as it appears in GUI and console modes is illustrated below.
===============================================================================
License Agreement
-----------------
Installation and use of Terracotta Universal Messaging requires acceptance of
the following License Agreement:
LEGAL NOTICES
This notice is valid for all products, product lines and associated products
of Software AG comprising software, documentation, user manuals and other
related materials in tangible or electronic form (the "Product").
"You" and "your" refers to the individual or entity that has executed a license
agreement pursuant to the provisions of Part B, Part C or Part D and that uses
the Product.
IMPORTANT: PLEASE READ BEFORE INSTALLING THE PRODUCT
PART A: GENERAL TERMS
You are not allowed to install or use the Product without a corresponding
license agreement.
(Full License Text Omitted)
to a third party the outcomes or results of any such exercise, or any
information derived from the outcomes or results of such exercise, without the
additional express written consent of Software AG.
END OF LEGAL NOTICES
DO YOU ACCEPT THE TERMS OF THIS LICENSE AGREEMENT? (Y/N):
Installation Folder
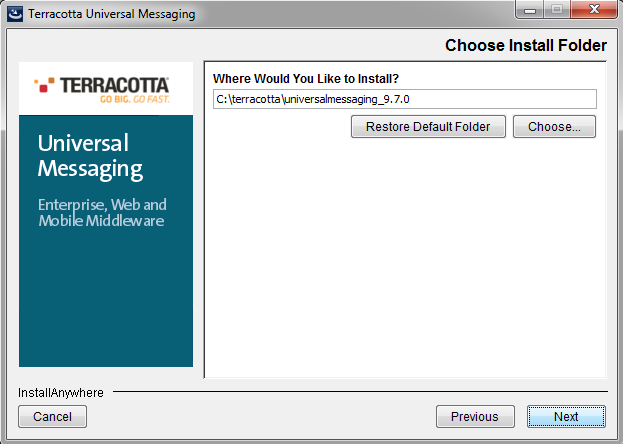
The third screen displayed by the installer asks you to choose the directory where you want the product installed. You can type the name of the directory or click on Choose to browse for a folder. If you type a directory name but wish to restore the default installation folder, you can do so by clicking on the Restore Default Folder button. The following figures illustrate an example of this screen for GUI and console modes.
===============================================================================
Choose Install Folder
---------------------
Where would you like to install?
Default Install Folder: /home/username/terracotta/universalmessaging_<version>
ENTER AN ABSOLUTE PATH, OR PRESS <ENTER> TO ACCEPT THE DEFAULT
Installation Set
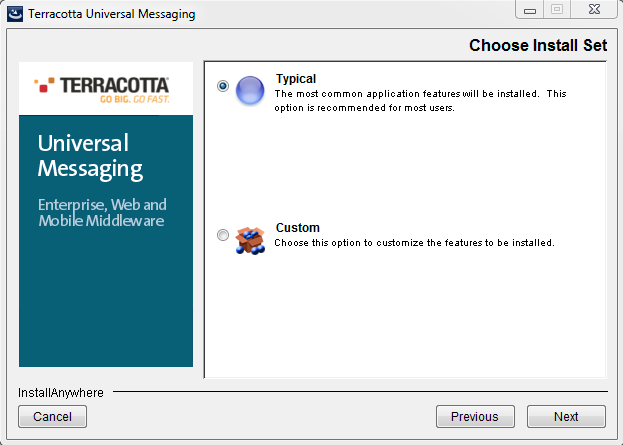
The fourth screen displayed by the installer asks you to specify if you wish to perform a typical installation or a customized one. A customized installation allows you to choose which product features should be installed as well as allows the customization of the Java virtual machine to use irrespective of the one chosen by the installer. The following figures illustrate an example of this screen for GUI and console modes.
===============================================================================
Choose Install Set
------------------
Please choose the Install Set to be installed by this installer.
->1- Typical
2- Customize...
ENTER THE NUMBER FOR THE INSTALL SET, OR PRESS <ENTER> TO ACCEPT THE DEFAULT
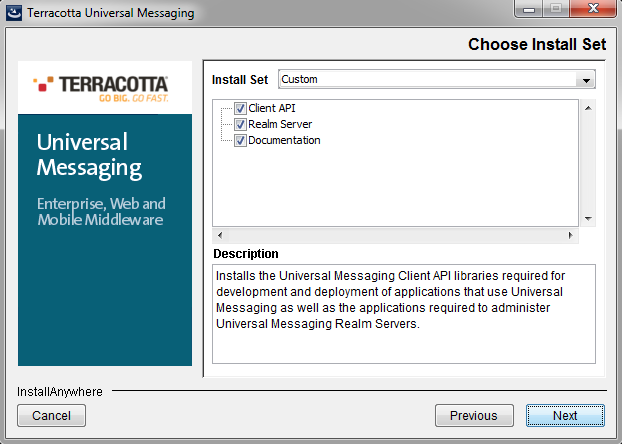
Installation Set Customization
This screen will only be displayed if you previously chose a custom installation set in order to choose the product features that will be installed. Selecting an individual product feature displays additional information to facilitate your choice. The following figures illustrate an example of this screen for GUI and console modes.
==============================================================================
Choose Product Features
-----------------------
ENTER A COMMA_SEPARATED LIST OF NUMBERS REPRESENTING THE FEATURES YOU WOULD
LIKE TO SELECT, OR DESELECT. TO VIEW A FEATURE'S DESCRIPTION, ENTER
'?<NUMBER>'. PRESS <RETURN> WHEN YOU ARE DONE:
1- [X] Client API
2- [X] Realm Server
3- [X] Documentation
Please choose the Features to be installed by this installer.
:
Realm Bootstrap Configuration
The Universal Messaging Realm server comes with a very powerful remote administration API. All the administration tools provided make use of that API only which means that all functionality is available for use in your applications or enterprise management tools of your choice.
As the administration API operates using any of the 4 available Universal Messaging transport protocols the installer needs to perform bootstrap configuration on the Realm server being installed so that further administration using the tools or API can be easily performed as soon as the installation completes. The following table illustrates a list of possible bootstrap configuration parameters, the default values provided by the installer and a short description.
Bootstrap Parameter | Default Value | Description |
Realm Name | Universal Messaging | This is a unique identifier for your Universal Messaging realm. It is very important that this name is unique when using your realm in federated namespaces or cluster configurations. |
NHP Interface binding | 0.0.0.0 | The Universal Messaging realm you are installing will have a bootstrap network interface installed to allow sample applications and administration tools to connect to it. This interface will use the NHP protocol (see protocol overview below). This parameter specifies if the interface should bind to all known IP addresses or a specific one only. |
NHP Interface port | 9000 | The port that the bootstrap interface will listen on. |
Data directory | <install folder>/server/<realm name>/data | This is the folder that all Universal Messaging realm data files, logs and configuration files will be stored when the server starts. This parameter is NOT customizable during the installation. |
Log level | 4 | This is the log level specifying the verbosity of the Universal Messaging realm log file ranging from 0 (very verbose) to 7 (quiet). This parameter is NOT customizable during the installation. |
Initial Memory | 256MB | This is the initial amount of memory the Universal Messaging realm will use. This parameter is NOT customizable during the installation. |
Max Memory | 512MB | This is the maximum amount of memory the Universal Messaging realm can use if needed. This parameter is NOT customizable during the installation |
During the installation process, the first 4 bootstrap parameters can be customized. The remaining can be customized by modifying the nserver.lax configuration file. The following figures illustrate an example of the bootstrap customization screens for GUI and console modes.
===============================================================================
Server Bootstrap Configuration - Realm Name
-------------------------------------------
This is a unique identifier for the Universal Messaging realm you are
installing in multiple realm namespaces and cluster configurations.
If you wish to use this functionality make sure that your realms do not
have the same name to avoid name conflicts.
Realm Name: (DEFAULT: umserver):
===============================================================================
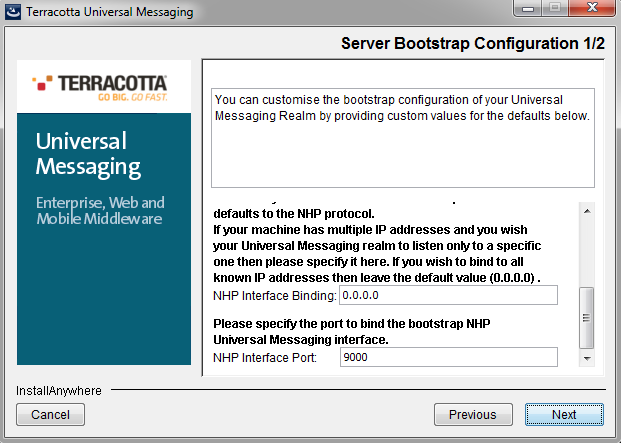
Server Bootstrap Configuration - NHP Interface Binding
------------------------------------------------------
The installation process will set up a bootstrap Universal Messaging
interface in your newly installed realm so that all sample applications
and tools can be preconfigured without any additional action. The
bootstrap interface defaults to the NSP protocol.
If your machine has multiple IP addresses and you wish your Universal
Messaging realm to listen only to a specific one then please specify it
here. If you wish to bind to all known IP addresses then leave the
default value (0.0.0.0) .
NHP Interface Binding: (DEFAULT: 0.0.0.0):
===============================================================================
Server Bootstrap Configuration - NHP Interface Port
---------------------------------------------------
Please specify the port to bind the bootstrap NHP Universal Messaging interface.
NHP Interface Port: (DEFAULT: 9000):
===============================================================================
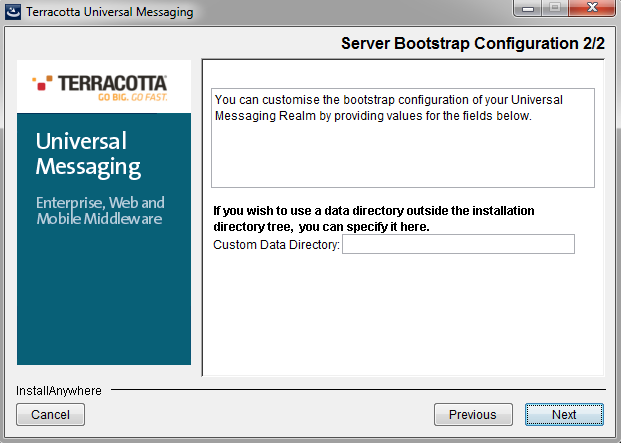
Server Bootstrap Configuration - Custom Data Directory
------------------------------------------------------
If you wish to use a data directory outside the installation directory tree,
you can specify it here.
Custom Data Directory: (DEFAULT: ):
Protocol Overview
Universal Messaging is capable of using multiple transport protocols depending on the deployment and security requirements in place. Although the bootstrap interface defaults to the Universal Messaging HTTP Protocol (NHP) more interfaces can be added using the Universal Messaging Enterprise manager or an application using the Universal Messaging Admin API.
Universal Messaging Socket Protocol
Out of the box the installer configures the Realm to have a Universal Messaging Socket Protocol (nsp) adapter. As the name suggests NSP uses TCP/IP sockets directly and is useful for servers and clients on a secure wan/lan configuration where encryption of data and firewall traversal are not required.
Universal Messaging HTTP Protocol
In order to facilitate communications in environments where security policies enforce network restrictions, the Realm can use the Universal Messaging HTTP (Protocol) (nhp). This driver supports HTTP and provides a mechanism for clients and other servers to communicate with the server through proxy servers, firewalls and essentially the Internet. It would not be prudent to run this protocol directly on the Internet without SSL to provide a level of security. It can be useful however, in traversing internal firewalls to get to a DMZ hosted Universal Messaging Realm server thus allowing trusted clients and servers access to the external facing Realm.
Universal Messaging Secure Socket Protocol
The Universal Messaging Secure Socket Protocol (nsps) is identical to the Universal Messaging Socket Protocol but using SSL sockets rather than plain TCP/IP ones. It can be configured to require client side authentication or not and it requires a Java VM with Secure Socket Layer installed. For more information on that please see the Secure Socket Layer Installation section below.
Universal Messaging Secure HTTP Protocol
The Universal Messaging Secure HTTP Protocol (nhps) is identical to the Universal Messaging HTTP Protocol but it uses SSL sockets rather than plain TCP/IP ones. It can be configured to require client side authentication or not and it requires a Java VM with Secure Socket Layer installed. For more information on that please see the Secure Socket Layer Installation section below.
Secure Socket Layer Installation
In order for the server to support the NSPS and NHPS protocols the Java Secure Socket Extension (JSSE) package is required. Please note that JSSE must be installed in the JVM before the server can utilise it (note that JSSE it is already built into recent JVM's, and as such does not require any further action). Should you need to install JSSE however, the installation can be found at
http://Java.sun.com/products/jsse/INSTALL.html. With recent JVMs, Universal Messaging Realm server can also be configured to use any JSSE compliant SSL provider.
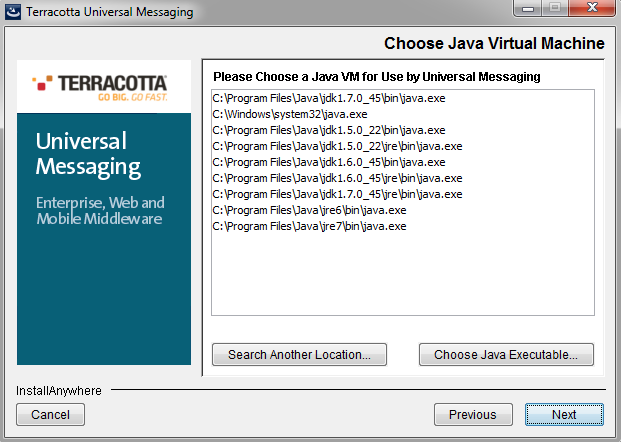
Java Virtual Machine Customizations
This screen will only be displayed if you previously chose a custom installation set. It allows you to specify which Java Virtual machine will be used by the product once the installation is complete, irrespective of the virtual machine chosen by the installer to perform the installation. The following figures illustrate an example of the screen for GUI and console modes:
===============================================================================
Choose Java Virtual Machine
---------------------------
Please choose a Java VM for use by Universal Messaging
->1- /usr/bin/java
2- /usr/local/java/jdk<jdk_version>/bin/java
3- Choose a Java VM already installed on this system
ENTER THE NUMBER FOR THE JAVA VM, OR PRESS <ENTER> TO ACCEPT THE
CURRENT SELECTION:
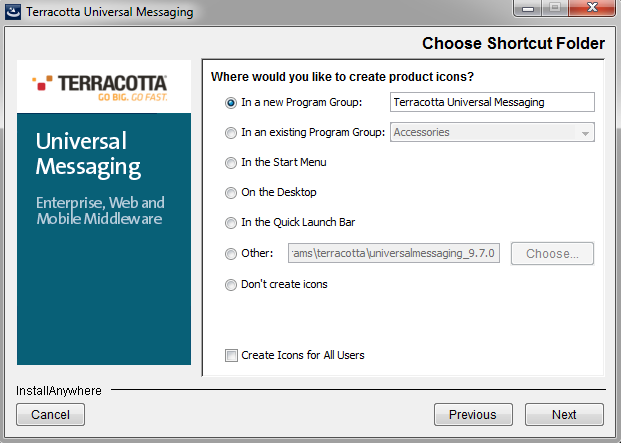
Shortcut/Link Customization
This screen will only be displayed if you previously chose a custom installation set. It allows you to specify the location that will be used to install shortcuts/links. The following figures illustrate an example of this screen for GUI and console modes.
===============================================================================
Choose Link Location
--------------------
Where would you like to create links?
->1- Default: /home/username/terracotta/universalmessaging_<version>/links
2- In your home folder
3- Choose another location...
4- Don't create links
ENTER THE NUMBER OF AN OPTION ABOVE, OR PRESS <ENTER> TO ACCEPT THE DEFAULT
:
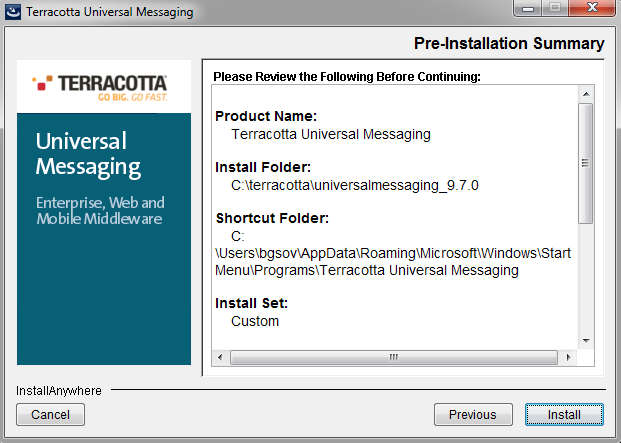
Pre-Installation Summary
The is the last screen displayed by the installer showing a pre-installation summary of the actions that will be performed if you choose to continue. The following figures illustrate an example of this screen for GUI and console modes.
===============================================================================
Pre-Installation Summary
------------------------
Please Review the Following Before Continuing:
Product Name:
Terracotta Universal Messaging
Install Folder:
/home/chefo/terracotta/universalmessaging_<version>
Link Folder:
/home/chefo/terracotta/universalmessaging_<version>/links
Install Set:
Custom
Product Features:
Client API,
Realm Server,
Documentation
Java VM to be Used by Installed Product:
/usr/local/java/jdk<jdk_version>
Disk Space Information (for Installation Target):
Required: 276,032,018 Bytes
Available: 13,249,114,112 Bytes
PRESS <ENTER> TO CONTINUE: