Complete Installation and Upgrade Information for Software AG Products : Installing Software AG Products : Installing and Uninstalling Analytics & Decisions : Install Products : Universal Messaging
Universal Messaging
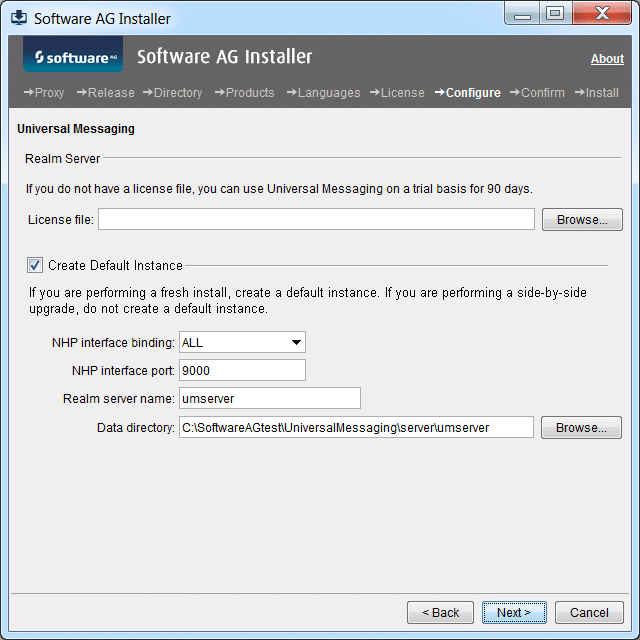
The panel shown above displays when you choose to install a Universal Messaging realm server (alone or with Enterprise Manager, Template Applications, or both). Select the check box to create a realm server instance and complete all fields on the panel.
Field
Entry
License file
If you do not have a Universal Messaging license file, you can use Universal Messaging on a trial basis for up to 90 days.
Note:  
If you obtain a Universal Messaging license file after installation, you can add it at that time. For instructions, see the product documentation.
NHP interface binding
If your machine has multiple IP addresses and you want Universal Messaging to listen to a specific one, select that IP address from the list.
NHP interface port
The installer sets up a bootstrap Universal Messaging interface to which all sample Universal Messaging applications and tools connect by default. Specify the port to which to bind the bootstrap interface.
Realm server name
Name for the realm server instance. If you are also installing an Enterprise Manager instance, Template Applications instance, or both, those instances will also use this name.
Note:  
Different types of instances can have the same name. However, the name you supply here must be unique among instances of the same type (that is, among instances of realm servers).
Data directory
Full path to the directory in which to store the data for the realm server instance.
Note:  
If you use a non-default location for the data directory, you will have to manually migrate the data directory when you upgrade Universal Messaging.
If you install multiple realm server instances on the same machine, use a different data directory for each instance.
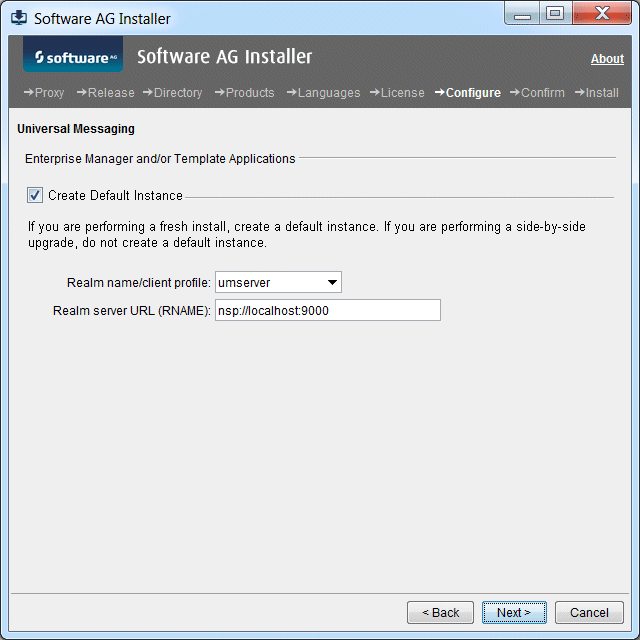
The panel shown above displays when you choose to install Universal Messaging Enterprise Manager, Template Applications, or both, without also choosing to install a Universal Messaging realm server. Select the check box to create an instance of each selected component and complete all fields on the panel. You can specify a realm server that is already installed or that will be installed later.
Field
Entry
Realm name/client profile
Name for the Enterprise Manager instance, Template Applications instance, or both. You might want to use the name of the realm server instance to which the tools will connect. The list shows the names of any realm server instances that already exist in the installation directory, but you can also type a name.
Note:  
Different types of instances can have the same name. However, the name you supply here must be unique among instances of the same type (that is, among instances of Enterprise Managers, and among instances of Template Applications).
Realm server URL (RNAME)
URL for the realm server instance to which the Enterprise Manager instance, Template Applications instance, or both should connect.
Copyright © 2007-2015 Software AG, Darmstadt, Germany.

Product LogoContact Support   |   Community   |   Feedback