The ApplinX server can be started either as a Windows service or using a batch file.
Note:
When selecting to run ApplinX as a service it will by default, start
automatically when Windows is started.
 To start the ApplinX server as a Windows system service
In the installation process, define that ApplinX server will run as a Windows system service.
Select .
Start the Software AG ApplinX Server service.
To start the ApplinX server using a batch command file
Access the <ApplinX installation>/bin folder.
Double-click startup.bat.
It is possible to configure the server's system properties.
Refer to ApplinX Server, System Parameters for further details.
To start the ApplinX server
In the ApplinX installation directory, start the server using the startup.sh shell command.
It is possible to configure the server's system properties.
Refer to ApplinX Server, System Parameters for further details.
When running ApplinX server as a batch file, these parameters can be configured in the startup.bat batch file/GXApplinXService.ini/startup.sh.
| Parameter | Description |
|---|---|
| com.sabratec.gxhome | The location of the applinx_home directory. |
| com.sabratec.license | The directory of the license file. |
| com.sabratec.useicon | Put the server icon in the icon tray. |
| com.sabratec.conf | ApplinX configuration file name - under the config folder of the installation. |
| com.sabratec.prpfile | The location of gxstartup.prp. |
| com.sabratec.logger | Servlet logger. |
| com.softwareag.applinx.ndt.endians_switch | When using Natural UNIX natural data transfer, if the download or upload gets stuck, this may be due to Endian issues and setting this parameter to true may fix this (by default this parameter is false). |
The following parameters provide you with the ability to determine the server's system properties. Define these properties in the \config\gxstartup.prp file. These parameters can be overridden by parameters defined in the startup.bat batch file/GXApplinXService.ini/startup.sh files.
| Parameter | Description |
|---|---|
| com.sabratec.license | The directory of the license file. |
| com.sabratec.useicon | Put the server icon in the icon tray. |
| com.sabratec.conf | ApplinX configuration file name - under the config folder of the installation. |
| com.sabratec.logger | Servlet logger. |
To stop the ApplinX server, when started as a Windows system service
Select .
Stop the Software AG ApplinX Server service.
To stop the ApplinX server using a batch command file
Access the ApplinX installation folder.
Double-click shutdown.bat.
To stop the ApplinX server
In the ApplinX installation directory, you will find the shutdown.sh shell command.
To connect to the server
In the ApplinX Designer, click on the toolbar, or right-click on the relevant server and select .
When connecting for the first time, ensure that the server address (IPv4 and IPv6 address formats are supported) and port that are displayed in the pop-up are correct.
Click .
Type the User name and Password and click .
To disconnect from the server
In the ApplinX Designer, click on the toolbar, or right-click on the relevant server and select .
The communication with the server terminates, and the user's details disappear.
To update a Server's configuration, open ApplinX Designer, and either right-click on the server (in the ApplinX Explorer) and select , or select from the menu.
The Server Properties dialog box is displayed.
Edit the dialog box as follows:
Selecting this option enables connecting to CentraSite. This is available only when you have a relevant license and have the installed the required Software AG common files. An error message will indicate when one of these are missing. If the common files are not installed, run the Software AG Installer and within "Infrastructure>Libraries" select to install "Shared Libraries" and "CentraSite Libraries".
The name of the host where CentraSite is installed.
The port number used to connect to CentraSite
Current user name.
Password of current user.
Clicking on this button will test that a connection with CentraSite has been established.
Does not require user name and password authentication.
The Secured port check box determines whether SSL is used to securely transfer the data between the client and ApplinX server.
To change the HTTP port, edit the server.xml and gxconfig.xml files.
This check box determines whether to automatically update the application with new/updated gxar files. Once selected, ApplinX searches the host-applications folder looking for new/updated gxar files. When one is found, it is loaded automatically as a new/updated application. You must determine how often to search the folder (by default this is set as one minute).
Selecting this checkbox, enables encrypting recorded sessions.
The encryption key enables ApplinX to encrypt and decrypt the recorded sessions. A key is required for each ApplinX server.
Note:
Refer to
Recording
Sessions for further details regarding encrypting recorded
sessions.
This page provides information regarding the ApplinX Server license. It includes the number of users, the number of licenses for each type of license, the expiry date, the platforms and the special license terms (such as whether the license includes Web Enablement and/or SOA and/or BPD (Screen Process Extractor)). Refer to the License Key Concept.
The server log can be accessed from ApplinX Administrator or from the ApplinX Designer. Refer to Viewing Server Logs for further details.
The contents of the log file are as detailed as this property defines, where every level includes the levels above it. For example, the Debug level also logs Normal, Warnings and Errors Only levels. Available values: "Errors only", "Warnings", "Normal" and "Debug" (by default Normal is selected).
The log is written to this file.
Enables you to see the list of existing log files.
Starts a new log file after the current file has been filled to the maximum file size.
Selecting this check box determines whether backups of old log files will be saved, after restarting the server.
The radio button options determine the number of backups saved before overwriting the old log files. For example: 10 means "save the last 10 log files, in addition to the current one, then start to overwrite". When selecting All Files, old log files are never deleted. Default value is "10".
The IP address of the SMTP server.
Mail sent as part of a Procedure, requires using a From address, which is defined in the procedure. When the From field in the procedure is left empty, the address defined here, in the Default From address, will be used.
For security reasons, you may want to require authentication. Enter the Account name and Password.
Note:
Only an Administrator is able to change the server's
configuration.
Enables selecting whether to work in embedded (default) or in external mode. Use the Embedded mode when WS-Stack uses the same Tomcat as ApplinX and also when working with Web Services created in previous ApplinX versions (Administrative Web Services and Procedure Group generated Web Services). Use the External mode when not using the same Tomcat as ApplinX, for example when working with one WS-Stack Web application for all SAG products or when working with a WS-Stack Web application which is on a different machine.
When connecting to a WS-Stack installation on a different machine, you are required to enter the following:
The host name or IP Address (IPv4 and IPv6 address formats are supported).
The Tomcat port where WS-Stack Web application is deployed.
The URL of the servlet that the WS-Stack uses for deployment tasks.
The user name used by WS-Stack.
The password used by WS-Stack.
Click , to test the connection to the remote machine.
Refer to Integration between ApplinX and WS-Stack
This feature provides important information required for monitoring the server's status and activity history.
To access the Server's status and activity history
In the ApplinX Administrator, click on the toolbar, or from the menu, select .
Click to exit the Server Information dialog box.
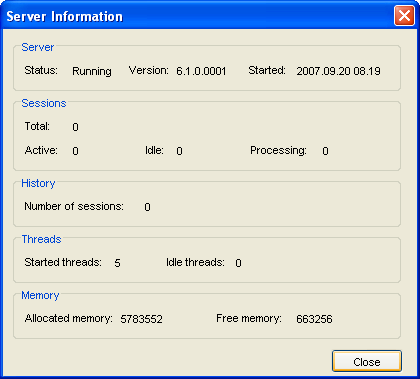
"Running" when the server is connected.
The ApplinX server's version.
The date and time the server was last initialized.
The total number of sessions connected to the server presently.
The number of currently active sessions.
The number of sessions currently idle (connected, but detached).
The number of sessions currently processing XML requests.
The total number of sessions that have connected to the server since it was last initialized.
The number of threads that were activated.
How many threads were activated, but are currently not used.
The total amount of memory (in bytes) that is currently allocated to ApplinX server on the Java Virtual Machine.
The amount of memory (in bytes) currently available for ApplinX to use.
This information can be accessed using the API detailed in Retrieving Server Information.
The Server Log includes information as to the Server's activities and problems. The contents of the server log file are defined according to the settings configured in the Server Parameter>Log node. The Server Log can be accessed either from ApplinX Administrator, from ApplinX Designer or via an external browser: ApplinX Administrator can be used by administrators and/or developers. Administrators who do not have ApplinX Designer can access the Server Log from the Designer. Administrators who do not have ApplinX Designer or ApplinX Administrator can access the Server Log via an external browser.
To View the contents of server log files from within ApplinX
Administrator
In the ApplinX Administrator, click on the toolbar to view the current log file's contents. To view previous log file history: click the node under the Management node. The paths of these log files; according to the Server definitions (see Server Configuration) appear in the Main view.
Double-click a file's name. A dialog box with the file's contents appears.
Click , or press the key on the keyboard to renew information on the log file manually. Check Auto refresh to automatically refresh the log file.
Click to exit the Log File window.
To View the contents of server log files from within ApplinX
Designer
In the ApplinX Designer, either right-click on a server and select , or select in the Menu.
To view previous log file history select the relevant file from the list of files in the File name field.
Double-click a file's name. A dialog box with the file's contents appears.
Click , or press the key on the keyboard to renew information on the log file manually.
Click to restart the log. The previous data is saved to a file, and a new file is created.