The EntireX PL/I Wrapper provides access to RPC-based components from PL/I applications. It enables you to develop both client and server applications.
This section introduces the various possibilities for RPC-based client applications written in PL/I.
A step-by-step guide is provided in the section Writing Applications with the PL/I Wrapper. Read this section first before writing your first RPC client program.
(1) The linkage name of the module can be customized, see
ERXPREFIX under PL/I Preprocessor Settings.
(2) The CICS name of the module can be customized, see
ERXPREFIX under PL/I Preprocessor Settings.
(3) For the target platforms, see Generating PL/I Source Files from Software AG IDL Files.
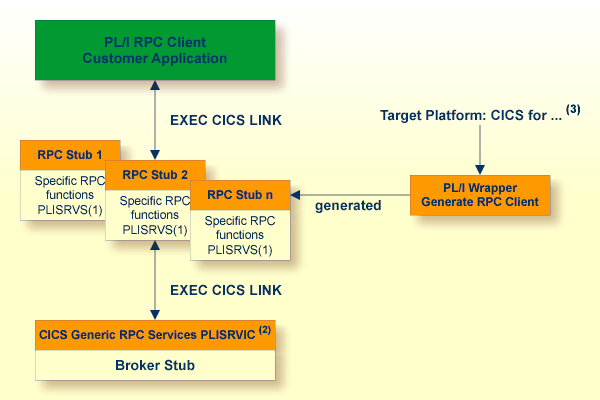
In this scenario the PL/I RPC Client Customer Application, every
generated client interface object and the CICS
Using the Generic RPC Services Module (PLISRVIC) are installed each as separate
individual CICS programs.
The broker stub is linked together with the CICS Generic RPC Services
(PLISRVIC) only, thus an update of the broker stub merely requires relinking
and reinstalling the Generic RPC Service module. The client interface
objects themselves are not involved.
Use the PL/I Wrapper for CICS if
you want to have an EXEC CICS LINK interface to your RPC stubs,
you wish to separate the broker stub from the client interface objects(s)
you require a distributed program link to the client interface object(s).
 To use the PL/I Wrapper for CICS
Generate the RPC stub for the target, e.g. "CICS for z/OS". See Generating PL/I Source Files from Software AG IDL Files.
If necessary, use FTP to transfer the client interface object to the target platform where you write your application.
Write your PL/I RPC client application (see Writing Applications with the PL/I Wrapper), taking into consideration the manner in which CICS programs are called.
If necessary, use FTP to transfer the client interface object and your application to the target platform where you translate and compile your application.
Set the preprocessor switch ERXTARGET in file RPCPPS
(PL/I Preprocessor Settings) to "CICS".
Using the CICS translator for PL/I provided with your CICS installation and a PL/I compiler supported by PL/I Wrapper, translate and compile the following:
the generated client interface object(s)
the specific RPC functions module (PLISRVS)
the CICS Generic RPC Service module (PLISRVIC)
your PL/I RPC client customer application
Link (bind) every generated client interface object together with the specific RPC functions module
(PLISRVS) to a CICS program, using the
standard linker (binder) of the target platform.
Link (bind) the CICS RPC service module (PLISRVIC) together with the broker stub
to a CICS program, using the standard linker (binder) of the
target platform. Use a broker stub supported in CICS. The CICS name of the
module is PLISRVI and it can be customized,
see ERXPREFIX under
PL/I Preprocessor Settings.
Link (bind) your PL/I RPC client customer application, using the standard linker (binder) of the target platform.
Install every client interface object, the CICS RPC service module and your PL/I RPC client customer application from the previous steps as separate CICS programs.
(1) The linkage name of the module can be customized, see
ERXPREFIX under
PL/I Preprocessor Settings
(2) For the target platforms, see Generating PL/I Source Files from Software AG IDL Files
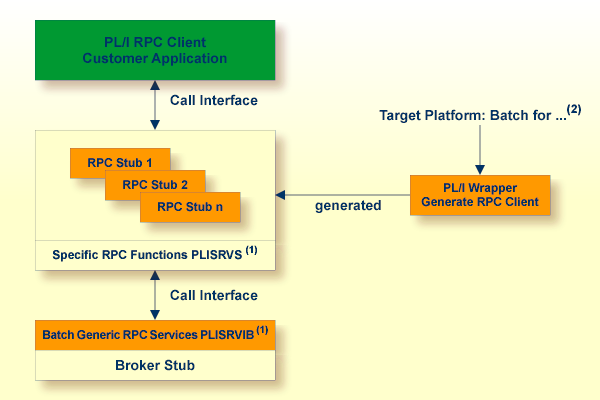
The PL/I Wrapper could be used with a call interface, even in
CICS. This means you build an application where the PL/I RPC client customer
application, every generated client interface object, the specific RPC
functions module (PLISRVS), the Batch
Using the Generic RPC Services Module (PLISRVIB) and the broker stub are linked together to an
executable application, similar to the Batch scenario.
Using a call interface within CICS may be useful if
the restriction of the COMMAREA length (about 31 KB) prevents you from using the CICS scenario
you prefer a call interface instead of EXEC CICS LINK
To use the
PL/I Wrapper with a call interface within CICS
Generate the client interface object for the target, e.g. "Batch for z/OS". See Generating PL/I Source Files from Software AG IDL Files.
If necessary, use FTP to transfer the client interface object to the target platform where you write your application.
Write your PL/I RPC client application. See Writing Applications with the PL/I Wrapper.
If necessary, use FTP transfer the client interface object and your application to the target platform where you translate and compile your application.
Set the preprocessor switch ERXTARGET in file RPCPPS
(PL/I Preprocessor Settings) to "BATCH".
Using the CICS translator for PL/I provided with your CICS installation and a PL/I compiler supported by PL/I Wrapper, translate and compile the following:
the generated client interface object(s)
the specific RPC functions module (PLISRVS)
the Batch RPC Service module (PLISRVIB)
PL/I RPC client customer application
Link (bind) all translated and compiled modules together with the broker stub to a CICS program, using the standard linker (binder) of the target platform. Use a broker stub supported in CICS.
Install the program within CICS.
This mode applies to z/OS.
(1) The linkage name of the module can be customized, see
ERXPREFIX under
PL/I Preprocessor Settings.
(2) For the target platforms see Generating PL/I Source Files from Software AG IDL Files.
In this scenario, the PL/I RPC client customer application, every
generated client interface object, the specific RPC functions module (PLISRVS),
the Batch Using the Generic RPC Services Module (PLISRVIB) and the broker stub are linked together to an
executable application.
To use the PL/I Wrapper for Batch
Generate the client interface objects for the target, e.g. "Batch for z/OS". See Generating PL/I Source Files from Software AG IDL Files.
If necessary, use FTP to transfer the client interface object to the target platform where you write your application.
Write your PL/I RPC client application. See Writing Applications with the PL/I Wrapper.
If necessary, use FTP to transfer the client interface object and your application to the target platform where you compile your application.
Set the preprocessor switch ERXTARGET in file RPCPPS
(PL/I Preprocessor Settings) to "BATCH".
Compile the following, using a PL/I compiler supported by PL/I Wrapper:
the generated client interface object(s)
the specific RPC functions module (PLISRVS)
the batch generic RPC service module (PLISRVIB)
your PL/I RPC client customer application
Link (bind) all compiled modules together with the broker stub to an executable program, using the standard linker (binder) of the target platform. Use a broker stub supported for batch processing in your environment.
The generic RPC services module contains the call to the broker stub, as well as other functions needed for RPC communication where a client interface object is not needed, such as
Logon to broker LO and Logoff from broker LF. See Using Broker Logon and Logoff.
Open Conversation OC, Close Conversation CB and Close Conversation with Commit CE. See Conversational RPC.
Create a Natural Security Token. See Using Natural Security.
Depending on your target environment the generic RPC services module is delivered in various sources:
For CICS, use the source
PLISRVIC. This module is shared by all PL/I RPC client applications because it
is installed only once within CICS.
For Batch and CICS with Call Interfaces use
the source PLISRVIB.
The program and linkage name of the generic RPC service module
is PLISRVI by default
does not depend on the source module used (PLISRVIB or PLISRVIC)
can be customized, see PL/I Preprocessor Settings
The delivery of the generic RPC service module and other required modules depends on the platform you are using.
For platform z/OS, see PL/I Wrapper Modules Delivered as Sources on z/OS.
The delivered generic RPC include data set EXP970.INCL (this data set may be delivered as a patch with a different name EXP970.INnn, where nn is the patch level number, make sure you install the highest patch level available) is required to SYSLIB input for the PL/I compiler.
For a non-tracing version, the Trace Functions module delivered in
the source PLISRVT in the generic RPC source data set EXP970.SRCE must
not be compiled and linked to your application.
The PL/I Wrapper requires the PL/I preprocessor for all scenarios, that is, the templates generate source code including preprocessor statements. See your PL/I compiler documentation on how to switch on the PL/I preprocessor.
The preprocessor settings are customized in the file RPCPPS; see
PL/I Wrapper Modules Delivered as Sources on z/OS. The following
switches are available:
| Preprocessor Switch | Values | Explanation |
|---|---|---|
ERXTARGET |
BATCH | CICS |
This is the most important switch. The setting must always be the same as the target option during generation, i.e. when using the PL/I Wrapper
If the setting is not the same, it will not be possible to compile the PL/I Wrapper successfully. |
ERXPREFIX |
A prefix composed of any three characters valid for PL/I names |
With this switch you can customize a prefix of the program and linkage name of the
The default of the prefix is PLI, the resulting linkage names
therefore are |
ERXTRACE |
YES NO |
With this switch you can build a trace version, See
Using Trace. For a non-tracing version,
if set to "NO", the Trace Functions module delivered in source
RPCSRVT must not be compiled and linked to your application.
|
The EntireX PL/I Wrapper provides access to RPC-based components from PL/I applications. It enables you to develop both client and server applications.
This section introduces the various possibilities for RPC-based server applications written in PL/I.
This scenario applies to z/OS. See also PL/I Scenarios.
(1) For the target platforms, see Generating PL/I Source Files from Software AG IDL Files
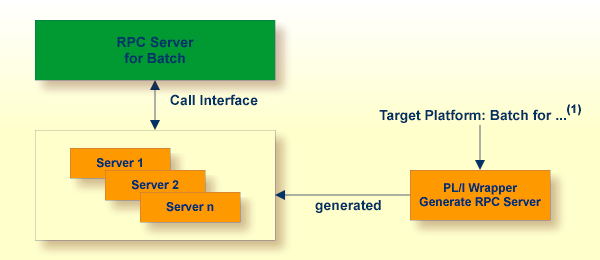
In batch mode the RPC server requires no server interface objects. All parameters of your server are set up dynamically in the format required. Your server is called dynamically using standard call interfaces.
To use the PL/I Wrapper for batch
Generate the server (skeleton) for the target, for example "Batch for z/OS". See Generating PL/I Source Files from Software AG IDL Files.
If necessary, use FTP to transfer the server (skeleton) to the target platform where you write your server.
Use the generated server (skeleton) and complete it by applying your application logic. Note the information given in Software AG IDL to PL/I Mapping.
If necessary, use FTP to transfer the server interface object and your server to the target platform where you compile your server.
Compile it using a PL/I compiler supported by PL/I Wrapper on your server.
Link (bind) the server to an executable program, using the standard linker (binder) of the target platform.
Provide the server and the server interface object to the RPC Server for Batch.
This mode applies to z/OS. See also PL/I Scenarios in the CICS RPC Server documentation.
(1) For the target platforms, see Generating PL/I Source Files from Software AG IDL Files
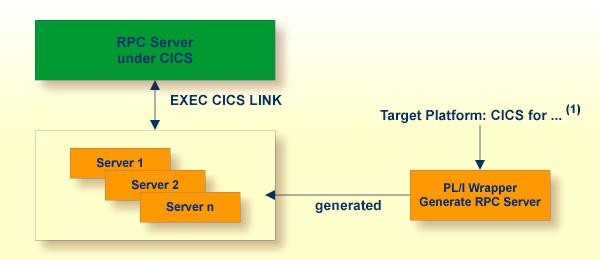
In CICS the RPC Server requires no server interface objects. All
parameters of your server are set up dynamically in the format required. Your
server is called using EXEC CICS LINK.
To use the PL/I Wrapper for CICS
Generate the server (skeleton) for the target, e.g. "CICS for z/OS". See Generating PL/I Source Files from Software AG IDL Files.
If necessary, use FTP to transfer the server (skeleton) to the target platform where you write your server.
Use the generated server (skeleton) and complete it by applying your application logic. Note the information given under Software AG IDL to PL/I Mapping and Aborting RPC Server Customer Code and Returning Error to RPC Client in the CICS RPC Server documentation.
If necessary, use FTP to transfer the server interface object and your server to the target platform where you translate and compile your server.
Translate and compile your server (including your application logic) using the CICS translator for PL/I provided with your CICS installation and a PL/I compiler supported by PL/I Wrapper.
Link (bind) the server to an executable program, using the standard linker (binder) of the target platform.
Install your server as a CICS program to provide it to the CICS RPC Server.
This mode applies to z/OS IMS mode BMP. See also PL/I Scenarios in the IMS RPC Server documentation
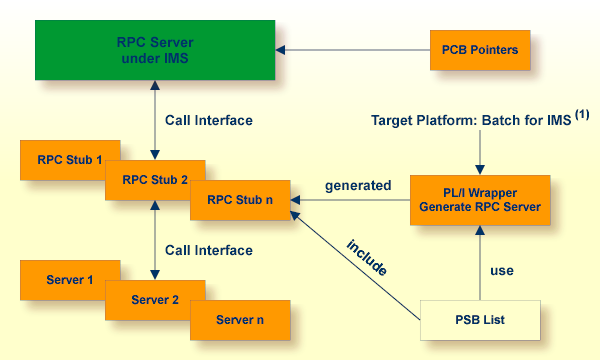
(1) For the target platforms, see Generating PL/I Source Files from Software AG IDL Files
In IMS, the RPC Server works with server interface objects. The interface objects provide the IMS-specific PCB pointers to your server. Your server is called dynamically using standard call interfaces. See IMS-specific PCB Pointers in the IMS RPC Server documentation.
All IMS PCB pointers are listed in a so-called PSB list, an include file containing the PCB pointers as PL/I declarations.
Assume a program uses two PSB definitions:
IOPCB for the terminal interactions to check whether all outstanding messages are displayed or not
DBPCB for all database interactions to read, add, delete or update segments in a given database.
Technically the PLI / DLI interface module PLITDLI is
called with the selected function code and PCB parameters. On return the
necessary status information can be checked to control the further processing
within the application program.
This status information is provided as parameter on return of the
PLITDLI call. For this purpose, the PCB areas have to be defined
with a DECLARE statement and as parameters.
   DCL 01 IOPCB                          ,
         02 LTERM-NAME         CHAR (08) ,
         02 FILLER_IO1         CHAR (02) ,
         02 TPSTATUS           CHAR (02) ,
         02 FILLER_IO2         CHAR (20);
   DCL 01 DBPCB                          ,
         02 DBNAME             CHAR (08) ,
         02 SEG_LEVEL_NO       CHAR (02) ,
         02 DBSTATUS           CHAR (02) ,
         02 FILLER             CHAR (20);

DBREAD: PROC(IOPCB, DBPCB) OPTIONS(...)
Now IMS is able to pass ADDRESSES for the IOPCB and DBPCB on entry of
the application program.
The PSB list would be:
10  IOPCB POINTER,
10  DBPCB POINTER;
In the application program itself the IMS parameter can only be identified by its name, thus it is necessary to provide a list of PCBs as an include file.
This include file is provided by the customer.
The PSB list must be named PSBLIST (otherwise generation will not be
possible) and it must not be empty, it must contain at least 1 PCB pointer.
It is used by the IDL Extractor for PL/I to find the IMS-specific
PCB pointers. In the IDL file, parameters originating from PCB pointers are
marked with the attribute IMS.
It is completed in the generated server interface object with the following level-1 parameter name, to address the IMS-specific PCB pointers correctly:
/* IMS parameter */
DCL 1 IMS_PARAMETER,
%INCLUDE PSBLIST;
Together with the level-1 parameter name the data declarations in the PSB list include file must form valid PL/I data declarations - otherwise compilation is not possible.
To use the PL/I Wrapper for IMS
Generate the server (skeleton) and server interface objects for the target "IMS for z/OS". See Generating PL/I Source Files from Software AG IDL Files.
If necessary, use FTP to transfer the server interface object and the server (skeleton) to the target platform where you write your server.
Use the generated server (skeleton) and complete it by applying your application logic. You can use the IMS specific PCB pointers in your server as usual. Note the information under Software AG IDL to PL/I Mapping and Aborting RPC Server Customer Code and Returning Error to RPC Client in the IMS RPC Server documentation.
If necessary, use FTP to transfer the server interface object and your server to the target platform where you compile your server.
Using a PL/I compiler supported by PL/I Wrapper, compile:
the generated server interface object(s) providing the PSB List (see above) as an include file
your server (including your application logic).
Link (bind) the server to an executable program, using the standard linker (binder) of the target platform.
Provide the server interface object(s) in the server interface object
library with the parameter stublib to the IMS RPC Server. See Configuring the RPC Server.
Provide the server to the IMS RPC Server.
For IMS
The delivered generic RPC include data set EXP970.INCL (this data set may be delivered as a patch with a different name EXP970.INnn, where nn is the patch level number; make sure you install the highest patch level available) is required to SYSLIB input for the PL/I compiler.
For all other platforms
No special considerations apply.
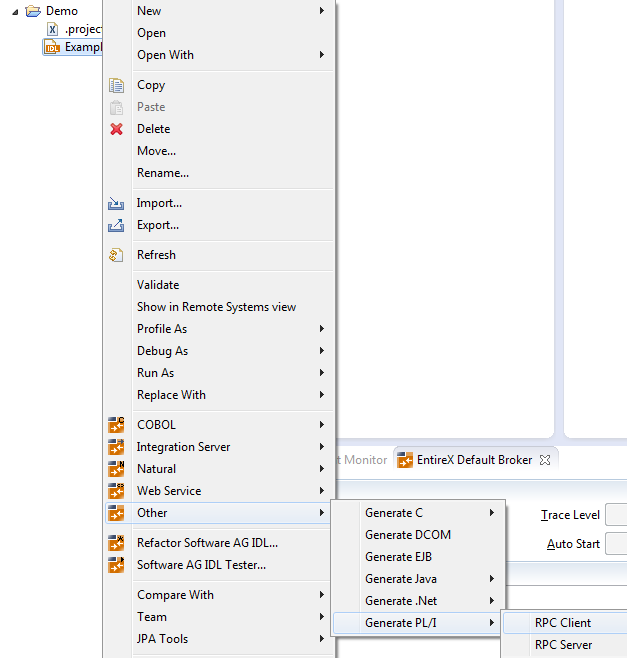
This section describes how to generate PL/I source files from Software AG IDL files. It covers the following topics:
From the context menu, choose and to generate the PL/I source files.
For the RPC client,
this creates the folders client and include in the Container folder, defined in the properties. These contain the client interface objects and the RPC client declarations.
In command-line mode, use the command -"pli:client".
See Using the PL/I Wrapper in Command-line Mode
For the RPC server,
this creates the folder server in the Container folder, defined in the properties. It contains the RPC server implementation skeletons.
Additionally, server interface objects may be generated depending on the platform, e.g. "IMS for z/OS" and features chosen in the folder serverstub in the Container folder, defined in the properties. It contains the server interface objects.
In command-line mode, use command -pli:server. See
Using the PL/I Wrapper in Command-line Mode.
| Warning: Take care not to overwrite an existing server implementation with a server skeleton.We recommend you move your server implementation to a different folder. |
For both RPC client and RPC server
If you generate using the GUI and generated files exist from a previous generation, you are prompted to overwrite them.
If you generate using command-line mode, existing files are always overwritten.
Use the properties of the IDL file to set the container folder where the source file subfolders will be stored. The target platform setting is responsible for the file extension and the content of the generated files.
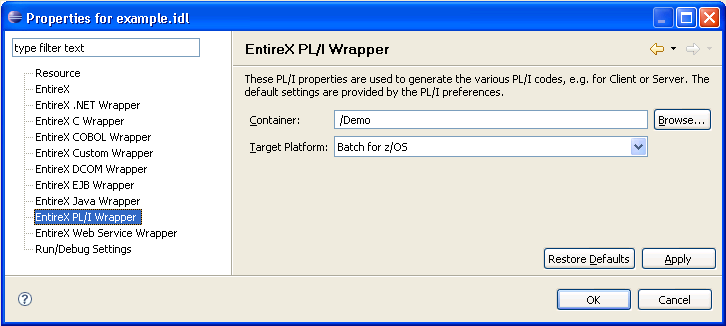
Select Batch, TP Monitor and Operating System for which PL/I code is to be generated.
| Target | Description |
|---|---|
| Batch for z/OS | Batch-dependent PL/I code will be generated. Interface objects and servers are called using standard call interface. Use this option if you want to build an RPC application as described under |
| CICS for z/OS | CICS-dependent PL/I code will be generated. The
interface is mapped to DFHCOMMAREA. Interface objects and servers are called
using EXEC CICS LINK. Use this option if you want to build an RPC application
as described under
|
| IMS for z/OS | IMS-dependent PL/I code will be generated.
Interface objects and servers are called using standard call interface,
considering also IMS-specific PCB pointers (IDL parameters marked with the
attribute IMS) for servers. See attribute-list under Software AG IDL Grammar. Use this option if you want to build
an RPC application for IMS as described under
|
The workspace default for the target platform is set in the preferences page of the PL/I Wrapper.
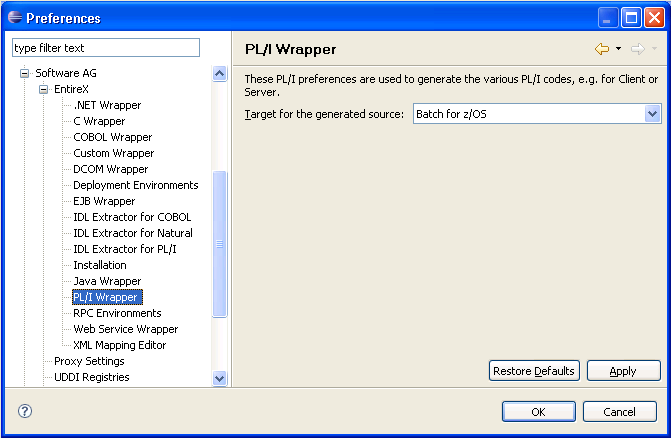
In command-line mode, use -target to set
this option.