This document covers the following topics:
See also Using the XML Tester.
![]() To start the XML Mapping Editor
To start the XML Mapping Editor
In the EntireX Workbench
Double click on an XMM file.
Or:
Select an IDL or XMM file and choose
> .
If the XMM file for the selected IDL file exists, the XML Mapping Editor loads this. The button is disabled because a mapping exists.
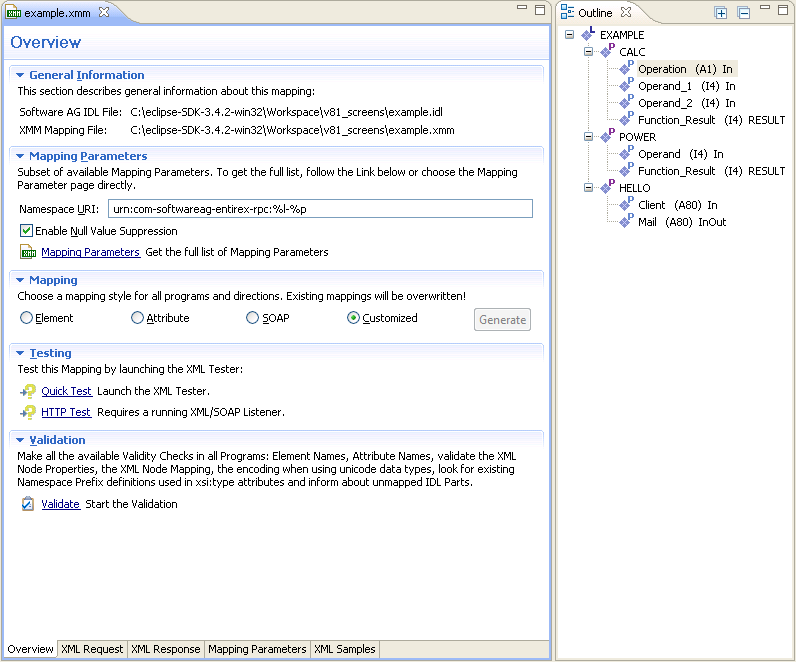
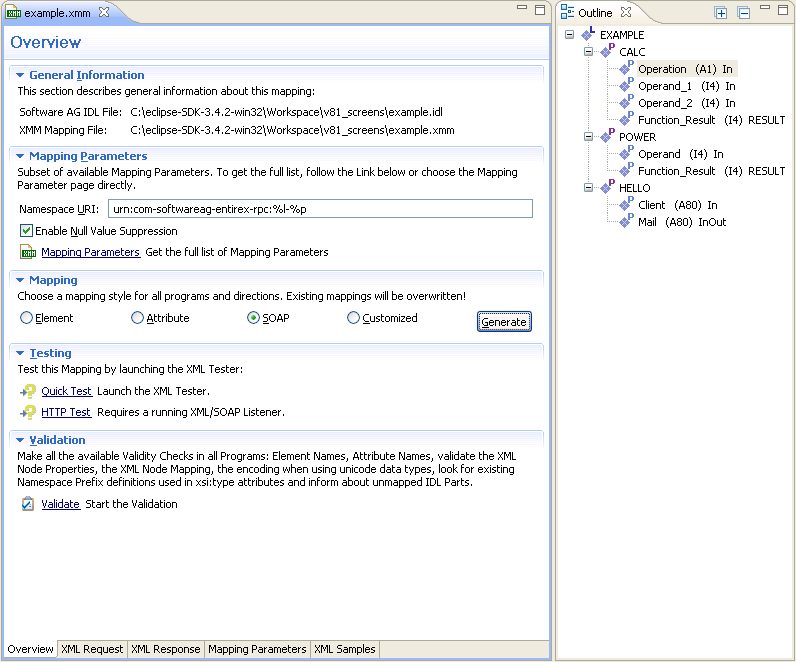
If no XMM file exists for the IDL file, the mapping style is set to "SOAP" as default value. Choose the required mapping style and press .
![]() To close the XML Mapping Editor
To close the XML Mapping Editor
From the menu, choose .
Or:
Click the icon in the editor title bar.
If the current XML mapping has not yet been saved, a dialog box appears from which the close operation can be stopped or the IDL-XML mapping can be saved. An XML mapping that is not clean is indicated with a leading asterisk in the file name, displayed in the editor title.
The Overview Page is the central page and provides sections for file information, the most important mapping parameters, mapping generation, testing and validation.
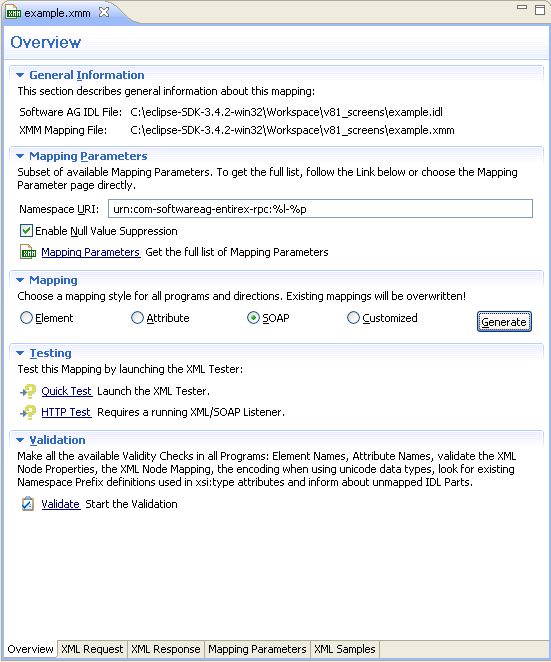
These sections are:
General Information
This section describes the names and locations of the selected XML
Mapping (XMM) file and the related IDL file.
Mapping Parameters
Provide the Namespace and Null Value
Suppression controls and contains a link to the Mapping
Parameters page
Testing
Allows you to launch the XML Tester in Quick mode or HTTP mode.
Validation
Make the validity checks in all programs and report the result in a
new dialog. Detected problems will be displaced in the
Problems view
Mapping
Start the Mapping generation for all Programs.
Note:
Existing Mappings will be overwritten!
This page contains the Mapping Tree of the XML Request, which is linked together by mapping paths with the IDL tree in the Outline View.
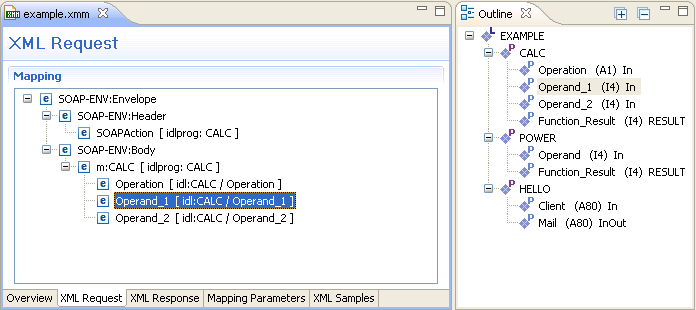
The XML Request shows the XML tree loaded or created so far for the selected IDL program. The XML tree can be modified in various ways. See IDL to XML Mapping with the XML Mapping Editor.
The Outline View shows the IDL tree of the currently selected IDL file. The IDL tree display has the same functionality as the IDL Editor's tree display; however, due to the fact that every IDL program must be separately mapped, only one of the IDL program tree nodes can be expanded.
Use the right mouse button to display the context menu. Double-click on a tree node to display detailed information on that node. The following keyboard options are also available in the XML request mapping area:
| Key | Description |
|---|---|
| A or SHIFT+INS | Create new parameter node after currently selected one. |
| D or DELETE | Delete the selected IDL tree node. |
| F | Find IDL node with given name pattern. |
| I or ALT+INS | Create a new group parameter node. |
| L | Create new IDL library node. |
| M | Find mapped XML node for selected IDL tree node. |
| N or INS | Create new parameter node. |
| O or CTRL+INS | Create new RPC program node. |
| P or ALT+ENTER | Open property dialog on selected IDL tree node. |
| R | Rename the selected IDL tree node. |
| F3 | Follow-up of M, find next mapped XML node for selected IDL tree node. |
The XML Node Properties dialog contains the XML node details, the bottom panel contains namespace settings.
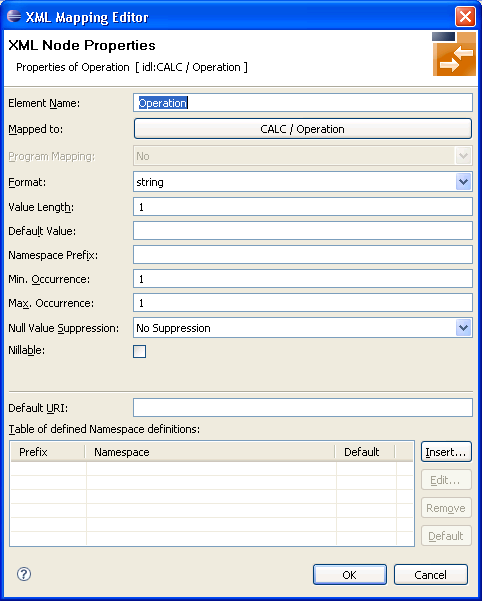
![]() To open the XML Node Properties Dialog
To open the XML Node Properties Dialog
Double-click on an XML node in the tree display.
Or:
Choose the Properties menu item in the context menus.
Or:
Select an XML tree node and press Enter.
The XML Node Properties can be modified. The node details panel consists of two subpanels.
The upper panel contains the following:
| Item | Description | ||||||||||||||||||||||||||||||||||||||||||||||||||||||||||||
|---|---|---|---|---|---|---|---|---|---|---|---|---|---|---|---|---|---|---|---|---|---|---|---|---|---|---|---|---|---|---|---|---|---|---|---|---|---|---|---|---|---|---|---|---|---|---|---|---|---|---|---|---|---|---|---|---|---|---|---|---|---|
| Element or attribute name | Name of the element or attribute. | ||||||||||||||||||||||||||||||||||||||||||||||||||||||||||||
| Mapped to | The IDL mapping link in the full path name format. For error (fault) trees, context information. | ||||||||||||||||||||||||||||||||||||||||||||||||||||||||||||
| Program Mapping |
|
||||||||||||||||||||||||||||||||||||||||||||||||||||||||||||
| Format |
|
||||||||||||||||||||||||||||||||||||||||||||||||||||||||||||
| Value Length | The length parameter contains the length or
precision of the data type, i.e.
Length V is legal for string types. It denotes variable-length strings, e.g. alphanumeric or Kanji. For Tamino/special nodes: Length of the storage reserved for the data must match format. |
||||||||||||||||||||||||||||||||||||||||||||||||||||||||||||
| Default Value | Must match the data type of the node, e.g. do not use alphanumeric defaults for integer nodes. Defaults that cannot be interpreted by the runtime component are ignored. See also Assigning Default Values. | ||||||||||||||||||||||||||||||||||||||||||||||||||||||||||||
| Namespace Prefix | Contains the namespace prefix to the tag name. | ||||||||||||||||||||||||||||||||||||||||||||||||||||||||||||
| Min. Occurrence | The minimum and maximum occurrence properties are numeric values greater than or equal to zero. They describe the number of allowed occurrences of the node in the incoming XML, and the number of occurrences to be generated in the outgoing XML. The minimum occurrences value must be less than or equal to the maximum occurrences value. Incorrect settings will be found in the validity check Validate XML node properties. If Min. Occurrence is greater than 0 for incoming documents, the corresponding attribute or element is required, i.e. must be set. | ||||||||||||||||||||||||||||||||||||||||||||||||||||||||||||
| Max. Occurrence | See Min. Occurrence. | ||||||||||||||||||||||||||||||||||||||||||||||||||||||||||||
| Null Value Suppression (NVS) | Specify suppression of null values (NVS), that
is, whether empty elements or attributes may be omitted in the outgoing
(generated) XML documents. Mainly determined by Min.Occurrences and Max.
Occurrences as follows:
It is also possible to suppress an attribute (independent of its value) if the associated element has a null value and null value suppression is enabled; to do this choose in property . For the data types, the following null values are defined:
|
||||||||||||||||||||||||||||||||||||||||||||||||||||||||||||
| Null Value | If NVS is switched on, this value is compared with the values of the XML document and it is decided whether the values need to be transmitted. The defaults are in the table for NullValue Suppression (NVS). | ||||||||||||||||||||||||||||||||||||||||||||||||||||||||||||
| Nillable | If NVS is set to "No Suppression", the Nillable option
is available in the dialog.
If the option is selected, an empty element is represented as an empty-element tag with attribute xsi:nil="true".
This means that if an nillable group element only has elements without value and without attributes,
only the enclosing group tag with attribute xsi:nil="true" is displayed.
|
||||||||||||||||||||||||||||||||||||||||||||||||||||||||||||
| Time Pattern |
Optional for date, time (deprecated) and dateTime. The default patterns conform to the XSD Schema 2001 specification: date: Value for user-defined time pattern:
|
||||||||||||||||||||||||||||||||||||||||||||||||||||||||||||
The value for null value suppression has a higher priority than the occurrence setting of affected elements or attributes. The following rules apply:
NVS="Suppress Element"/"Suppress Attribute"
Setting NVS to Suppress Element" or "Suppress Attribute" results in
a value of minimum occurrence of zero, which makes it optional.
NVS="No Suppression"
Setting NVS to "No Suppression" means that the element/attribute is
always displayed so the value of #minOccur must be 1 - otherwise the
element/attribute would be optional and could be suppressed.
NVS for arrays
For arrays, the dependency of minimum occurrence and Null Value
Suppression is more complex:
NVS set to "No Suppression"
For an array with fixed size the setting is #minOccur =
#maxOccur = #array size.
An array with variable size will contain all non-suppressable
elements, but at least #minOccur elements. Empty elements will be
generated to guarantee the number of #minOccur.
NVS set to value other than "No Suppression"
The number of array elements is at least #minOccur (empty elements
will be generate and appended if number of elements is lower than
#minOccur).
The lower panel is only available for element nodes and contains namespace-related properties:
| Item | Description |
|---|---|
| Namespace URI | A default Namespace (xmlns= .....) for this element node. |
| Namespace definitions (table) | A table of namespace prefix / URI assignments for this element node. The listed namespaces are defined for this element and all subelements, as described in the XML namespaces specification document. Two buttons, Add and Delete, allow you to add or delete namespace definitions, respectively. |
The context menu of the XML tree enables you to modify the XML structure. It contains menu items to insert new nodes, remove or rename nodes, remove an IDL mapping, change the XML part type to element or attribute, move the selected node to the top or bottom of the current subtree, move the selected node up or down within the subtree, or show the XML Node Properties dialog.
![]() To open the context menu
To open the context menu
Select the XML tree node and click the right mouse button.
| Menu Item | Shortkey | Description |
|---|---|---|
| New child node | Ctrl-N | Insert a child node under the selected node. |
| Insert before | Ctrl-B | Insert a new node before the selected node. |
| Insert after | Insert | Insert a new node after the selected node. |
| Set to Attribute | Ctrl-S | Turn an attribute into an element. Also works for multiple selected nodes. |
| Set to Element | Ctrl-E | Turn an element into an attribute. Also works for multiple selected nodes. |
| Bring to top | Ctrl-T | Move the selected node to the top of the current subtree. |
| Bring to bottom | Ctrl-O | Move the selected node to the bottom of the current subtree. |
| Move up | Ctrl-U | Move the selected node up within the subtree. |
| Move down | Ctrl-D | Move the selected node down within the subtree. |
| Cut | Ctrl-X | Cut the selected node. |
| Copy | Ctrl-C | Copy the selected node. |
| Paste | Ctrl-V,Ctrl-P | Paste a node from the clipboard (after copy or cut). |
| Unmap | Ctrl-M | Unmap the selected IDL and XML nodes, i.e, remove link. Also works for multiple selected nodes. |
| Delete | Delete/Backspace | Remove the selected node. Also works for multiple selected nodes. |
| Rename | Ctrl-R | Rename the selected node. |
| Properties | Alt-Enter | Open the XML Details Panel. |
You can use drag-and-drop operations within the XML tree instead of move and cut-and-paste. Select a node (even with subnodes) and drag it to another place. The dragged subtree is then inserted after, before or under the corresponding drop node (to insert it under the drop node, use the Ctrl key as a toggle).
Some drag-and-drop operations are illegal, e.g. dragging a node into one of its descendant nodes (children). This would result in a cyclic reference and is thus forbidden.
Dropping a dragged node into an attribute node will convert the attribute node to an element node. This is because attributes may not have descendant nodes.
| Warning: If you drag a subtree into or out of an array, the IDL mapping links of all nodes of that subtree will be deleted. This is because the cardinality of the node occurrence has changed, and the resulting IDL mapping is very likely to be incorrect. |
If you drag an IDL tree node onto an XML tree node, the IDL-XML mapping link for that XML node is changed. The new XML-IDL mapping of this XML tree node is to the dragged IDL node. The IDL tree is not changed.
This is a quick way to change IDL mappings for XML parts. Note that there is no immediate check for duplicate assignment of an IDL node; however, the validity checks will detect it.
This page contains the Mapping Tree of the XML Response, which is linked together by mapping paths with the IDL tree in the Outline View. The page extends the XML Request page with an additional section, Fault Document Manager, at the bottom.
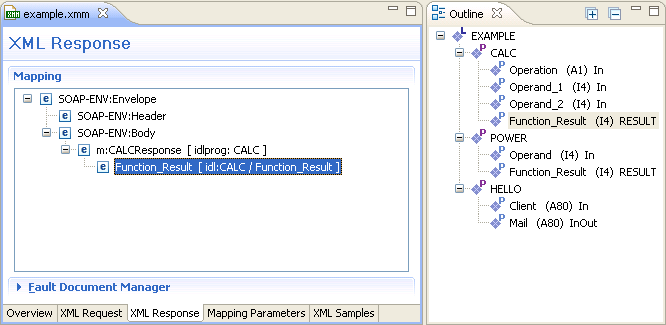
The Fault Document Manager contains the entry for the XML Fault Response Document. By selecting the entry, the button will be enabled. Press to display the following dialog:
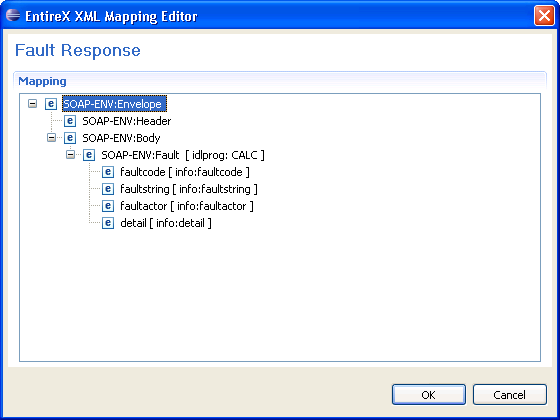
The same operations as for the XML Request and XML Response trees are possible. Confirm the changes with , or click to exit without changes.
This page covers the Mapping Parameters to affect the Mapping Structure. The default values for that page will be managed in the preferences and can be loaded by using the button in the upper right corner.
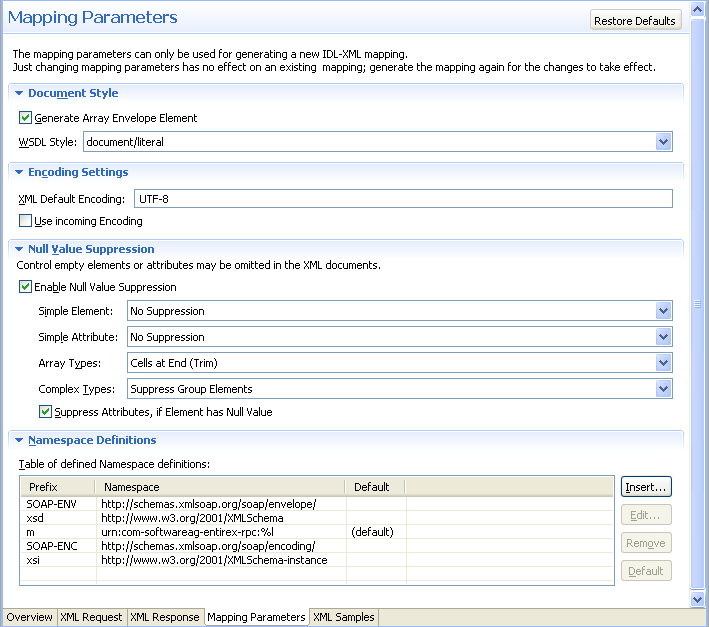
| Parameter | Description |
|---|---|
| Generate Array Envelope Element | Determines whether for each array a surrounding additional element (envelope) is generated or not. |
| WSDL Style | Prepare the SOAP Mapping for selected WSDL Style. Possible values: document/literal or RPC/encoded. |
| XML Default Encoding | This encoding is used for the XML/SOAP document sent if the box Use incoming XML encoding is not checked (for XML-based clients), or if the XML/SOAP RPC Server is used. |
| Use Incoming Encoding | Check this box to enable the XML/SOAP Wrapper to use same encoding for the incoming document as for the outgoing document. |
| Enable Null Value Suppression(1) | Switch on/off the null value suppression.(1) |
| Simple Element(1) | Suppress Elements. Possible Values: No Suppression or Suppress Element.(1) |
| Simple Attribute(1) | Suppress Attributes. Possible Values: No Suppression or Suppress Attribute.(1) |
| Array Types(1) | Suppress Array Types. Possible Values: No Suppression, All empty cells or Cells at end (Trim).(1) |
| Complex Types(1) | Suppress Complex Types. Possible Values: No Suppression Suppression (no special handling of complex types - null value suppression defined for 'Simple Element' is used), or Suppress Group Elements.(1) |
| Suppress Attributes, if Elements has Null Value(1) | Suppression depends on the Parent Element.(1) |
| Namespace Definitions Table | Manage all Namespaces with prefix and URI. |
(1) For more details on null value suppression, see below or Null Value Suppression in Writing Advanced Applications with the XML/SOAP Wrapper.
This page allows the generation and modification of XML Sample Documents. They can be used to test the Mapping by sending the generated Request Document to the XML Tester. Another useful point is to compare the XML Sample Document structure with the real XML Document returned by your application to detect differences, for example Namespace Definitions, typos or anything else.
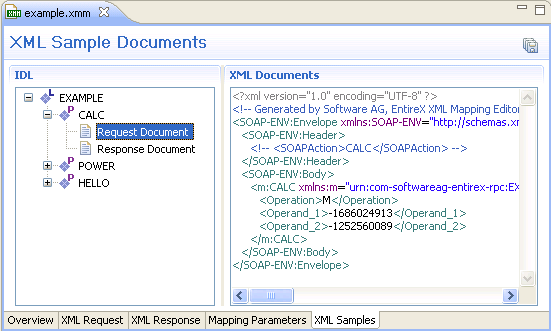
All generated XML Sample Documents can be stored in parallel to the selected XMM file by using the Save All toolbar button in the upper right corner of this page or the Save command in the context menu. The generated file name is built as follows:
[xmm name] .[library name].[program name].[direction (request | response)].xml
For example: example.EXAMPLE.CALC.request.xml
If a file already exists, a dialog will prompt you for confirmation to overwrite it.
The XML Samples context menu allows the generation of XML Sample Documents.
There are two different menus:
Library or Program is selected

Generate All means both directions (Request and Response). When a Library is selected, the commands here will be inherited by all Programs.
Request or Response Document is selected

The XML Tester... command sends the selected XML Sample Document to the XML Tester as Quick Test and enters the name of the XMM file.
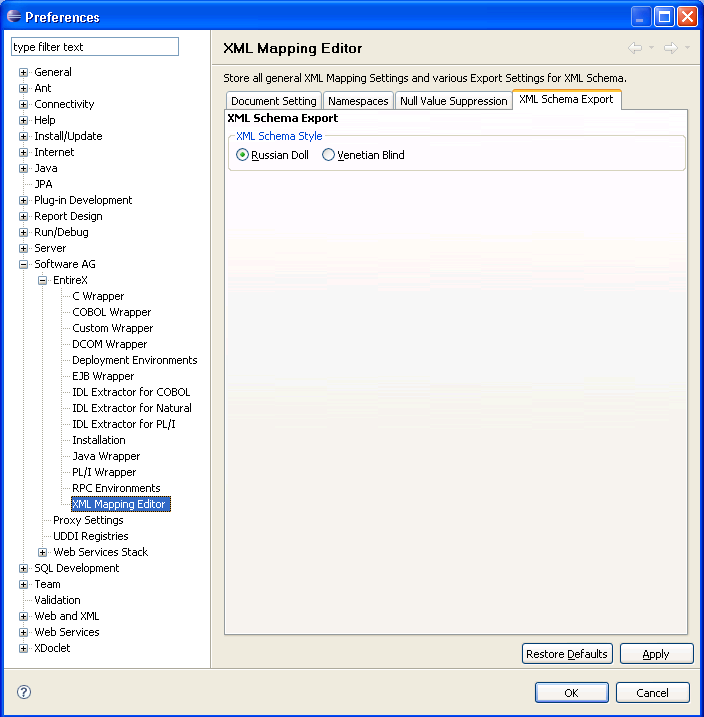
The current XML Mapping can be exported as XML Schema, using the context menu of the XMM file. The XML Schema style "Russian Doll" or "Venetian Blind" can be selected in the preferences.
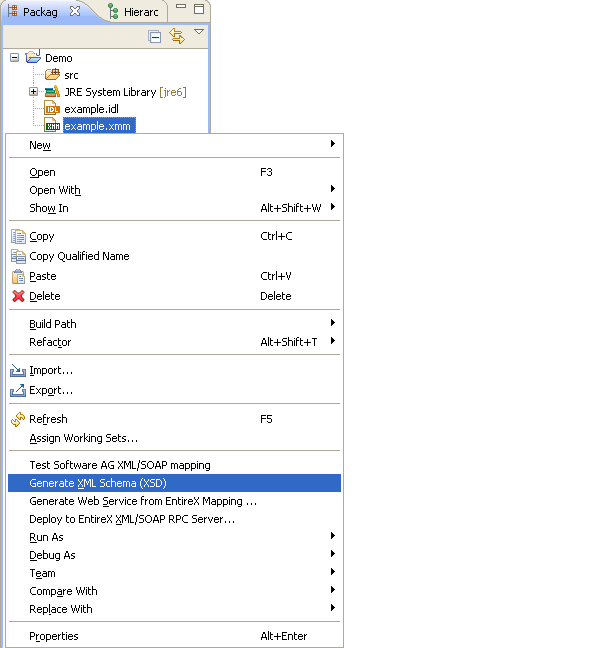
The generated XML Schema files will be stored in parallel to the selected XMM file, where one file represents the direction (request or response) and the defined prefixed element.
For example: a SOAP mapping creates four files from the example CALC program: two prefixes ("SOAP-ENV" and "m"), and two directions (request and response). The generated file name is built as follows.
[xmm name].[library name].[program name].[direction (request |
            response)][(optional).additional prefix].xsd
example.EXAMPLE.CALC.request.xsd
example.EXAMPLE.CALC.request.m.xsd
example.EXAMPLE.CALC.response.xsd
example.EXAMPLE.CALC.response.m.xsd
If a file already exists, a dialog will prompt you for confirmation to overwrite it.
The preference page XML Mapping Editor manages the default values.
For XML Schema the style "Russian Doll" or "Venetian Blind" can be selected.
All other parameters are described under Mapping Parameters.
![]() To remove one or more unused namespaces
To remove one or more unused namespaces
Open the XML Mapping Editor for the XMM file.
Select tab XML Request.
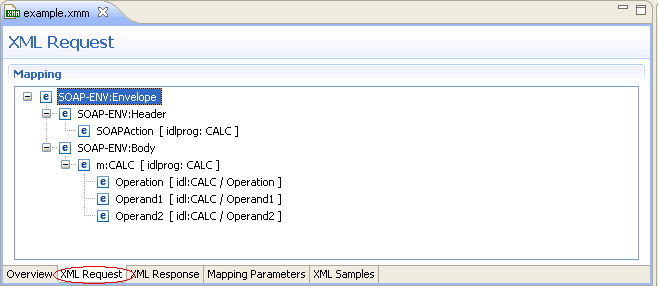
Select the element that defines namespace(s) to be removed.
From the context menu, choose Properties.
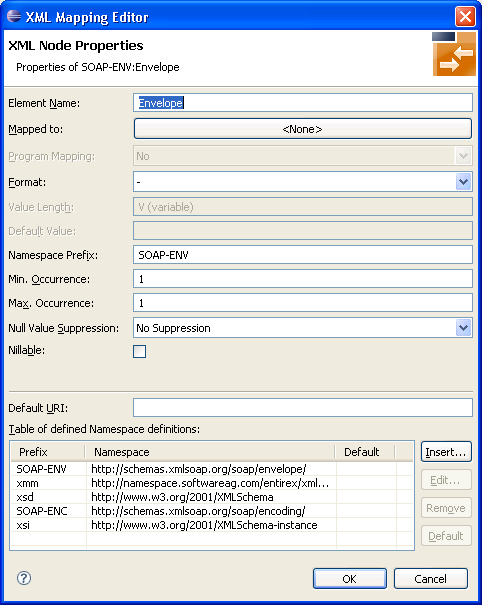
Select (unused) namespace entry/entries in list and choose Remove.
Press .
Repeat these steps for the XML response (select the XML Response tab and repeat the steps above).
Save the XMM file.
Switch to XML Samples tab, which shows the following:

The XMM file defines the following:
...
<FromXml>
<Method relatedIdlLibrary="EXAMPLE" relatedIdlProgram="CALC" encoding="UTF-8"
useIncomingEncoding="true">
<XmlNode name="Envelope" length="0" min="1" max="1" namespacePrefix="SOAP-ENV"
nullSuppression="NVS_NONE" nullValue="" >
<XmlNamespaceDef prefix="SOAP-ENV" uri="http://schemas.xmlsoap.org/soap/envelope/" />
<XmlNamespaceDef prefix="SOAP-ENC" uri="http://schemas.xmlsoap.org/soap/encoding/" />
<XmlNode name="Header" length="0" min="1" max="1" namespacePrefix="SOAP-ENV"
nullSuppression="NVS_NONE" nullValue="" >
<XmlNode name="SOAPAction" format="string" type="xsd:string" length="0" min="1" max="1"
default="CALC" nullSuppression="NVS_NONE" nullValue="" programNode="ev" >
</XmlNode>
...