This document covers the following topics:
Events during Which Design/Change-Time Policies Can Be Enforced
Configuring Policies that Execute on Lifecycle State Changes
Note:
For descriptions of the built-in actions that you can include in a
design/change-time policy, see the document Built-In
Design/Change-Time Actions Reference.
Design/change-time policies specify a set of actions that are to be executed when a specified event occurs to an instance of a specified object type. You use design/change-time policies to customize the behavior of CentraSite when certain events occur on assets and other objects in the registry (for example, during creation, modification and/or deletion events). You can use design/change-time policies to perform tasks such as obtaining approvals, executing automated tests, issuing notifications and imposing organizational standards when assets or other objects are created, modified or deleted.
Note:
The use of design/change-time policies is not supported if you are
using a CentraSite Community Edition license.
Design/change-time policies operate on the objects that CentraSite manages. The types of objects to which you can apply design/change-time policies are:
Organizations
Users (Note that policies you apply to User objects are enforced when events occur to the User objects in the CentraSite registry, not when events occur in the external naming directory.)
Taxonomies
Policies
Assets (You can create policies that apply generally to all policy-enabled assets or to specific policy-enabled types. For more information about policy-enabled assets, see Applying Policies to Assets, below. )
Report Templates
Lifecycle Models
The type definition for an asset includes a property setting called Policies Can Be Applied. This property determines whether assets of the given type are policy-enabled (i.e., whether design/change-time policies are to be executed against them). When this property is enabled, you can create policies that are specific to the assets of that type. Additionally, instances of that type are capable of triggering design/change-time policies that target "assets" in general.
By default, the Policies Can Be Applied property is enabled for an asset type. If you do not want instances of particular asset type to be affected by design/change-time policies, disable this property in the asset's type definition.
When an asset is an instance of a virtual type, the set of policies that CentraSite applies to the asset depends on the virtual type's Inherit Base Type Policies setting. If the type's Inherit Base Type Policies option is enabled, CentraSite applies the policies of the base type to the asset in addition to the policies of the virtual type. For example, the Inherit Base Type Policies option is, by default, enabled for virtual services. Therefore, when CentraSite enforces policies for a virtual service, it applies the set of policies that are defined for the Virtual Service object type and the set of policies that are defined for the Service object type (the base type for the Virtual Service type).
If you disable the Inherit Base Type Policies option for a virtual type, CentraSite applies to the asset only the policies that are defined for the virtual type. For example, if you disable the Inherit Base Type Policies option for the Virtual Service object type, CentraSite applies to virtual services, only the policies that are defined for the Virtual Service type. Policies that are defined for the Service type are not applied.
The following table summarizes how the set of policies that CentraSite enforces for a virtual type is affected by the state of the Inherit Base Type Policies option.
| If the virtual type's "Inherit Base Type Policies" option is... | And the policy is defined for the... | The instances of the virtual type will have... |
|---|---|---|
| ENABLED |
Base Type |
Base Type Policies |
| ENABLED |
Virtual Type |
Virtual Type Policies |
| ENABLED |
Base Type —AND— Virtual Type |
Base Type Policies —AND— Virtual Type Policies |
| DISABLED |
Base Type |
None |
| DISABLED |
Virtual Type |
Virtual Type Policies |
| DISABLED |
Base Type —AND— Virtual Type |
Virtual Type Policies |
For more information about virtual types and the Inherit Base Type Policies option, see the section What is a Virtual Type? in the document Object Type Management. For information about which predefined types in CentraSite are virtual types, see the section The Predefined Asset Types Installed with CentraSite in the same document.
Note:
The Inherit Base Type Policies option does not
affect policies that are assigned to the generic "Asset" type (i.e., policies
that apply to all assets). Policies that are associated with the "Asset" type
are applied to both base types and virtual types, irrespective of the
Inherit Base Type Policies setting.
You can apply design/change-time policies when the following events occur to an object in CentraSite.
| Event | Occurs... |
|---|---|
| PreCreate | Immediately before CentraSite commits a new object to the registry. |
| PostCreate | Immediately after CentraSite commits a new object to the registry. |
| PreUpdate | Immediately before CentraSite commits an update to an existing object in the registry. |
| PostUpdate | Immediately after CentraSite commits an update to an existing object in the registry. |
| PreDelete | Immediately before CentraSite removes an object from the registry. |
| PostDelete | Immediately after CentraSite removes an object from the registry. |
| PreStateChange | Immediately before a specified lifecycle state change is made to an object. |
| PostStateChange | Immediately after a specified lifecycle state change is made to an object. |
| OnConsumerRegistration | When an asset owner accepts a pending registration
request by clicking the
button in the Pending Registrations inbox.
Note: |
| OnTrigger | When you use the button in CentraSite Control to run a policy on demand. For more information about this type of event, see Running Policies On Demand. |
| OnCollect | When a handler process calls the collector. This event is intended to be used only by predefined policies that perform a collection process. For more information about collectors, see Collector and Handler Policies. |
| OnExport | When the export handler is called during an export operation. This event is intended to be used only by predefined policies that perform an export operation. For more information about export handlers, see Collector and Handler Policies. |
| OnMove | When the move handler is called during a move operation (the movement of an asset to another user or organization. This event is intended to be used only by predefined policies that perform a move operation. For more information about move handlers, see Collector and Handler Policies. |
Not all object types support the full set of events. Some events occur only with certain types of objects. For example, a PreStateChange event occurs only on Assets, Policies and Lifecycle Models. If you create a policy for a PreStateChange event on a User object, that policy will never execute, because a PreStateChange event will never occur on a User object.
The following table identifies the events that each object type supports.
| Organization | Taxonomy | User | Policy | Lifecycle Model | Assets | Report Template |
|
|---|---|---|---|---|---|---|---|
| PreCreate |
|
|
|
|
|
|
|
| PostCreate |
|
|
|
|
|
|
|
| PreUpdate |
|
|
|
|
|
|
|
| PostUpdate |
|
|
|
|
|
|
|
| PreDelete |
|
|
|
|
|
|
|
| PostDelete |
|
|
|
|
|
|
|
| PreStateChange |
|
|
|
||||
| PostStateChange |
|
|
|
||||
| OnConsumerRegistration |
|
||||||
| OnTrigger |
|
|
|
|
|
|
|
| OnCollect |
|
|
|
|
|
|
|
| OnExport |
|
|
|
|
|
||
| OnMove |
|
|
An action in a design/change-time policy instructs CentraSite to perform a specific task, such as submit a request for approval, send an email notification to a group of users, perform a specified test or validate certain properties of an object.
CentraSite includes many built-in actions that you can use to compose design/change-time policies. Built-in actions are provided in the following categories:
| Category | Descriptions |
|---|---|
| WS-I Compliance | Actions that test the conformance of a Web service to the basic profiles specified by the Web Services Interoperability organization (WS-I). |
| Design Time | Actions that you can apply when an object is initially added to CentraSite. In general, the actions in this category are designed to be used during a PreCreate event. |
| Change Time | Actions that you can apply when an object within CentraSite is modified or deleted. This category contains actions that you use to obtain approvals, classify objects and perform various types of validation checks. |
| Global Templates | Actions that perform general tasks such as sending email notifications or setting permissions. The actions in this category can be used with nearly all event types. |
| ARIS | An action that notifies ARIS when changes occur to the business processes and services that have been published by ARIS to CentraSite. |
For information about the built-in actions that CentraSite provides for design/change-time policies, see the document Built-In Design/Change-Time Actions Reference.
If you need to execute a task that is not provided by a built-in action, you can create a custom action to perform the work. A custom action consists of a Java class or a Groovy script that performs the required task (for example, running a test, adding a required attribute or updating an external database).
To use a custom action, you must upload the Java class or Groovy script to the CentraSite repository and define an action template for it. An action template specifies the location of your custom code and identifies the parameters that it uses. After you create the action template, your custom action appears in the CentraSite Control user interface and it can be inserted into a policy just like a built-in action.
For information about adding custom actions to CentraSite, see the document Developing Custom Actions.
The policy-enforcement process begins when a CentraSite user submits a request that acts on one of the object types listed in Objects On Which Design/Change-Time Policies Can Operate. Depending on the type of request the user submits, one of the events identified in Events During Which Design/Change-Time Policies Can Be Enforced can occur.
When an event occurs, CentraSite queries its database and executes policies that satisfy the following criteria:
The policy's Event Type and Object Type settings match the given event type and object type.
—AND—
The policy's object-selection criteria are satisfied by the object on which the event occurred.
—AND—
The policy is scoped for the same organization as the object —OR— the policy is system-wide, meaning that it applies to all organizations.
Note:
It does not matter what kind of client submits the request or how the
request reaches CentraSite. Design/change-time policies are applied to all
requests, regardless of whether they come from the CentraSite Control user
interface, a UDDI client or a JAXR-based client. Be aware that the execution of
a policy can itself trigger another policy. This can occur if an action in a
policy performs an operation that is within the scope of another policy.
When multiple policies have the same scope, all of those policies are triggered when an in-scope event occurs. To determine the order in which to execute these policies, CentraSite examines each policy's Priority setting.
The Priority setting contains a non-negative integer that indicates the policy's priority. A priority value of 0 represents the highest possible priority. The following priority values are reserved for system use. These priorities can only be assigned to predefined policies. You cannot assign these priority values to the regular, user-defined policies that you create using CentraSite Control.
Values 0 through 10
Values greater than 9999
Note:
A policy's Priority property is used
only when CentraSite is given multiple policies to enforce for the
same event. If CentraSite has only one policy to enforce, the
Priority property is ignored entirely.
When an event triggers multiple policies, CentraSite executes the policies serially, in priority order from lowest to highest (that is, it executes the policy with the lowest priority value first). Each policy in the series is executed to completion before the next one begins.
If two or more policies have the same priority value, their order is indeterminate. CentraSite will execute these policies in serial fashion after all lower priority policies and before any higher priority policies. However, you cannot predict their order
If CentraSite were given the following policies to enforce for an event:
| Policy | Priority |
|---|---|
| Policy A | 11 |
| Policy B | 25 |
| Policy C | 11 |
| Policy D | 100 |
| Policy E (system policy) | 0 |
It would execute the policies in the following order:
| Policy | Priority |
|---|---|
| Policy E (system policy) | 0 |
| Policy A then Policy C (or vice versa) The order of these two policies cannot be controlled or predicted because they have the same priority. | 11 |
| Policy B | 25 |
| Policy D | 100 |
Note:
The preceding example is shown for illustrative purposes. It is not
a good practice to have an event trigger policies that have the same priority
as exhibited by policies A and C above.
When an action in a design/change-time policy completes its execution, it returns a completion code and a completion message. This information is written to the policy log if CentraSite is configured to log successful policies.
If the completion code indicates success, CentraSite performs the next action in the policy (if one exists) or completes the requested work on the object (for example, it commits the given change to the database).
If the completion code indicates failure, CentraSite records the error in the policy log. Then it immediately exits the policy. If the policy contains additional actions, those actions are not executed. If the policy was triggered by one of the pre-commit events (for example, during a PreCreate, PreUpdate or PreStateChange event) the requested operation is not performed. If the initial request had triggered multiple policies, any policy that had not yet been executed will be bypassed.
For information about viewing failed policies in the policy log, see Viewing the Policy Log and Viewing Failed Policies From Your Inbox.
CentraSite includes a set of predefined policies that execute internal operations on the registry. Many of these policies relate to operations such as deleting objects, exporting objects and moving objects. By default, predefined policies are not shown in the policy list, however, you can view them by enabling the Show Predefined Policies option.
System policies often execute on events such as OnCollect, OnMove and OnExport. For example, the OnMove event triggers the Default Move Handler policy, which makes the changes necessary to move an asset from one organization and/or user to another. If your site has special requirements, it can override certain predefined policies. For example, if you have an asset type that is not suitably exported by CentraSite's Default Export Handler policy, you can develop your own export handler policy to export assets of that type. For more information about replacing the predefined policies installed with CentraSite, see Working with Predefined Policies.
Important:
If you belong to a role that includes the "Manage System-Wide
Design/Change-Time Policies" permission, you have the ability to edit, delete
and deactivate CentraSite's predefined policies. However, you should not do
this. These policies perform critical functions within the registry and must
not be edited, deleted, or deactivated except under the direction of a
technical representative from Software AG.
To create and manage (i.e., view, edit and delete) policies for a specific organization, you must belong to a role that includes the "Manage Design/Change-Time Policies" permission for that organization. By default, users in the CentraSite Administrator, Organization Administrator or Policy Administrator role have this permission.
To create and manage system-wide policies (i.e., policies that apply to all organization within an instance of CentraSite), you must belong to a role that includes the "Manage System-Wide Design/Change-Time Policies" permission. By default, users in the CentraSite Administrator and Operations Administrator role have this permission.
For more information about permissions, see the section About Roles and Permissions in the document Users, Groups, Roles and Permissions.
To create a design/change-time policy you must perform the following high-level steps:
Create a new design/change-time policy.
During this step, you specify the scope of the policy and select the
actions that you want it to execute. For procedures, see
Creating a New
Design/Change-Time Policy.
Optionally refine the scope.
During this step you can specify additional criteria to narrow the set
of objects to which the policy applies. For procedures, see
Refining the Object
Scope.
Configure the policy actions.
During this step, you assign values to the input parameters for the
individual actions. For procedures, see
Configuring
Policy Action Parameters.
Activate the policy.
During this step, you put the new policy into effect. For procedures,
see Activating a
Design/Change-Time Policy.
Perform these steps to create the design/change-time policy and save it to CentraSite.
![]() To create a design/change-time policy
To create a design/change-time policy
In CentraSite Control, go to .
Click .
In the Policy Information panel, specify the following fields:
| In this field... | Do the following... |
|---|---|
| Name | Enter a name for the new policy. A policy name can contain
any character (including spaces).
A policy name does not need to be unique within the registry. However, to reduce ambiguity, you should avoid giving multiple policies the same name. As a best practice, we recommend that you adopt appropriate naming conventions to ensure that policies are distinctly named within your organization. |
| Description | Optional. Enter a description for the new policy. This description appears when a user displays a list of policies in the user interface. |
| Version | Optional. Specify a version identifier for the new
policy.
Note: Examples:
  0.0a
  1.0.0 (beta)
  Pre-release 001
  V1-2007.04.30
The version identifier you enter here is the policy's public, user-assigned version identifier. CentraSite also maintains an internal, system-assigned version number for the policy. For more information about user-assigned and system-assigned version identifiers, see, System-Assigned vs User-Assigned Version Identifiers. |
| Priority | Enter an integer that represents the priority of this policy
with respect to other policies that might be triggered by the same event. The
priority value determines the order in which the policies are enforced. The
lower the Priority value, the higher the priority (i.e., 0
is the highest priority, and policies with this priority value are executed
first).
|
In the Scope panel, specify the object and event types to which the policy applies.
| In this field... | Do the following... |
|---|---|
| Object Types |
Specify the types of objects to which this policy applies. Note: |
| Event Types |
Specify the types of events to which this policy applies. Note: Important: |
| Organization |
Specify the organization to which the policy applies or select "All" if the policy applies to all organizations. Note: Important: For more information about the Organization property, see System-Wide versus Organization-Specific Policy Enforcement. |
Click .
If you selected the PreStateChange or PostStateChange event in the previous panel and there is a lifecycle model for the object types that you have specified, CentraSite Control will ask you to select the lifecycle states that will trigger the policy. To complete this panel, do the following:
If you want the policy to execute immediately before the state is actually changed, click the button in the Before the Object Enters State list and select the states that will cause this policy to execute. (Note that the Before the Object Enters State list will only be present if you selected the PreStateChange event in the previous panel.)
If you want the policy to execute immediately after the state is changed, click the button in the After the Object Entered State list and select the states that will cause this policy to execute. (Note that the After the Object Entered State will only be present if you selected the PostStateChange event in the previous panel.)
Click .
From the Available Actions list, choose the actions that you want CentraSite to execute when it applies this policy. Keep the following points in mind when you select the actions for the policy:
The actions shown in the Available Actions list are determined by the object types and event types that you specified on the Scope panel. If you do not see an action that you need, that action is probably not compatible with all of the object types and/or event types that you selected in the Scope panel.
If necessary, you can click to return to the Scope panel and change your object-type and event-type selections.
Make sure that the actions in the Selected Actions list appear in the order that you want CentraSite to execute them at enforcement time. If necessary, use the controls above the list to place the actions in the correct order.
Be aware that actions from the WS-I category cannot be combined with other types of actions. Also be aware that when you add a WS-I action to the action list, CentraSite will automatically add dependent actions to the list as necessary.
Note:
For descriptions of the built-in actions that CentraSite
provides for design/change-time policies, see the document Built-In
Design/Change-Time Actions Reference.
Click to save the new (as yet incomplete) policy.
Complete the new policy by doing the following:
Configure the parameters for each action on the Actions tab. For procedures, see Configuring Policy Action Parameters.
Optional. Specify additional selection criteria to narrow the set of objects to which this policy applies. For procedures, see Refining the Object Scope.
If the policy is to be enforced during a PreStateChange or PostStateChange event, ensure that the options on the States tab specify the lifecycles and state changes to which the policy applies. For procedures, see Configuring Policies that Execute on Lifecycle State Changes.
If you want to allow other users to view, edit or delete this policy, click the Permissions tab and assign permissions to those users. For procedures, see Setting Permissions on a Policy.
Activate the policy when you are ready to put it into effect. For procedures, see Activating a Design/Change-Time Policy.
CentraSite does not begin enforcing a Design/Change Time policy until you activate it.
To activate a policy, you change the policy's lifecycle state to the "Productive" state. This state change executes CentraSite's Automatic Policy Activation policy.
Note:
The Automatic Policy Activation policy is a
hidden system policy. You cannot edit or delete this policy.
When you activate a policy, be aware that:
You will not be allowed to activate the policy unless all of its parameters have been set. When you switch the policy to the Productive state, CentraSite executes the Validate Policy Activation policy. This policy will not allow you to switch a policy to the Productive state if the policy's parameters have not yet been set.
Some organizations require an approval to activate a policy. If your organization has an approval action associated with the activation of a policy, CentraSite will not activate the policy until the required approvals are obtained. For more information about approval actions, see Using Approval Policies.
If an earlier version of the policy is already active, CentraSite will deactivate the old version before it activates the new one. For more information about working with versioned policies, see Versioning a Policy
When a policy becomes active, CentraSite begins enforcing it immediately. You can suspend enforcement of a policy by switching it to the Suspended state as described in Deactivating a Design/Change-Time Policy.
To activate a policy, you must have permission to change the policy to the Productive state.
To determine whether a policy is active or inactive, examine the policy's Active indicator on the > page. The icon in the Active column indicates the policy's activation state as follows:
| Icon | Description |
|---|---|
|
|
Policy is active. |
|
|
Policy is inactive. |
The activation state of a policy is also reported next to the State field in the Design/Change-Time Policy Details page.
![]() To activate a policy
To activate a policy
Display the Design/Change-Time Policy Details page for the policy that you want to activate. If you need procedures for this step, see To view or edit the properties of a policy.
Examine the Actions tabs and verify that all of the actions on this tab display the green checkmark icon in the Parameters Set column. If any of the actions display the red circle icon in this column, set their parameters before you continue.
In the Policy Information panel, click the button. (If you do not see the button, it is probably because you do not have permission to change the lifecycle state of a policy.)
In the Change Lifecycle State dialog box, select the Productive lifecycle state and click OK.
Examine the State field in the Policy Information panel to verify that the policy's state has been changed.
If this state change requires approval, the State field will indicate that the policy is in the "pending" mode. CentraSite will automatically switch the policy to the requested state (and activate the policy) after all the necessary approvals have been obtained. For information about checking the status of objects that you have submitted for approval, see Reviewing Requests that You Have Submitted for Approval.
Note:
While the policy is in pending mode, it cannot be edited.
Deactivating a design/change-time policy causes CentraSite to suppress enforcement of the policy. You usually deactivate a policy for the following reasons:
To suspend enforcement of a particular policy (temporarily or permanently).
To edit a policy (for example, to modify the scope of a policy or change its action list).
To deactivate a policy, you change the policy to the Suspended state. Switching the policy to this state triggers the Automatic Policy Deactivation policy, which deactivates the policy. (Switching the policy to the Retired state also deactivates the policy, but you do not want to switch a policy to this state unless you intend to deactivate it permanently. After you place a policy in the Retired state, you cannot reactivate it.)
When you deactivate a policy, keep the following points in mind:
CentraSite will not deactivate a policy if it is in the process of being executed. If you attempt to deactivate a policy while it is executing, your state change request will fail. If this occurs, wait for a period time and then try to deactivate the policy again.
To deactivate a policy, you must have permission to change the policy to the Suspended state.
Important:
If you belong to a role that includes the "Manage System-Wide
Design/Change-Time Policies" permission, you have the ability to deactivate
CentraSite's predefined policies. However, you should not do this. These
policies perform critical functions within the registry and must not be
deactivated except under the direction of a technical representative from
Software AG.
![]() To deactivate a policy
To deactivate a policy
Display the Design/Change-Time Policy Details page for the policy that you want to deactivate. If you need procedures for this step, see To view or edit the properties of a policy.
In the Policy Information panel, click the button. (If you do not see the button, it is probably because you do not have permission to change the lifecycle state of a policy.)
In the Change Lifecycle State dialog box, select the Suspended state (to deactivate it temporarily) or the Retired state (to deactivate it permanently), then click OK
Examine the State field in the Policy Information panel to verify that the policy's state has been changed.
If this state change requires approval, the State field will indicate that the policy is in the "pending" mode. CentraSite will automatically switch the policy to the requested state (and deactivate the policy) after all the necessary approvals have been obtained. For information about checking the status of objects that you have submitted for approval, see Reviewing Requests that You Have Submitted for Approval.
The Design/Change-Time Policies page displays the design/change-time policies in CentraSite. Note that this list displays policies for all organizations, not just your own. It also includes system-wide policies (policies that apply to all organizations).
By default, the policy list shows only the user-defined policies in the registry. If you want to view the internal predefined policies, you must enable the Show Predefined Policies option. This option displays both user-defined and predefined policies. For more information about predefined policies, see Predefined Policies Used by CentraSite.
You can sort the list by object type or event type. To specify the sorting order, choose either or from the drop-down list labeled Browse by:.
Be aware that a policy might appear multiple times in the list. For example, if you create a policy that applies to both Assets and Report Templates, the policy will appear under the Assets heading and the Report Templates heading when you view the list by object type.
![]() To view the policy list
To view the policy list
In CentraSite Control, go to to display the policy list.
If you want to filter the list to see just a subset of the available policies, type a partial string in the Search field. CentraSite applies the filter to the Name column. The Search field is a type-ahead field, so as soon as you enter any characters, the display will be updated to show only those policies whose name contains the specified characters. The wildcard character "%" is supported.
If you want to see predefined policies as well as user-defined policies, enable the Show Predefined Policies option.
The Design/Change-Time Policies page provides the following information about each policy.
Note:
Only the first six columns described below are displayed in this
list by default. You can choose to display the additional columns using the
![]() Select Columns button.
Select Columns button.
| Column | Description | |
|---|---|---|
| Name | The name assigned to the policy. | |
| Description | Additional comments or descriptive information about the policy. | |
| Type |
The object type(s) to which the policy applies. |
|
| Event |
The event(s) that triggers the policy. |
|
| Organization | The organization to which the policy applies. | |
|
This value...
|
Indicates that...
|
|
| All | The policy is system-wide and applies to all organizations. | |
| OrgName | The policy applies to the specified organization. | |
| For more information about this property, see System-Wide versus Organization-Specific Policy Enforcement. | ||
| Active | The policy's current enforcement state. | |
|
Icon
|
Description
|
|
|
|
The policy is active. CentraSite enforces this policy when events within the scope of the policy occur. | |
|
|
The policy is inactive. Inactive policies exist in the registry, but they are not enforced. | |
| Priority | The priority value assigned to the policy. For more information about when this value is used, see What Happens if an Event Triggers Multiple Policies? | |
| Owner | The user to which the policy belongs. | |
| System Version |
The automatically generated system-assigned version identifier for the policy. For more information about system-assigned version identifiers, see, System-Assigned vs User-Assigned Version Identifiers. |
|
| Version | The user-assigned version
identifier for the policy.
For more information about user-assigned version identifiers, see, System-Assigned vs User-Assigned Version Identifiers. |
|
| State | The policy's current lifecycle state. | |
You use the Design/Change-Time Policy Details page to examine and/or edit the properties of a policy. When editing a policy, keep the following points in mind:
To edit a policy, you must have Modify permission on the policy. If your user account belongs to a role that has the "Manage Design/Change-Time Policies" permission for an organization, you automatically have permission to modify all of the policies in that organization. If your user account belongs to a role that has the "Manage System-Wide Design/Change-Time Policies" permission, you have permission to edit any system-wide policy.
You cannot modify an active policy. If the policy that you want to edit is in the active state, you must deactivate it or use the versioning feature to create a new version of the policy. Creating a new version of the policy allows you to make your changes without having to deactivate the existing policy. For details, see Versioning a Policy.
Important:
If you belong to a role that includes the "Manage System-Wide
Design/Change-Time Policies" permission, you have the ability to edit
CentraSite's predefined policies. However, you should not do this. These
policies perform critical functions within the registry and must not be edited
except under the direction of a technical representative from Software
AG.
![]() To view or edit the properties of a policy
To view or edit the properties of a policy
In CentraSite Control, go to to display the policy list.
Locate the policy whose details you want to view or edit and choose from its context menu.
On the policy's details page, examine or modify the policy properties as necessary.
| Field | Description |
|---|---|
| Name | The name of the policy. A policy name can contain any
character (including spaces).
A policy name does not need to be unique within the registry. However, to reduce ambiguity, you should avoid giving multiple policies the same name. As a best practice, we recommend that organizations adopt appropriate naming conventions to ensure the assignment of distinct policy names. |
| Description | Optional. Additional comments or descriptive information about the policy. |
| Version | The user-assigned version ID assigned to this policy. You may
use any versioning scheme you choose for identifying different versions of a
policy. The identifier does not need to be numeric.
Examples:
CentraSite also maintains a system-assigned version identifier for a policy. The system-assigned version identifier is independent from the version identifier that you specify in this field. For more information about user-assigned and system-assigned version identifiers, see System-Assigned vs User-Assigned Version Identifiers. |
| Priority | An integer that represents the priority of this policy with
respect to other policies that might be triggered by the same event.
|
| Actions | The settings on this tab specify the actions that CentraSite will execute when the policy is enforced. For more information about setting the properties on this tab, see Assigning Actions to a Design/Change-Time Policy. |
| Scope | The settings on this tab specify the object types and event types to which the policy applies. For information about setting the properties on this tab, see Specifying the Scope of a Design/Change-Time Policy. |
| States | The settings on this tab specify the lifecycles
and state changes to which this policy applies. For more information about
setting the properties on this tab, see
Configuring Policies that
Execute on Lifecycle State Changes.
Note: |
| Permissions | The settings on this tab identify the users who have instance-level permissions on the policy. For more information about the properties on this tab, see Setting Permissions on a Policy. |
If you edited any of the settings on the Design/Change-Time Policy Details page, click to save the updated policy.
You can view the details page of multiple policies as follows:
![]() To view the details page of multiple policies
To view the details page of multiple policies
In CentraSite Control, go to to display the policy list.
Locate the policies whose details you want to view, and mark their checkboxes.
In the menu, choose .
The details page of each of the selected policies will now be displayed.
Scope refers to the set of properties that determine when a policy is enforced. For a design/change-time policy, scope is determined by the policy's Object Types, Event Types and Organization properties, which are described below.
| Property | Description |
|---|---|
| Object Types | The list of object types to which this policy applies. A
design/change-time policy can be applied to the objects listed in
Objects On Which
Design/Change-Time Policies Can Operate.
Note: You can optionally restrict a policy to specific instances of the selected object types by specifying additional object-selection criteria. For procedures, see Refining the Object Scope. |
| Event Types | The list of event types to which the policy applies. A
design/change-time policy can be triggered by the events listed in
Events During Which
Design/Change-Time Policies Can Be Enforced.
Note: Important: |
| Organization | Determines whether the policy belongs to a specific
organization or is system-wide. For more information about the
Organization property, see
System-Wide
versus Organization-Specific Policy Enforcement.
Important: |
The Organization property specifies the organization to which the policy applies. When the Organization property is set to "All," it indicates that the policy is system-wide. When the Organization property specifies a particular organization, it indicates that the policy is organization-specific.
An organization-specific policy is enforced on objects that belong to the same organization as the organization to which the policy applies. For example, if you have a policy that executes when User objects are updated and its Organization property specifies organization ABC, CentraSite will only execute that policy when User objects in organization ABC are updated.
Points to keep in mind when working with organization-specific policies:
You can create organization-specific policies for any organization on which you have "Manage Design/Change-Time Policies" permission. For example, if have you "Manage Design/Change-Time Policies" permission for organization ABC and XYZ, you can create organization-specific policies for either organization.
You set the Organization property when you create a policy. After a policy is created, you cannot change this property.
At enforcement time, CentraSite selects policies based on the organization to which the object belongs, not the organization to which the requestor belongs. For example, if a user from organization XYZ edits an asset in organization ABC, CentraSite applies organization ABC's policies (the organization to which the asset belongs), not organization XYZ's policies (the organization to which the requestor belongs).
A system-wide policy is enforced for all organizations. For example, if you create a system-wide policy that executes when an asset is created, CentraSite will enforce the policy whenever any user in any organization adds an asset to the catalog.
To create a system-wide policy, you must belong to a role that has "Manage System-Wide Design/Change-Time Policies" permission. In a standard CentraSite configuration, only users in the CentraSite Administrator role and the Policy Administrator role have this permission.
System-wide policies are useful for managing many types of objects. For example, they are often used to assign users to certain server-wide groups or to enforce server-wide naming conventions on objects. However, organization-specific policies are often better choices for asset-related policies, because they enable an organization to tailor its policies to its own development processes and methodologies.
You use the Scope tab on the Design/Change-Time Policy Details page to specify a policy's scope.
Scope changes are limited by the set of actions currently selected on the Actions tab. That is, CentraSite will not allow you to save a policy if its scope includes object types and/or events that are not compatible with the current set of specified actions. In some cases, you might need to clear actions from the Actions tab in order to select the object types and event types you need on the Scope tab. For more information about policy and action compatibility, see Policy Scope and Action Scope.
Note:
You cannot change the Organization property on
the Scope tab. After a policy has been created, its
Organization property cannot be changed.
![]() To modify the scope of a design/change-time policy
To modify the scope of a design/change-time policy
Display the Design/Change-Time Policy Details page for the policy whose scope you want to modify. If you need procedures for this step, see To view or edit the properties of a policy.
If the policy is active, deactivate it. You cannot change the scope of an active policy. If you need procedures for this step, see Deactivating a Design/Change-Time Policy.
Select the Scope tab and specify the following:
In the Object Types and Event Types lists, select the object types and event types to which the policy applies.
Optional. In the Apply policy to objects that meet the following criteria section, specify additional selection criteria to narrow the set of objects to which this policy will be applied. For procedures, see Refining the Object Scope.
Click to save the modified policy.
Note:
If the selected object and/or event types are not compatible with
the current set of actions in the action list, CentraSite will not permit you
to save the policy. You must correct the policy's action list or its scope to
save the policy successfully.
When you are ready to put the policy into effect, activate it as described in Activating a Design/Change-Time Policy.
If you want to further restrict the set of objects to which the policy is applied, you can specify additional selection criteria in the Apply policy to objects that meet the following criteria section of the Scope tab. Using this section, you can filter objects by Name, Description and/or Classification attributes.
You can filter objects based on their Name and/or Description attributes using any of the following comparison operators:
| Comparison Operator | Description |
|---|---|
| Equals | Selects objects whose Name or Description value
matches a given string of characters.
For example, you would use this operator if you wanted to apply a policy only to Taxonomy objects with the Description value "Project IDs". |
| Not Equals | Selects objects whose Name or Description value
does not match a given string of characters.
For example, you would you use this operator if you wanted to apply a policy to all Taxonomies except those with the Description value "Project IDs". |
| Contains | Selects objects whose Name or Description
property includes a given string of characters anywhere within the property's
value.
For example, you would use this operator if you wanted to apply a policy to Application Server objects that had the word "Fairfax" anywhere in their Description property. |
| Starts With | Selects objects whose Name or Description
property begins with a given string.
For example, you would use this operator if you wanted to apply a policy only to Web services whose name begins with the characters "UTIL-". |
When specifying match strings for the comparison operators described above, keep the following points in mind:
Match strings are not case-sensitive. If you define a filter for names that start with "ABC", it will select names starting "abc" and "Abc" (and other variations) as well as "ABC".
Wildcard characters are not supported. That is, you cannot use characters such as * or % to represent "any sequence of characters". These characters, if present in the match string, are simply treated as literal characters that are to be matched.
You can also filter objects based on the way in which they are classified. When you filter objects in this way, CentraSite applies the policy to objects that have at least one classification attribute whose value matches a specified taxonomy category. For example, you could use a classification filter to apply a policy to those Application Servers objects that are classified as "JBoss" servers.
When you filter objects by classification, CentraSite inspects all of an object's classification attributes at enforcement time. If any of those attributes contain the exact category specified by the selection criteria, the policy is executed.
Note:
To satisfy the selection criteria, the attribute value in the object
must match the category specified in the selection criteria exactly.
Sub-categories of the specified category are not considered to be
matches. For example, say you have a taxonomy category called "Project ABC",
and that category has the subcategories "Project ABC Design", Project ABC
Development" and "Project ABC Deployment". If you filter for category "Project
ABC", CentraSite will apply the policy to objects that are classified by the
specific category "Project ABC", but not objects that are classified by that
category's sub-categories.
Use the following procedure to specify additional criteria for selecting the objects to which you want the policy applied.
![]() To refine the object scope
To refine the object scope
Select the policy's Scope tab.
If you want to filter by Name or Description, take the following steps in the Apply policy to objects that meet the following criteria section of the tab.
Select Name or Description in the first field.
Select the comparison operator in the second field.
Specify the match string in the third field.
If you want to filter by object classification, take the following steps in the Apply policy to objects that meet the following criteria section of the tab.
Select Classification in the first field.
Click and select the category by which you want to filter objects.
If you want to specify additional criteria, click the plus button and repeat steps 2 and 3.
Important:
If you specify multiple filters, the policy is applied only
if the object matches all the selection criteria (i.e., the selection
criteria is combined using an AND operator, not an OR).
If you create a policy that executes on the PreStateChange or PostStateChange event type, you must configure the policy's States tab. The settings on this tab identify the specific state changes that will trigger the policy. This tab also specifies whether the policy is to be executed before or after the object is switched to a specified state.
When creating policies that execute on state changes, keep the following points in mind:
Policies that are triggered by a state change execute when an object switches to a specified state (called the target state). The object's state prior to the change is immaterial. For example, if you have a lifecycle model with the states: Test, Production and Offline, and you have a policy that specifies the Offline target state, that policy will execute anytime the object switches to the Offline state. It does not matter whether the transition occurs from the Test state or the Production state.
Policies that are triggered by a state change are executed regardless of whether the state change is initiated from the CentraSite Control UI, the API (e.g., a custom client program) or another policy.
You cannot specify a target state on the States tab unless that state has already been defined in a lifecycle model. Additionally, the lifecycle model must be active. In other words, you cannot completely configure a policy that executes on a state change until you have created and activated the lifecycle model whose state(s) will trigger the policy.
If you configure the policy to execute before the object's state is changed (i.e., on a PreStateChange event), and any action in the policy fails, the state change will not occur.
The Actions tab on the Design/Change-Time Policy Details page specifies the list of actions that you want CentraSite to execute when it enforces the policy. CentraSite executes actions in the order in which they appear in the list.
The action list can include any built-in or custom actions that are compatible with the policy's scope (as currently specified on the policy's Scope tab).
Note:
For descriptions of the built-in actions that you can include in a
design/change-time policy, see the document Built-In
Design/Change-Time Actions Reference.
Like a policy, an action has a declared scope. The scope of an action is declared in the Object Types and Event Types properties in the action's action template. An action template is an object that defines a policy action that is available within CentraSite. For more information about action templates, see the document Developing Custom Actions.
A policy can only include actions whose scope matches or exceeds the policy's own scope. For example, if you had an action ABC with the following scope:
| Action ABC's Scope | |
|---|---|
| Object Type(s): | Service |
| Event Type(s): | PostCreate PostUpdate |
You could use this action in policies 1 and 2 below, because these policies include only objects and events that are encompassed by scope of the action. However, you could not use the action in policies 3 or 4, because these policies include objects and/or events that the action does not support.
| Policy #1 Scope | Compatible with Action ABC? | |
|---|---|---|
| Object Types(s): | Service | Yes |
| Event Type(s): | PostCreate | Yes |
| Policy #2 Scope | Compatible with Action ABC? | |
|---|---|---|
| Object Types(s): | Service | Yes |
| Event Type(s): | PostCreate PostUpdate |
Yes |
| Policy Scope | Compatible with Action ABC? | |
|---|---|---|
| Object Types(s): | Service Report Template (out of scope) |
No |
| Event Type(s): | PostCreate | Yes |
| Policy Scope | Compatible? | |
|---|---|---|
| Object Types(s): | Service | Yes |
| Event Type(s): | PostCreate PostUpdate PostDelete (out of scope) |
No |
You can use the following procedure to examine the scope for a particular action.
![]() To examine the scope of an action
To examine the scope of an action
In CentraSite Control, go to to display the list of action templates that exist on your instance of CentraSite.
Locate the action whose scope you want to examine and choose from its context menu.
On the Edit Action Template page, select the action's Scope tab. This tab specifies the object types and event types with which the action can be used.
Note:
Virtual types and base types are treated as distinct object types
with respect to policy action scope. A policy action that is scoped to a base
type cannot be inserted into a policy that is scoped only for the virtual
type(s) associated with the base type, nor can an action that is scoped for a
particular virtual type be inserted into a policy that is scoped specifically
for the base type. The scope of a policy action is not affected by a virtual
type's Inherit Base Type Policies option. (In other words,
the Inherit Base Type Policies option does not enable you
to insert actions that are scoped for a virtual type into a policy that is
scoped for a base type, or vice versa. Virtual types and base types are treated
simply as different types when CentraSite determines which actions are
compatible with the specified scope of a policy.)
Use the following procedure to modify the action list for a policy.
![]() To modify the action list for a design/change-time policy
To modify the action list for a design/change-time policy
Display the Design/Change-Time Policy Details page for the policy whose action list you want to edit. If you need procedures for this step, see To view or edit the properties of a policy.
If the policy is active, deactivate it. You cannot change the action list of an active policy. If you need procedures for this step, see Deactivating a Design/Change-Time Policy.
Select the Actions tab to display the list of actions associated with the policy.
To add actions to, delete actions from or modify the order of actions in the list, do the following.
Click .
Use the controls in the Edit Assigned Actions dialog box to add actions to the list and/or delete actions from the list.
When editing the list of actions, keep the following points in mind:
This dialog only displays actions that support the policy's current scope. If you need to specify actions for object or event types that are outside of the current scope, you must modify the policy's scope first (on the Scope tab) and then update the action list. For more information about the scope of a policy, see Policy Scope and Action Scope and Specifying the Scope of a Design/Change-Time Policy.
Make sure the actions in the Assigned Actions list appear in the order that you want CentraSite to execute them.
Be aware that actions from the WS-I category cannot be combined with other types of actions. Also be aware that when you add a WS-I action to the action list, CentraSite will automatically add dependent actions to the list as necessary.
Click to save the modified list.
Use the procedure in Configuring Policy Action Parameters to configure the parameter settings for any new actions that you might have added to the list in the preceding steps or to make any necessary updates to the parameter values for existing actions in the list.
Note:
For information about the parameter settings for the built-in
actions provided by CentraSite, see the document Built-In
Design/Change-Time Actions Reference.
When the action list is complete and you have configured all of the input parameters for the actions correctly, click to save the updated policy.
Most policy actions have input parameters that you must set to configure the action's enforcement behavior.
When you display the Actions tab on the Design/Change-Time Policy Details page, the icon in the Parameters Set column indicates whether the action has input parameters that need to be set.
| This Icon... | Indicates that... |
|---|---|
|
|
The action has required input parameters that have not yet been set. |
|
|
All of the action's required input parameters have been set.
Note: |
![]() To configure the input parameters for a policy action
To configure the input parameters for a policy action
Display the Design/Change-Time Policy Details page for the policy whose actions you want to configure. If you need procedures for this step, see To view or edit the properties of a policy.
If the policy is active, deactivate it. You cannot modify the actions of an active policy. If you need procedures for this step, see Deactivating a Design/Change-Time Policy.
On the Actions tab do the following for each action in the list:
Click the action whose parameters you want to examine or set.
In the Edit Action Parameters page, set the parameters as necessary.
Note:
Required parameters are marked with an asterisk.
Click Save to save the parameter settings.
After you configure the parameters for all of the actions in the list, click to save the updated policy.
Be default, all users have View permissions on the design/change-time policies in the registry.
Users who belong to a role that includes the "Manage Design/Change-Time Policies" permission for an organization have Full permission on the policies that belong to the organization. Users who belong to a role that includes the "Manage System-Wide Design/Change-Time Policies" permission, have Full permission on all system-wide policies. To enable other users to modify and/or delete policies, you must modify the policy's instance-level permission settings.
You can modify the instance-level permissions for a policy by executing a design/change-time policy or by specifying the permissions manually on the Permissions tab in CentraSite Control. Procedures for both ways are provided later in this section.
When setting permissions on policies, keep the following points in mind:
To set permissions on a organization-specific policy, you must belong to a role that has the "Manage Design/Change-Time Policies" for the organization to which the policy belongs or have the Full instance-level permission on the policy itself.
To set permissions on a system-wide policy, you must belong to a role that has the "Manage System-Wide Design/Change-Time Policies" or have the Full instance-level permission on the policy itself.
You can assign permissions to any individual user or group defined in CentraSite.
The groups to which you can assign permissions include the following system-defined groups:
| Group Name | Description |
|---|---|
| Users |
All users within a specified organization. |
| Members |
All users within a specified organization and its child organizations. |
| Everyone |
All users of CentraSite including guest users (if your CentraSite permits access by guests). |
If a user is affected by multiple permission assignments, the user receive the union of all the assignments. For example, if group ABC has Modify permission on a policy and group XYZ has Full permission on the same policy, users that belong to both groups will, in effect, receive Full permission on the policy.
You can include the Set Permissions action in a design/change-time policy to set instance-level permissions on a policy. You can use this action to automatically assign permissions to a policy during any of the following events.
PostCreate
PreStateChange
PostStateChange
OnTrigger
For more information about using the Set Permissions action, see the description of this action in the document Built-In Design/Change-Time Actions Reference.
Use the following procedure to assign instance-level permissions to a policy from the Permission tab in CentraSite Control.
![]() To assign permissions to a policy
To assign permissions to a policy
Display the Design/Change-Time Policy Details page for the policy whose permissions you want to modify. If you need procedures for this step, see To view or edit the properties of a policy.
On the Policy details page, click the Permissions tab.
To add users or groups to the Users / Groups list, do the following:
Click .
Select the users and groups to which you want to assign permissions.
If you want to filter the list, type a partial string in the Search field. CentraSite applies the filter to the Users/Groups column.
Examples| String | Description |
|---|---|
b |
Displays names that contain "b" |
bar |
Displays names that contain "bar" |
% |
Displays all users and groups |
Click .
To remove a user or group from the Users / Groups list, select the check box beside the group name or user ID and click Delete.
Use the View, Modify and Full check boxes to assign specific permissions to each user and/or group in the Users / Groups list as follows:
| Permission | Allows the selected user or group to... |
|---|---|
| View |
View the policy. Note: |
| Modify |
View and edit the policy. |
| Full |
View, edit and delete the policy. This permission also allows the selected user or group to assign instance-level permissions to the policy. |
Click to save the new permission settings.
Note:
If you have given users Modify or Full permissions on the policy and
you want them to be able to work with the policies in CentraSite Control, be
sure the users belong to a role that has the "Use the Policies
UI" permission.
If you create a policy for the OnTrigger event, you can use the button on the details page to run the policy "on demand."
Many of the built-in actions in CentraSite support the OnTrigger event. For example, you can run the WS-I actions on demand. You can also use the OnTrigger event to execute policies that set permissions on certain types of objects or change the state of an object.
You can run a policy on demand if you have view permission on the policy.
When you run a policy on demand, CentraSite queries the objects in the organization to which the policy applies and selects objects that satisfy the following conditions.
The object is one that is within the policy's object scope.
The object is one on which you have View permission.
The object's name, description and/or classification properties satisfy the object-selection criteria on the policy's Scope tab (if any).
Note:
If the policy's Organization property is set to
"All " (meaning that it is a system-wide policy),
then CentraSite queries all organizations for objects that satisfy
the conditions listed above.
CentraSite executes the policy's actions on each object in the result set produced by this query (henceforth, referred to as the target set).
If an action in the policy performs an update or delete operation on the objects in the target set, be aware that these operations will only execute successfully if you have the appropriate Modify or Full permission on the target object. If you do not have the required permissions, the action that performs the edit or delete operation will fail and the failure will be reported in the policy log.
Keep in mind also that, as with other policies, a policy that you execute on demand might trigger other policies. This will occur anytime an action in the policy performs an operation that is within the scope of another policy.
When you run a policy on demand, CentraSite executes the policy against each object in the target set. Results are written to the policy log and are also displayed in the results window in the user interface.
For example, if you have a policy that contains actions 1, 2 and 3 and the target set contains objects A, B and C, the policy will iterate over the objects in the target set as follows:
Iteration 1: Execute actions 1, 2 and 3 on object A
Iteration 2: Execute actions 1, 2 and 3 on object B
Iteration 3: Execute actions 1, 2 and 3 on object C
If an action returns a failure code during an iteration of the policy, CentraSite writes the failure message to the policy log and immediately exits that iteration of the policy. If the target set contains additional objects, CentraSite applies the policy to the next object in the target set.
There is one exception, namely if the Send Email Notification action returns a failure code; in this case, CentraSite writes the failure message to the policy log and performs the next action in the policy (if one exists).
Use the following procedure to execute a policy on demand.
![]() To run a policy on demand
To run a policy on demand
Display the Design/Change-Time Policy Details page for the policy that you want to execute. If you need procedures for this step, see To view or edit the properties of a policy.
Examine the Scope tab and verify that the Object Types property and the criteria in the Apply policy to objects that meet the following criteria section of the tab (if any) identify the precise set of objects to which you want the policy applied.
Examine the Actions tab and verify that the action list contains the set of actions that you want CentraSite to execute and that the parameters for all actions in the list are set properly.
Click .
If the button does not appear on the Design/Change-Time Policy Details page, it is most likely because:
The policy has not been activated.
The policy's Event Type property does not include the OnTrigger event.
When the policy completes, examine the results window to determine whether all iterations of the policy executed successfully. (CentraSite also writes these results to the policy log, so you can view them later.) For information about viewing the policy log, see Viewing the Policy Log.
You delete a policy to remove it from CentraSite permanently.
CentraSite is installed with a system-wide policy called Check State Validation Policy for Policy. This policy will not allow you to delete a policy unless the policy is in the New or Retired state.
Important:
If you belong to a role that includes the "Manage System-Wide
Design/Change-Time Policies" permission, you have the ability to delete
CentraSite's predefined policies. However, you should not do this. These
policies perform critical functions within the registry and must not be deleted
except under the direction of a technical representative from Software
AG.
In addition to being in the New or Retired state, the following conditions must also be met in order to delete a policy:
The policy must not be in-progress.
The policy must be inactive.
You must have Full permission on the policy.
![]() To delete a policy
To delete a policy
In the CentraSite Control, go to Policies > Design/Change Time to display the policy list.
Enable the checkbox next to the name of the policy that you want to delete.
Click .
Note:
When you delete a policy that is an intermediate version,
CentraSite also deletes all previous versions of the policy.
You can delete multiple policies in a single step. The rules described above for deleting a single policy apply also when deleting multiple policies.
Important:
If you have selected several policies where one or more of them
are predefined policies (e.g., collector and handler policies), you can use the
button to delete the policies. However, as you
are not allowed to delete predefined policies, only policies you have
permission for will be deleted. The same applies to any other policies for
which you do not have the required permission.
![]() To delete multiple policies in a single operation
To delete multiple policies in a single operation
In CentraSite Control, go to to display the policy list.
Mark the checkboxes of the policies that you want to delete.
From the Actions menu, choose Delete.
A design/change-time policy can become quite complex, especially if it includes many policy actions. Instead of creating a new policy “from scratch”, it is sometimes easier to copy an existing policy that is similar to the one you need and edit the copy.
When you create a copy of a policy, be aware that:
To create a copy of a policy, you must have permission to manage design/change-time policies for the organization specified in the scope of the original policy. For example, if the original policy is scoped for organization ABC, you will not be permitted to create a copy of that policy unless you have permission to manage design/change-time policies for organization ABC. (This is because the copied policy has the same organizational scope as the original.)
When CentraSite creates a copy of a policy, the new copy of the policy is identical to the original one except that:
The new policy's system-assigned version identifier is always set at 1. (For additional information about system-assigned version numbers, see System-Assigned vs User-Assigned Version Identifiers.)
Ownership of the new policy is assigned to the user who created the copy.
Like all new policies, the copied policy begins it lifecycle in the New state and it is marked as inactive.
There is no expressed relationship between the copy and the original policy (i.e., CentraSite does not establish any type of association between the two policies).
In general, a copied policy no different than a policy that you create from scratch.
![]() To copy a policy
To copy a policy
In CentraSite Control, go to to display the policy list.
Locate the policy that you want to copy and choose from its context menu.
Modify the new policy as necessary and then save it.
When you need to make changes to an existing policy, creating a new version of the policy is an efficient way to accomplish this task. Versioning a policy enables you to create a new version of a policy (which is an identical copy of the existing policy) and make your changes to the new version. When you are ready to put the updated policy into effect, you simply "activate" the new version of the policy. When you activate the new version, CentraSite automatically deactivates and retires the old version of the policy.
When you create a new version of a policy, be aware that:
You can only create a new version from the latest version of a policy. For example, if a policy already has versions 1.0, 2.0 and 3.0, CentraSite will only allow you to create a new version of the policy from version 3.0. (It makes no difference whether the policy that you are versioning is active or inactive. You can version a policy in either mode.)
To create a new version of a policy, you must have permission to manage design/change-time policies for the organization specified in the scope of the original policy. For example, if the original policy is scoped for organization ABC, you will not be permitted to create a new version of that policy unless you have permission to manage design/change-time policies for organization ABC.
When CentraSite creates a new version of a policy, it produces a version that is identical to the previous version, except that:
The new policy's system-assigned version identifier is incremented by one. (For additional information about system-assigned version numbers, see System-Assigned vs User-Assigned Version Identifiers.)
Ownership of the new policy is assigned to the user who created the new version.
Like all new policies, the new version begins its lifecycle in the New state and is marked as inactive.
CentraSite automatically establishes a relationship between the new version of the policy and the previous version. This relationship enables several capabilities and features in CentraSite that relate to versioned policies.
![]() To version a policy
To version a policy
In CentraSite Control, go to to display the policy list.
Locate the most recent version of the policy for which you want to create a new version and choose Create New Version from its context menu.
Modify the new version of the policy as necessary and then save it.
When you are ready to put the new version into effect, activate the new policy. CentraSite will automatically deactivate and retire the previous version.
Note:
If you activate the new version of the policy while CentraSite
is in the middle of executing the old version, your activation request will
fail. If this occurs, wait for a period time and then try to activate the new
version of the policy again.
CentraSite maintains two version identifiers for a policy: a system-assigned identifier and a user-assigned identifier.
The system-assigned identifier is a version number that CentraSite maintains for its own internal use. CentraSite automatically assigns this identifier to a policy when the policy is created. You cannot delete it or modify it. A policy's system-assigned identifier is numeric and always has the format MajorVersion.Revision. A policy always begins with a system-assigned version identifier of 1.0. The MajorVersion number is incremented by one each time you create a new version of a policy (e.g., 1.0, 2.0, 3.0).
A policy's system-assigned version number is shown in the System Version column on the Design/Change-Time Policies page and in the System Version field of the policy's detail page.
The user-assigned identifier is an optional identifier that you can assign to a distinguish a specific version of a policy. This identifier does not need to be numeric. For example, you might use a value such as "V2.a (beta)" to identify a version.
A policy's system-assigned version number is shown in the Version column on the Design/Change-Time Policies page and in the Version field of the policy's detail page.
The policy log contains information about policy that CentraSite has executed. By default, CentraSite only logs information about policies that fail. However, you can optionally configure CentraSite to log information about policies that resulted in success, info, warning, and failure alerts. For information about configuring the logging facility for policies, see the section Configuring Logs in the document Logging.
Note:
Over time, the policy log can grow quite large, especially
if you are logging information about successful policies. To prevent the policy
log from growing too large, you should purge it periodically. For information
about purging the policy log, see the section Purging Logs
in the document Logging.
The following procedure describes how to view the policy log. To view this log, you must belong to a role that includes the "View Policy Log" permission.
If you belong to the CentraSite Administrator role, you can view all entries in the policy log.
If you belong to the Organization Administrator role for an organization, you can view the log entries for policies that were triggered by users in your organization.
If you do not belong to either of these roles, but you have the "View Policy Log" permission, you can view the log entries for the policies that you triggered.
Note:
From your inbox on the My CentraSite page, you can view the list of
policies that failed during events that you triggered. You do not need special
permissions to view this log. For procedures, see
Viewing Failed Policies
From Your Inbox.
![]() To view the policy log
To view the policy log
In CentraSite Control, go to .
Complete the following fields to specify which type of log entries you want to view:
| In this field... | Specify... | |
|---|---|---|
| Object Name |
Optional. A pattern string that describes the names of the objects (of Object Type) whose log entries you want to view. You can provide the exact name or use a pattern string consisting of a character sequence and/or the % wildcard character (which represents any string of characters). For example, if you specify the pattern string ‘A%', CentraSite displays entities whose names start with ‘A'. Leave Entity Name empty to view all names. |
|
| Policy Type | The type of policy whose log entries you want to view. To view the log entries for design/change-time policies, select Design/Change Time from the drop-down list (if it is not already selected). | |
| Object Type | The object type whose log entries you want to view. | |
| Event Type | The event type whose log entries you want to view. | |
| Policy Status | The policy execution status that
you want to view.
A policy's execution status is the result set of each of its action's execution result. CentraSite writes the following policy execution status to the policy log depending on the log configuration. |
|
|
Icon
|
Description
|
|
|
|
Success. Displays policies that have resulted in success alert. | |
|
|
Info. Displays policies that have resulted in informational alert. | |
|
|
Inprogress. Displays policies that have resulted in inprogress alert. | |
|
|
Warning. Displays policies that have resulted in warning alert. | |
|
|
Failure. Displays policies that have resulted in failure alert. | |
|
Note: |
||
| Execution Date |
Optional. The time period that you want to examine. Leave the From and To fields empty to view log entries for all dates. |
|
Click to retrieve the specified log entries.
To view details for a particular entry in the returned list, click the name of the policy.
Note:
If a policy included a WS-I action, the log entry for the policy
will include a link to the results of the WS-I action.
A policy's execution status basically depends on each of its action's execution result.
When an action in a design/change-time policy completes its execution, it returns a completion code and a completion message. If the completion code indicates success, informational or warning, CentraSite performs the next action in the policy (if one exists) or completes the requested work on the object (for example, it commits the given change to the database) and writes the information to the policy log. The policy log displays a success, informational and/or warning alert accordingly if configured to log these alerts.
However, if the completion code indicates failure, CentraSite records the error in the policy log. Then it immediately exits the policy. If the policy contains additional actions, those actions are not executed. If the policy was triggered by one of the pre-commit events (for example, during a PreCreate, PreUpdate or PreStateChange event) the requested operation is not performed. If the initial request had triggered multiple policies, any policy that had not yet been executed will be bypassed.
The policy's execution status is a result set of each of its actions result.
The following table summarizes how a policy's execution status is affected by each of its action's execution result.
| The policy's execution status will have... | Icon... | Policy Action A | Policy Action B | Policy Action C | Policy Action D | Policy Action E |
|---|---|---|---|---|---|---|
| SUCCESS |
|
SUCCESS | SUCCESS | SUCCESS | SUCCESS | SUCCESS |
| INFO |
|
SUCCESS | SUCCESS | INFO | SUCCESS | SUCCESS |
| INPROGRESS |
|
INFO | INPROGRESS | SUCCESS | SUCCESS | SUCCESS |
| WARNING |
|
SUCCESS | INPROGRESS | INFO | WARNING | WARNING |
| FAILURE |
|
SUCCESS | WARNING | SUCCESS | SUCCESS | FAILURE |
Note:
If you have used a client jar from the version 8.2.2, then
CentraSite will show policy's result status as “Success” in the client side;
but however on the server side the policy log will continue to store the
policy's result status as “Informational” or “Warning”. This is because, a
client jar used from versions of CentraSite prior to version 8.2.5 do not
support the above policy status.
Your inbox on the My CentraSite page includes the Failed Policies link, which displays the list of policies that failed during events that you initiated.
When you click the Failed Policies link in your inbox, CentraSite Control opens a two-pane screen. The upper pane displays the list of logged policy failures that occurred during events that you initiated. The lower pane displays detailed information for a selected failure.
A failure stays in your Failed Policies list until you explicitly clear it from the list using the button or the underlying log entry is purged from the policy log.
Note:
When you clear an entry from this list using the , you do not remove the entry from the underlying policy
log. You simply eliminate it from your inbox display.
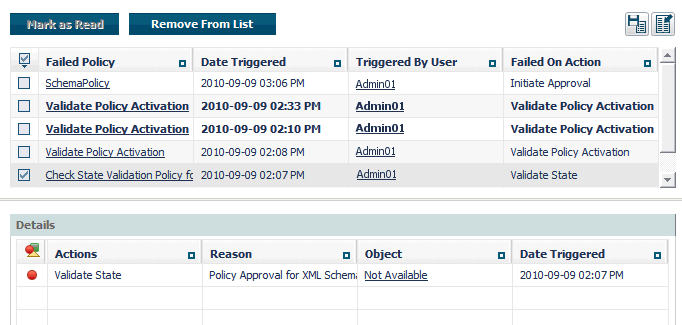
![]() To view the policy log
To view the policy log
In CentraSite Control, go to > .
In the Policy Log section of the Inbox, click Failed Policies.
Examine the list of failures in the upper pane of the Failed Policies window.
If you want to examine the details for a reported failure, click in any non-linked area of the row that contains the failure log entry. The details for the selected failure will appear in the lower pane.
| This Icon... | Indicates That... |
|---|---|
|
|
Indicates that the action had resulted in success alert. |
|
|
Indicates that the action had resulted in informational alert. |
|
|
Indicates that the action had resulted in inprogress alert. |
|
|
Indicates that the action had resulted in warning alert. |
|
|
Indicates that the action had resulted in failure alert. |
Using the import and export features, you can export a design/change-time policy from one instance of CentraSite and import it into another.
The following sections provide specific information about exporting and importing policies. Before you use the import and export features with policy objects, review the general information provided in the document Importing/Exporting Registry Objects.
When exporting a design/change-time policy, keep the following points in mind:
You can export a policy that is active or inactive. You do not need to deactivate a policy to export it.
The export process does not export the following objects that a policy references.
Lifecycle State
Organization
When an administrator imports the policy on the target instance, the import process assigns these properties as described in Importing Design/Change-Time Policies.
The export process does not export the policy's instance-level permissions. When an administrator imports the policy on the target instance, the import process assigns instance-level permissions as described in Importing Design/Change-Time Policies.
If the policy includes a custom action, CentraSite will export the action template for the custom action along with the action's associated Java archive file (if the action has been implemented as a Java program) or Groovy script (if the action has been implemented as a Groovy script).
If the policy's object scope includes a custom asset type, CentraSite will export that type along with the policy. (Note that many of the predefined types that are installed with CentraSite are treated as "custom" asset types and will be exported if they are within the policy's scope. For a list of the predefined types that are treated as custom types, see the section The Predefined Asset Types Installed with CentraSite in the document Object Type Management.)
If the policy scope is "Assets", then the type information will not be exported. So any basic attributes referenced in the policies have to be edited in the target registry (for example, if the policy has assertions such as "Set Attribute value" or "Validate Attribute value"). There is one exception, namely if the policy uses classification attributes in the policy assertions; in this case, the type information is included in the export.
The export process will export the parameter values assigned to the actions in the policy. If the parameter value is a reference to an instance of one of the following object types, you must export the referenced object and import it on the target instance of CentraSite before you import the policy.
Organization
User
Group
If referenced User/Group objects do not already exist on the target instance of CentraSite when you import the policy, the import will remove the references to these objects and the import will be successful. After the import, you can edit the policy to reference the necessary user/group objects. If a parameter references any other type of object, the export process will export the referenced object with the policy, and that object will be imported as necessary into the target registry.
If the policy executes on a PreStateChange or PostStateChange event, the lifecycle model and state information on the policy's States tab will be exported. If the specified lifecycle model and states do not exist in the target instance of CentraSite when the policy is imported, the import process will fail (i.e., the policy will not be imported).
![]() To export a policy
To export a policy
In CentraSite Control go to to list the available policies.
Locate the policy that you want to export and choose from its context menu.
Specify the options in the Export dialog box and click . If you need information about these options, see the section Exporting and Importing Objects Using CentraSite Control in the document Importing/Exporting Registry Objects.
Save the archive file when prompted to do so.
Examine the export log that is displayed by CentraSite Control and check for any errors that occurred during the export process.
When importing a design-time policy, keep the following points in mind.
If the policy, or any related object in the archive already exists in the target instance of CentraSite, the existing object will be overwritten according to the conditions described in the topic What Happens When an Imported Object Already Exists in the Target Registry? in the section Introduction of the document Importing/Exporting Registry Objects.
To import a policy successfully, you must belong to a role that includes the "Manage Design/Change-Time Policies" permission. If the archive contains a system-wide policy or custom action templates, you must also belong to a role that has the "Manage System-Wide Design/Change-Time Policies" permission.
When the imported policy is added to the registry, the import process assigns the Organization, Lifecycle State and Activation State properties to the imported policy as follows.
| Property | Value assigned to new policy |
|---|---|
| Organization | The organization of the user that is performing the import, unless the policy is a system-wide policy. If the policy is system-wide, the policy's Organization attribute will remain set to "All". |
| Lifecycle State | The initial state for new policies.
Note: |
| Activation State | Inactive |
Additionally, CentraSite assigns instance-level permissions to the imported policy just as though you created the policy manually. (In other words, the imported policy receives the same permission settings as the policies you create from scratch.)
When an imported policy replaces (updates) an existing policy in the target registry, all of the policy's properties, except for its permission settings, are updated according to the policy object in the archive. This includes the policy's organizational scope, its lifecycle state, and its activation state (i.e., whether the policy is active or inactive). If the referenced organization and/or lifecycle model does not already exist on the target registry, the import process will fail. Also, be aware that the import process will replace the policy on the target regardless of whether the target policy is currently active or inactive. Due to this behavior, you might want to import only new versions of a policy, and not use the import process to directly replace a version of a policy that already exists.
If the archive file contains a reference to an object that is not already present in the target registry or is not included in the archive file itself, the policy will not be imported.
If design/change-time policies exist for the events that the import process initiates (e.g., the creation of a policy), those policies will be triggered.
![]() To import a design/change-time policy
To import a design/change-time policy
In CentraSite Control, go to Policies > Design/Change Time.
Click the Import icon.
Click Browse and select the zip file containing the policy that you want to import.
If you want the importer to automatically replace the policy if it already exists, select Allow replace of existing objects.
Click .
When the import process is complete, check the import log to make sure that the policy and its associated objects were imported successfully.
If the import process was successful, open the policy in CentraSite Control and do the following:
Inspect the parameter settings for each action in the policy to ensure that they are set properly. Specify appropriate values as necessary.
Inspect the other properties assigned to the policy and ensure that they are set appropriately.
Activate the policy.
CentraSite provides a lifecycle model for policies, which consists of four states: New, Productive, Suspended and Retired. Predefined policies associated with this lifecycle model activate and deactivate a policy as appropriate when you switch the policy's lifecycle state. The model is also structured in a way that allows CentraSite to automatically deactivate the old version of a policy when you activate a new one.
Because of the complex nature of this lifecycle model and its associated policies, you can make only the following kinds of changes to it:
You can edit the lifecycle model's name, description and permission settings.
You can rename the states in the lifecycle model.
To make these changes, you must create a new version of the lifecycle model and make your modifications to the new version as described in the section Updating a Lifecycle Model in the document Customizing Lifecycle Management.
You can also associate additional policies with the states in the lifecycle model. (Do not modify or delete the predefined policies that are associated with this lifecycle model, however.)
Important:
Make only the kinds of customization described above. Do not add
states to the model. Do not remove states from the model. Do not modify any of
its transitions.