The Welcome page that you see when you start CentraSite Control can be customized to suit your own requirements. You can change aspects such as icons used, colors, text, fonts and layouts. You can also define links that will take you straight to the pages of CentraSite Control that you use the most, and links to external web sites.
The information contained in the following sections describes how to customize your Welcome page.
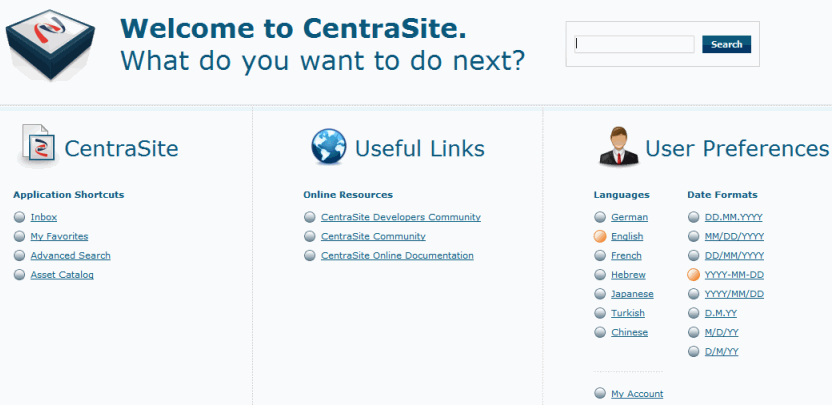
The standard Welcome page gives you quick links to the pages of CentraSite Control that you will probably use frequently during your day-to-day work with CentraSite. It also provides links to external web sites that provide useful information related to CentraSite. In the Welcome page you can specify the language you wish to use for your further work with CentraSite Control, and you can specify the date format to be used in the various displays.
A search box allows you perform a keyword search for registry assets and objects whose name or description contains the given keyword.
The Welcome page has the following schematic layout:
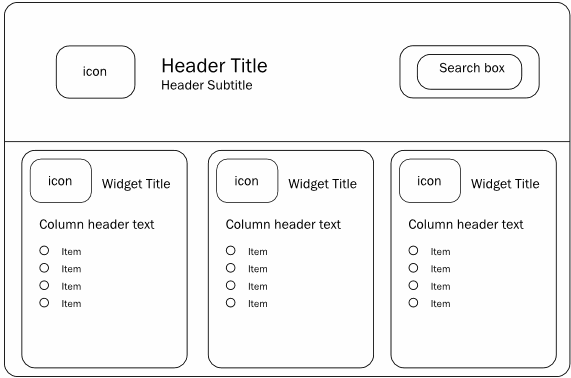
The header section at the top contains a title text and a subtitle text. You can change the texts, the fonts and colors used to display the texts. An icon can be displayed adjacent to the title and subtitle. A search box is displayed by default, which allows you to perform a keyword search for an asset. You can hide the search box as part of the page customization. You can change the background color for the whole header section, and you can change the background color of the search box.
Below the header section, there can be one or more so-called widgets. Each widget contains a title, with an icon adjacent to the text. Under the title, you can have a list of entries, each representing some executable action. Typically, an action contains a URL to either a page of your choice within CentraSite Control, or to an external web page that you regularly visit within the context of your work with CentraSite.
There are several kinds of widget:
Single-column widget
In this widget, the executable actions are displayed as a table
consisting of a single column. Each table cell contains one executable action.
Each cell can also have an icon beside it. There is a header text above the
table.
Multi-column widget
In this widget, the executable actions are displayed as a table
consisting of two or more columns. Each table cell contains one executable
action. Each cell can also have an icon beside it. There is a header text above
each column of the table.
HTML-style widget
In this widget, the contents are freely programmable as HTML code.
The HTML statements you use must be valid within the context of an HTML table
cell, i.e. there is an implicit HTML <td> element enclosing the HTML code
you supply.
The Welcome page can contain up to 10 widgets. The widgets are displayed side by side in a single row.
In general, you can use CSS stylesheet statements to customize the appearance of text and colors in the Welcome page.
The Welcome page is implemented as a plug-in module within the CentraSite pluggable UI architecture. This means that all of the development aspects that are relevant for implementing CentraSite plug-in modules apply also to the Welcome page.
The following sections describe the technical implementation of the Welcome page.
The layout and contents of the Welcome page are implemented as Java code.
Each customizable part of the Welcome page requires a corresponding Java class. The Welcome screen can be defined as a combination of the following hierarchical structures:
The header and body of the Welcome page.
The widgets in the body of the Welcome page.
The items in the columns of the widgets.
The Welcome page is composed of a header and a body. The header contains a title, subtitle, icon, search box and background image. The body contains one or more widgets.
The content and appearance of these components are determined by the Java methods shown in the following diagram.
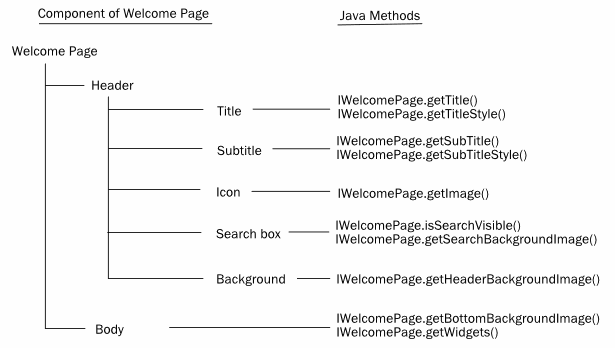
The following table describes the purpose of these Java methods:
| Name of Java interface | Java Method | Description |
|---|---|---|
| IWelcomePage | getTitle(); | Defines the header text to be used. |
| IWelcomePage | getTitleStyle(); | Defines the CSS style information for the header. |
| IWelcomePage | getSubTitle(); | Defines the header subtitle text to be used. |
| IWelcomePage | getSubTitleStyle(); | Defines the CSS style information for the header subtitle. |
| IWelcomePage | getImage(); | Defines the icon to be used in the header. |
| IWelcomePage | isSearchVisible(); | Defines whether the search box in the header part is visible or invisible. |
| IWelcomePage | getSearchBackgroundImage(); | Defines a background image to be used for the search box. |
| IWelcomePage | getHeaderBackgroundImage(); | Defines a background image to be used for the header part. |
| IWelcomePage | getBottomBackgroundImage(); | Defines a background image to be used for the body part. |
| IWelcomePage | getWidgets(); | Defines the widgets that will be used in the body part. |
The body part of the Welcome page is composed of one or more widgets. A widget can define just HTML code (an HTML-style widget) or can define content and layout, similar to the header part of the Welcome page. The content/layout components are: a background image, a header text, the definition of a single-column table of items, the definition of a multi-column table of items.
The content and appearance of these components are determined by the Java methods shown in the following diagram.
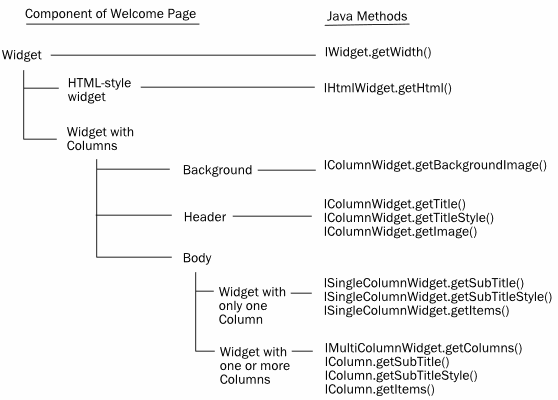
The following table describes the purpose of these Java methods:
| Name of Java interface | Java Method | Description |
|---|---|---|
| IWidget | getWidth(); | Defines the screen width of the widget. |
| IHtmlWidget | getHtml(); | Defines HTML code for an HTML-style widget. |
| IColumnWidget | getBackgroundImage(); | Defines the background image to be used for a column of a widget. |
| IColumnWidget | getTitle(); | Defines the header text of a column of a widget. |
| IColumnWidget | getTitleStyle(); | Defines the CSS style for the header text of a column of a widget. |
| IColumnWidget | getImage(); | Defines the background image to be used for the header part of the widget. |
| ISingleColumnWidget | getSubTitle(); | Defines the subtitle text of a single-column widget. |
| ISingleColumnWidget | getSubTitleStyle(); | Defines the CSS style for the subtitle header text of a single-column widget. |
| ISingleColumnWidget | getItems(); | Defines the items contained in a single-column widget. |
| IMultiColumnWidget | getColumns(); | Defines the columns used in a multi-column widget. |
| IColumn | getSubTitle(); | Defines the subtitle text of a column of a multi-column widget. |
| IColumn | getSubTitleStyle(); | Defines the CSS style for the subtitle text of a column of a multi-column widget. |
| IColumn | getItems(); | Defines the items contained in a column of a multi-column widget. |
Each widget in the body part of the Welcome page can contain one or more items, arranged in one or more table columns. An item represents an executable action, which you can define freely; for example, the action could be the activation of a URL in order to reach a particular page within CentraSite Control or an external web site.
The content and appearance of these components are determined by the Java methods shown in the following diagram.
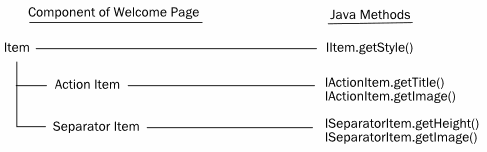
The following table describes the purpose of these Java methods:
| Name of Java interface | Java Method | Description |
|---|---|---|
| IItem | getStyle(); |
Defines the CSS style for the item. |
| IActionItem | getTitle(); | Defines the text to be displayed for the item. |
| IActionItem | getImage(); |
Defines the icon to be displayed adjacent to the descriptive text. |
| ISeparatorItem | getHeight(); |
Defines the height in pixels of the area that contains the separator image. |
| ISeparatorItem | getImage(); |
Defines the image be displayed as the separator item. |
The following list shows the Java methods that are not related to a screen component, but which are required for the pluggable UI architecture of CentraSite Control.
| Name of Java interface | Java Method | Description |
|---|---|---|
| (all interfaces) | setLocale(); |
This informs the widget or item about the CentraSite Control locale that is required to localize texts for the display. This method is called automatically before any other method that might depend on the locale. |
| (all interfaces) | setActionContext(); |
This informs the widget or item about the CentraSite Control context that is required for the processing to be done subsequently by the execute() method. This method is called automatically before any other method that might depend on the action context. |
| IWidget | invalidate(); | This sets the status that the display of the current item must be refreshed (true) or does not need to be refreshed (false). |
| IWidget | isInvalidated(); | This returns whether or not the display of the item needs to be refreshed. |
| IItem | getWidget(); | This method gets the widget to which the current item belongs. |
| IItem | setWidget(); | This method sets the widget to which the current item belongs. |
| IActionItem | execute(); | This activates the action to be performed when you click on the current item. |
The interface hierarchy is as follows:
IWelcomePage

IWidget
   IColumnWidget
      IMultiColumnWidget
      ISingleColumnWidget
   IHtmlWidget

IColumn

IItem
   IActionItem
   ISeparatorItem
The Welcome page is implemented as a CentraSite Control extension point in the context of CentraSite's pluggable UI architecture. To install your customized Welcome page, you need to modify CentraSite Control's pluggable UI configuration in the Software AG Runtime environment.
The required deployment steps are describe in the following sections:
Before you make any changes to the Software AG Runtime environment, stop the Software AG Runtime process.
The standard plugin.xml configuration file delivered with the CentraSite kit contains all of the names of the CentraSite Control extension points, including the extension point for the Welcome page. You must update this file to contain the definition of the customized Welcome page. The configuration file is located in the folder <RuntimeDir>\workspace\webapps\PluggableUI\CentraSiteControl .
There are two elements in the standard plugin.xml file that refer to the Welcome page. The first part defines the name of the extension point to be used for the Welcome page, and looks like this:
  <extension-point id="welcomePage">
  </extension-point>
The second part defines the Java class that implements the Welcome page, and looks like this:
   <!-- Welcome Page -->
   <extension
      point="com.centrasite.control.welcomePage"
      id="welcomePage"
      class="com.centrasite.control.ext.welcome.standard.WelcomePage">
   </extension>
The point attribute of the
extension element in the second part must match the
name given by the id attribute of the
plugin element (usually in the first line in the
plugin.xml file) concatenated with a dot and the
id attribute of the
extension-point element in the first part. For
example, if the id attribute of the
plugin element is
"com.centrasite.control" and the id
attribute of the extension-point element is
"welcomePage", then the value of
point attribute of the
extension element must be
"com.centrasite.control.welcomePage".
The Java class identified by the class
attribute of the extension element must implement
the interface IWelcomePage.
To use your customized Welcome page instead of the standard Welcome
page, set the class attribute to your customized
Java class that implements the interface IWelcomePage.
For general information about plugin.xml, see the section Installing and Uninstalling Plug-ins.
The changes that you make in plugin.xml take effect the next time Software AG Runtime is started.
Note:
Instead of overwriting the standard element in
plugin.xml, you might want to retain a copy of the
original element and comment it out. This means that you can revert easily to
the original Welcome page if required, by commenting out your customized
element and uncommenting the original element.
In addition to modifying the plugin.xml file, as described above, you need to copy the Java classes for your customized Welcome page to the CentraSite Control location in Software AG Runtime.
There are two ways of doing this:
Create a jar file containing the class files for your customized Welcome page, and copy the jar file to the CentraSiteControl\lib folder in Software AG Runtime.
Copy the class files to the CentraSiteControl\classes folder and its subfolders, according to the naming convention of the Java package that contains the classes. If, for example, your package name is com.centrasite.control.ext.welcome.sample, then copy the classes to the CentraSiteControl\classes\com\centrasite\control\ext\welcome\sample folder.
You can also combine these methods, and define some classes via a jar file in the lib folder and some classes as class files in the appropriate subfolder of the classes folder. If you have defined a class in both lib and a subfolder of classes, the class in the CentraSiteControl\classes subfolder will be used.
If you have defined new icons for the customized Welcome page, you
need to copy the icons to the appropriate location under the
CentraSiteControl folder. If, for example, your code
contains the definition public String getImage() { return
"images/my_welcome_icon.png"; }, ensure that the icon
my_welcome_icon.png is copied to
CentraSiteControl\images.
After you have made the changes to the Software AG Runtime environment, restart the Software AG Runtime process. The changes you have made should now be visible when you view the Welcome Page.
This section describes the customized welcome page that is provided as a demo in the product distribution.
All of the required files for the demo are contained in the folder demos\WelcomePage under the CentraSite installation location. The following files are available at this location:
The Java source files. These are located in the subfolder src.
Icons to be displayed in the Welcome page. These are located in the subfolder resources.
Updates for the Software AG Runtime configuration. These are in the file resources\plugin.xml.
Eclipse project files .classpath and .project.
Apache Ant files build.properties and build.xml for building the files that will be deployed to Software AG Runtime.
The following sections describe how to use these files to build and deploy the demo Welcome page.
This section shows the differences between the standard welcome page and the demo welcome page. Based on this you should be able to quickly evaluate the usefulness of this feature for your own business requirements.
The standard welcome page has the following appearance:
The demo welcome page used as an example in this section has the following appearance:
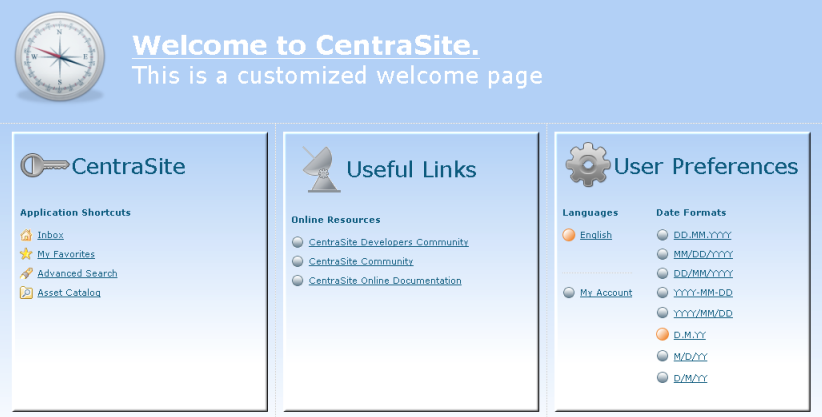
The main changes between the standard welcome page and the customized welcome page that Software AG supplies as a demo can be summarized as follows:
The text in the title of the header section has changed. Also the color of this text has changed.
The background color in the customized welcome page has changed.
The large icons in the titles of the header part and of the widgets have changed.
The small icons in the CentraSite widget have changed.
The widgets have 3-D effect shadowed borders.
The search box in the header section has been removed.
This section lists the layout possibilities of the welcome page and specifies the Java methods where the layout is defined.
Note:
If any background image that is defined for an area of the display
is not as wide as the area, the image is repeated horizontally until the whole
width of the area is covered.
| Layout component | Source file | Java Method |
|---|---|---|
| Icon | WelcomePage.java | getImage(); |
| Background image | WelcomePage.java | getHeaderBackgroundImage(); |
| Title text | WelcomePage.java | getTitle(); |
| CSS style of title text | WelcomePage.java | getTitleStyle(); |
| Subtitle text | WelcomePage.java | getSubTitle(); |
| CSS style of subtitle text | WelcomePage.java | getSubTitleStyle(); |
| Background image of the Search box | WelcomePage.java | getSearchBackgroundImage(); |
| Make the Search box visible/invisible | WelcomePage.java | isSearchVisible(); |
| Layout component | Source file | Java Method |
|---|---|---|
| Image | SeparatorItem.java | getImage(); |
| Height in pixels | SeparatorItem.java | getHeight(); |
| Layout component | Source file | Java Method |
|---|---|---|
| Width of widget | CentraSiteWidget.java | getWidth(); |
| Title text | CentraSiteWidget.java | getTitle(); |
| CSS style of title text | CentraSiteWidget.java | getTitleStyle(); |
| Subtitle text | CentraSiteWidget.java | getSubTitle(); |
| CSS style of subtitle text | CentraSiteWidget.java | getSubTitleStyle(); |
| Header icon | CentraSiteWidget.java | getImage(); |
| Background image | CentraSiteWidget.java | getBackgroundImage(); |
| CentraSite widget: define the items to be included in the bullet list | CentraSiteWidget.java | getItems(); |
| Icon for item "Asset Catalog" | KeywordSearchItem.java | getImage(); |
| Text for item "Asset Catalog" | KeywordSearchItem.java | getTitle(); |
| Icon for item "Advanced Search" | AdvancedSearchItem.java | getImage(); |
| Text for item "Advanced Search" | AdvancedSearchItem.java | getTitle(); |
| Icon for item "Inbox" | InboxItem.java | getImage(); |
| Text for item "Inbox" | InboxItem.java | getTitle(); |
| Icon for item "My Favorites" | MyFavoriteItem.java | getImage(); |
| Text for item "My Favorites" | MyFavoriteItem.java | getTitle(); |
| Layout component | Source file | Java Method | Comment |
|---|---|---|---|
| Header icon | UsefulLinksWidget.java | getImage(); | |
| Width of widget | UsefulLinksWidget.java | getWidth(); | |
| Title text | UsefulLinksWidget.java | getTitle(); | |
| CSS style of title text | UsefulLinksWidget.java | getTitleStyle(); | |
| Subtitle text | UsefulLinksWidget.java | getSubTitle(); | |
| CSS style of subtitle text | UsefulLinksWidget.java | getSubTitleStyle(); | |
| Background image | UsefulLinksWidget.java | getBackgroundImage(); | |
| Text for item "CentraSite Developers Community" | DeveloperCommunityItem.java | getTitle(); | |
| URL for item "CentraSite Developers Community" | DeveloperCommunityItem.java | execute(); | The creation of a hyperlink that opens a new
browser page is implemented by a call of the
openPageInNewWindow method of the
getDisplayAdapter() class that is available in the
CentraSiteControlUI.jar file in
Software AG Runtime.
|
| Text for item "CentraSite Community" | CentraSiteCommunityItem.java | getTitle(); | |
| URL for item "CentraSite Community" | CentraSiteCommunityItem.java | execute(); | See the comment for "CentraSite Developers Community". |
| Text for item "CentraSite Online Documentation" | OnlineDocumentationItem.java | getTitle(); | |
| URL for item "CentraSite Online Documentation" | OnlineDocumentationItem.java | execute(); | See the comment for "CentraSite Developers Community". |
| Define the items to be included in the bullet list | UsefulLinksWidget.java | getItems(); |
| Layout component | Source file | Java Method |
|---|---|---|
| Header icon | UserPreferencesWidget.java | getImage(); |
| Width of widget | UserPreferencesWidget.java | getWidth(); |
| Title text | UserPreferencesWidget.java | getTitle(); |
| CSS style of title text | UserPreferencesWidget.java | getTitleStyle(); |
| Background image | UserPreferencesWidget.java | getBackgroundImage(); |
| Text of the "Languages" subtitle | LanguagesColumn.java | getSubTitle(); |
| CSS style of the "Languages" subtitle | LanguagesColumn.java | getSubTitleStyle(); |
| Width of "Languages" column in pixels | LanguagesColumn.java | getWidth(); |
| Text of the "Date Formats" subtitle | DateFormatsColumn.java | getSubTitle(); |
| CSS style of the "Date Formats" subtitle | DateFormatsColumn.java | getSubTitleStyle(); |
| Width of "Date Formats" column in pixels | DateFormatsColumn.java | getWidth(); |
| Languages column: define the items to be included in the bullet list | LanguagesColumn.java | getItems(); |
| Date Formats column: define the items to be included in the bullet list | DateFormatsColumn.java | getItems(); |
| Layout component | Source file | Constant |
|---|---|---|
| Widgets: default "blue circle" icon to mark individual entries in a widget | WelcomePage.java | BLUE_CIRCLE_ICON |
| Widgets: default "orange circle" icon to mark individual entries in a widget | WelcomePage.java | ORANGE_CIRCLE_ICON |
| Widgets: default CSS style of the title text of a widget | WelcomePage.java | WIDGET_TITLE_STYLE |
| Widgets: default CSS style of the subtitle text of a widget | WelcomePage.java | WIDGET_SUBTITLE_STYLE |
| Widgets: default CSS style of the text for each item of a widget | WelcomePage.java | ACTION_ITEM_STYLE |
If you wish to use Eclipse as your development environment for updating the Java sources of the customized welcome page, the demos\WelcomePage folder contains the Eclipse project files .classpath and .project. You can use these files to create an Eclipse Java project for managing your Java sources. To create and use the Eclipse Java project, proceed as follows:
![]() To create and use the Eclipse Java project
To create and use the Eclipse Java project
Start Eclipse.
Select .
This opens the wizard for creating a new Java project.
Select Create project from existing source.
Specify the path demos\WelcomePage as the location of the existing project files.
When you build the project in Eclipse (using for example ), there should be no errors reported.
To deploy the demo welcome page to Software AG Runtime, you need to create a jar file containing the Java classes of your Java sources, then copy the jar file and any required graphic icons to the Software AG Runtime environment.
You can build the jar file by using Apache Ant with the build file build.xml provided in the demos\WelcomePage folder. The file build.xml uses a properties file build.properties to define some customer-specific files names and folder locations.
The build file build.xml also builds a zip file that contains the jar file and all required graphical icons. To deploy the demo welcome page, you can unzip the contents of the zip file directly into your Software AG Runtime location, as described below.
The file build.properties contains the following properties that you should tailor to your working environment before you run build.xml.
| Property | Description |
|---|---|
| projectName |
This is the name that will be used for the jar file and zip file that are created by the Ant task. The jar file will be copied to the CentraSite\lib folder in the Software AG Runtime environment, so choose a name that will easily distinguish the jar file from other jar files at the Software AG Runtime location. |
| pluggableLocation | This is the location of the folderPluggableUI in the <RuntimeDir>/workspace/webapps/ directory. In a Windows environment, you should use forward slashes instead of backward slashes in the path name. |
| centraSiteLocation | This is the path where your CentraSite installation is located. In a Windows environment, you should use forward slashes instead of backward slashes in the path name. |
The build.xml file contains the definition of the tasks to be performed by Ant. The tasks defined in the delivered demo version are:
Compile the Java sources that are located in the folder src and store the Java classes in the folder classes.
Create a jar file containing all of the class files, and store the jar file in the folder lib.
Create a zip file that contains the jar file and all icons associated with the customized welcome page, and store the zip file in the folder lib.
The build.xml file is an XML file that contains element definitions such as:
<zipfileset dir="resources" prefix="images">
   <include name="*.png" />
</zipfileset>
In such cases, the dir attribute
indicates the name of the folder in the build environment where Ant can locate
the required files, and the prefix attribute indicates the
folder in the Software AG Runtime environment where the files will be copied
to. In the extract shown above, Ant will search for all PNG graphics files
("*.png") in the resources folder in the build environment
and add them to the zip file so that they can be unzipped into the
images folder in the Software AG Runtime environment.
To build the deployment files, you can use either of the following methods:
![]() To build the deployment files (method 1)
To build the deployment files (method 1)
In Eclipse, select the build.xml file in the Package Explorer view.
In the context menu, click .
Ensure that the options are set for "Clear Environment", "Compile Sources", "Create JAR file", "Create ZIP file".
Click .
![]() To build the deployment files (method 2)
To build the deployment files (method 2)
This method assumes that you have Apache Ant installed as an executable program on your computer.
Open a command prompt window.
Go to the demos\WelcomePage folder.
Enter the command ant clean.
Enter the command ant.
In both methods, the Ant tasks defined in
build.xml are processed. Ant builds a new jar file
demos\WelcomePage\lib\SagBlueWelcomePage.jar, containing
all of the Java classes required for the Software AG Runtime environment. It
also build a zip file
demos\WelcomePage\lib\SagBlueWelcomePage.zip, containing
the jar file and all required PNG graphics. The name
"SagBlueWelcomePage" comes from the definition of
the property projectName in the file
build.properties.
To deploy the demo Welcome page to Software AG Runtime, you need to copy the Java classes and icons of the demo Welcome page to the Software AG Runtimet environment, and update the Software AG Runtime plugin.xml file. To do this, proceed as follows:
![]() To deploy the demo Welcome page to Software AG Runtime
To deploy the demo Welcome page to Software AG Runtime
Stop Software AG Runtime.
Unzip the zip file created by the Ant build into <RuntimeDir>\workspace\webapps\PluggableUI\CentraSiteControl directory.
This will copy the jar file created by Ant into the folder <RuntimeDir>\workspace\webapps\PluggableUI\CentraSiteControl\lib and the PNG files into the folder <RuntimeDir>\workspace\webapps\PluggableUI\CentraSiteControl\images.
Or:
As an alternative to using the zip file, you can just copy the jar
file from the Ant build into
<RuntimeDir>\workspace\webapps\PluggableUI\CentraSiteControl\lib and the PNG
files into
<RuntimeDir>\workspace\webapps\PluggableUI\CentraSiteControl\images.
As indicated in the section Updating the plugin.xml configuration file, the plugin.xml file in the Software AG Runtime environment must be updated to point to the Java classes of the customized Welcome page. The file plugin.xml in the folder demos\WelcomePage\resources contains the elements that must be updated in the plugin.xml file for Software AG Runtime.
Copy the entries manually from demos\WelcomePage\resources\plugin.xml to the plugin.xml file under Software AG Runtime. Remember to comment out the original entries for the standard Welcome page when you copy in the new entries.
Restart Software AG Runtime.
After you have deployed the demo to the Software AG Runtime environment, as described in the previous section Deploying the demo to Software AG Runtime, and restarted Software AG Runtime, the demo Welcome page will be visible when you start CentraSite Control.
This section summarizes some of the techniques you might find useful when creating your own customized welcome page. You can find code examples of the techniques in the demos\WelcomePage folder.
| Technique | Code Example in demos\WelcomePage folder |
|---|---|
| Activate the "Advanced Search" page. | AdvancedSearchItem.java |
| Activate the "Keyword Search" page. | KeywordSearchItem.java |
| Start the "My Account" dialog. | UserPreferencesItem.java |
| Start the "Add Asset" dialog. | CreateAssetItem.java |
| Start the "Import" dialog. | ImportWsdlFileItem.java |
| Activate "My CentraSite" and show "Assets I Provide". | MyFavoriteItem.java |
| Open the external website "http://communities.softwareag.com/centrasite". | CentraSiteCommunityItem.java |
| Open the external website "http://www.centrasite.com ". | DeveloperCommunityItem.java |
| Open the external website "http://documentation.softwareag.com/default.htm". | OnlineDocumentationItem.java |
| Create an empty line in a widget. | EmptyItem.java |
| Create a dotted dividing line. | SeparatorItem.java |
| Create a column (list) with all available date formats. | DateFormatsColumn.java |
| Select a specific date format from a list. | DateFormatItem.java |
| Create a column (list) with all available languages. | LanguagesColumn.java |
| Select a specific language from a list. | LanguageItem.java |