A lifecycle model describes the distinct steps through which a particular type of SOA asset passes on its way from conception to retirement. In a very simple sense, a lifecycle model enables you to classify assets according to the state they have reached in their lifecycle. It also provides the basis for CentraSite's lifecycle governance capabilities. Using these capabilities, you can steer assets through the different steps of their lifecycle and apply governance controls at significant junctures of the lifecycle process.
Issues to Consider When Using Lifecycle Models in a Single-Stage Environment
Issues to Consider When Using Lifecycle Models in a Two-Stage Environment
One benefit of using lifecycle models is that they give you increased visibility into the development and/or operational status of the assets in your catalog.
When you apply a lifecycle model to an asset type, the lifecycle model itself is treated as a taxonomy by many of CentraSite's browse and search tools. For example, using the catalog browser in CentraSite Control, you can view the contents of your catalog according to a specified lifecycle model. This view enables you to quickly ascertain which assets are in a particular phase of their development lifecycle.
CentraSite's search tools and reporting features also allow you to query assets by lifecycle state. You can use the advanced search feature, for example, to filter assets by their lifecycle state. You can also use CentraSite's reporting facility to examine the lifecycle status of the assets in your catalog.
Lifecycle models enable you to govern your assets more effectively by allowing you to enforce governance controls at various points in an asset's lifecycle.
When you associate a lifecycle model with an asset type, you make it possible to impose design/change-time policies at each step of the asset's lifecycle. These policies enable you to control the transition of an asset from one step of its lifecycle to another by triggering review and approval processes, issuing email notifications, updating permission settings and generally verifying that an asset meets the requirements necessary to enter the next step in its lifecycle.
Note:
The following discussion of lifecycle models describes how you can
use lifecycle models with assets. CentraSite also uses lifecycle models to
manage policies and lifecycle models.
A lifecycle model is composed of states and transitions.
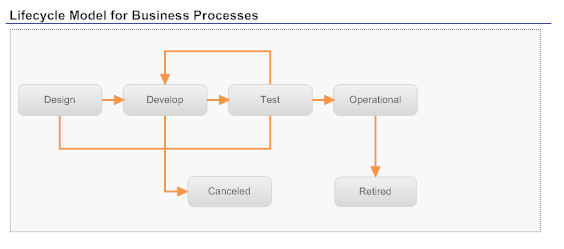
A state represents a distinct step through which an asset passes on its way from conception to retirement. A very simple lifecycle model for an asset might include states such as Design, Development, Test, Operational and Retired. It might also include the Canceled state for assets whose lifecycle is terminated prior to completion.
A transition represents the act of switching an asset from one state to another. When you define a lifecycle model, you specify both the states that make up the lifecycle and the transitions that can occur from each state. For example, the Test state might have possible transitions to the Operational, Development and Canceled states. If these are the only three transitions that you define for the Test state, these are the only states to which CentraSite will allow an asset in the Test state to be switched.
Lifecycle models are composed of states and transitions
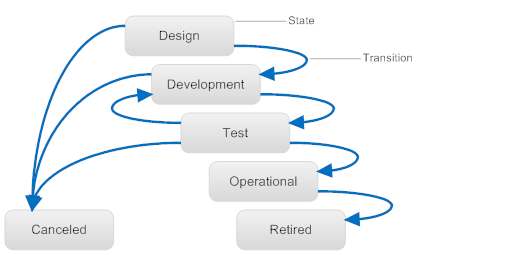
A lifecycle model must have one initial state. Assets to which the model is applied enter the initial state when they are first added to the registry. Every state except the initial state must have at least one inbound transition associated with it.
A lifecycle model must have at least one end state. An end state has no outbound transitions associated with it. The lifecycle model depicted in the figure above, for example, has two end states: Canceled and Retired.
Each state that you define in a lifecycle model includes a set of optional state permissions. State permissions enable you to restrict who can transition assets to a specified state. You can assign state permissions to individual users or to groups.
If you do not explicitly assign permissions to a state, any user with Modify permission on an object can switch the object to that state.
You can optionally assign permissions to the states in a lifecycle
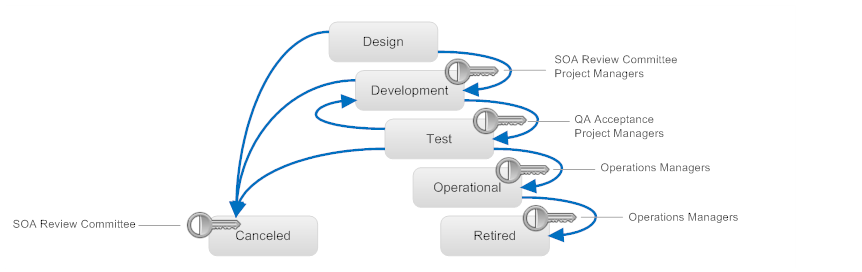
When you assign permissions to a state, two sets of users are allowed to switch an asset to that state: 1) the set of users to which you explicitly grant state permission and 2) users who have implicit permission to switch lifecycle states. The set of users who have implicit permission to switch lifecycle states are:
Users with "Manage System-Wide Lifecycle Models" permission (on objects managed by a system-wide lifecycle model).
Users with "Manage Lifecycle Models" permission (on objects managed by an organization-specific lifecycle model).
The owner of the Lifecycle Model.
Note that the group of users with implicit permission to switch states does not include the owner of the asset itself. If you want to give asset owners the ability to switch their assets to a particular state, you must explicitly include them using the state permission settings.
Also note that granting state permission to a user does not, in itself, give the user the ability to switch an asset to that state. The user must also have Modify permission on the asset itself. For example, let's say you give the Users group for organization ABC permission to switch assets to the Development state. Doing this does not mean that any user in organization ABC can switch the assets in organization ABC to the Development state. It means that any user in organization ABC with Modify permission on an asset can switch that asset to the Development state.
Note:
CentraSite does not allow you to modify a lifecycle model,
including its state permissions, after you activate the model (more about
activation, below). If you assign state permissions to a lifecycle model,
consider assigning the permissions to groups instead of individual users. Doing
this will enable you to make simple adjustments to the permission settings by
simply modifying the membership of the assigned groups. You will not need to
deactivate the model to make these kinds of changes.
You can configure design/change-time policies to execute during the transition points in an asset's lifecycle. For example, you might apply a policy that gives View permission to a specified group of users when an asset enters the Operational state, or you might apply a policy that obtains approvals from a review group before an asset enters the Development state.
CentraSite will trigger polices when specified state transitions occur
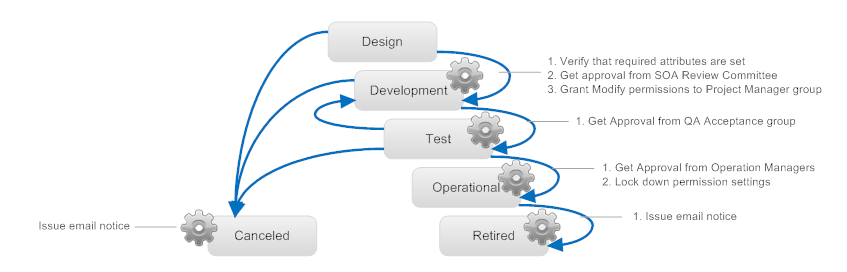
When you create a policy that executes on a state change event, you specify whether the policy is to execute immediately before CentraSite actually modifies the asset's state (which is called a PreStateChange event) or immediately after CentraSite modifies the asset's state (a PostStateChange event).
Generally speaking, you execute policies that perform approval and validation actions on the PreStateChange event. In other words, you use PreStateChange policies to ensure that an asset satisfies the entry criteria for a given state.
On a PostStateChange event, you typically execute policies that update the asset (e.g., granting instance-level permissions to the users who need to work with the asset in the next phase of its lifecycle) or issue notifications (e.g., sending an email). In short, you use PostStateChange policies to execute actions that are to be carried out only if the asset's state is switched successfully.
There are, of course, exceptions to the generalizations above. Under some circumstances you might want to set an asset's instance-level permissions or update its attributes in a PreStateChange policy. But generally speaking, you want to perform approval and validation actions in a PreStateChange policy, and you want to issue notifications and perform "state-certain" actions (i.e., actions that should occur only after an object's state has been successfully switched) in a PostStateChange policy.
When you define a lifecycle model, you specify the asset types to which the model applies. Because different types of assets usually have different development paths, you generally create models that are specific to a single asset type (i.e., one model for Service assets, one model for XML Schema assets, one model for Business Processes and so forth). However, if multiple asset types have the same lifecycle path, you can apply the same lifecycle model to them all.
You can model different lifecycle models for different assets types
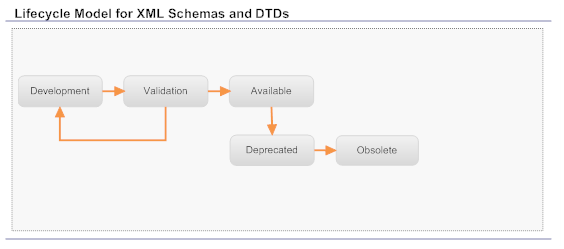
When you apply the same lifecycle model to multiple asset types, you do not necessarily have to apply the same state-change policies to those types. You can trigger different policies depending on the type of asset whose state is changed. If you were using the lifecycle model for XML Schema and DTDs shown in the figure above, you might create one policy that executes when an XML Schema switches to the Available state and another policy that executes when a DTD switches to the Available state.
A lifecycle model is either system-wide or organization-specific. System-wide lifecycle models apply to all organizations within an instance of CentraSite. Organization-specific models apply only to a specified organization.
You can use a system-wide lifecycle model when all of the organizations in the registry have to follow the same lifecycle for a particular type of asset. If all your organizations will use the same lifecycle for XML schemas, for example, you could create a system-wide model for the XML Schema asset type. However, if each organization intends to follow a different lifecycle for XML schemas, or if some organizations do not want to impose lifecycle models on their XML schemas at all, you must use lifecycle models that are organization-specific.
Note that when you apply a system-wide lifecycle model to an asset type, all organizations must follow the same path through the lifecycle, however, each organization can define its own set of policies for the lifecycle's transition points. In other words, the state and transition definitions in system-wide model are applied to all organizations, but each organization can associate its own policies with the lifecycle model.
CentraSite does not require you to apply lifecycle models to the assets in your registry. You can create and maintain an asset catalog without them. However, most of CentraSite's policy-based governance controls (e.g., enforcing approval processes, validating attribute settings) can only be applied to assets that have an associated lifecycle model. The use of lifecycle models also makes it easier to manage the assignment of permissions (e.g., granting View permissions to additional organizations) as an asset moves through its lifecycle.
If you want to use design/change-time policies to impose governance controls on a particular type of asset or you want to automate routine management tasks at certain points in the asset's lifecycle (such as setting permission assignments), associate a lifecycle model with the asset type.
Note:
For your convenience, CentraSite provides predefined
lifecycle models for several types of assets. You can use these lifecycle
models "as-is" or customize them to suit your needs. For a list of
the predefined lifecycle models, see the section The Predefined
Lifecycle Models Installed with CentraSite in the section
Customizing Lifecycle Management.
Sometimes an asset's overall lifecycle is split across two or more registries. The most common example of this occurs when assets that are in the development and test phases of their lifecycle are maintained in one registry (the "creation" CentraSite) and assets that are deployed (i.e., in production) are maintained in a separate registry (the "consumption" CentraSite).

When a site splits an asset's lifecycle across multiple registries, each participating registry is referred to as a stage. Each stage knows about the other participating stages, but does not know the details of the lifecycle that takes place in those stages (that is, the registries that participate in the overall lifecycle are not aware of the specific states and transitions that occur in the other registries).
To model a lifecycle that extends across multiple registries, you must create a separate lifecycle model on each participating registry. Each model describes just the segment of the lifecycle that occurs within its own registry. For example, in the multi-stage lifecycle depicted above, the lifecycle model on the creation registry would consist of the Requested, Declined, Approve, Development, Revising, QA and Promoted states. The lifecycle model on the consumption registry would consist of the Pre-Production, In Production, Deprecated and Retired states.
To indicate that a lifecycle ends on one registry and continues on another, the state that represents the end of an asset's lifecycle on a particular registry will include a pointer to the registry that hosts the next stage of the lifecycle.
Important:
Only an end state in a lifecycle model can have a pointer to
another stage.
When an asset reaches the end of its lifecycle on one registry, you promote the asset to the next stage of its lifecycle by exporting the asset from the current registry and importing it to the next.
When you import the asset into the registry that hosts the next stage of its lifecycle, CentraSite will first verify that the asset is being imported into the correct stage. It does this by checking the address specified in the "stage" parameter that is included in the archive file with the exported asset. If the address identified in the stage parameter in the archive file matches the registry's own address, CentraSite allows the asset to be imported.
This section describes a simple lifecycle model that you might create for an XML Schema in a single-stage CentraSite deployment. This example assumes that the registry supports both the development (creation) and production (consumption) environments.
In the lifecycle depicted in the following example, the organization that develops an XML schema (the provider organization) retains ownership of that schema throughout the schema's entire lifecycle. As the schema progresses through the lifecycle, the provider organization makes the schema available to others organizations. When the schema reaches the Available state (the point at which it might be used by services that are in production), the Operations organization assumes control over the schema.
A basic lifecycle model for an XML Schema
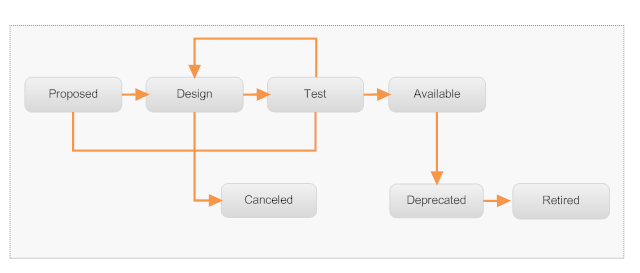
In general, this lifecycle uses a simple "push it forward" design. With this approach, the user or group responsible for completing a particular development phase switches the schema to the next state when their phase is complete. This action triggers an approval policy, which prevents the state change from occurring unless the "gatekeepers" associated with the next phase approve the change. For example, the developer who proposes the development of a new XML schema pushes the schema to the "Design" state after he or she prepares the specifications necessary for development to begin. However, the schema does not actually enter the "Design" state until the "gatekeepers" of the next phase, in this case the SOA Review group, approve the state change.
The following sections describe each state in more detail. Note that each section includes a description of the state permissions assigned to the state (which identifies those responsible for switching the schema to that particular state) and the policies that are executed during a transition to that state.
The Proposed state is the initial state in this lifecycle model. An XML schema asset enters the Proposed state when a user adds a schema to the registry. (Typically, the user is a developer, but it might be an analyst or business owner who is requesting the development of the schema.)
The schema remains in the Proposed state while the user gathers the information required for the XML schema to enter the development phase. This might include supplying a formal request document and/or preliminary specifications for the schema. The user might also attach a preliminary XSD file to the schema asset at this point, but that would not be required.
State Permissions. None. An initial state does not have state permissions.
The user switches the schema to the Design state after he or she has the documents and specifications needed to obtain approval to develop the schema. Entry into this state must be approved by the SOA Review group.
The schema remains in the Design state until development of the schema is complete and the schema is ready to undergo formal test and validation.
State Permissions. None. Any user with Modify permission on the XML Schema can switch the schema to the Design state.
Policy Execution. When an XML schema is switched to the Design state, a PreStateChange policy executes to obtain approval for the change from the SOA Review group.
The developer switches the XML schema to the Test state when the schema is ready for formal testing and validation. Entry into this state must be approved by the QA Acceptance group.
The schema remains in this state while it is in testing. However, a tester might return it to the Design state if the schema fails the testing process and requires additional development or design work.
State Permissions. None. Any user with Modify permission on the XML Schema can switch the schema to the Test state.
Policy Execution. When an XML schema is switched to the Test state, a PreStateChange policy executes to obtain approval for the change from the QA Acceptance group.
A PostStateChange policy executes to give Full permission on the schema to the QA Acceptance group.
A member of the QA Acceptance group switches the XML Schema to the Available state when testing is complete and the schema is considered to be ready for use. Entry into this state must be approved by the Operations Acceptance group.
When the schema enters this state, a group within the Operations organization generally assumes control of the schema and is given Full permission on the schema. As necessary, they grant View permission to other users.
State Permissions. The QA Acceptance group is given permission to switch an XML schema asset to this state.
Policy Execution. When an XML schema is switched to the Available state, a PreStateChange policy executes to obtain approval for the state change from the Operations Acceptance group.
A PostStateChange policy executes to give Full permission on the XML schema to the Operations Acceptance group. It removes all other instance-level permissions assigned to the schema.
A member of the SOA Review group switches the schema to the Canceled state if development of the schema is halted and will not be resumed. A schema might enter this state, for example, if the proposal submitted by the developer is rejected by the SOA Review group because the requested schema already exists in the catalog.
State Permissions. The SOA Review group is the only group that is allowed to switch an XML schema asset to this state.
Policy Execution. A PostStateChange policy sends an email to notify the entire SOA Review group that development of the schema has been terminated.
A member of the Operations Acceptance group switches an XML schema to the Deprecated state to indicate that the XML schema is obsolete.
State Permissions. The Operations Acceptance group is given permission to switch an XML schema asset to this state.
Policy Execution. A PostStateChange policy sends an email to notify developers that the XML schema has been deprecated.
A member of the Operations Acceptance group switches an XML schema to the Retired state when the XML schema is no longer available for use.
State Permissions. The Operations Acceptance group is given permission to switch an XML schema asset to this state.
When creating your own lifecycle models for a single-stage environment, keep the following points in mind:
Be aware that in a single-stage lifecycle design like the one described above, the user who enters the XML schema into the catalog retains ownership of the schema throughout its entire lifecycle. Consequently, when the XML schema reaches the Available state in this lifecycle, the original owner (and any other user with "Manage Assets" permission within the owner's organization) retains the ability to edit and delete the schema. The schema will not be under the sole control of the Operations organization. To address this issue, you might want to move the asset into the Operations organization when it reaches the Available state.
In any lifecycle design that uses approval polices, it is important to ensure that the members of the approval groups have View permission on the assets that they will be asked to approve. Without View permission on the asset, an approver cannot process an approval request on that asset. To ensure that the appropriate permissions are in effect when an asset reaches an approver, consider including an action in the approval policy that grants View permission to the approval group just before the policy executes the approval action.
Generally speaking, to change an asset to a particular state, a user must have state permission on that state and have Modify permission on the asset itself. However, if the state change triggers a policy that sets instance-level permissions on the asset, the user who triggers the policy must have Full permission on the asset. Otherwise the policy will fail. Thus, if your lifecycle design uses policies to set instance-level permissions on an asset during certain state changes, make sure that you give the users who will make those state changes Full permission on the asset.
This section shows how you might take the simple lifecycle for an XML schema described above and modify it for a two-stage deployment. As shown in the figure below, the overall lifecycle of the schema, from the Proposed state to the Retired state, now occurs over two registries.
Example Lifecycle for XML Schema Split Over Two Registries
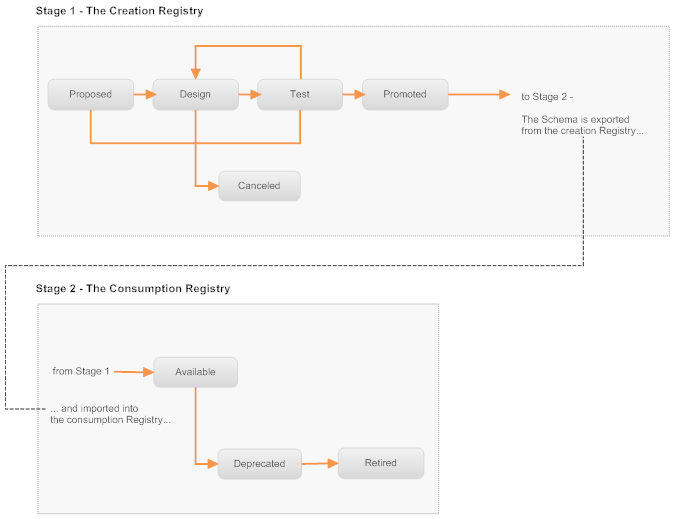
Modeling this kind of lifecycle requires two lifecycle models: one on the creation registry and one on the consumption registry.
The lifecycle model on the creation registry encompasses the development and testing phases of the lifecycle. This lifecycle model includes the Proposed, Design and Test states, just like the single-stage example. The design of these steps in the lifecycle, in terms of state permissions and policy execution, is also the same as the one used by the single-stage example. However, instead of moving directly to the Available state when testing is complete, a schema moves to the Promoted state.
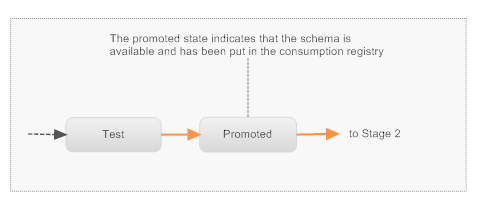
The Promoted state is an end state in this lifecycle model. The Stages property is set on the Promoted state. This property indicates that the schema's lifecycle continues on another registry and it identifies the address of that registry.
A member of the QA Acceptance group switches the XML Schema to the Promoted state when testing is complete and the schema is considered to be ready for use. Entry into this state must be approved by the Operations Acceptance group.
After the schema enters the Promoted state, an administrator exports the schema to an archive file. This file is subsequently imported by an administrator on the consumption registry.
State Permissions. The QA Acceptance group is given permission to switch an XML schema asset to this state.
Policy Execution. When an XML schema is switched to the Available state, a PreStateChange policy executes to obtain approval for the state change from the Operations Acceptance group.
A PostStateChange policy executes to give Full permission on the XML schema to a small group of administrators. It removes all other instance-level permissions assigned to the schema.
The lifecycle model on the consumption registry defines three states: Available, Deprecated and Retired. The Available state is the initial state. A schema will enter this state when it is imported into the registry.
In terms of state permissions and policy execution, the design of this lifecycle model is similar to the last three states of the single-stage example.
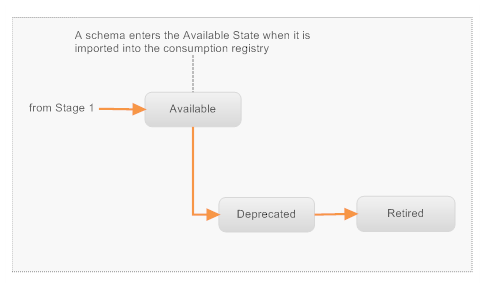
Typically, on a consumption registry, an "operations" organization owns and controls all assets in the registry. Users in this organization are the only ones permitted to create assets. (The schema would be imported by one of these users, for example.) All other users are simply consumers. The operations organization grants these users View permission on the assets as necessary.
When creating lifecycle models for a two-stage environment like the examples shown above, keep the following points in mind:
The user who imports an asset into the consumption registry specifies the organization into which asset will be imported. This user can import the asset to any organization for which he or she has "Create Assets" permission. If the archive file includes system-wide objects, such as asset types or taxonomies, the user who performs the import must also have permission to create those types of objects. Because of the permission requirements that an import process might require, an administrator in the CentraSite Administrator role often performs the import task. (Bear in mind, that whoever imports the objects on the target registry becomes the owner of those objects. For this reason, you might want to have more than one user in a role with the permissions necessary to import all types of registry objects.)
Be aware that when an asset reaches an end state on a particular stage, the asset remains in that end state on that stage regardless of the state changes that occur in the next stage. For example, when a schema reaches the Promotion state in the example above, the schema's state will no longer change on the creation registry. The remaining states in the schema's overall lifecycle (i.e., the Available, Deprecated, Retired states), are reflected only in the consumption registry. To determine whether a Promoted schema has been moved to the Deprecated or Retired states, a user must view the asset in the consumption registry.
If you need to update an asset that has reached the "production" phase of its lifecycle, you have a couple of choices. If you need to make a minor change, for example, you need to correct an attribute setting, add a classifier to the asset or modify the asset's description, an authorized user can simply make the change directly to the production version of the asset. If you are working in a multi-stage environment, you will need to manually apply the updates to the asset in each of the participating registries.
If the changes are substantive, in particular, if they involve changes to the structure of a schema or the definition of an interface, then you should create a new version of the asset. When you create a new version of an asset, the new version enters the initial lifecycle state, just as though it were a completely new asset. The new version of the asset will pass through the entire lifecycle just like any other new asset of its type.
If you are working in a multi-stage environment, you must create the new version on the registry that hosts the first stage of the lifecycle (i.e., on the creation CentraSite). When the new version reaches the end state on that stage, you would promote the new version of the asset to the next stage just as you did with the previous version of the asset.
For certain asset types, you might want to define separate lifecycle paths for new instances of an asset and new versions of an asset. For example, in a lifecycle for an XML schema like the one shown below, you might want new versions of existing schemas to bypass the Proposed state and go directly to the Design state.
Alternate Lifecycle Path for a New Version of an Asset
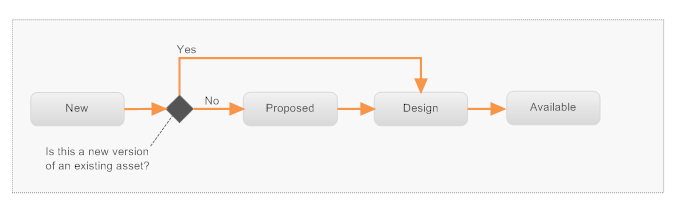
Creating an alternate path in a lifecycle requires the use of policies that conditionally change the state of an asset depending on the way in which the asset is classified. In the example shown above, this is achieved by doing the following:
• Defining an initial state (the New state) through which all schemas (new or versioned) pass.
• Creating policies that execute immediately after a schema enters the New state. These policies switch the schema to the "Proposed" state or the "Design" state depending whether the schema is classified as "New" or "Existing".
To implement a lifecycle like the one above, you must add to the XML Schema asset type a Classification attribute that can be used to classify a schema as either "New" or "Existing". (You would need to create a custom taxonomy to support this attribute.)
You must also create two policies that execute after a schema enters the New state: one policy that executes when a "New" schema enters the New state (this policy will switch the schema to the Proposed state), and one policy that executes when an "Existing" schema enters the New state (this policy switches the schema to the Design state).
Note:
The example above describes how you can use policies to
conditionally route an asset between two alternate paths when an asset enters
the initial state of its lifecycle. However, you can use this same technique to
establish alternate paths at any point in the asset's lifecycle. Its use is not
limited to the initial state.
When you switch an asset from one state to another, the asset exists in a "pending" state until the requested state change is complete. While an asset is in the pending state, it cannot be modified.
For most state switches, this is a very brief period of time. However, if the state change involves the execution of policies, it can be quite long (in the case of an approval policy, an asset might remain in the pending state for days).
An object remains in the "pending" state until the requested state change is complete

An asset can, on occasion, encounter conditions that cause it to become stuck in the pending state. To resolve the situation where an asset becomes stuck in the pending state, a user that belongs to the CentraSite Administrator role can use the Revert Pending State command to return the asset to its prior state. After the asset is reverted and the issue that caused the asset to become stuck is corrected, an authorized user can switch the asset to its next lifecycle state again.
Note:
Reverting the lifecycle state of an asset does not undo any
attribute changes that might have been made by policies that executed during
the first state change event. It simply returns the asset's lifecycle property
to its previous state. If other attribute changes occurred during the state
change event, you will need to undo those changes manually.
This section describes issues relating to the creation and maintenance of lifecycle models.
Lifecycle models are themselves governed by a predefined lifecycle model. This lifecycle model defines three states: New, Productive and Retired.
When you initially create a lifecycle model it enters the New state. CentraSite does not begin enforcing a new lifecycle model until you activate the model by switching it to the Productive state.
After you activate a lifecycle model (i.e., place it in the Productive state), that lifecycle model can no longer be modified. To make changes to the lifecycle model, you must create a new version of the model and make your changes to the new version.
Note:
After you retire a lifecycle model, that model cannot be activated
again. The Retired state is an end state for lifecycle models.
If you need to make changes to a lifecycle model after the model has been activated (i.e., after you place it in the "Productive" state), you must either create a new version of the existing model or replace the existing model with a completely new model. You cannot modify a lifecycle model directly after it has been activated.
The easiest way to apply changes to a lifecycle model is to generate a new version of the model. This task involves the following basic steps:
Creating a new version of the model. During this step, CentraSite creates an exact copy of the existing lifecycle model.
Updating the new version of the lifecycle model as necessary (e.g., adjusting its state permissions, inserting additional states, removing states, modifying transition paths, applying it to additional object types).
Activating the new version. This step automatically activates the new version and retires the old version.
When you activate a new version of a lifecycle, instances of assets that were created under the old lifecycle model will automatically switch to the new lifecycle model if they are in a state that exists in the new model. Otherwise, they will continue to follow the old lifecycle model until they are switched to a state that exists in both models. At that point, they will switch to the new lifecycle model. For more information about how CentraSite maps the states between old and new versions of a lifecycle model, see the user documentation for lifecycle models.
You can also apply changes to a lifecycle by defining an entirely new lifecycle model. To put the new model into effect, you must retire the existing model and then activate the new model. When you change a lifecycle this way, the objects that were created using the old model will complete their lifecycles under the old model. Objects that are created after the new model is activated will follow the new model.
The predefined lifecycle model that CentraSite uses for lifecycle models is made up of three states: New, Productive and Retired. This lifecycle is generally adequate for most environments. However, you can make certain types of customizations to it if necessary.
For information about the ways in which you can customize this lifecycle model, see the section Customizing Lifecycle Management > Lifecycle Model for Lifecycle Models .