This document provides basic information about working with CentraSite Business UI, including logging on/off, using the basic navigation controls and setting the user preferences.
The content is organized under the following sections:
The CentraSite Welcome page is your entry point to the CentraSite Business UI.
From this page you can:

Perform the CentraSite Business functions from the Activities menu.
Search or Browse for assets in CentraSite registry.
Navigate to frequently-used Saved Searches.
Set User Preferences.
View or respond to your most important notifications from the Inbox.
Access Help Center for information on the CentraSite Business functions.
Use the Activities menu to access the core CentraSite function (). For more information about creating assets, see Managing Assets .
Search or Browse to find assets stored in the CentraSite registry. For more information about using the search or browse feature, see Managing the CentraSite Catalog.
Customize the Welcome page to view your frequently-used functions (such as "My Saved Searches", "Pending Approval"s etc.). CentraSite Business UI organizes these functions as widgets and renders them based on your preferences. For more information about portlets, see Working with Portlets.
Select the user ID to set personal options. Options include account information, the name of your organization, contact information, language, time zone, notification style, saved searches, lists, and formats for dates and numbers. For more information about setting the user preferences, see Setting User Preferences below.
The Inbox displays items that involve your user account, such as the notification requests. For more information about managing the inbox, see Managing Your Inbox below.
On the Help Center, you can perform a browse to find the CentraSite help information you want.
Additionally, click on a topic of interest to display information on the top-level topics. For more information about help center, see Using the CentraSite Help Center below.
This section describes how to access the browser-based Business user interface for managing the CentraSite Registry Repository.
Note:
Because CentraSite's browser-based user interface uses JavaScript,
you must ensure that your web browser is set up to allow JavaScript to execute.
For more information about how to verify that your web browser settings to
allow JavaScript, see the help for your web browser.
Important:
The use of theCentraSite Business UI is not supported if you
are using a CentraSite Community Edition license.
The following URL has been predefined to allow you to start the Business user interface directly in a browser:
| URL | UI Component started |
|---|---|
| http://<server>:<port>/BusinessUI/ | CentraSite Business User Interface |
Here, <server> is the machine on which the CentraSite Application Server Tier is running, and <port> is the number of the Tomcat port. So, for example, http://localhost:53307/BusinessUI/ would start CentraSite Business UI on a local installation using the default Tomcat port number.
The Windows menu item contain an entry for starting CentraSite Business UI.
This Start menu entry is available on the machine where the CentraSite Application Server Tier is installed.
If you have just installed CentraSite, clear your web browser's cache, otherwise JavaScript errors can occur when you start some browser-based components of CentraSite.
This section explains how to log in to CentraSite using the Business UI. Also, this section addresses how to request an account in the CentraSite Business user interface.
When you log in for the first time after the product installation, you must use the username "Administrator" and password "manage". This logs you on as the internal user "Administrator", and this user has the "CentraSite Administrator" role. After you have logged on with this username and password, you can perform all administration tasks, such as customizing the portlets, viewing your inbox etc.
You can alternatively log in as a guest user (see instructions in the following section), but this user cannot perform any administration tasks.
You can log in as the internal user "Administrator", or as a user who has been registered as a CentraSite user by another user with the appropriate permissions. Alternatively, you can log in as a guest user without being registered as a user.
When you log in as a registered user, you supply a username and password. CentraSite Business UI validates the username and password against your machine's user repository (for example, operating system or LDAP). See the section About Users in the document Users, Groups, Roles and Permissions for information about defining CentraSite users and associating them with users in the user repository.
When you access CentraSite Business UI as a guest, you are permitted to view only the assets that have been made available for general viewing by their owners. By default, guest users cannot create, modify or delete any asset data. However, if the guest users have been granted permissions explicitly they can then access the user interface functions appropriately.
![]() To log in to CentraSite Business UI as a registered user
To log in to CentraSite Business UI as a registered user
In the CentraSite Business UI login screen, enter your username and your password.
Click .
![]() To log in to CentraSite Business UI as a guest user
To log in to CentraSite Business UI as a guest user
In the CentraSite Business UI login screen, click Access as Guest, without supplying a username or password.
To log out from CentraSite Business UI, choose the Log Out link at the top of the screen.
If you do not log out when you are finished using CentraSite (that is, if you simply close the browser window with out logging out), your session will automatically time out after 60 minutes of inactivity.
Note:
We recommend you to explicitly log out when you have finished using
the user interface. Logging off ensures that the cookies from your session are
cleared from your machine. If you close your browser without logging out, these
cookies might not be cleared (depending on which browser you use) and could be
reused if you were to log in to CentraSite Business UI before your earlier
session's timeout period had elapsed.
If you are not a registered user of CentraSite Business UI, use the following procedure to request access to CentraSite assets.
![]() To request access to CentraSite Business UI
To request access to CentraSite Business UI
In the CentraSite Business UI login screen, Click to create your CentraSite Business UI account.
Enter your first name, last name, email address and reason for the request.
Click .
CentraSite Business UI displays a message indicating that your request was submitted to the "Administrator".
After your request has been approved, you can log in and use CentraSite Business UI.
For information about starting and logging in to CentraSite Business UI, see the section Starting the Graphical User Interfaces.
After you have logged in to CentraSite Business UI, you see the Welcome page. In addition to the standard navigation bar, this page offers you links to frequently used CentraSite Business UI features and also to Help Center links.
The following section describes the main navigation controls in CentraSite Business UI. The example shown is the asset details page.
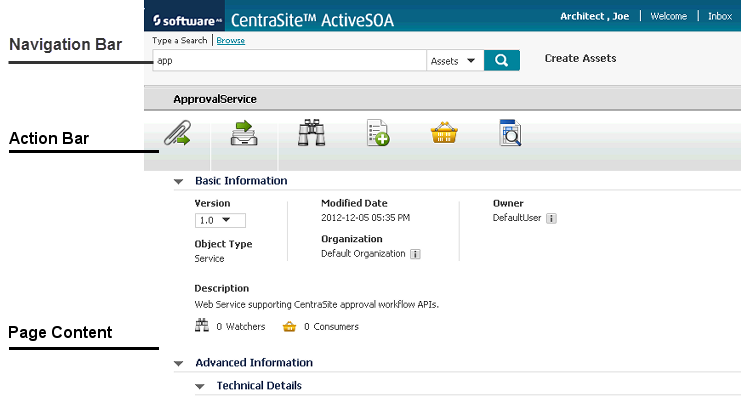
Navigation bar
You use the links on the navigation bar to browse or search for assets
in the CentraSite catalog. The activity menus let you choose the activity
(say, Create Assets) that you want to perform on the user interface. The
activity menus that appear on this bar depend upon your custom
configuration.
Action bar
You use the menus on the action bar to view the information that you
require and to choose the task that you want to perform. The menus that appear
on this bar depend upon the role(s) assigned to your user account.
Page content
This is the area in which CentraSite Business UI displays the
details associated with your chosen task. The actual content that you will see
for a specific task depends upon the role-based and instance-based permissions
associated with your user account.
This section describes how to control the logged in user's account and various aspects of the user's viewing and editing environment.
The User Preferences page allows you to set preferences related to the appearance and functionality of each component of your CentraSite application.
Note:
Some settings may not take effect until you log out and then log
back in to your CentraSite application.
![]() To access the User Preferences page
To access the User Preferences page
To access the User Preferences page (having logged on), click the current user ID in the navigation bar (at the top right of every page).
Once you have logged in, you can customize various aspects of CentraSite via the User Preferences. The preferences are split into five components:
Account Details
Notification Options
Language and Time Settings
Saved Searches
My Favorites
My Portlets
This section describes how to handle the various user preference components:
On the Account Details, you can change your basic account information, including your name, email address, contact information and avatar.
Note:
You may not be able to change certain fields in your user profile.
Contact your CentraSite administrator for information.
![]() To view/edit information about your user account
To view/edit information about your user account
In the CentraSite Business UI navigation bar, click the current user ID.
The User Preferences page appears.
Display Account Details.
To modify general information about your user account (name, email address, contact phone and fax numbers, avatar etc.,), edit the contents of the Account Details tab as necessary.
If you have made any changes to your account information, click .
Using the notification feature, you can request CentraSite to alert you when specified assets are modified.
The Notification Options allows you to enable or disable the notification options on specific events.
![]() To set the notification options
To set the notification options
In the CentraSite Business UI navigation bar, click the current user ID.
The User Preferences page appears.
Display Notification Options.
There are two options:
CentraSite – wherein notifications will be sent to your .
Email – wherein notifications will be sent to your email address (as configured above).
Select or unselect the check boxes to enable or disable the notification options as necessary.
If you have made any changes to your notification options, click .
Important:
When you attempt to disable both the notification options,
keep the following points in mind:
The action in the asset details page will not be visible, even if you belong to the "CentraSite Administrator" role.
The in navigation bar will remain disabled.
You can configure your display settings in the CentraSite Business UI. The display settings specify the language in which CentraSite Business UI displays the user interface (assuming the appropriate language pack is installed on the Application Server Tier) and the time zone in which timestamped events are rendered when you view the activity logs and other dated information in the CentraSite Business UI.
![]() To set display preferences
To set display preferences
In the CentraSite Business UI navigation bar, click the current user ID.
The User Preferences page appears.
Display Language and Time Settings.
Specify the following details:
| In this field... | Specify... |
|---|---|
| Display Language |
The language in which you want CentraSite Business user interface to be displayed. |
| Operating Language (Locale) |
The language in which you want data in the CentraSite Business user interface to be displayed. |
| Date Format |
The format in which you want CentraSite Business UI to display dates to you. |
| Time Format |
The format in which you want CentraSite Business UI to display times to you. |
| Time Zone |
The time zone in which you want time stamped log information rendered when it is displayed to your user account. |
If you have made any changes to your display settings, click .
Important:
Changes to the Display Language and
Operating Language (Locale) setting take effect at the
next logon. All other changes you make are immediately active.
The Saved Searches feature enables you to execute the search and display the results with a single click.
On the Saved Searches, you can view a list of any saved searches that you have created. You can open the saved searches to modify their contents, and you can delete them if you no longer require them.
Use the following procedure to view the list of Saved Searches that you have created.
![]() To view the list of Saved Searches
To view the list of Saved Searches
In the CentraSite Business UI navigation bar, click the current user ID.
The User Preferences page appears.
Display Saved Searches.
This shows the list of saved searches in CentraSite.
Use the following procedure to add a user-defined search to the Saved Searches.
![]() To add a search to Saved Searches
To add a search to Saved Searches
Define a simple search or and advanced search. If you need procedures for this step, see Searching the CentraSite Catalog.
Specify a name for the saved search.
If the name you specify for the saved search already exists, you will be asked to provide a different name.
Choose . Note that you can save your search without first executing it.
Important:
If a saved search with the given name already exists in the
CentraSite, you will be asked whether you wish to replace the existing search
with your current search criteria.
Use the following procedure to modify a user-defined search in the Saved Searches.
![]() To modify a search in Saved Searches
To modify a search in Saved Searches
In the CentraSite Business UI navigation bar, click the current user ID.
The User Preferences page appears.
Display Saved Searches.
This shows the list of your saved searches in CentraSite.
Click on the name of the saved search that you want to view of edit.
This runs the saved search and shows the results in the Search Results page.
The Search Results page displays the search criteria that were used in the search.
Examine and/or redefine your search criteria as necessary.
If you have made changes to the search criteria, click to save the changes.
Use the following procedure to rename a search in Saved Searches.
![]() To rename a search in Saved Searches
To rename a search in Saved Searches
In the CentraSite Business UI navigation bar, click the current user ID.
The User Preferences page appears.
Display Saved Searches.
This shows the list of your saved searches in CentraSite.
Hover your mouse over the name of the saved search you wish to rename.
Click the (![]() ) icon.
) icon.
Specify a new name for the search and click .
Important:
If a saved search with the given name already exists in the
CentraSite, you will be asked whether you wish to replace the existing search
with your current search criteria.
Use the following procedure to remove a search from Saved Searches.
![]() To remove a search from Saved Searches
To remove a search from Saved Searches
In the CentraSite Business UI navigation bar, click the current user ID.
The User Preferences page appears.
Display Saved Searches.
This shows the list of your saved searches in CentraSite.
Hover your mouse over the name of the saved search you wish to delete.
Click the (![]() ) icon.
) icon.
A confirmation message appears that the saved search will be deleted.
The My Favorites feature enables you to create lists and shortcuts to items that you use routinely or otherwise want to keep close at hand.
Using My Favorites, you can create quick links to selected assets in the catalog.
Use the following procedure to view the lists that you have created.
![]() To view the lists in My Favorites
To view the lists in My Favorites
In the CentraSite Business UI navigation bar, click the current user ID.
The User Preferences page appears.
Display My Favorites.
This shows the lists you have created in CentraSite.
Using My Favorites, you can build a collection of assets that you can display as a group. When the asset names are displayed as a group, you can click on the name of any given asset and select the actions that are appropriate for that asset.
![]() To add an asset to a list in My Favorites
To add an asset to a list in My Favorites
In CentraSite Business UI, display the asset that you want to add to My Favorites. If you need procedures for this step, see the section Viewing Details for an Asset.
On the asset details page, click the (![]() ) icon.
) icon.
In the Add to List dialog, do one of the following:
If you want to add the asset to an existing list, choose the list from the drop-down Select an Existing List.
Otherwise, type a name in the text box to create a new list.
Choose .
Or:
Note:
If at any time you wish to abandon your unsaved list and return
to your previous screen, just click the
button.
You can also add multiple assets to a list in My Favorites in a single operation. To do this, proceed as follows:
![]() To add multiple assets to a list in My Favorites in a single
operation
To add multiple assets to a list in My Favorites in a single
operation
In CentraSite Business UI, use either the Browse or the Search feature in the registry to select a list of the assets you want to add. If you need information on how to browse or search the registry, refer to the section Browsing the CentraSite Catalog or Searching the CentraSite Catalog.
Mark the checkbox of each asset you want to add.
In the actions menu, click the (![]() ) icon.
) icon.
In the Add to List dialog, select the assets, and then continue as described above for an individual asset.
If at a later stage you want to remove the asset from a list in My Favorites, proceed as follows:
![]() To remove an asset from a list via My Favorites
To remove an asset from a list via My Favorites
Display My Favorites and choose the list that contains the asset that you want to remove.
This displays the names of the assets contained in the list.
Mark the checkbox of the asset you want to remove from the list.
Choose the
(![]() ) icon.
) icon.
Alternatively, you can remove an asset from a list in My Favorites via the asset details page as follows:
![]() To remove an asset from a list via asset details page
To remove an asset from a list via asset details page
In CentraSite Business UI, display the asset that you want to remove from a list in My Favorites. If you need procedures for this step, see the section Viewing Details for an Asset.
On the asset details page, click the (![]() ) icon.
) icon.
In the Remove from List dialog, choose the list from that you want to remove the asset by the drop-down list.
If you want to specify multiple lists, use the plus button to add additional rows.
Choose .
You can also remove multiple assets from a list in My Favorites in a single operation. To do this, use one of the following procedures:
![]() To remove multiple assets from a list via My Favorites
To remove multiple assets from a list via My Favorites
In CentraSite Business UI, use either the Browse or the Search feature in the registry to select a list of the assets you want to remove. If you need information on how to browse or search the registry, refer to the section Browsing the CentraSite Catalog or Searching the CentraSite Catalog.
Mark the checkbox of each asset you want to remove.
In the actions menu, click the (![]() ) icon.
) icon.
In the Remove from List dialog, select the list, and then continue as described above for an individual asset.
If you add an asset to a list and later delete the original asset that the list entry points to, the entry in the list is deleted automatically.
Use the following procedure to rename an entry in My Favorites.
![]() To rename an entry in My Favorites
To rename an entry in My Favorites
In the CentraSite Business UI navigation bar, click the current user ID.
The User Preferences page appears.
Display My Favorites.
Hover your mouse over the name of the entry you wish to rename.
Click the (![]() ) icon.
) icon.
Specify a new name for the entry and click .
Important:
If an entry with the given name already exists in the
CentraSite, you will be asked whether you wish to replace the existing entry
with your current entry.
Use the following procedure to remove an entry from My Favorites.
Note that when you remove an entry, any underlying assets to which the entry refers are not affected.
![]() To remove an entry from My Favorites
To remove an entry from My Favorites
In the CentraSite Business UI navigation bar, click the current user ID.
The User Preferences page appears.
Display My Favorites.
Hover your mouse over the name of the entry you wish to delete.
Click the (![]() ) icon.
) icon.
A confirmation message appears that the entry will be deleted.
The My Portlets feature includes a list of portlets that represent the result set of a search query, any external HTML page or a graphical image.
Use the following procedure to view the list of portlets that you have created.
![]() To view the list of portlets
To view the list of portlets
In the CentraSite Business UI navigation bar, click the current user ID.
The User Preferences page appears.
Display My Portlets.
This shows the list of portlets you have created in CentraSite.
Use the following procedure to rename a portlet.
![]() To rename a portlet
To rename a portlet
In the CentraSite Business UI navigation bar, click the current user ID.
The User Preferences page appears.
Display My Portlets.
Hover your mouse over the name of the portlet you wish to rename.
Click the (![]() ) icon.
) icon.
Specify a new name for the portlet and click .
Important:
If a portlet with the given name already exists in the
CentraSite, you will be asked whether you wish to replace the existing
portlet with your current portlet.
Note:
As an alternative, you can rename a portlet using its
option, as described in
Personalization Settings for
Portlet Functions.
Use the following procedure to permanently remove a portlet from CentraSite.
Note that when you remove a portlet, any underlying objects to which the portlet refers are not affected.
![]() To remove a portlet
To remove a portlet
In the CentraSite Business UI navigation bar, click the current user ID.
The User Preferences page appears.
Display My Portlets.
Hover your mouse over the name of the portlet you wish to delete.
Click the (![]() ) icon.
) icon.
A confirmation message appears that the portlet will be deleted.
This section describes how to manage your inbox in CentraSite Business UI.
Your Inbox is where you receive notifications and send and receive messages.
If you have requested to receive notifications whenever certain assets are modified, CentraSite Business UI's inbox shows the list of such notifications.
Important:
Remember that CentraSite will not display
in navigation bar unless you have chosen to
receive notifications via CentraSite inbox. For information about setting the
notification preferences, see the section Setting User
Preferences.
Every notification you receive appears as an item in your inbox. You may choose to receive other notifications in your inbox as well.
Explicitly clear an entry from the list using the (![]() ) icon.
) icon.
Use the following procedure to access your inbox in the CentraSite Business user interface.
![]() To access your inbox
To access your inbox
Log in into the CentraSite Business UI.
Click the link in the upper right-hand corner of the user interface. CentraSite displays the Welcome to Your Inbox page.
Use the following procedure to have CentraSite notify you when a specified asset is modified.
![]() To create a notification request
To create a notification request
In CentraSite Business UI, display the asset that you want to watch. If you need procedures for this step, see the section Viewing Details for an Asset.
On the asset details page, click the
(![]() ) icon.
) icon.
Your notification request is reflected as
Watchers on the asset's Basic
Information profile. The Watchers
displays the list of users who are currently registered to receive
notifications for the asset.
Note:
If you see the icon on the
actions menu instead of the icon, that
indicates that you are already registered to receive notifications for the
selected asset.
Go to the to verify that the notification request has been added to your notifications list.
You can also create notification requests for multiple assets in a single operation. To do this, proceed as follows:
![]() To create notification requests for multiple assets in a single
operation
To create notification requests for multiple assets in a single
operation
In CentraSite Business UI, use either the Browse or the Search feature in the registry to select a list of the assets you want to watch. If you need information on how to browse or search the registry, refer to the section Browsing the CentraSite Catalog or Searching the CentraSite Catalog.
Mark the checkbox next to the name of each asset you want to watch.
On the asset details page, click the
(![]() ) icon.
) icon.
If you have requested a notification for one or more assets,
CentraSite Business UI displays an envelope (![]() ) beside the
in navigation bar indicating objects on your
notification list have been updated since the last time you viewed your
notifications.
) beside the
in navigation bar indicating objects on your
notification list have been updated since the last time you viewed your
notifications.
Use the following procedure to display the notifications that you have received.
![]() To view notifications you have received
To view notifications you have received
Display .
To view an asset's information, click on the asset's name. CentraSite Business UI will display the details page for that asset.
If you no longer want to receive notifications for an asset, use the following procedure to delete your notification request.
![]() To delete a notification request
To delete a notification request
In CentraSite Business UI, display the asset that you want to unwatch. If you need procedures for this step, see the section Viewing Details for an Asset.
Note:
If you see the icon on the
actions menu instead of the icon, that
indicates that you are not registered to receive notifications for the selected
asset.
On the asset details page, click the
(![]() ) icon. CentraSite automatically changes the watcher
count in the asset's Basic Information profile.
) icon. CentraSite automatically changes the watcher
count in the asset's Basic Information profile.
Go to the Inbox to verify that the remove from notification request has been added to your notifications list.
![]() To delete notification requests for multiple assets in a single
operation
To delete notification requests for multiple assets in a single
operation
In CentraSite Business UI, use either the Browse or the Search feature in the registry to select a list of the assets you want to watch. If you need information on how to browse or search the registry, refer to the section Browsing the CentraSite Catalog or Searching the CentraSite Catalog.
Mark the checkbox next to the name of each asset you want to unwatch.
On the asset details page, click the
(![]() ) icon.
) icon.
Use the following procedure to remove a notification from your . Note that when you remove a notification, any underlying assets to which the notification refers are not affected.
![]() To remove a notification from your
To remove a notification from your
Display Inbox and locate the notification that you want to remove.
From the actions menu, click the (![]() ) icon.
) icon.
Refiners enable you to drill down into the Inbox based on attributes that are associated with the notifications, such as name, description, event type, last modified date, last modified user, comment etc.
Refiners are displayed in the menu that is located just above the result view area.
CentraSite Help Center gives an overview of the functionality of the CentraSite Business UI. Browse the CentraSite Help Center to get information about your product. This section describes how to access and use the various help topics in CentraSite Business UI.
Use the following procedure to access the CentraSite Business UI Help Center.
![]() To access CentraSite Help Center
To access CentraSite Help Center
Log in to the CentraSite Business UI.
Click the link in the upper right-hand corner of the user interface. CentraSite displays the Welcome to the Help Center page.
Alternatively, you will find Help Center links on several pages through out the CentraSite Business user interface.
On the Help Center page, browse topics in the view area. Click on a topic to have it displayed.
Don't have a CentraSite Business user interface yet? Begin with our Introduction section to know about the features that are offered by the CentraSite Business UI.
Chances are, you're here to check out the possible actions on an asset. For quick access to various modifications on the asset, start with this page that lists All about Assets.
Need some help with Using Keyword Searching? The CentraSite Business UI provides a powerful search facility. You can search for assets across organizations, classifications and types on the basis of several search criteria using ALL/ANY combinations. We'll also tell you how to define a simple search and give you plenty of points that help you define a simple search.
You'll undoubtedly need to view the complete list of assets at some point. You can also view a list of assets that belong to a particular asset type, organization, and user by Browsing the Catalog.
Need some help with Managing the Catalog? CentraSite has dozens of assets that you'll want to get familiar with. We'll show you how to create or import an asset of a certain type and give you plenty of information if you want to go further on asset's definition.
We can provide you with all the details about approving requests for assets. The Collaborating on Assets section of the Help Center is all about approval management, so start here if you need info about the approval workflows.
You can start Working with Notifications feature to request CentraSite to alert you when specified assets are modified. The notification can be sent to you via Email and/or Inbox, depending on how notification is configured in your user preferences.
The Welcome page of the CentraSite Business user interface is configurable and you can set up views of your most frequently used functions and reports as portlets. You can walk through the contents of the Welcome page and the supported portlet types in our Customizing Your Welcome Page section.
Need some help with Updating Your User Profile? You can change various aspects of the Business user interface displays to suit your personal preferences.
For more information about CentraSite Business user interface and its functions, see the Further Resources section.