Configure header and footer
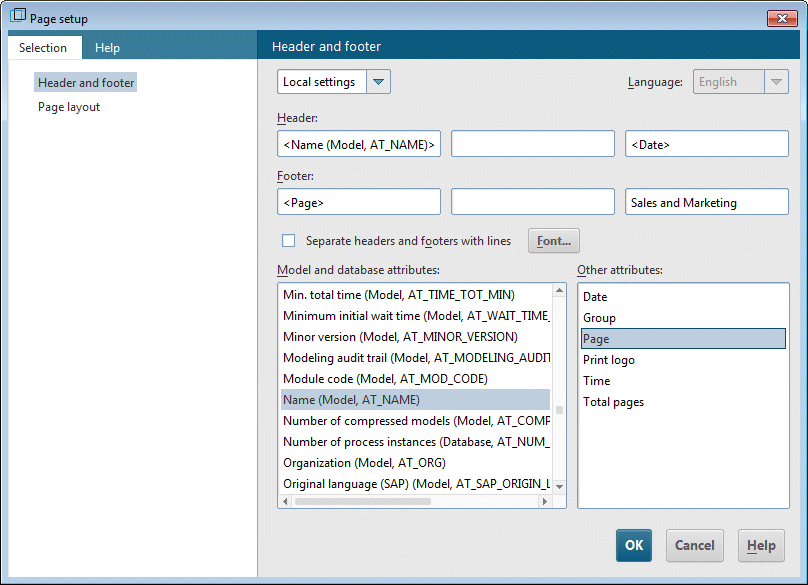
To add more information to the print output than is contained in the model, you can place data in the header and footer. In the following, you will display the model name and the current date in the header of the expression and the page number and Sales and Marketing in the footer.
Procedure
1. Click ARIS > Print >  Page setup. The Page setup dialog opens. You can specify all of the settings for printing the model here.
 2. Ensure that the Header and footer entry is selected on the Selection tab.
3. Change Global settings to Local settings. To do this, click the down arrow in the first input box, and select Local settings. All other input boxes will become available for you to specify your settings.
4. Click in the left Header box.
5. Double-click in the list Model and database attributes on the entry Name (Model, AT_Name) to transfer it to the header.
6. Click in the right field of the header and then double-click Date in the Other attributes list.
7. Click in the left field of the footer and double-click Page in the Other attributes list.
8. Click in the right field of the footer and enter Sales and Marketing.
9. Enable the Separate headers and footers with lines check box.
10. Click OK.
Your settings are displayed in the print preview.
Tip: | You can hide the header and footer in the printout and then show it again by clicking the  Insert headers/footers Insert headers/footers icon in the Print preview dialog. |